
User Guide
SCP-3100
Sample Cover Only (F P O)
SCP3100NZ060529qxd 06.5.29 1:28 PM Page a

SCP3100NZ060529qxd 06.5.29 1:28 PM Page b

Table of Contents
1. The Basics . . . . . . . . . . . . . . . . . . . . . . . . . . . . . . . . . . . .2
Front View of Your Phone . . . . . . . . . . . . . . . . . . . . . . . . . . . . . . . . . . . .2
Viewing the Display Screen . . . . . . . . . . . . . . . . . . . . . . . . . . . . . . . . . .5
Turning Your Phone On and Off . . . . . . . . . . . . . . . . . . . . . . . . . . . . . . .7
Using the Battery . . . . . . . . . . . . . . . . . . . . . . . . . . . . . . . . . . . . . . . . . .8
Navigating Through Phone Menus . . . . . . . . . . . . . . . . . . . . . . . . . . . .10
Displaying Your Phone Number . . . . . . . . . . . . . . . . . . . . . . . . . . . . . .10
Making and Answering Calls . . . . . . . . . . . . . . . . . . . . . . . . . . . . . . . . .11
Entering Text . . . . . . . . . . . . . . . . . . . . . . . . . . . . . . . . . . . . . . . . . . . .23
2. Your Phone’s Settings . . . . . . . . . . . . . . . . . . . . . . . . .27
Sound Settings . . . . . . . . . . . . . . . . . . . . . . . . . . . . . . . . . . . . . . . . . . .27
Display Settings . . . . . . . . . . . . . . . . . . . . . . . . . . . . . . . . . . . . . . . . . .32
Location Settings . . . . . . . . . . . . . . . . . . . . . . . . . . . . . . . . . . . . . . . . .36
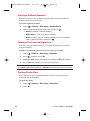
Messaging Settings . . . . . . . . . . . . . . . . . . . . . . . . . . . . . . . . . . . . . . . .37
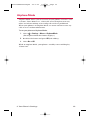
Airplane Mode . . . . . . . . . . . . . . . . . . . . . . . . . . . . . . . . . . . . . . . . . . .39
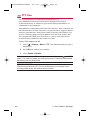
TTY Use . . . . . . . . . . . . . . . . . . . . . . . . . . . . . . . . . . . . . . . . . . . . . . . .40
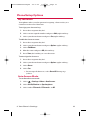
Phone Setup Options . . . . . . . . . . . . . . . . . . . . . . . . . . . . . . . . . . . . . .41
3. Security . . . . . . . . . . . . . . . . . . . . . . . . . . . . . . . . . . . .46
Accessing the Security Menu . . . . . . . . . . . . . . . . . . . . . . . . . . . . . . . .46
Using Your Phone’s Lock Features . . . . . . . . . . . . . . . . . . . . . . . . . . . .46
Restricting Calls . . . . . . . . . . . . . . . . . . . . . . . . . . . . . . . . . . . . . . . . . .48
Using Special Numbers . . . . . . . . . . . . . . . . . . . . . . . . . . . . . . . . . . . .48
Erasing the Contacts Directory . . . . . . . . . . . . . . . . . . . . . . . . . . . . . . .49
Erasing My Content . . . . . . . . . . . . . . . . . . . . . . . . . . . . . . . . . . . . . . .49
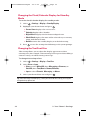
Resetting Your Picture Message Account . . . . . . . . . . . . . . . . . . . . . . .50
Resetting Your Phone . . . . . . . . . . . . . . . . . . . . . . . . . . . . . . . . . . . . . .50
Lost or Stolen Phones . . . . . . . . . . . . . . . . . . . . . . . . . . . . . . . . . . . . . .51
Security Features for Internet . . . . . . . . . . . . . . . . . . . . . . . . . . . . . . . .52
4. Roaming . . . . . . . . . . . . . . . . . . . . . . . . . . . . . . . . . . . .53
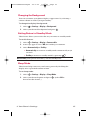
Understanding Roaming . . . . . . . . . . . . . . . . . . . . . . . . . . . . . . . . . . . .53
5. Menu Navigation . . . . . . . . . . . . . . . . . . . . . . . . . . . . .54
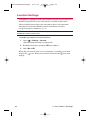
Viewing the Menus . . . . . . . . . . . . . . . . . . . . . . . . . . . . . . . . . . . . . . . .54
6. Managing Call History . . . . . . . . . . . . . . . . . . . . . . . . .57
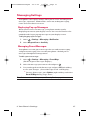
Viewing History . . . . . . . . . . . . . . . . . . . . . . . . . . . . . . . . . . . . . . . . . .57
Call History Options . . . . . . . . . . . . . . . . . . . . . . . . . . . . . . . . . . . . . . .58
Making a Call From Call History . . . . . . . . . . . . . . . . . . . . . . . . . . . . . .58
SCP3100NZ060529qxd 06.5.29 1:28 PM Page c

Saving a Phone Number From Call History . . . . . . . . . . . . . . . . . . . . . .59
Prepending a Phone Number From Call History . . . . . . . . . . . . . . . . . .60
Erasing Call History . . . . . . . . . . . . . . . . . . . . . . . . . . . . . . . . . . . . . . .60
7. Contacts Directory . . . . . . . . . . . . . . . . . . . . . . . . . . . .61
Adding a New Contacts Entry . . . . . . . . . . . . . . . . . . . . . . . . . . . . . . . .61
Finding Contacts List Entries . . . . . . . . . . . . . . . . . . . . . . . . . . . . . . . .61
Contacts List Entry Options . . . . . . . . . . . . . . . . . . . . . . . . . . . . . . . . .62
Adding a Phone Number to a Contacts Entry . . . . . . . . . . . . . . . . . . . .63
Editing a Contacts Entry . . . . . . . . . . . . . . . . . . . . . . . . . . . . . . . . . . . .63
Erasing a Contact Entry From the List . . . . . . . . . . . . . . . . . . . . . . . . . .63
Assigning Speed Dial Numbers . . . . . . . . . . . . . . . . . . . . . . . . . . . . . . .64
Assigning an Image to a Contacts Entry . . . . . . . . . . . . . . . . . . . . . . . .65
Selecting a Ringer Type for an Entry . . . . . . . . . . . . . . . . . . . . . . . . . . .65
Secret Contacts Entries . . . . . . . . . . . . . . . . . . . . . . . . . . . . . . . . . . . . .66
Dialing Services . . . . . . . . . . . . . . . . . . . . . . . . . . . . . . . . . . . . . . . . . .66
8. Personal Organiser . . . . . . . . . . . . . . . . . . . . . . . . . . .67
Using Your Phone’s Calendar . . . . . . . . . . . . . . . . . . . . . . . . . . . . . . . .67
Using the Call Alarm Feature . . . . . . . . . . . . . . . . . . . . . . . . . . . . . . . . .71
Using the To Do List . . . . . . . . . . . . . . . . . . . . . . . . . . . . . . . . . . . . . . .73
Using Your Phone’s Alarm Clock . . . . . . . . . . . . . . . . . . . . . . . . . . . . .75
Using Your Phone’s Tools . . . . . . . . . . . . . . . . . . . . . . . . . . . . . . . . . . .76
Personal Information Management . . . . . . . . . . . . . . . . . . . . . . . . . . .78
Downloading through the Web Wirelessly . . . . . . . . . . . . . . . . . . . . . .79
9. Voice Services . . . . . . . . . . . . . . . . . . . . . . . . . . . . . . .82
Using Voice-Activated Dialing . . . . . . . . . . . . . . . . . . . . . . . . . . . . . . .82
Using the Voice Memos . . . . . . . . . . . . . . . . . . . . . . . . . . . . . . . . . . . .84
Setting Up Screen Call . . . . . . . . . . . . . . . . . . . . . . . . . . . . . . . . . . . . .87
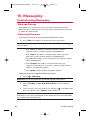
10. Messaging . . . . . . . . . . . . . . . . . . . . . . . . . . . . . . . . .90
Understanding Messaging . . . . . . . . . . . . . . . . . . . . . . . . . . . . . . . . . .90
11. Built-in Camera . . . . . . . . . . . . . . . . . . . . . . . . . . . . .94
Taking Pictures . . . . . . . . . . . . . . . . . . . . . . . . . . . . . . . . . . . . . . . . . . .94
Storing Pictures . . . . . . . . . . . . . . . . . . . . . . . . . . . . . . . . . . . . . . . . . .98
Sending a Picture Message . . . . . . . . . . . . . . . . . . . . . . . . . . . . . . . . .101
Managing Photos . . . . . . . . . . . . . . . . . . . . . . . . . . . . . . . . . . . . . . . .103
12. Push 2 Talk . . . . . . . . . . . . . . . . . . . . . . . . . . . . . . . .107
Getting Started With Push 2 Talk . . . . . . . . . . . . . . . . . . . . . . . . . . . .107
Making and Receiving a Push 2 Talk Call . . . . . . . . . . . . . . . . . . . . . . .109
Adding and Editing Push 2 Talk Contacts . . . . . . . . . . . . . . . . . . . . . .116
SCP3100NZ060529qxd 06.5.29 1:28 PM Page d

Erasing Push 2 Talk List Entries . . . . . . . . . . . . . . . . . . . . . . . . . . . . . .120
Updating Your Push 2 Talk List . . . . . . . . . . . . . . . . . . . . . . . . . . . . . .121
Managing Push 2 Talk Settings . . . . . . . . . . . . . . . . . . . . . . . . . . . . . .122
13. Service Features . . . . . . . . . . . . . . . . . . . . . . . . . . .125
Using Voicemail . . . . . . . . . . . . . . . . . . . . . . . . . . . . . . . . . . . . . . . . .125
Responding to Call Waiting . . . . . . . . . . . . . . . . . . . . . . . . . . . . . . . .126
Making a Three-Way Call . . . . . . . . . . . . . . . . . . . . . . . . . . . . . . . . . . .127
Accessing Wireless Chatrooms . . . . . . . . . . . . . . . . . . . . . . . . . . . . . .127
Web . . . . . . . . . . . . . . . . . . . . . . . . . . . . . . . . . . . . . . . . . . . . . . . . . .128
Email . . . . . . . . . . . . . . . . . . . . . . . . . . . . . . . . . . . . . . . . . . . . . . . . .132
14. Safety Guidelines and Warranty Information . . . .133
Safety . . . . . . . . . . . . . . . . . . . . . . . . . . . . . . . . . . . . . . . . . . . . . . . . .133
Warranty . . . . . . . . . . . . . . . . . . . . . . . . . . . . . . . . . . . . . . . . . . . . . . .138
Index . . . . . . . . . . . . . . . . . . . . . . . . . . . . . . . . . . . . . . . .141
SCP3100NZ060529qxd 06.5.29 1:28 PM Page e

SCP3100NZ060529qxd 06.5.29 1:28 PM Page f

SCP-3100
User Guide
Note: Due to possible updates with the phone software, this printed
guide may not include the most current instructions for your phone.
For further information on Telecom Mobile services, please visit
www.telecom.co.nz/mobile or call *123.
SCP3100NZ060529qxd 06.5.29 1:28 PM Page 1

2
1. The Basics
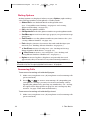
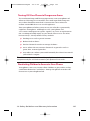
Front View of Your Phone
17. Softkey (right)
25. Headset Jack
26. Push 2 Talk
/
Memo Button
22. Camera Lens
23. Mirror
27. Side Volume
Key
5. Softkey (left)
8. TALK Key
4. Navigation Key
6. MENU/OK
7. Camera Key
3. Main LCD
10. Accessories Connector 11. Charger Jack
19. Speaker
20. Sub LCD
24. Antenna
2. Signal Strength
Indicator
1. Earpiece
14. END/POWER Key
16. Side Camera Key
15. BACK Key
13. SPEAKER Key
18.
Battery Strength
Indicator
21. LED
Indicator
9. Microphone
12. Keypad
1. The Basics
SCP3100NZ060529qxd 06.5.29 1:28 PM Page 2

3
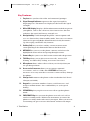
Key Features
1. Earpiece lets you hear the caller and automated prompts.
2. Signal Strength Indicator represents the signal strength by
displaying bars. The more bars displayed, the better the signal
strength.
3. Main LCD (display) displays all the information needed to operate
your phone, such as the call status, the Contacts list, the date
and time, the signal and battery strength, etc.
4. Navigation Key scrolls through the phone’s menu options and
acts as a shortcut key from standby mode. You can access menu
shortcuts by pressing Right: Phone Book, Left: My Favourites,
Up: Messaging, and Down: My Content.
5. Softkey (left) lets you select softkey actions or menu items
corresponding to the bottom left line on the Main LCD.
6. MENU/OK lets you access the phone’s menus and selects the
highlighted choice when navigating through a menu.
7. Camera Key lets you access the Pictures menu and take pictures.
8. TALK Key allows you to place or receive calls, answer Call
Waiting, use Three-Way Calling, or activate Voice Dial.
9. Microphone allows other callers to hear you clearly when you
are speaking to them.
10. Accessories Connector allows you to connect optional
accessories, such as a USB cable. CAUTION! Inserting an
incorrect accessory into the accessories connector may damage
the phone.
11. Charger Jack connects the phone to the Standardised AC Travel
Charger (included).
12. Keypad lets you enter numbers, letters, and characters, and
navigate within menus. Press and hold keys 2–9 for speed
dialing.
13. SPEAKER Key lets you place or receive calls in speakerphone
mode.
14. END/POWER Key
lets you turn the phone on or off, end a call, or
return to standby mode. While in the main menu, it returns the
phone to standby mode and cancels your input. When you receive
an incoming call, press to enter silent mode and mute the ringer.
1. The Basics
SCP3100NZ060529qxd 06.5.29 1:28 PM Page 3

4
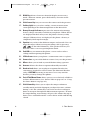
15. BACK Key deletes characters from the display in text entry
mode. When in a menu, press the Back key to return to the
previous menu.
16. Side Camera Key lets you activate the camera and take pictures.
17. Softkey (right) lets you select softkey actions or menu items
corresponding to the bottom right line on the Main LCD.
18. Battery Strength Indicator represents the amount of remaining
battery charge currently available in your phone. When all bars
are displayed in the battery icon, the phone’s battery is fully
charged. When no bars are displayed, the phone’s battery is
completely discharged or empty.
19. Speaker lets you hear the different ringers and sounds. You can
mute the ringer when receiving incoming calls by pressing
, , or the Side Volume key. The speaker also lets you
hear the caller’s voice in speakerphone mode.
20. Sub LCD lets you monitor the phone’s status and see who’s
calling without opening the phone.
21. LED Indicator shows your phone’s connection status at a glance.
22. Camera Lens as part of the built-in camera, lets you take pictures.
23. Mirror allows you to look at yourself before taking a picture.
24. Antenna delivers the best reception when fully extended.
25. Headset Jack allows you to plug in an optional headset for
convenient, hands-free conversations (for Monaural Headset
Only). CAUTION! Inserting an incorrect accessory into the
headset jack may damage the phone.
26. Push 2 Talk/Memo Button allows you to access the Push 2 Talk List
or Voice Memo menu. (See “Push 2 Talk”on page 107 or “Using
the Voice Memos”on page 84.)
27. Side Volume Key allows you to adjust the ringer volume in
standby mode (with the flip open) or adjust the voice volume
during a call. The volume key can also be used to scroll up or
down to navigate through the different menu options. To mute
the ringer during an incoming call, press the volume key up or
down. Press and hold to make a voice dial or redial with the flip
closed.
1. The Basics
SCP3100NZ060529qxd 06.5.29 1:28 PM Page 4

5
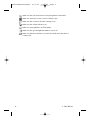
Viewing the Display Screen
This list identifies the symbols you’ll see on your phone’s display screen:
shows your current signal strength. The more lines you have,
the stronger your signal.
means your phone cannot find a signal.
indicates the call is on hold.
tells you a call is in progress.
indicates the Push 2 Talk service is enabled.
indicates the Push 2 Talk service is enabled and the
speakerphone mode is set to on.
indicates the Push 2 Talk service is disabled.
indicates Internet/Push 2 Talk access is inactive.
indicates Internet/Push 2 Talk access is active.
indicates Internet/Push 2 Talk access is disabled.
indicates you are in Roaming Service area.
indicates you have new voicemail messages.
indicates you have new text messages.
indicates you have new picture messages.
indicates you have new voicemail messages and text messages.
indicates you have new picture messages, voicemail messages
and text messages.
shows the level of your battery charge. The more black you see,
the more power you have left. (Icon is animated while charging)
shows your battery is charging in “Power Off” state.
indicates you have menus to scroll (in four directions).
indicates the vibrate feature is set.
indicates volume level 4 or 1 and vibrate feature are set.
indicates 1 beep feature is set.
indicates the voice call ringer setting is off.
indicates all the sound settings are off.
indicates the Location Service of your phone is enabled.
1. The Basics
SCP3100NZ060529qxd 06.5.29 1:28 PM Page 5

6
indicates the Location Service of your phone is disabled.
indicates you have a new screen call message.
indicates the Screen Call Auto setting is on.
indicates the Alarm Clock is on.
indicates your phone is in TTY mode.
indicates the speakerphone mode is set to on.
indicates Headset mode is set to Push 2 Talk and a headset is
connected.
1. The Basics
SCP3100NZ060529qxd 06.5.29 1:28 PM Page 6

7
Turning Your Phone On and Off
Turning Your Phone On
To turn your phone on:
䊳
Press .
Once your phone is on, it displays “Looking for service...” which
indicates that your phone is searching for a signal. When your phone
finds a signal, it automatically enters standby mode – the phone’s idle
state. At this point, you are ready to begin making and receiving calls.
If your phone is unable to find a signal after 15 minutes of searching,
the Power Save feature is automatically activated. When a signal is
found, your phone automatically returns to standby mode.
In Power Save mode, your phone searches for a signal periodically
without your intervention. You can also initiate a search for service
by pressing any key (when your phone is turned on).
Tip: The Power Save feature helps to conserve your battery power when you are
in an area where there is no signal.
Turning Your Phone Off
To turn your phone off:
䊳
Press and hold until you see the powering down animation
on the display screen.
Your screen remains blank while your phone is off (unless the battery
is charging).
1. The Basics
SCP3100NZ060529qxd 06.5.29 1:28 PM Page 7

8
Using the Battery
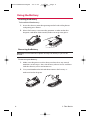
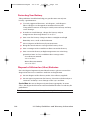
Installing the Battery
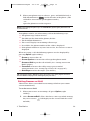
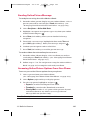
To install the LiIon battery:
1. Insert the battery into the opening on the back of the phone
and gently press down.
2. Place the battery cover into the position as indicated in the
diagram, and then slide it until you hear it snaps into place.
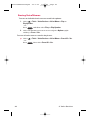
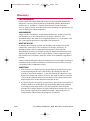
Removing the Battery
Warning! Do not handle a damaged or leaking Lilon battery as you can be
burned.
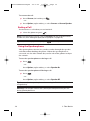
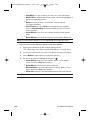
To remove your battery:
1. Make sure the power is off so that you don’t lose any stored
numbers or messages. Press the battery release latch, and then
slide the battery cover and remove it.
2. Use your thumbnail to lift and then remove the battery as
indicated in the diagram.
1. The Basics
SCP3100NZ060529qxd 06.5.29 1:28 PM Page 8

9
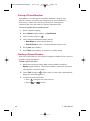
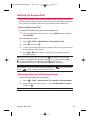
Charging the Battery
Your phone’s LiIon battery is rechargeable and should be charged as
soon as possible so you can begin using your phone.
Keeping track of your battery’s charge is important. If your battery
level becomes too low, your phone automatically turns off and you
will lose all the information you were just working on. For a quick
check of your phone’s battery level, glance at the battery charge
indicator located in the upper-right corner of your phone’s display
screen. If the battery charge is getting too low, the low battery icon
appears and the phone displays a warning message.
Warning! Using the wrong battery charger could cause damage to your phone
and void the warranty.
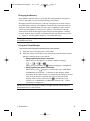
Using the Travel Charger
To use the travel charger provided with your phone:
1. Plug the travel charger into a wall outlet.
2. Plug the other end of the travel charger into the bottom of your
phone (with the battery installed).
䡲
Charging when your phone is turned on:
The battery icon appears as follows while charging.
→→→
The battery icon turns to when charging is completed.
䡲
Charging when your phone is turned off:
The battery icon appears, and the message “BATTERY
CHARGING--Power Off--” is shown on the display while
charging. When the battery is completely discharged, it may
take several minutes until the message is shown on the
display. The battery icon turns to , and the message
changes to “CHARGING COMPLETE--Power Off--” when
charging is completed.
Tip: Be sure to watch your phone’s battery strength indicator and charge the
battery before it runs out of power.
1. The Basics
SCP3100NZ060529qxd 06.5.29 1:28 PM Page 9

10
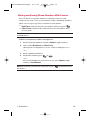
Navigating Through Phone Menus
The navigation key on your phone allows you to scroll through
menus quickly and easily.
To navigate through a menu, simply press the navigation key up or
down. You can change your phone’s main menu style (see page 33
for Changing the Phone’s Menu Style). If you are in a first-level menu
of the Grid View, such as Settings, you may also navigate to the next or
previous first-level menu by pressing the navigation key right or left.
For a diagram of your phone’s menu, please see “Menu Navigation”
on pages 54 - 56.
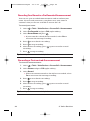
Selecting Menu Items
As you navigate through the menu, menu options are highlighted. In
the List View, select any numbered option by simply pressing the
corresponding number on the phone’s keypad. You may also select any
item by highlighting it and pressing .
For example, if you want to view your last incoming call:
1. Press to access the main menu.
2. Select Call History by pressing when using the List view
(page 33) or by highlighting it and pressing when using the
Grid view (page 33). (It may already be highlighted.)
3. Select Incoming by pressing or by highlighting it and
pressing . (If you have received any calls, they are displayed
on the screen.)
Note: For the purposes of this guide, the above steps condense into Select >
Call History > Incoming.
Displaying Your Phone Number
To display your phone number:
䊳
Select > Contacts > My Phone# .
Tip: You can also display your phone number from the Phone Info menu.
Select >
Settings > Phone Info > My Phone#. (Your phone number and other
information about your phone will be displayed.)
ABC
1. The Basics
SCP3100NZ060529qxd 06.5.29 1:28 PM Page 10

11
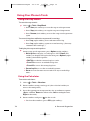
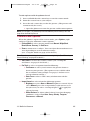
Making and Answering Calls
Making Calls
To place a call using your keypad:
1. Make sure your phone is on.
2. Enter a phone number from standby mode. (If you make a
mistake while dialing, press to erase one digit at a time.
Press and hold to erase the entire number.)
3. Press or .
4. Press or close the phone (see “To activate the Close Flip
feature:” on page 42) when you are finished.
Tip: To redial your last outgoing call, press or twice.
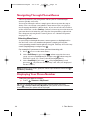
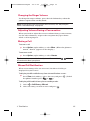
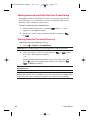
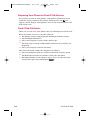
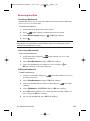
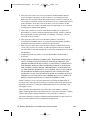
Important:
When you use your phone to maximise performance, extend the
antenna and do not touch the antenna.
To place a call with the flip closed:
1. Make sure your phone is on.
2. Press and hold on the left side of the phone.
3. Follow the system prompts. (The call will be made in
speakerphone mode, unless you have a headset attached to the
phone.)
䡲
Redial to redial the last number you called.
䡲
Voice Dial to use the Voice Dial function. (See “Using Voice-
Activated Dialing” on page 82.)
Tip: This function is available when the Side Key Guard setting is off.
See page 43 for the Side Key Guard.
Note: To use a Voice Dial, you must have stored Voice Dial entries.
(See “Programming Voice Dial Tags”on page 82.)
Correct Incorrect
1. The Basics
SCP3100NZ060529qxd 06.5.29 1:28 PM Page 11

12
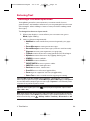
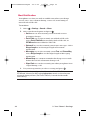
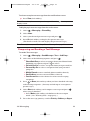
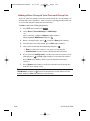
Dialing Options
Dialing options are displayed when you press Options (right softkey)
after entering numbers in the phone’s standby mode.
䢇
Abbrev. Dial to use Ph.Book Match or Prepend feature.
(See “Using Abbreviated Dialing” on page 21 and “Setting
Abbreviated Dialing” on page 44.)
䢇
Call to dial the phone number.
䢇
Call:Speaker On to dial the phone number in speakerphone mode.
䢇
Send Message to send a text message (page 91) or a picture message
(page 101).
䢇
Save Phone# to save the phone number in your Contacts list. (See
“Saving a Phone Number” on page 18.)
䢇
Find to display Contacts list entries that end with the digits you
entered. (See “Finding a Phone Number” on page 18.)
䢇
Hard Pause to insert a hard pause. (See “Dialing and Saving
Phone Numbers With Pauses” on page 19.)
䢇
2-Sec. Pause to insert a 2-second pause. (See “Dialing and
Saving Phone Numbers With Pauses” on page 19.)
䢇
Hyphen to insert a hyphen. (Hyphens are generally for visual
appeal only; they are not necessary when entering numbers.)
Tip: To speed dial a phone number, press and hold the appropriate speed dial key
(locations 2-9). See “Assigning Speed Dial Numbers” on page 64.
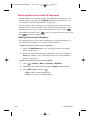
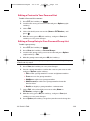
Answering Calls
To answer an incoming call with the flip open:
1. Make sure your phone is on. (If your phone is off, incoming calls
go to voicemail.)
2. Press or to answer an incoming call. (Depending on
your phone’s settings, you may also answer incoming calls by
opening the phone or by pressing any number key. See “Setting
the Open/Close Flip Option”on page 42 and “Setting Any Key
Answer” on page 42 for more information.)
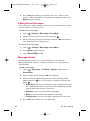
To answer an incoming call with the flip closed:
1. Make sure your phone is on. (If your phone is off, incoming calls
go to voicemail.)
T
H
1. The Basics
SCP3100NZ060529qxd 06.5.29 1:28 PM Page 12

13
2. When your phone rings or vibrates, press and hold the Push 2
Talk/Memo Button ( ) on the left side of the phone. (The
call will be answered in speakerphone mode.)
– or –
Open the phone to use the earpiece.
Note: If the setting for Open Flip is set to No Action, opening the phone will not
answer the call.
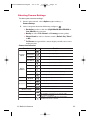
Your phone notifies you of incoming calls in the following ways:
䢇
The phone rings and/or vibrates.
䢇
The LED (on the front of the phone) flashes.
䢇
The backlight illuminates.
䢇
The screen displays an incoming call message.
䢇
If available, the phone number of the caller is displayed.
䢇
If the phone number is in your Contacts list, the contact’s name is
displayed.
When receiving a call, the following options are also displayed by
pressing Options (right softkey).
䢇
Answer to answer the call.
䢇
Answer:Speaker to answer the call in speakerphone mode.
䢇
Answer on Hold to put the call on hold. (See “Setting Answer on
Hold” below.)
䢇
Screen Call to answer the call by using a pre-recorded
announcement. (See “Setting Up Screen Call” on page 87.)
䢇
Quiet Ringer to mute the ringer. (if available.)
Tip: Your phone offers additional ways to answer calls. (See page 41 for Auto-
Answer Mode and page 42 for Setting Any Key Answer.)
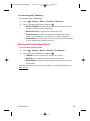
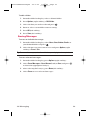
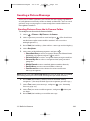
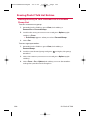
Setting Answer on Hold
This feature allows you to hold an incoming call when you cannot
answer immediately.
To set Answer on Hold:
1. When you receive an incoming call, press Options (right
softkey).
2. Select Answer on Hold. (The caller hears a message while waiting
for you to answer. will display on the screen while the call is
on hold.)
1. The Basics
SCP3100NZ060529qxd 06.5.29 1:28 PM Page 13

14
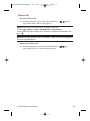
To resume the call:
䊳
Press Answer (left softkey) or .
– or –
䊳
Press Options (right softkey) > select Answer or Answer:Speaker.
Ending a Call
To disconnect a call when you are finished:
䊳
Close the phone or press .
Note: If the setting for Close Flip is not set to End Call closing the phone will not
end the call. (See “Setting the Open/Close Flip Option” on page 42.)
Tip: Time/Date is displayed when you press while the phone is in use.
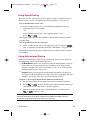
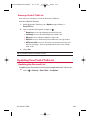
Using the Speakerphone
The speakerphone feature lets you hear audio through the speaker
and talk without holding the phone. When the speakerphone is
activated, use the Side Volume Key on the side of the phone to adjust
the volume.
To turn the speakerphone on during a call:
䊳
Press .
– or –
Press Options (right softkey) > select Speaker On.
To turn the speakerphone off during a call:
䊳
Press .
– or –
Press Options (right softkey) > select Speaker Off.
Tip: You can adjust the speakerphone volume using the Side Volume key or the
navigation key.
Warning! Due to higher volume levels, do not place the phone near your ear
during speakerphone use.
1. The Basics
SCP3100NZ060529qxd 06.5.29 1:28 PM Page 14
Page is loading ...
Page is loading ...
Page is loading ...
Page is loading ...
Page is loading ...
Page is loading ...
Page is loading ...
Page is loading ...
Page is loading ...
Page is loading ...
Page is loading ...
Page is loading ...
Page is loading ...
Page is loading ...
Page is loading ...
Page is loading ...
Page is loading ...
Page is loading ...
Page is loading ...
Page is loading ...
Page is loading ...
Page is loading ...
Page is loading ...
Page is loading ...
Page is loading ...
Page is loading ...
Page is loading ...
Page is loading ...
Page is loading ...
Page is loading ...
Page is loading ...
Page is loading ...
Page is loading ...
Page is loading ...
Page is loading ...
Page is loading ...
Page is loading ...
Page is loading ...
Page is loading ...
Page is loading ...
Page is loading ...
Page is loading ...
Page is loading ...
Page is loading ...
Page is loading ...
Page is loading ...
Page is loading ...
Page is loading ...
Page is loading ...
Page is loading ...
Page is loading ...
Page is loading ...
Page is loading ...
Page is loading ...
Page is loading ...
Page is loading ...
Page is loading ...
Page is loading ...
Page is loading ...
Page is loading ...
Page is loading ...
Page is loading ...
Page is loading ...
Page is loading ...
Page is loading ...
Page is loading ...
Page is loading ...
Page is loading ...
Page is loading ...
Page is loading ...
Page is loading ...
Page is loading ...
Page is loading ...
Page is loading ...
Page is loading ...
Page is loading ...
Page is loading ...
Page is loading ...
Page is loading ...
Page is loading ...
Page is loading ...
Page is loading ...
Page is loading ...
Page is loading ...
Page is loading ...
Page is loading ...
Page is loading ...
Page is loading ...
Page is loading ...
Page is loading ...
Page is loading ...
Page is loading ...
Page is loading ...
Page is loading ...
Page is loading ...
Page is loading ...
Page is loading ...
Page is loading ...
Page is loading ...
Page is loading ...
Page is loading ...
Page is loading ...
Page is loading ...
Page is loading ...
Page is loading ...
Page is loading ...
Page is loading ...
Page is loading ...
Page is loading ...
Page is loading ...
Page is loading ...
Page is loading ...
Page is loading ...
Page is loading ...
Page is loading ...
Page is loading ...
Page is loading ...
Page is loading ...
Page is loading ...
Page is loading ...
Page is loading ...
Page is loading ...
Page is loading ...
Page is loading ...
Page is loading ...
Page is loading ...
Page is loading ...
Page is loading ...
Page is loading ...
Page is loading ...
-
 1
1
-
 2
2
-
 3
3
-
 4
4
-
 5
5
-
 6
6
-
 7
7
-
 8
8
-
 9
9
-
 10
10
-
 11
11
-
 12
12
-
 13
13
-
 14
14
-
 15
15
-
 16
16
-
 17
17
-
 18
18
-
 19
19
-
 20
20
-
 21
21
-
 22
22
-
 23
23
-
 24
24
-
 25
25
-
 26
26
-
 27
27
-
 28
28
-
 29
29
-
 30
30
-
 31
31
-
 32
32
-
 33
33
-
 34
34
-
 35
35
-
 36
36
-
 37
37
-
 38
38
-
 39
39
-
 40
40
-
 41
41
-
 42
42
-
 43
43
-
 44
44
-
 45
45
-
 46
46
-
 47
47
-
 48
48
-
 49
49
-
 50
50
-
 51
51
-
 52
52
-
 53
53
-
 54
54
-
 55
55
-
 56
56
-
 57
57
-
 58
58
-
 59
59
-
 60
60
-
 61
61
-
 62
62
-
 63
63
-
 64
64
-
 65
65
-
 66
66
-
 67
67
-
 68
68
-
 69
69
-
 70
70
-
 71
71
-
 72
72
-
 73
73
-
 74
74
-
 75
75
-
 76
76
-
 77
77
-
 78
78
-
 79
79
-
 80
80
-
 81
81
-
 82
82
-
 83
83
-
 84
84
-
 85
85
-
 86
86
-
 87
87
-
 88
88
-
 89
89
-
 90
90
-
 91
91
-
 92
92
-
 93
93
-
 94
94
-
 95
95
-
 96
96
-
 97
97
-
 98
98
-
 99
99
-
 100
100
-
 101
101
-
 102
102
-
 103
103
-
 104
104
-
 105
105
-
 106
106
-
 107
107
-
 108
108
-
 109
109
-
 110
110
-
 111
111
-
 112
112
-
 113
113
-
 114
114
-
 115
115
-
 116
116
-
 117
117
-
 118
118
-
 119
119
-
 120
120
-
 121
121
-
 122
122
-
 123
123
-
 124
124
-
 125
125
-
 126
126
-
 127
127
-
 128
128
-
 129
129
-
 130
130
-
 131
131
-
 132
132
-
 133
133
-
 134
134
-
 135
135
-
 136
136
-
 137
137
-
 138
138
-
 139
139
-
 140
140
-
 141
141
-
 142
142
-
 143
143
-
 144
144
-
 145
145
-
 146
146
-
 147
147
-
 148
148
-
 149
149
-
 150
150


Ask a question and I''ll find the answer in the document
Finding information in a document is now easier with AI
Related papers
-
Sanyo SCP-4920 User manual
-
Sanyo SCP-3100 User manual
-
-
-
-
-
-
-
-
