Page is loading ...

Standard Display Endpoint
User Guide
Basic Digital Endpoint


1
QUICK REFERENCE GUIDE TO
FREQUENTLY USED FEATURES
These are the basic instructions for the most frequently used telephone and
voice mail features for Inter-Tel endpoints. For detailed information about these
and other features, refer to the complete instructions in the appropriate user
guide.
PLACING AN INTERCOM CALL
1. Dial an extension number.
2. If your call goes through handsfree to the called endpoint’s speaker, speak
after you hear a double tone.
If you hear continuous ringing, wait for the call to be answered.
PLACING AN OUTSIDE CALL
1. With or without the handset lifted, press or dial the Outgoing Call
feature code (the default feature code is ).
2. Dial the desired number. (If you hear a single progress tone, you must dial
an account code before you can place your call.)
ANSWERING AN INTERCOM OR OUTSIDE CALL
EITHER, Respond handsfree (if enabled).
OR, Lift the handset for privacy.
OR, Press ,
, or .
OR, Press the flashing (Intercom) button.
PLACING A CALL ON HOLD
While on a call, press or . Hang up or place another call. To return to
the call, lift the handset an then press , , or the flashing button.
PLACING AN EMERGENCY CALL
Dial (in the U.S.) or (in Europe) to automatically place a
call to the system’s programmed emergency number. You do not have to select
an outside line first.
CAUTION
If you are using an IP or SIP endpoint, consult your system administrator
and your local Inter-Tel servicing company for important information about
dialing emergency services before you begin using it.
OUTGOING
8
SPKR
ANSWER
IC
HOLD
HOLD
9
1 1
9 9 9
© Inter-Tel, Inc. January 2005 printed in US
Part no. 835.2449-4

2
P
LACING A CONFERENCE CALL
1. While on the first call, press . The call is now on hold.
2. Place an intercom or outside call, then press the flashing button to
place the call on hold. (If necessary, repeat this step to place a third call on
hold.)
3. Press the flashing button to join all of the calls together in the con-
ference.
NOTE: Conference calls are limited to three parties on SIP endpoints.
FORWARDING CALLS
1. Press . (Six-line display model users must then select a menu button.)
2. Do one of the following:
• To forward to an outside telephone number: Select an outside line
and dial a telephone number.
• To forward to an extension number: Dial the extension number.
• To forward to your voice mailbox: Dial the voice mail extension.
To cancel call forwarding:
1. Press .
2. If you have a six-line display endpoint, press the FWD OFF menu button.
If you have a non-display or two-line display endpoint, press , , or
lift and replace the handset.
RESPONDING TO A WAITING CALL
If you hear a “call waiting” tone through your handset or headset, either end
your current call or place it on hold. Then press , , , or the
flashing button.
CHANGING VOLUME LEVELS
EITHER, Press the high ( ) or low ( )end of the Volume button.
OR, Press the Up or Down arrow on the Volume button.
OR, Press the
VOL UP or VOL DN button.
To save your change:
EITHER, Press both ends of the Volume button at the same time.
OR, Press the middle of the Volume button.
OR, Press both
VOL UP and VOL DN buttons at the same time.
REDIALING A NUMBER
Select an outside line and press or dial . The number is auto-
matically dialed.
CNF
CNF
CNF
FWD
FWD
SPKR
SPKR ANSWER
REDIAL
3
8
0

3
P
AGING
1. Lift the handset and press or dial .
2. Dial the desired page zone number (0-9).
3. After the tone, make your announcement and hang up.
NOTE: The Page feature is not supported in SIP mode.
TRANSFERRING A CALL TO AN EXTENSION/OUTSIDE NUMBER
1. Press or .
2. Dial the desired extension or telephone number.
3. Wait for an answer, announce the call, and then hang up.
If the number is busy, there is no answer, or the transfer is refused, press ,
, or the flashing button to return to the caller. (Press for SIP
mode.)
TRANSFERRING A CALL TO VOICE MAIL
1. Press or .
2. Dial the voice mail extension number.
3. Hang up to send the call to the voice mail menu (so that the caller can enter
the mailbox number).
USING REVERSE TRANSFER (CALL PICKUP)
1. Lift the handset and dial .
2. Dial the extension number where the call is ringing or holding.
ACCESSING YOUR MAILBOX
NOTE: If your voice mail system has Automatic Speech Recognition (ASR)
capability and it is enabled for your mailbox, you can complete voice mail tasks
by issuing spoken commands or by pressing dialpad digits.
If your button is lit and you have a message from voice mail:
1. Lift the handset or press or press .
2. Press . A call is automatically placed to the voice mail system.
3. Enter your personal password and press .
If your button is not lit:
1. Dial the voice mail extension number. (You hear the main menu.)
2. During or after the greeting, say “Login” or press to identify yourself as a
subscriber.
3. Say or enter your mailbox number.
4. Enter your mailbox password (if programmed). Then press .
PAGE
7
TRANSFER XFR
SPKR
TRANSFER XFR
4
MSG
SPKR
MSG
#
MSG
#

4
A
CCESSING VOICE MAIL MESSAGES
1. Access your mailbox as described on page 3.
2. If E-Mail Reader is enabled for your mailbox, say “Voice Mail” or press .
If E-Mail Reader is not enabled for your mailbox, skip this step.
3. Select one of the following:
• Say “New” or press to listen to new messages.
• Say “Saved” or press to listen to saved messages.
4. While you are listening to a message, you can use the following options:
• Say “Skip” or press
to skip to the end of the recording.
• Say “Backup” or press to back up.
• Say “Pause” or press to pause. (Press to continue.)
• Say “Forward” or press to skip ahead.
• Say “Lower” or press to lower the volume.
• Say “Envelope” or press to play the message envelope.
• Say “Higher” or press to raise the volume.
• Say “Save” or press to save the new message in your mailbox.
• Say “Delete” or press to delete the message from your mailbox.
5. When the message has finished playing, you have the following options:
• Say “Replay” or press to replay the message from the beginning.
• Say “Reply” or press to reply to the message.
• Say “Forward” or press to forward a copy of the message.
• Say “Previous” or press to listen to the previous message.
• Say “Envelope” or press to play the introductory message envelope.
• Say “Next” or press to listen to the next message.
• Say “Save” or press to save the new message in your mailbox.
• Say “Delete” or press to delete the message from your mailbox.
RECORDING AND SENDING VOICE MAIL MESSAGES
1. Access your mailbox as described on page 3.
2. Say “Record” or press .
3. Say or enter the mailbox number where you want to leave the message.
4. Say “Yes” or press to accept the subscriber’s name.
5. Record your message after the tone.
6. When finished, hang up to deliver the message or press to access more
options.
1
1
3
#
1
2
#
3
4
5
6
7
9
1
2
3
4
5
6
7
9
2
#
#

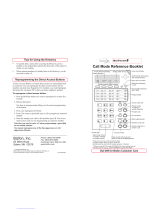
MESSAGE OPTIONS*
Below is a summary of the options you can
use when accessing messages, after playing
messages, and when recording voice mail
messages.
*
Message options vary based on media type.
FEATURE CODES*
*Some feature codes may not apply to your endpoint. For a list of feature
codes specific to your endpoint, consult the user guide.
TELEPHONE SYSTEM AND
VOICE MAIL FEATURE GUIDE
USING VOICE MAIL
To access your mailbox:
1. Dial the voice mail extension number.
2. Say “Login” or press and say or enter
your mailbox number.
3. Enter your password and press .
4. Voice mail plays the main menu for your
mailbox type and guides you through the
available options.
STANDARD VOICE MAILBOX MAIN MENU:
ADVANCED MAILBOX MAIN MENU:
# LISTENING TO MSG AFTER MSG PLAYS LEAVING MSG
1 Back Up Replay the
message
Replay the
message
2 Pause Reply to the
message
Append the
message
3 Skip forward Forward a copy Erase and
re-record
4 Lower volume Listen to previ-
ous msg
—
5 Play envelope Play envelope —
6 Increase vol-
ume
Listen to next
message
—
7 — Save the
message
—
8———
9 — Delete the
message
Access deliv-
ery options
* — — Cancel
# Skip to end — Send message
and exit
CODE FEATURE NAME CODE FEATURE NAME
391 Account Code – All Calls 324 Hunt Group Remove/Replace
390 Account Code – Optional 303 LCD Contrast Control
326 ACD Agent Log In 365 Message
327 ACD Agent Log Out 366 Message - Cancel Msg Left
328 ACD Agent Log In/out 368 Message -Cancel Msg On Endpt.
329 ACD Agent Wrap-up Term. 367 Message - Silent
375 Agent Help Request 314 Microphone Mute
376 Agent Help Reject 7 Page
361 Automatic Intercom Access 325 Page Remove/Replace
360 Automatic Line Access 397 Program Buttons
350 Automatic Line Answer 392 Program Station Password
313 Background Music 6 Queue (Callback) Request
355 Call Forward All Calls 385 Record-A-Call
357 Call Forward If Busy 380 Redial
356 Call Forward If No Answer 331 Redirect Call
358 Call Fwd. If No Answer/Busy 305 Reminder Message
5 Conference 306 Reminder Message Cancel
394 Default Station 359 Remote Programming
307 Directory 4 Reverse Transfer
300 Display Time And Date 396 Review Buttons
372 Do-Not-Disturb On/Off 377 Ring Intercom Always On/off
373 Do-Not-Disturb Override 398 Ring Tone Selection
395 Feature Button Default 382 Station Speed Dial
312 Group Listen 383 Station Speed Dial Program
319 Handsfree On/Off 354 System Forward On/Off
317 Headset On/Off 381
System Speed Dial
336 Hold – Individual 399 Switch Keymap
335 Hold – System 346 Transfer To Hold
330 Hookflash (Recall in Europe) 345 Transfer To Ring
TO... SAY PRESS
Access new voice mail messages “New” 1
Record voice mail messages “Record” 2
Access saved voice mail messages “Saved” 3
Access personal mailbox options “Personal” 4
Access message options “Options” 5
Disable Automatic Speech Recognition “Disable” 8
TO... SAY PRESS
Access voice mail messages “Voice mail” 1
Record voice mail messages “Record” 2
Access e-mail messages “E-mail” 3
Access personal mailbox options “Personal” 4
Access message options “Options” 5
Access faxes “Facsimile” 6
Disable Automatic Speech Recognition “Disable” 8
#

REMOTE FEATURE ACCESS
Remote Feature Access allows you to change
your station password, place your endpoint in
Do-Not-Disturb mode, and forward calls from
another endpoint or through a special dial-up
line.
If you do not hear a tone after each step, or if
you hear repeating tones, you have made a
mistake or the feature is restricted. Start over.
To use Remote Feature Access:
1. EITHER, call _______________ (number
provided by your system administrator). If
required, enter your password.
OR, use any endpoint on the system.
2. Enter
.
3. Enter your extension number.
4. Enter your password and press . You
can now use the features described below
and at right.
To change the station password:
1. Enter
.
2. Enter your current password and press
.
3. Enter the new password and press .
4. Enter the new password again for verifica-
tion and press .
To turn on Do-Not-Disturb:
1. Enter
.
2. Enter message number 01-20 (see the
default DND message list below).
3. If desired, enter the optional second-line
message text (see the dialpad character
chart on the next page).
4. Hang up.
To turn off Do-Not-Disturb:
Enter
and hang up.
DO-NOT-DISTURB MESSAGES
*VACATION is replaced by HOLIDAY in European systems.
DIALPAD CHARACTERS
NOTE: The characters associated with the 5 and 6 dialpad
digits are dependent on the software version.
To turn on Call Forward:
1. Enter one of the following Call Forward fea-
ture codes:
2. Enter an extension number or enter a line
access code followed by an outside tele-
phone number.
3. Hang up.
To turn off Call Forward:
1. Enter
.
2. Press and hang up.
3 5 9
#
3 9
2
#
#
#
01 DO-NOT-DISTURB 11 OUT OF TOWN ’TIL
02 LEAVE A MESSAGE 12 OUT OF OFFICE
03 IN MEETING UNTIL 13 OUT UNTIL
04 IN MEETING 14 WITH A CLIENT
05
ON VACATION
*
’TIL
15 WITH A GUEST
06
ON VACATION
*
16 UNAVAILABLE
07 CALL ME AT 17 IN CONFERENCE
08 AT THE DOCTOR 18 AWAY FROM DESK
09 ON A TRIP 19 GONE HOME
10 ON BREAK 20 OUT TO LUNCH
3 7 0
3 7
1
NUMBER OF TIMES BUTTON IS PRESSED
BUTTON
12345
1
-&( )1
2
ABC ' 2
3
DEF ! 3
4
GH I * 4
5
JKL# or /5
6
MNOÑ or #6
7
PQRS 7
8
TUV?8
9
WXYZ 9
All Calls 355
If No Answer 356
If Busy 357
If No Answer/Busy 358
3 5 5
#

Notice
This Inter-Tel
®
user guide is released by Inter-Tel, Inc. as a guide for end-users. It pro-
vides information necessary to use the Standard/Basic endpoints. The contents of this
user guide, which reflect current Inter-Tel standards, are subject to revision or change
without notice. Some features or applications mentioned may require a future release and
are not available in the initial release. Future product features and applications are subject
to availability and cost. Some features or applications may require additional hardware
and/or specific software.
Some system features can only be accessed by an
administrator. For information about these features, see the
Frequently Asked Questions section on page 91.
For sales, service, or technical support,
contact your local authorized Inter-Tel provider.
Comments about this user guide or other
technical documentation should be directed to
Inter-Tel’s Technical Publications Department at:
All products and services mentioned in this publication are the trademarks, service marks,
registered marks, or registered service marks of their respective owners.
Inter-Tel
®
and Enterprise
®
are registered trademarks of Inter-Tel, Incorporated.
Microsoft
®
and Outlook
®
are registered trademarks of Microsoft Corporation.

PRODUCT DISPOSAL INSTRUCTIONS
This symbol indicates that the product is classified as electrical or
electronic equipment and should not be disposed of with other com-
mercial or household waste at the end of its working life. For appro-
priate disposal and recycling instructions, contact your local recycling
authority or Inter-Tel provider.
The Waste of Electrical and Electronic Equipment (WEEE) Directive (2002/96/EC) was established by the
European Union to minimize negative impact on the environment, control hazardous substances, and curtail
landfill expansion by using the best available recovery and recycling techniques.

iii
©Inter-Tel, Inc. March 2006 printed in US
CONTENTS PAGE
Table of Contents
FINDING YOUR WAY . . . . . . . . . . . . . . . . . . . . . . . . . . . . . . . . . . . . . . . . . . . . . . . . . . . 1
Welcome. . . . . . . . . . . . . . . . . . . . . . . . . . . . . . . . . . . . . . . . . . . . . . . . . . . . . . . . . . . . . . . . . 2
About This Guide . . . . . . . . . . . . . . . . . . . . . . . . . . . . . . . . . . . . . . . . . . . . . . . . . . . . . . . . . 2
About Your Endpoint . . . . . . . . . . . . . . . . . . . . . . . . . . . . . . . . . . . . . . . . . . . . . . . . . . . . . . 3
About Voice Mail . . . . . . . . . . . . . . . . . . . . . . . . . . . . . . . . . . . . . . . . . . . . . . . . . . . . . . . . . . 7
What You See and Hear . . . . . . . . . . . . . . . . . . . . . . . . . . . . . . . . . . . . . . . . . . . . . . . . . . . 11
Software Compatibility . . . . . . . . . . . . . . . . . . . . . . . . . . . . . . . . . . . . . . . . . . . . . . . . . . . . 12
GETTING STARTED . . . . . . . . . . . . . . . . . . . . . . . . . . . . . . . . . . . . . . . . . . . . . . . . . . 13
Introduction . . . . . . . . . . . . . . . . . . . . . . . . . . . . . . . . . . . . . . . . . . . . . . . . . . . . . . . . . . . . . 14
Setting Up Voice Mail . . . . . . . . . . . . . . . . . . . . . . . . . . . . . . . . . . . . . . . . . . . . . . . . . . . . . 14
Making and Receiving Calls. . . . . . . . . . . . . . . . . . . . . . . . . . . . . . . . . . . . . . . . . . . . . . . . 17
Placing Calls On Hold. . . . . . . . . . . . . . . . . . . . . . . . . . . . . . . . . . . . . . . . . . . . . . . . . . . . . 21
Placing Conference Calls . . . . . . . . . . . . . . . . . . . . . . . . . . . . . . . . . . . . . . . . . . . . . . . . . . 22
Transferring Calls . . . . . . . . . . . . . . . . . . . . . . . . . . . . . . . . . . . . . . . . . . . . . . . . . . . . . . . . 23
Using Reverse Transfer . . . . . . . . . . . . . . . . . . . . . . . . . . . . . . . . . . . . . . . . . . . . . . . . . . . 24
Forwarding Calls . . . . . . . . . . . . . . . . . . . . . . . . . . . . . . . . . . . . . . . . . . . . . . . . . . . . . . . . . 25
Redialing a Number . . . . . . . . . . . . . . . . . . . . . . . . . . . . . . . . . . . . . . . . . . . . . . . . . . . . . . 26
Displaying Information on Your Endpoint . . . . . . . . . . . . . . . . . . . . . . . . . . . . . . . . . . . . 27
Using a Headset . . . . . . . . . . . . . . . . . . . . . . . . . . . . . . . . . . . . . . . . . . . . . . . . . . . . . . . . . 28
Using the Speaker and Microphone . . . . . . . . . . . . . . . . . . . . . . . . . . . . . . . . . . . . . . . . . 29
Using the Message Button . . . . . . . . . . . . . . . . . . . . . . . . . . . . . . . . . . . . . . . . . . . . . . . . . 31
Accessing Your Mailbox . . . . . . . . . . . . . . . . . . . . . . . . . . . . . . . . . . . . . . . . . . . . . . . . . . . 32
Disabling and Enabling ASR . . . . . . . . . . . . . . . . . . . . . . . . . . . . . . . . . . . . . . . . . . . . . . . 33
Accessing Voice Mail Messages . . . . . . . . . . . . . . . . . . . . . . . . . . . . . . . . . . . . . . . . . . . . 34
Using Do-Not-Disturb Mode . . . . . . . . . . . . . . . . . . . . . . . . . . . . . . . . . . . . . . . . . . . . . . . . 40
Using Reminder Messages . . . . . . . . . . . . . . . . . . . . . . . . . . . . . . . . . . . . . . . . . . . . . . . . 42
MOVING ON . . . . . . . . . . . . . . . . . . . . . . . . . . . . . . . . . . . . . . . . . . . . . . . . . . . . . . . . . 43
Introduction . . . . . . . . . . . . . . . . . . . . . . . . . . . . . . . . . . . . . . . . . . . . . . . . . . . . . . . . . . . . . 44
Setting Endpoint Preferences . . . . . . . . . . . . . . . . . . . . . . . . . . . . . . . . . . . . . . . . . . . . . . 44
Setting Mailbox Preferences . . . . . . . . . . . . . . . . . . . . . . . . . . . . . . . . . . . . . . . . . . . . . . . 47
FINDING YOUR WAY
GETTING STARTED
MOVING ON
USING E-MAIL READER LEARNING MORE

iv
CONTENTS PAGE
Speed Dialing. . . . . . . . . . . . . . . . . . . . . . . . . . . . . . . . . . . . . . . . . . . . . . . . . . . . . . . . . . . . 54
Using Record-A-Call . . . . . . . . . . . . . . . . . . . . . . . . . . . . . . . . . . . . . . . . . . . . . . . . . . . . . . 57
Paging . . . . . . . . . . . . . . . . . . . . . . . . . . . . . . . . . . . . . . . . . . . . . . . . . . . . . . . . . . . . . . . . . 58
Performing a “Hookflash” During a Call. . . . . . . . . . . . . . . . . . . . . . . . . . . . . . . . . . . . . . 59
Programming Your Feature Buttons . . . . . . . . . . . . . . . . . . . . . . . . . . . . . . . . . . . . . . . . . 59
Programming Direct Station Selection Buttons . . . . . . . . . . . . . . . . . . . . . . . . . . . . . . . . 60
Programming Secondary Extension Buttons. . . . . . . . . . . . . . . . . . . . . . . . . . . . . . . . . . 61
Using Account Codes. . . . . . . . . . . . . . . . . . . . . . . . . . . . . . . . . . . . . . . . . . . . . . . . . . . . . 62
Screening Calls . . . . . . . . . . . . . . . . . . . . . . . . . . . . . . . . . . . . . . . . . . . . . . . . . . . . . . . . . . 62
Using Call Logging . . . . . . . . . . . . . . . . . . . . . . . . . . . . . . . . . . . . . . . . . . . . . . . . . . . . . . . 63
Using Directories . . . . . . . . . . . . . . . . . . . . . . . . . . . . . . . . . . . . . . . . . . . . . . . . . . . . . . . . 64
Programming Remote Feature Access . . . . . . . . . . . . . . . . . . . . . . . . . . . . . . . . . . . . . . . 69
Requesting Agent Help. . . . . . . . . . . . . . . . . . . . . . . . . . . . . . . . . . . . . . . . . . . . . . . . . . . . 71
Working in Hunt Groups. . . . . . . . . . . . . . . . . . . . . . . . . . . . . . . . . . . . . . . . . . . . . . . . . . . 72
USING E-MAIL READER . . . . . . . . . . . . . . . . . . . . . . . . . . . . . . . . . . . . . . . . . . . . . . . 75
Introduction . . . . . . . . . . . . . . . . . . . . . . . . . . . . . . . . . . . . . . . . . . . . . . . . . . . . . . . . . . . . . 76
E-Mail Reader Features . . . . . . . . . . . . . . . . . . . . . . . . . . . . . . . . . . . . . . . . . . . . . . . . . . . 77
Using Your Advanced Mailbox. . . . . . . . . . . . . . . . . . . . . . . . . . . . . . . . . . . . . . . . . . . . . . 78
Setting Up Your E-Mail Password . . . . . . . . . . . . . . . . . . . . . . . . . . . . . . . . . . . . . . . . . . . 79
Accessing E-Mail Messages . . . . . . . . . . . . . . . . . . . . . . . . . . . . . . . . . . . . . . . . . . . . . . . 81
Using Main Menu E-Mail Reader Count . . . . . . . . . . . . . . . . . . . . . . . . . . . . . . . . . . . . . . 83
Accessing Fax Messages. . . . . . . . . . . . . . . . . . . . . . . . . . . . . . . . . . . . . . . . . . . . . . . . . . 84
Recovering Deleted Messages . . . . . . . . . . . . . . . . . . . . . . . . . . . . . . . . . . . . . . . . . . . . . 85
Changing Message Envelopes . . . . . . . . . . . . . . . . . . . . . . . . . . . . . . . . . . . . . . . . . . . . . 86
Voice Mail Flowchart (Advanced Mailbox) . . . . . . . . . . . . . . . . . . . . . . . . . . . . . . . . . . . . 87
LEARNING MORE . . . . . . . . . . . . . . . . . . . . . . . . . . . . . . . . . . . . . . . . . . . . . . . . . . . . 89
Introduction . . . . . . . . . . . . . . . . . . . . . . . . . . . . . . . . . . . . . . . . . . . . . . . . . . . . . . . . . . . . . 90
What the Administrators Can Do for You . . . . . . . . . . . . . . . . . . . . . . . . . . . . . . . . . . . . . 90
Frequently Asked Questions (FAQs). . . . . . . . . . . . . . . . . . . . . . . . . . . . . . . . . . . . . . . . . 91
Default Feature Codes . . . . . . . . . . . . . . . . . . . . . . . . . . . . . . . . . . . . . . . . . . . . . . . . . . . . 94
INDEX . . . . . . . . . . . . . . . . . . . . . . . . . . . . . . . . . . . . . . . . . . . . . . . . . . . . . . . . . . . . . . 99

1
Inter-Tel
®
Standard/Basic Endpoint User Guide
FINDING YOUR WAY
Finding Your Way
SECTION CONTENTS PAGE
Welcome . . . . . . . . . . . . . . . . . . . . . . . . . . . . . . . . . . . . . . . . . . . . . 2
About This Guide . . . . . . . . . . . . . . . . . . . . . . . . . . . . . . . . . . . . . . 2
About Your Endpoint . . . . . . . . . . . . . . . . . . . . . . . . . . . . . . . . . . . 3
Standard Display Endpoint. . . . . . . . . . . . . . . . . . . . . . . . . . . . 3
Basic Digital Endpoint . . . . . . . . . . . . . . . . . . . . . . . . . . . . . . . 4
Feature Button Functions . . . . . . . . . . . . . . . . . . . . . . . . . . . . . 5
Display . . . . . . . . . . . . . . . . . . . . . . . . . . . . . . . . . . . . . . . . . . . 6
DSS/BLF . . . . . . . . . . . . . . . . . . . . . . . . . . . . . . . . . . . . . . . . . 7
About Voice Mail . . . . . . . . . . . . . . . . . . . . . . . . . . . . . . . . . . . . . . 7
Enterprise Messaging. . . . . . . . . . . . . . . . . . . . . . . . . . . . . . . . 9
Automatic Speech Recognition (ASR) . . . . . . . . . . . . . . . . . . 10
What You See and Hear. . . . . . . . . . . . . . . . . . . . . . . . . . . . . . . . 11
Software Compatibility . . . . . . . . . . . . . . . . . . . . . . . . . . . . . . . . 12

2
Inter-Tel
®
Standard/Basic Endpoint User Guide
FINDING YOUR WAY
WELCOME
Your new Standard/Basic endpoints provide access to several features, each of which
is described in this guide. The About This Guide section below lists the different sec-
tions in this user guide and describes the type of information you can find there. If
you need to access information quickly, refer to the Quick Reference Guide attached
to the front of this guide. You can also tear out the pocket guide to keep as a handy
reference for features you are likely to use while away from the office (Remote Fea-
ture Access and Voice Mail).
ABOUT THIS GUIDE
This guide contains instructions for using both the Standard two-line display endpoint
and the Basic digital non-display endpoint on the Inter-Tel
®
telephone system. To
help you find information more quickly, this guide is divided into five separate sec-
tions, as indicated by the tabs.
These sections include the following:
• Finding Your Way: This section provides you with a picture of your endpoint
and includes general information designed to help you find what you need.
• Getting Started: This section includes basic endpoint and voice mail informa-
tion, and provides instructions on how to perform everyday tasks, such as
answering calls, making calls, and using voice mail.
• Moving On: In this section you’ll learn how to use advanced endpoint and voice
mail features.
• Using E-Mail Reader: This section includes information on how to use the
advanced messaging features available with E-Mail Reader.
• Learning More: This section outlines how your administrators can help if you
experience a problem with your endpoint. It also provides you with a list of Fre-
quently Asked Questions (FAQs) so you can troubleshoot problems and learn
more about the system.
In addition, this guide contains a list of default feature codes (see page 94) and an
index (see page 99) for easy reference.
NOTE: Because the telephone system is very flexible and programmable, the proce-
dures for using the features might vary slightly from the descriptions in this guide. If so,
your trainer or system administrator can tell you how your system differs and how to
use the features.

3
Inter-Tel
®
Standard/Basic Endpoint User Guide
FINDING YOUR WAY
ABOUT YOUR ENDPOINT
Your endpoint has two basic types of buttons in addition to a display.
• Dialpad buttons: Allow you to enter numbers and letters.
• Feature buttons: Provide quick access to various telephone and voice mail fea-
tures.
Standard Display Endpoint
SPKR MSG
MUTE FWD
∞
CALL 1
CALL 2
CALL 3
CALL 4
IC
DID
CNF
ANSWER
OUTGOING
HOLD
SYS SPDL REDIAL
TRANSFER
123
45 6
789
0
#
DEF
PRS TUV WXY
ABC
MNO
JKL
GHI
*
OPER
REDIAL
HANDSFREE
MICROPHONE
RING AND VOICE
VOLUME CONTROL
(underneath edge)
12-BUTTON
DIALPAD
FEATURE
BUTTONS
LCD WITH TWO
16-CHARACTER LINES
HEARING AID-COMPATIBLE
(HAC) HANDSET
INTERNAL
SPEAKER
SPECIAL
BUTTON

4
Inter-Tel
®
Standard/Basic Endpoint User Guide
FINDING YOUR WAY
Basic Digital Endpoint
NOTE: This is the default configuration. Your buttons may have been programmed dif-
ferently. If you are uncertain about the configuration, ask your system administrator.
SPKR MSG
MUTE FWD
∞
CALL 1
CALL 2
CALL 3
CALL 4
IC
DND
CNF
ANSWER
OUTGOING
HOLD
SYS SPDL REDIAL
TRANSFER
123
45 6
789
0
#
DEF
PRS TUV WXY
ABC
MNO
JKL
GHI
*
OPER
FEATURE
BUTTONS
HEARING AID-COMPATIBLE
(HAC) HANDSET
INTERNAL
SPEAKER
FEATURE
BUTTONS
SPECIAL
BUTTON
HANDSFREE
MICROPHONE
RING AND VOICE
VOLUME CONTROL
(underneath edge)
12-BUTTON
DIALPAD

5
Inter-Tel
®
Standard/Basic Endpoint User Guide
FINDING YOUR WAY
Feature Button Functions
The feature buttons are designed to automate some of the commonly-used functions,
such as dialing an outside number. Each of these is described in the table below.
In addition to the buttons identified in the preceding table, your endpoint has a Spe-
cial button ( ). Depending on how your telephone system is configured, you
may need to press this button before you dial a feature code.
NOTE: Because the telephone system allows customized feature buttons, your end-
point may have been reprogrammed so that the feature buttons do not match those
described in this guide.
BUTTON IF YOU... YOU CAN... PG.
Press Answer a call. 20
Press and dial the number Place an outgoing call. 19
CALL or
LINE
Press an unlit button or the flashing button Select an outside line or answer a call. 19, 20
Press Access an intercom call. 17
Press unlit or lit Enable/disable Do-Not-Disturb mode. 40
Press
and dial the numbers you
would like to add to the conference
Place a conference call. 22
Press Put a call on hold. 21
Press and dial the destination
number
Transfer a call. 23
Press View or access System Speed-Dial num-
bers.
56
Press Redial a telephone number or save the
last number.
26
Press
and hang up Put a call on the speaker. 29
Press Leave or listen to a message. 31
Press Mute the microphone. 29
Press
and dial destination num-
ber
Forward calls to the specified number. 25
Press the high or low end of the volume
button
Adjust volume during a call. 44
ANSWER
ANSWER
OUTGOING OUTGOING
IC
IC
DND
DND
CNF
CNF
HOLD
HOLD
TRANSFER
TRANSFER
SYS SPD
SYS SPD
REDIAL
REDIAL
SPKR
SPKR
MSG
MSG
MUTE
MUTE
FWD
FWD
∞

6
Inter-Tel
®
Standard/Basic Endpoint User Guide
FINDING YOUR WAY
Display
Your Standard display endpoint has two lines of display with 16 characters per line.
When your endpoint is idle, this display shows your extension number, your user-
name, the time of day, and the date. At other times, it may display reminder messages,
Do-Not-Disturb (DND) messages, numbers dialed, call sources, elapsed time of calls,
current call costs, error messages, etc.
Because the display can only support 16 characters, you may see a few abbreviations.
The most commonly used abbreviations are provided in the table below.
NOTE: The Basic digital endpoint does not have a display.
ABBREVIATION WORD/PHRASE
ACCT CODE Account Code
CNF Conference
DEST Destination
DIR Directory
DND Do-Not-Disturb
EXT Extension
MSG Message
RCL Recall
SPKR Speaker
SPKRPHN Speakerphone
STN SPD Station Speed Dial
SYS SPD System Speed Dial
TFR Transfer
TG Trunk Group (a group of outside lines)
TRNK Trunk (an outside line)

7
Inter-Tel
®
Standard/Basic Endpoint User Guide
FINDING YOUR WAY
DSS/BLF
Generally, the Direct Station Selection/Busy Lamp Field (DSS/BLF) unit is used by
individuals that handle a high volume of incoming calls, such as receptionists. The
DSS/BLF provides one-button access to up to several extension numbers or a pro-
grammable feature. For more information about programming and using the DSS,
refer to the current Administrator’s Guide.
The DSS/BLF lamps indicate the status of the extension or feature assigned to the
button. These indications are shown in the table below.
ABOUT VOICE MAIL
Voice mail is an application that is part of the Inter-Tel voice processing system.
Using voice mail, you and other callers can send and receive recorded messages from
any supported endpoint on the system. To use voice mail features, each user (or sub-
scriber) is assigned a mailbox, which usually corresponds to the extension number
assigned to your endpoint. You can, however, have an unassociated mailbox that does
not correspond to an extension. (Unassociated mailboxes are typically used for agents
or other personnel who don’t have a permanent office.)
With your mailbox, you can use personal or system greetings to let callers know if
you are out of town, on a call, etc. If a caller reaches your mailbox, they can leave a
message, hang up, or access an attendant. In addition, if your voice mail administrator
sets up one or more “group lists” of mailboxes, you can send a message to a group of
people by entering one number instead of everyone’s individual mailbox number.
If the lamp is... Then...
Solidly lit The associated extension is busy, or the associated feature is enabled.
Flashing slowly The extension is in Do-Not-Disturb.
Flashing rapidly The extension has a call ringing in.
Fluttering continuously The extension is causing a STATION OFF-HOOK system alarm.

8
Inter-Tel
®
Standard/Basic Endpoint User Guide
FINDING YOUR WAY
Inter-Tel voice mail systems support the following types of mailboxes:
• Advanced Mailbox: If E-Mail Reader is enabled for your mailbox, you have
access to voice mail, e-mail, and fax messages in your mailbox. You can also cus-
tomize your personal mailbox options, and access advanced messaging features.
See page 75 for information and instructions about using E-Mail Reader features.
For a voice mail flowchart for advanced mailbox users, see page 87.
• Standard Voice Mailbox: This type of mailbox allows you to send and receive
voice mail messages, record personal greetings, and allows you to customize per-
sonal mailbox options. A standard voice mailbox does not allow you to access e-
mail and fax messages. For a voice mail flowchart for standard mailbox users,
see page 105.
NOTE: If you have the Enterprise
®
Messaging (EM) voice mail system, you also have
access to advanced communication and messaging features such as E-Mail Reader
and Automatic Speech Recognition (ARS). For more information about EM, see page 9.
The instructions for many voice mail tasks are identical for standard voice mailbox
and advanced mailbox users. The instructions for the following common mailbox
tasks are included in the Getting Started and Moving On sections of this guide:
• Initializing your mailbox (see page 14)
• Recording your personal greetings (see page 15)
• Recording your voice mail directory name (see page 16)
• Accessing your mailbox (see page 32)
• Disabling and enabling ASR (see page 33)
• Accessing voice mail messages (see page 34)
• Recording and sending voice mail messages (see page 37)
• Canceling unheard voice mail messages (see page 39)
• Changing your mailbox password (see page 47)
• Changing the call screening transfer method (see page 49)
• Programming a fax destination (see page 50)
• Changing the message search order (see page 51)
• Programming remote messaging (see page 52)
• Screening calls (see page 62)
• Using the voice mail directory (see page 67)
/