Olivetti LINEA office Owner's manual

Category
Multifunctionals
Type
Owner's manual
USER GUIDE
LINEA
Edited/Published/Produced by:
Olivetti S.p.A.
Gruppo Telecom Italia
Via Jervis, 77
Ivrea (TO)
Italy
www.olivetti.com
Copyright © Olivetti, 2007
All rights reserved
Code:535315 gb
Date of publication: May 2007
Trademarks:
Microsoft and Windows are registered
trademarks of Microsoft Corporation.
Other trademarks and trade names may be used in this
document to refer to either the entities claiming the
marks and names or their products. Olivetti disclaims any
proprietary interest in trademarks and trade names other
than its own.
Contents iii
CONTENTS
1 GETTING STARTED . . . . . . . . . . . . . . . . . . . . . . . . . . . . . . . . . . 1
OVERVIEW . . . . . . . . . . . . . . . . . . . . . . . . . . . . . . . . . . . . . . . . . . . . . . . .2
SAFETY INSTRUCTIONS . . . . . . . . . . . . . . . . . . . . . . . . . . . . . . . . . . . . . . .2
INFORMATION ON PRINT QUALITY AND THE WARRANTY . . . . . . . . . . . . . 2
LOCATING THE PRINTER COMPONENTS . . . . . . . . . . . . . . . . . . . . . . . . . .3
PRINTER KEYBOARD . . . . . . . . . . . . . . . . . . . . . . . . . . . . . . . . . . . . . . . . . 5
Key Functions . . . . . . . . . . . . . . . . . . . . . . . . . . . . . . . . . . . . . . . . . . .5
LEDS ON THE PRINTER FRONT PANEL . . . . . . . . . . . . . . . . . . . . . . . . . . . .7
PRINTER POWER SUPPLY . . . . . . . . . . . . . . . . . . . . . . . . . . . . . . . . . . . . . . 7
SWITCHING THE PRINTER ON AND OFF . . . . . . . . . . . . . . . . . . . . . . . . . . .8
Printer Economy Mode . . . . . . . . . . . . . . . . . . . . . . . . . . . . . . . . . . . .8
LOADING PAPER ONTO THE AUTOMATIC SHEET FEEDER . . . . . . . . . . . . . 8
Loading Different Types of Paper . . . . . . . . . . . . . . . . . . . . . . . . . . . .9
LOADING DOCUMENTS ONTO THE AUTOMATIC DOCUMENT FEEDER . . 10
CONNECTING A DIGITAL CAMERA TO THE PRINTER . . . . . . . . . . . . . . . . 10
CONNECTING THE PRINTER TO THE TELEPHONE NETWORK . . . . . . . . . .11
Connecting to the Telephone Network and Connecting
an External Telephone . . . . . . . . . . . . . . . . . . . . . . . . . . . . . . . . 11
INSTALLING THE FAX . . . . . . . . . . . . . . . . . . . . . . . . . . . . . . . . . . . . . . . 13
Installation Procedure . . . . . . . . . . . . . . . . . . . . . . . . . . . . . . . . . . . . 13
SETTING FAX DATE AND TIME . . . . . . . . . . . . . . . . . . . . . . . . . . . . . . . . .14
2 USING THE PRINTER WITHOUT A COMPUTER . . . . . . . . . . . 15
COPYING A DOCUMENT . . . . . . . . . . . . . . . . . . . . . . . . . . . . . . . . . . . . 16
PRINTING PHOTOS FROM A DIGITAL CAMERA . . . . . . . . . . . . . . . . . . . . 16
PRINTING PHOTOS FROM A PICTBRIDGE DIGITAL CAMERA . . . . . . . . . .17
PRINTING PHOTOS FROM A DPOF DIGITAL CAMERA . . . . . . . . . . . . . . . 17
FAX MANAGEMENT MENU . . . . . . . . . . . . . . . . . . . . . . . . . . . . . . . . . . .17
Reception . . . . . . . . . . . . . . . . . . . . . . . . . . . . . . . . . . . . . . . . . . . . . 17
Installation . . . . . . . . . . . . . . . . . . . . . . . . . . . . . . . . . . . . . . . . . . . . 18
Print Report . . . . . . . . . . . . . . . . . . . . . . . . . . . . . . . . . . . . . . . . . . . 18
Service . . . . . . . . . . . . . . . . . . . . . . . . . . . . . . . . . . . . . . . . . . . . . . . 18
Contentsiv
CONFIGURING THE PRINTER TO RECEIVE FAXES . . . . . . . . . . . . . . . . . . . 18
Setting Reception Mode . . . . . . . . . . . . . . . . . . . . . . . . . . . . . . . . . . 18
SENDING A FAX . . . . . . . . . . . . . . . . . . . . . . . . . . . . . . . . . . . . . . . . . . . 19
Sending a Fax From the Keyboard . . . . . . . . . . . . . . . . . . . . . . . . . . 19
Sending a Fax Using the Automatic Document Feeder . . . . . . . . . . . 19
PRINTING FAX REPORTS . . . . . . . . . . . . . . . . . . . . . . . . . . . . . . . . . . . . . 20
Fax Report for Power Failure . . . . . . . . . . . . . . . . . . . . . . . . . . . . . . 20
MODIFYING FAX SETTINGS: RESOLUTION AND CONTRAST . . . . . . . . . . . 20
MODIFYING RING TYPE ON RESPONSE (RING DISTINCTION) . . . . . . . . . . 20
USING THE PHONE BOOK . . . . . . . . . . . . . . . . . . . . . . . . . . . . . . . . . . . . 20
3 USING THE PRINTER WITH A COMPUTER . . . . . . . . . . . . . . .21
BEFORE YOU BEGIN . . . . . . . . . . . . . . . . . . . . . . . . . . . . . . . . . . . . . . . . 22
THE PRINTER STATUS MONITOR . . . . . . . . . . . . . . . . . . . . . . . . . . . . . . . 22
THE TOOLBOX . . . . . . . . . . . . . . . . . . . . . . . . . . . . . . . . . . . . . . . . . . . . 23
PRINTING, COPYING AND SCANNING FROM THE TOOLBOX . . . . . . . . . . 23
PRINTING FROM AN APPLICATION . . . . . . . . . . . . . . . . . . . . . . . . . . . . . 25
Setting Print Preferences from the Computer . . . . . . . . . . . . . . . . . . 26
SCANNING A DOCUMENT FROM AN APPLICATION . . . . . . . . . . . . . . . . 26
PRINTING PHOTOS . . . . . . . . . . . . . . . . . . . . . . . . . . . . . . . . . . . . . . . . . 27
FAX SETUP FROM THE TOOLBOX APPLICATION . . . . . . . . . . . . . . . . . . . 27
Fax Settings . . . . . . . . . . . . . . . . . . . . . . . . . . . . . . . . . . . . . . . . . . . 27
Installation . . . . . . . . . . . . . . . . . . . . . . . . . . . . . . . . . . . . . . . . . . . . 27
Service . . . . . . . . . . . . . . . . . . . . . . . . . . . . . . . . . . . . . . . . . . . . . . . 29
SENDING A FAX USING THE COMPUTER . . . . . . . . . . . . . . . . . . . . . . . . . 29
Sending a Fax From the Scanner Glass Using the
Toolbox Application . . . . . . . . . . . . . . . . . . . . . . . . . . . . . . . . . . 29
Sending a Fax From the Toolbox Application Using the
Automatic Document Feeder . . . . . . . . . . . . . . . . . . . . . . . . . . . 30
Sending a Fax from a File . . . . . . . . . . . . . . . . . . . . . . . . . . . . . . . . . 32
4 INK CARTRIDGES . . . . . . . . . . . . . . . . . . . . . . . . . . . . . . . . . .33
CHECKING INK LEVELS . . . . . . . . . . . . . . . . . . . . . . . . . . . . . . . . . . . . . . 34
Information Required for Purchasing new Ink Cartridges . . . . . . . . . 34
REPLACING THE INK CARTRIDGES . . . . . . . . . . . . . . . . . . . . . . . . . . . . . 35
ALIGNING THE INK CARTRIDGES . . . . . . . . . . . . . . . . . . . . . . . . . . . . . . 36
Aligning the Ink Cartridges from the Toolbox Application . . . . . . . . . 36
MANAGING INK CARTRIDGES IN FAX MODE . . . . . . . . . . . . . . . . . . . . . 37
USING THE PHOTO INK CARTRIDGE . . . . . . . . . . . . . . . . . . . . . . . . . . . . 37
Contents v
5 MAINTENANCE AND TROUBLESHOOTING . . . . . . . . . . . . . . 39
CLEANING THE PRINTER . . . . . . . . . . . . . . . . . . . . . . . . . . . . . . . . . . . . . 40
CLEANING THE INK CARTRIDGE NOZZLES . . . . . . . . . . . . . . . . . . . . . . . . 40
TROUBLESHOOTING . . . . . . . . . . . . . . . . . . . . . . . . . . . . . . . . . . . . . . . . 40
Problems When Installing the Printer . . . . . . . . . . . . . . . . . . . . . . . . 40
Problems Switching on the Printer . . . . . . . . . . . . . . . . . . . . . . . . . . 41
Printing, Copying and Scanning Problems . . . . . . . . . . . . . . . . . . . . . 42
FAX ERROR MESSAGES . . . . . . . . . . . . . . . . . . . . . . . . . . . . . . . . . . . . . .43
Messages During Transmission . . . . . . . . . . . . . . . . . . . . . . . . . . . . . 43
Messages During Reception . . . . . . . . . . . . . . . . . . . . . . . . . . . . . . . 43
General Messages . . . . . . . . . . . . . . . . . . . . . . . . . . . . . . . . . . . . . . 43
ERROR CODES PRINTED ON THE FAX REPORT . . . . . . . . . . . . . . . . . . . . . 44
Transmission Report Error Codes . . . . . . . . . . . . . . . . . . . . . . . . . . . 44
Activity Report Error Codes . . . . . . . . . . . . . . . . . . . . . . . . . . . . . . . 44
CLEARING PAPER JAMS . . . . . . . . . . . . . . . . . . . . . . . . . . . . . . . . . . . . . 45
6 TECHNICAL SPECIFICATIONS . . . . . . . . . . . . . . . . . . . . . . . . . 47
GENERAL SPECIFICATIONS . . . . . . . . . . . . . . . . . . . . . . . . . . . . . . . . . . .48
PRINTER SPECIFICATIONS . . . . . . . . . . . . . . . . . . . . . . . . . . . . . . . . . . . .49
COPIER SPECIFICATIONS . . . . . . . . . . . . . . . . . . . . . . . . . . . . . . . . . . . . .50
SCANNER SPECIFICATIONS . . . . . . . . . . . . . . . . . . . . . . . . . . . . . . . . . . .50
FAX SYSTEM SPECIFICATIONS . . . . . . . . . . . . . . . . . . . . . . . . . . . . . . . . .50
PAPER SPECIFICATIONS . . . . . . . . . . . . . . . . . . . . . . . . . . . . . . . . . . . . . .52
Paper Types Supported . . . . . . . . . . . . . . . . . . . . . . . . . . . . . . . . . . . 52
Paper Formats and Sizes Supported . . . . . . . . . . . . . . . . . . . . . . . . . 53
Contentsvi
All information included herein is subject to change without notice. Olivetti S.p.A. is not responsible for any loss or
damages, direct or indirect, arising from or related to the use of this operation manual.
MIPC (Mobile Imaging and Printing Consortium)
The MIPC is a non-profit industry association founded in 2004 by leading companies in home photo printing and the
mobile phone industry. Its mission is to promote and support the development of interoperability guidelines enabling
printing of images and other content between mobile phones and home printers. The guidelines are promoted for use
internationally to ensure a broad spectrum of products and services for mobile phone consumers.
www.mobileprinting.org.
LINEA office: This Mobile Printing Ready product is designed to provide easy printing from mobile phones. This
product follows Mobile Imaging and Printing Consortium (MIPC) Implementation Guidelines for Home Printing with
Mobile Terminals, Version 2.1, for PictBridge.
Getting Started 1
1GETTING STARTED
OVERVIEW
SAFETY INSTRUCTIONS
INFORMATION ON PRINT QUALITY AND THE WARRANTY
LOCATING THE PRINTER COMPONENTS
PRINTER KEYBOARD
LEDS ON THE PRINTER FRONT PANEL
PRINTER POWER SUPPLY
SWITCHING THE PRINTER ON AND OFF
LOADING PAPER ONTO THE AUTOMATIC SHEET FEEDER
LOADING DOCUMENTS ONTO THE AUTOMATIC DOCUMENT FEEDER
CONNECTING A DIGITAL CAMERA TO THE PRINTER
CONNECTING THE PRINTER TO THE TELEPHONE NETWORK
INSTALLING THE FAX
SETTING FAX DATE AND TIME
Getting Started2
OVERVIEW
This multifunction product provides the integrated functions of a high quality ink-jet printer and of a colour scanner,
photocopier and fax. Copying and faxing multiple page documents is made simple by the automatic document feeder.
For normal printing and copying operations, a colour ink cartridge can be used with a black ink cartridge. For printing
photos, it is recommended that you replace the black cartridge with a photo ink cartridge (sold separately). All
cartridges are also available in a High Capacity version.
The printer can be used without a computer for faxing documents and making copies; you can also print photos by
simply connecting a digital camera to the USB interface on the front panel.
The Installation CD supplied with the printer provides the software for connection with a computer, and an application
called the Toolbox which provides rapid access to all the printer features.
A second CD provides the software for manipulating text and images.
Complete information can also be found in electronic format by selecting Start > Programs or All programs >
Olivetti, which you can browse or print.
Online Help is available for each software screen by just selecting Help.
SAFETY INSTRUCTIONS
Read and follow attentively the following safety instructions:
Use exclusively the CWT model PAA060P power supply unit and the power cable supplied with the product. If a
different power supply unit is used to that provided in the package, it is the sole responsibility of the user to guarantee
its conformity with current safety standards, and that it meets the correct power supply requirements of the product.
Connect the power supply cable to a grounded electrical outlet that is near the product, and easily accessible.
Install the printer on a flat, stable surface, in a location where no one can step on or trip over the power cable.
Do not use the printer near water, or with wet hands.
Do not expose the printer to rain or moisture.
Do not attempt to disassemble the printer.
Observe all warnings and instruction markings on the printer.
Read and understand all the documentation supplied with the printer.
INFORMATION ON PRINT QUALITY AND THE WARRANTY
To guarantee correct operation of the printer and top quality printing, use only original Olivetti ink cartridges.
Olivetti declines any responsibility whatsoever for damage to the printer caused by the tampering with, or refilling, ink
cartridges. Such conduct also renders the Warranty void.
Getting Started 3
LOCATING THE PRINTER COMPONENTS
Getting Started4
Reference Part Description
1 Paper guide Guides the paper as it is fed into the printer.
2 Automatic sheet feeder Automatically feeds the paper into the printer for printing.
3 Automatic document
feeder
Automatically feeds the original document to be printed, scanned or
faxed.
4 Document tray Collects the original documents after use by the automatic document
feeder.
5 Scanner glass cover Protects the scanner glass. Comprises the automatic document feeder.
6 Paper output tray An extendible tray that collects the printed paper as it is output from
the printer.
7 Keyboard Provides the keys to switch the printer on and off, and for all the
selection and send operations.
8 PictBridge/DPOF
compatible USB interface
Allows the USB cable of a compatible digital camera or external
memory devices to be connected.
9 Scanner glass Surface on which documents are placed for scanning or copying.
10 High-speed USB
interface
Allows connection of the USB cable (not supplied) so the printer can be
used with a computer.
11 Power connector Printer power supply connector. Connect the plug of the external
power supply unit to the printer. See "LEDS on the Printer Front Panel".
12 External power supply
unit
Supplies the printer with electrical current. Connect the power cable to
the electrical outlet.
13 RJ11 Connector Telephone signal input line (LINE IN).
14 RJ11 Connector Telephone signal output line (LINE EXT), to connect a telephone or an
answering device.
15 Ink cartridge carrier Holds two ink cartridges. The colour cartridge is inserted on the right,
the black cartridge (or photo cartridge, sold separately) is inserted on
the left.
For replacing the cartridges, see "Replacing the Ink Cartridges".
To access the carrier, with both hands raise the upper part of the
printer. The support lever automatically blocks the upper part of the
printer in the open position.
16 Storage/protection
garage for black and
photo ink cartridges
Stores and protects the black or photo cartridge when not being used.
Getting Started 5
PRINTER KEYBOARD
The keyboard provides selection and start keys for all the functions available: copy, fax and print from digital camera or
compatible memory device connected to the printer. Under normal operating conditions, the keyboard should be left
open. To open the keyboard, press on the shiny area at the top right of the door.
Key Functions
Reference Part Description
1 On/Off key Switch the printer on and off.
If there is a fax in memory that has been received but not yet printed
(yellow light on), switching off the printer is disabled.
Note: Switching off the printer results in the loss of date and time
settings, it is therefore recommended that you do NOT carry out
this operation which has been replaced by automatic energy saving
mode. If, nevertheless, you want to switch the printer off, press
the On/Off key for 5 seconds.
2 Display Indicates the fax status, and displays the menu and phone book.
3 Alphanumeric
keypad
You can enter the telephone number or the initial of the name you want to
find in the phone book.
4 * key Provides access the special functions provided by the telephone company.
Also allows you to change from “Pulse dialling” to “Tone dialling”.
5 # key Provides access to the special functions provided by the telephone
company.
Getting Started6
6 Phone book The first number displayed is the last number called. The name search can
be effected using the Navigator, or by entering the initial of the name you
want to find.
Entries can be made to the phone book only from the computer.
7 Menu Provides access to all the fax functions.
You can browse using the Navigator, confirm your selections using the
Confirm key, or cancel selections using the Cancel key.
8 Confirm Select and confirm the options shown on the display.
9 Navigator Browse menu items on the display or entries in the phone book.
10 Fax quality Modify the resolution to be used when sending faxes.
11 Copy counter Displays the number of copies setting.
The number displayed decreases as each copy is printed.
12 Select number of
copies
Set the number of copies to be made using the plus (+) and minus (-) keys.
The number selected is displayed on the Copy counter.
13 Cancel Cancel a job immediately. Restore settings to their factory values.
14 Select print quality Select the print and copy quality.
Photo quality is recommended for copying images, or when printing on
special ink-jet paper.
15 Copy contrast Lighten or darken the copy.
16 Start B/W copy Start copying in B/W. Press and keep held down to activate the
"Fit to page" functionality. This functionality is not available when
documents are loaded onto the automatic document feeder.
17 Start colour copy Start copying in colour. Press and keep held down to activate the
"Fit to page" functionality. This functionality is not available when
documents are loaded onto the automatic document feeder.
18 Start scanning Enabled when the printer is connected to a computer.
Press to scan the document on the scanner glass or loaded onto the
automatic document feeder.
A Toolbox application window is displayed on the computer allowing you
to scan the image directly into an application of your choice, and to
customise scan settings.
19 Start B/W fax Start receiving or sending a black and white fax.
20 Start colour fax Start receiving or sending a colour fax.
21 Start printing Enabled when a digital camera or a compatible memory device is
connected to the printer.
This key flashes when printing is in progress.
Reference Part Description
Getting Started 7
LEDS ON THE PRINTER FRONT PANEL
Open out the keyboard to access the compartment where the LEDs can be seen.
PRINTER POWER SUPPLY
The printer is powered from the mains using the external AC power supply unit provided.
Proceed as follows to connect the power supply unit to the electrical outlet:
1 Insert the plug of the external AC power supply unit cable into the printer socket.
2 Insert one end of the power cable into the power supply unit and the other end into the electrical outlet.
Reference Indicator Description
1 USB status A green light indicates that a digital camera or compatible memory
device is connected. A flashing light indicates that data is being
transferred to the printer.
2 Fax present
in memory
A fax is present in memory (i.e. was not printed when it was
received).
The printer cannot be switched off without correcting the reason for
the error, and printing the faxes present in memory.
A fax transmission or reception error has occurred.
3 Paper error Indicates:
Paper jam.
No paper in feeder.
4 Out-of-ink The LEDs flash when the black, photo or colour cartridges are nearly out
of ink. A steady orange light indicates that the ink has run out.
Getting Started8
SWITCHING THE PRINTER ON AND OFF
Press the On/Off key.
When the keyboard is closed, the two LEDs indicate if the printer is switched on and if any operating errors have
occurred.
Printer Economy Mode
After a time interval that can be modified from the Toolbox, the printer enters energy saving mode and the keyboard is
disabled.
The printer re-activates on receiving any signal from the computer or the keyboard.
Note: Switching off the printer is not recommended as it results in the loss of the date and time.
LOADING PAPER ONTO THE AUTOMATIC SHEET FEEDER
1 Raise the automatic sheet feeder into its upright position, then press the paper width guide and slide it to its
outermost position.
2 Load the paper vertically (portrait orientation), with the side to print on facing the front of the printer, and
positioned against the right-side guide.
Note: The feeder capacity is 100 sheets of 80 g/m
2
plain paper.
3 Press the left paper guide and slide it up against the left edge of the paper.
Reference Indicator
Description
1 On/Off LED A green light indicates that the printer is switched on.
2 Error LED An orange light indicates that errors are signalled by the LEDs on the
printer front panel.
Getting Started 9
Loading Different Types of Paper
To load: Proceed as follows:
Plain paper, coated paper,
photo paper, greeting
cards, index cards or post
cards, envelopes, ink-jet
labels.
Load the media vertically, against the right side of the automatic sheet feeder, and
with the print side facing up.
Pressing the paper guide, slide it up against the left edge of the paper.
Note: Load letterhead paper with the top of the letterhead entering the printer first,
facing up.
Transparencies Transparencies that can be used must have a white backing paper, or a removable
white stripe on the leading edge to be inserted first into the printer.
Note: Transparencies must be inserted into the printer without removing the
protection as indicated in the suppliers instructions.
Banner paper Remove all paper from the feeder.
Insert the leading edge of the banner paper vertically into the printer,
against the
right side of the automatic sheet feeder
, and with the print side facing up
.
Note: Do not use perforated fan-fold banner paper.
Press the paper guide and slide it up against the left edge of the banner paper.
Iron-on transfers Read the instructions supplied with the transfers.
Load the sheets vertically against the right side of the automatic sheet feeder and
with the side to be printed facing towards the front of the machine.
Press the paper guide and slide it up against the left edge of the transfer.
Getting Started10
LOADING DOCUMENTS ONTO THE AUTOMATIC DOCUMENT FEEDER
The automatic document feeder for copying or faxing documents can contain a maximum of 35 sheets of 80 g/m
2
plain
paper.
The document sizes supported are: A4, Legal, Letter and A5.
Note: Do not insert postcards, photos, small items or light materials (such as newspaper cuttings). For these types of
materials, use the scanner and the computer.
1 The original document must be inserted with the printed side to be copied facing upwards.
2 Adjust the paper width guide of the automatic document feeder and make sure that it is positioned against the
edge of the paper.
CONNECTING A DIGITAL CAMERA TO THE PRINTER
11 Switch on the digital camera. For more information, read the digital camera’s User Guide.
2 With the printer switched on, connect one end of the USB cable to the USB connector of the digital camera, and
the other end to the USB connector on the printer front panel. The connection LEDs and the Start printing key
icon illuminate.
Note: If you are connecting a PictBridge digital camera, the Start printing key icon does not illuminate because
printing is controlled directly from the digital camera.
The green USB status LED illuminates to indicate that a correct connection has been established.
If the connection is not established, make sure you have connected a compatible device.
Getting Started 11
CONNECTING THE PRINTER TO THE TELEPHONE NETWORK
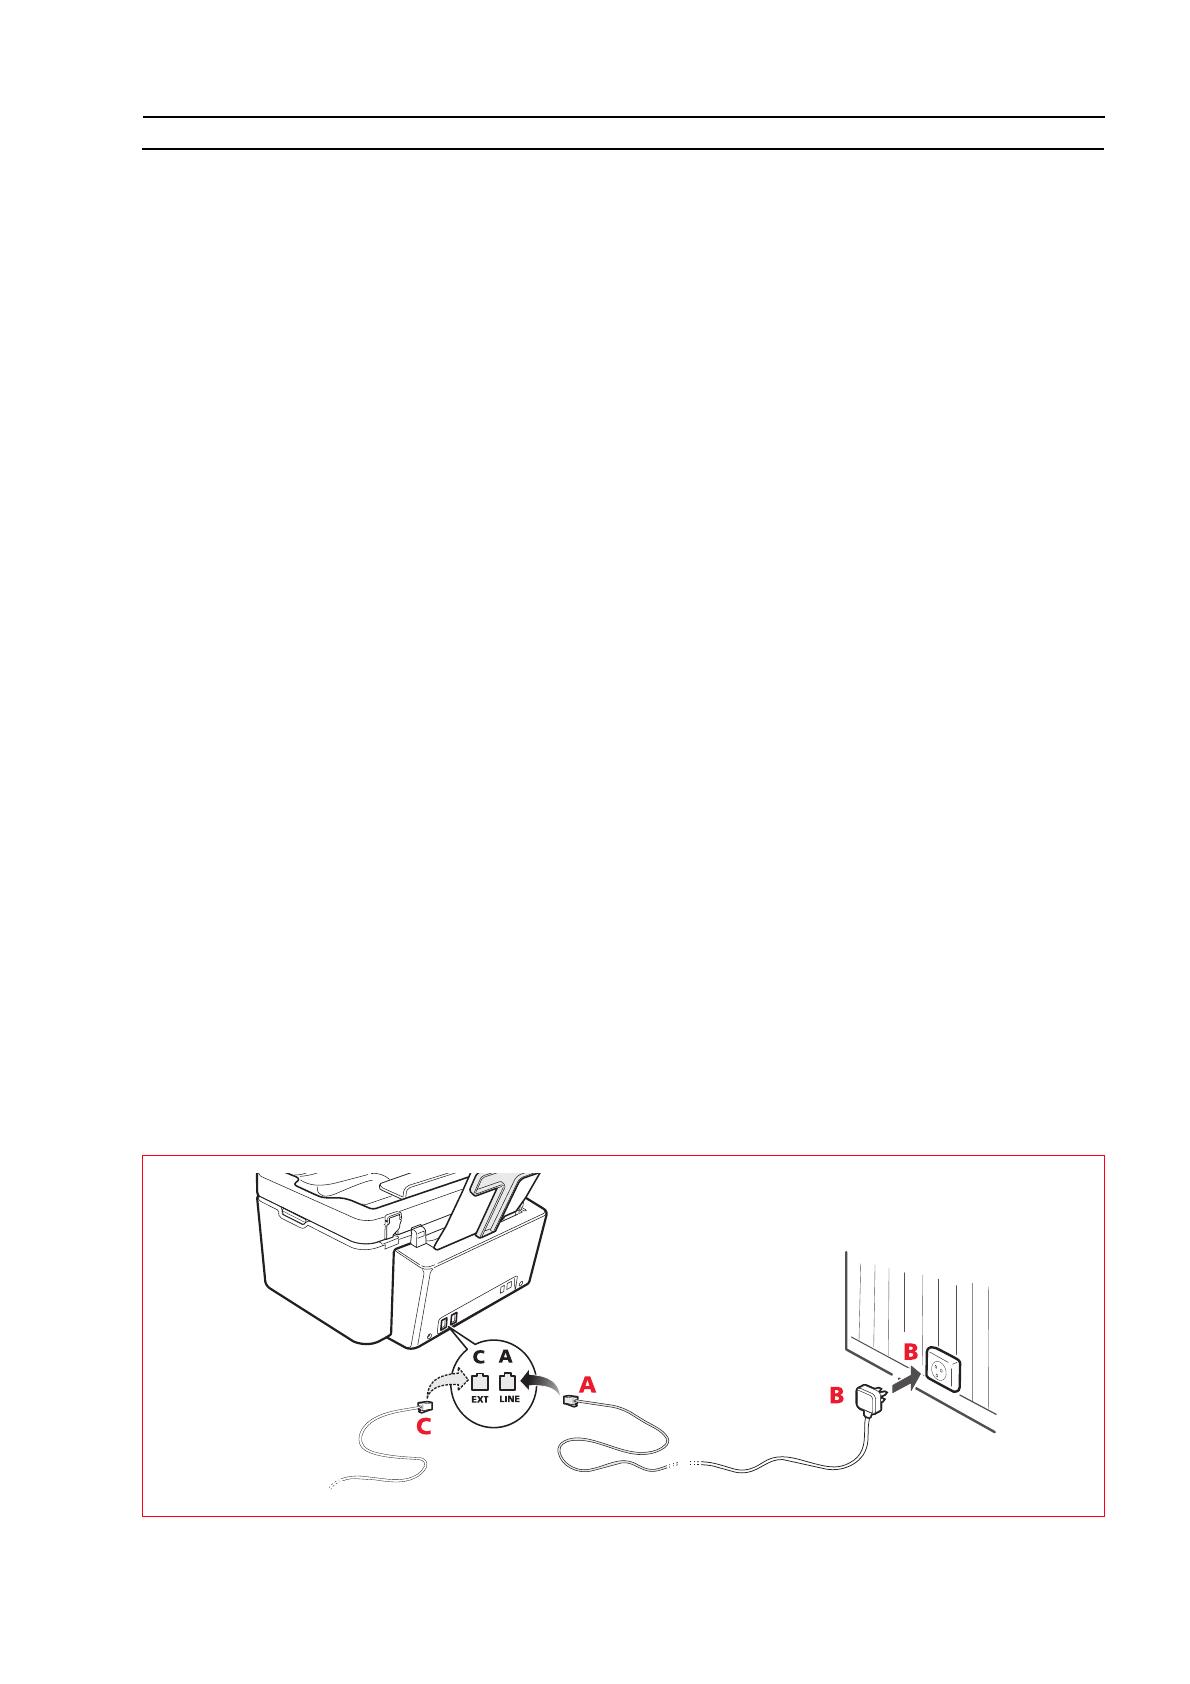
Two RJ11 connectors are present on the back of the printer:LINE” (on the right) and "EXT" (on the left). Using the
telephone cable provided, connect the telephone line to the "LINE" socket.
You can connect an external telephone or an answering device to the "EXT" socket.
If the socket is protected by a cover, remove it.
A telephone connected in a cascade can be used to make and reply to calls, and to send a START signal to receive a fax
(the default DTMF code * * can be customised by selecting Toolbox > Settings > Fax settings > Installation >
Configuration ).
In this case, the keyboard display indicates that an additional telephone is connected.
Connecting to the Telephone Network and Connecting an External Telephone
As connecting an additional telephone or other device to the fax telephone line is subject to national regulations, which
vary from country to country, the illustrations on the next pages show connection examples.
If, in the destination country, connection to the telephone line differs from those shown in the examples, refer to the
regulations in force in the destination country.
The fax is set up to be connected to the
public telephone line
. To connect it to a private line and use it also on a
public line, refer to the section “Installing the Fax”.
In the case of a
multiple-socket telephone system
, additional telephone devices can be connected to any of the
sockets available provided that the system is of the type with
multiple sockets in parallel
. In this case, the dial tone is
always present when the handsets of the existing telephone devices are lifted simultaneously.
If the dial tone is not present when the hand-sets of the pre-existing telephone devices are lifted simultaneously, this
means that the telephone system is of the type with
multiple sockets in series.
In this case, the additional telephone
devices must be connected directly to the printer as already explained above.
If this is not possible, connect the printer to the socket with the highest priority.
Each country uses a specific type of telephone plug. The most frequently-used connections are illustrated below.
Connection Case 1 (Italy and Switzerland)
Insert the connector of the additional telephone or other device (see the related illustration) into the "EXT" socket. If it
is not possible to connect the additional telephone directly to the "EXT" socket, use the specific adapter supplied with
the additional telephone.
A = telephone line input (LINE IN)
B = wall socket for telephone plug
C = external telephone with or without adapter, telephone answering device (EXT)
D = socket for external telephone, telephone answering device or other unit.
Connection Case 1 Italy
Getting Started12
Connection Case 1 Switzerland
Connection Case 2
Insert the connector or plug of the additional device into the socket (see the related illustration).
A = telephone line input (LINE IN)
B = wall socket for telephone plug
C = external telephone, with or without adapter, telephone answering device (EXT)
D = socket for external telephone, telephone answering device or other unit.
Connection Case 3
Insert the plug of the additional unit into the wall socket of the telephone line (see the related illustration).
Using the specific adapter (as for the first type of connection), you can connect another device to the printer "EXT"
socket for connection to the telephone line.
A = telephone line input (LINE IN)
B = wall socket for telephone plug
C = external telephone, with or without adapter, telephone answering device (EXT)
D = socket for external telephone, telephone answering device or other unit.
Getting Started 13
INSTALLING THE FAX
After having connected the telephone cable and the power supply cable, press the On/Off key to switch on the printer.
The printer executes a series of autodiagnostic tests displaying, at the end, a message indicating that the printer is ready
for use as a fax.
Installation Procedure
1 When switched on, the display shows the languages available in sequence, each uniquely identified by a 2-digit
code "nn".
Enter the keys relative to the number "nn" corresponding to the language you want to set.
2 Confirm your selection by pressing the key. Alternatively, press the key to return to step 1.
3 The possible choices for the destination country are shown on the display.
Each country is uniquely identified by a 2-digit code "nn".
Enter the keys relative to the number "nn" corresponding to the destination country you want to set.
4 Confirm your selection by pressing the key. Alternatively, press the key to return to step 3.
5 Installation is terminated.
6 To enter the date and time, press the Menu key followed by the Confirm key. The message "SET DATE/TIME"
appears on the display.
7 Enter the data using the alphanumeric keypad then press the Confirm key.
Note: The date and time can also be sent from the computer by selecting Toolbox > Settings > Fax settings.
Note: If there is a power failure, the date and time settings are lost. When the printer is next switched on, a
message is displayed prompting you for the date and time again.
Note: If you want to change the Destination country setting, press in sequence the keys C + * + *. The display
allows you to choose your language and Destination country. Enter the data and then switch off the printer.
When you switch the printer on again, you must enter the correct date and time.
Getting Started14
SETTING FAX DATE AND TIME
To set the date and time manually when you switch on the printer:
In stand-alone mode, press the
Menu
key. The message
"SET DATE/TIME"
is displayed.
Enter the date and time using the alphanumeric keypad and press
Confirm
again at the end.
You can also send the date and time from the computer by selecting
Toolbox
>
Settings
>
Fax settings
.
Country Selection Country Selection
Argentina
Australia
Austria
Belgium
Brazil
Chile
China
Colombia
Czech Republic
Denmark
Finland
France
Germany
Greece
Hong Kong
India
Israel
Italy
AMERICA LATINA
NZL/AUSTRIA
ÖSTERREICH
BELGIUM
BRASILE
AMERICA LATINA
CHINA
AMERICA LATINA
CZECH
DANMARK
FINLAND
FRANCE
DEUTSCHLAND
GREECE
SINGAPORE
INDIA
ISRAEL
ITALIA
Ireland
Luxembourg
Mexico
New Zealand
Norway
Netherlands
Portugal
Peru
Rest of the world
Spain
South Africa
Sweden
Switzerland
Turkey
UK
Uruguay
Venezuela
UK/IRLANDA
BELGIUM
AMERICA LATINA
NZL/AUSTRALIA
NORGE
HOLLAND
PORTUGAL
AMERICA LATINA
INTERNATIONAL
ESPAÑA
S. AFRICA
SVERIGE
SCHWEIZ
TURKEY
U.K. / IRELAND
AMERICA LATINA
AMERICA LATINA
  • Page 1 1
  • Page 2 2
  • Page 3 3
  • Page 4 4
  • Page 5 5
  • Page 6 6
  • Page 7 7
  • Page 8 8
  • Page 9 9
  • Page 10 10
  • Page 11 11
  • Page 12 12
  • Page 13 13
  • Page 14 14
  • Page 15 15
  • Page 16 16
  • Page 17 17
  • Page 18 18
  • Page 19 19
  • Page 20 20
  • Page 21 21
  • Page 22 22
  • Page 23 23
  • Page 24 24
  • Page 25 25
  • Page 26 26
  • Page 27 27
  • Page 28 28
  • Page 29 29
  • Page 30 30
  • Page 31 31
  • Page 32 32
  • Page 33 33
  • Page 34 34
  • Page 35 35
  • Page 36 36
  • Page 37 37
  • Page 38 38
  • Page 39 39
  • Page 40 40
  • Page 41 41
  • Page 42 42
  • Page 43 43
  • Page 44 44
  • Page 45 45
  • Page 46 46
  • Page 47 47
  • Page 48 48
  • Page 49 49
  • Page 50 50
  • Page 51 51
  • Page 52 52
  • Page 53 53
  • Page 54 54
  • Page 55 55
  • Page 56 56
  • Page 57 57
  • Page 58 58
  • Page 59 59
  • Page 60 60
  • Page 61 61

Olivetti LINEA office Owner's manual

Category
Multifunctionals
Type
Owner's manual

Ask a question and I''ll find the answer in the document

Finding information in a document is now easier with AI