Gigabyte T1132 Quick start guide
- Category
- Notebooks
- Type
- Quick start guide
This manual is also suitable for

Manual
Global Warranty Card
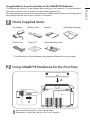
Congratulations on your purchase of the GIGABYTE Notebook.
This Manual will help you to get started with setting up your notebook. For more detailed
information, please visit our website at http://www.gigabyte.com.
All specications are subject to the manufacturer's conguration at the time of shippingand
may change without prior notice, written or otherwise.
Using GIGABYTE Notebook for the First Time
Check Supplied Items
1
2
AC Adapter
Power Cord
Battery Pack
Driver CD
Handy Bag (Optional)
* The illustrations in this document may appear different from your model.
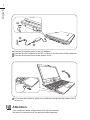
Insert the battery pack into the compartment.
Remember to slide the switch to the “Lock” position.
1
2
English
1
1
2

!
Lift up the rear panel to open your notebook and press the power button
to turn on.
1
Connect the power cord to the AC adapter.
Connect the AC adapter to the DC-in jack on the left side of the notebook.
Connect the power cord to the power outlet.
1
3
2
Your computer takes a few minutes for the rst startup.
No action is required until the setup window appears.
Attention
English
2
2
1
3

Left View
1
DC-in Jack
2
Ethernet Port
3
Docking Port
4
External Display (VGA) Port
5
eSATA\USB 2.0 Combo Port
6
Power Button
1
Web Camera
2
Microphone
3
LCD Display
4
Keyboard
5
Touchpad
6
Click Button
7
LED Indicators
8
Microphone Jack
9
Headphone Jack
Num. Lock Indicator
Caps Lock Indicator
3.5G Indicator
Bluetooth Status LED
Wireless LAN Status LED
HDD Status LED
Battery Status LED
Power Status LED
Your GIGABYTE Notebook Tour
3
Top View
English
3
1 2 3 4 5 6
1 2 3
4 5 6
8 9
7
7

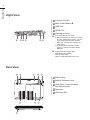
Right View
1
Function Key
2
Multi Card Reader
3
USB Port
4
HDMI Port
5
Kensington Lock
To activate the Function Key
a) During the off mode, press “Fn” button
to enter “Smart Setup” menu. You can
choose BIOS Setup Utility, System
Recovery, and other functions in this
setup menu.
b) In the Windows operation system,
press “Fn” button to initiate “Smart
Manager”.
Supports Secure Digital (SD),
Multi Media Card (MMC),
Memory Stick (MS),
Memory Stick PRO (MS PRO) card.
Base View
1
Battery Bay
2
Battery Release Latch
3
Hard Disk, Communication,
and Memory Bay
4
Speakers
5
SIM Card Slot
English
4
14 2 2 4
5
3 44
1 2 34 53

English
5
Hotkeys
The computer employs hotkeys or key combinations to access most of the computer’s
controls like screen brightness and volume output.
To activate hotkeys, press and hold the <Fn> key before pressing the other key in the
hotkey combination.
Hotkey Function Description
Fn+F1
Sleep Puts the computer in Sleep mode.
Fn+F2
Wireless LAN Enables/disables the Wireless LAN function.
Fn+F3
Brightness Down Decrease the screen brightness.
Fn+F4
Brightness Up Increases the screen brightness.
Fn+F5
Display Toggle
Switches display output between the display
screen, external monitor (if connected) and both.
Fn+F6
Touchpad Toggle Turns the internal touchpad on and off.
Fn+F7
Speaker Toggle Turns the speaker on and off.
Fn+F8
Volume Down Decreases the sound volume.
Fn+F9
Volume Up Increases the sound volume.
Fn+F10
3.5G
Enable/Disables the 3.5G function.
(3.5G module is optional)
Fn+F11
Bluetooth Enables/disables the Bluetooth function.
Fn+F12
Webcam Turns the internal webcam on and off.

English
6
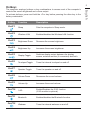
GIGABYTE Software Application
(The interface, icons and functions of the software listed below may vary based on the purchased models.)
4
● GIGABYTE Smart Manager
You can activate GIGABYTE Smart Manager by double clicking on the shortcut
icon on the desktop if the machine you purchased has the operation system built-
in. GIGABYTE Smart Manager is an icon-based control interface, enabling users to
intuitionally access common system setup as well as GIGABYTE exclusive utilities.
Please be noted that the GIGABYTE Smart Manager interface, icons, utilities
and software versions may vary based on the purchased models. Please operate
GIGABYTE Smart Manager according to the actual version built-in.
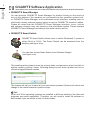
● GIGABYTE Smart Switch
bit
GIGABYTE Smart Switch allows users to switch Windows® 7 system to
either 64-bit or 32-bit. The Smart Switch can be accessed from the
desktop (see gure icon).
You can also access Smart Switch from Windows Gadget.
(see gure icon).
The handle position helps to show the current mode, and serves as a tool to switch to
another mode by pulling it down. Following dialog box will show up when the icon is
clicked to toggle between modes.
The system will ask you to save all your work before proceed. System will reboot and
change to the mode selected in previous step.
TIPS:
64-bit and 32-bit operating systems are installed in different partitions (the les and
programs are saved separately). Therefore, you will need to install the software in
both modes if you would like to use it in both modes.

English
7
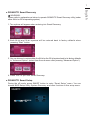
● GIGABYTE Smart Recovery
WARNING:
Please refer to explanation as below to operate GIGABYTE Smart Recovery utility (under
either 64-bit or 32-bit operating system).
1. Two options will appear when entering into Smart Recovery.
2. Both 64-bit and 32-bit systems will be restored back to factory defaults when
pressing “Start” button.
3. You can choose to restore either the 64-bit or the 32-bit system back to its factory defaults
in “Advanced Option” (select from the sub-menu after pressing “Advanced Option”).
4. Press “Exit” to quit from Smart Recovery.
● GIGABYTE Smart Setup
During the off mode, press SMART button to enter “Smart Setup” menu. You can
choose BIOS Setup Utility, System Recovery, and other functions in this setup menu.

English
8
Press”Continue to OS” button to enter operating system.
Press”BIOS Setup Utility” button to enter BIOS setup utility.
Press”System Recovery” button to enter GIGABYTE Xpress Recovery.
Press”Shutdown” button to shutdown the system.
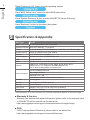
SKU Type T1132
CPU 2
nd
Generation Intel
®
Core™ Processor
Operation System Microsoft
®
Windows
®
7 Compliant
Display 11.6" HD Ready TFT-LCD Touch panel, 1366x768, with LED back-light
System Memory DDRIII SO-DIMM 2 slots (Max 4GB*2)
Chipset Intel
®
HM65 Express Chipset
Video Graphics NVIDIA
®
GeForce
®
GT520M DDRIII 1GB
HDD 2.5" SATA HDD
Audio 2W Speakers*4 (Include Woofer speaker *2), Internal Microphone
I/O Port
USB port*2, eSATA/USB Combo, HDMI, D-sub, RJ45, Mic-in,
Earphone-out, 4-in-1(supports SD/MMC/MS/MS Pro),
DC-in Jack, Docking station connection port
Communications
10/100/1000Mbps Ethernet
802.11b/g/n Wireless
Bluetooth v3.0 + HS
3.5G antenna build-in, 3.5G module is optional
Webcam 1.3 Megapixel
Security Kensington Lock, TPM (Optional)
Battery 6-cell Li-polymer
Dimensions 290(W) x 220.7 (D) x 27.86~40(H) mm (w/ Battery)
Weight ~1.76kg (w/ Battery)
* This specication is for users’ reference only. The nal conguration depends on the users' bought.
■ Warranty & Service
Warranty and service and related information please refer to the warranty card
or GIGABYTE service website as the below link:
http://www.gigabyte.com/support-downloads/technical-support.aspx
■ FAQ
FAQ (Frequent Asked Questions) please refer to the below link:
http://www.gigabyte.com/support-downloads/faq.aspx
Specication & Appendix
5
-
 1
1
-
 2
2
-
 3
3
-
 4
4
-
 5
5
-
 6
6
-
 7
7
-
 8
8


Gigabyte T1132 Quick start guide
- Category
- Notebooks
- Type
- Quick start guide
- This manual is also suitable for
Ask a question and I''ll find the answer in the document
Finding information in a document is now easier with AI
Related papers
-
Gigabyte T1125 Series User manual
-
-
Gigabyte U2442F Owner's manual
-
-
-
-
-
-
-