Pacific hydrostar Item 68284-UPC 792363682848 Owner's manual
- Category
- Power tools
- Type
- Owner's manual
This manual is also suitable for

Visit our website at: http://www.harborfreight.com
Email our technical support at: [email protected]
Owner’s Manual & Safety Instructions
Save This Manual Keep this manual for the safety warnings and precautions, assembly,
operating, inspection, maintenance and cleaning procedures. Write the product’s serial number in the
back of the manual near the assembly diagram (or month and year of purchase if product has no number).
Keep this manual and the receipt in a safe and dry place for future reference. 21c
When unpacking, make sure that the product is intact
and undamaged. If any parts are missing or broken,
please call 1-888-866-5797 as soon as possible.
Copyright
©
2020 by Harbor Freight Tools
®
. All rights reserved.
No portion of this manual or any artwork contained herein may be reproduced in
any shape or form without the express written consent of Harbor Freight Tools.
Diagrams within this manual may not be drawn proportionally. Due to continuing
improvements, actual product may differ slightly from the product described herein.
Tools required for assembly an d se rv ic e may n ot b e in cl uded.
Read this material before using this product.
Failure to do so can result in serious injury.
SAVE THIS MANUAL.

Page 2 For technical questions, please call 1-888-866-5797. Item 68284 68285
Table of Contents
Safety ......................................................... 2
Specifications ............................................. 7
Setup .......................................................... 8
Operation ................................................... 11
Maintenance .............................................. 18
Parts Lists and Diagrams .......................... 20
Warranty .................................................... 24
WARNING SYMBOLS AND DEFINITIONS
This is the safety alert symbol. It is used to alert you to potential personal injury hazards.
Obey all safety messages that follow this symbol to avoid possible injury or death.
Indicates a hazardous situation which, if not avoided,
will result in death or serious injury.
Indicates a hazardous situation which, if not avoided,
could result in death or serious injury.
Indicates a hazardous situation which, if not avoided,
could result in minor or moderate injury.
Addresses practices not related to personal injury.
IMPORTANT SAFETY INFORMATION
General Power Tool Safety Warnings
Read all safety warnings and instructions.
Failure to follow the warnings and instructions may result in electric shock, fire and/or serious injury.
Save all warnings and instructions for future reference.
The term ″power tool″ in the warnings refers to your mains-operated (corded) power tool.
Work area safety
1. Keep work area clean and well lit.
Cluttered or dark areas invite accidents.
2. Do not operate power tools in explosive
atmospheres, such as in the presence of
flammable liquids, gases or dust. Power tools
create sparks which may ignite the dust or fumes.
3. Keep children and bystanders
away while operating a power tool.
Distractions can cause you to lose control.
SAFETY OPERATION MAINTENANCESETUP

Page 3For technical questions, please call 1-888-866-5797.Item 68284 68285
Electrical safety
1. Power tool plugs must match the outlet.
Never modify the plug in any way.
Do not use any adapter plugs with grounded
power tools. Unmodified plugs and matching
outlets will reduce risk of electric shock.
2. Avoid body contact with grounded surfaces
such as pipes, radiators, ranges and
refrigerators. There is an increased risk of
electric shock if your body is grounded.
3. Do not expose power tools to rain or wet
conditions. Water entering a power tool
will increase the risk of electric shock.
4. Do not abuse the cord. Never use the cord
for carrying, pulling or unplugging the
power tool. Keep cord away from heat, oil,
sharp edges or moving parts. Damaged or
entangled cords increase the risk of electric shock.
5. When operating a power tool outdoors,
use an extension cord suitable for
outdoor use. Use of a cord suitable for outdoor
use reduces the risk of electric shock.
Personal safety
1. Stay alert, watch what you are doing
and use common sense when operating
a power tool. Do not use a power
tool while you are tired or under the
influence of drugs, alcohol or medication.
A moment of inattention while operating power
tools may result in serious personal injury.
2. Use personal protective equipment.
Always wear eye protection.
Safety equipment such as dust mask, non-
skid safety shoes, hard hat, or hearing
protection used for appropriate conditions
will reduce personal injuries.
3. Prevent unintentional starting. Ensure the switch
is in the off-position before connecting to
power source, picking up or carrying the tool.
Carrying power tools with your finger on
the switch or energizing power tools that
have the switch on invites accidents.
4. Remove any adjusting key or wrench
before turning the power tool on.
A wrench or a key left attached to a rotating part
of the power tool may result in personal injury.
5. Do not overreach. Keep proper footing and
balance at all times. This enables better control
of the power tool in unexpected situations.
6. Dress properly. Do not wear loose clothing or
jewelry. Keep your hair, clothing and gloves
away from moving parts. Loose clothes, jewelry
or long hair can be caught in moving parts.
7. Only use safety equipment that has been
approved by an appropriate standards agency.
Unapproved safety equipment may not provide
adequate protection. Eye protection must be
ANSI-approved and breathing protection
must be NIOSH-approved for the
specific hazards in the work area.
Power tool use and care
1. Do not force the power tool. Use the
correct power tool for your application.
The correct power tool will do the job better and
safer at the rate for which it was designed.
2. Do not use the power tool if the
switch does not turn it on and off.
Any power tool that cannot be controlled with
the switch is dangerous and must be repaired.
3. Disconnect the plug from the power source
before making any adjustments, changing
accessories, or storing power tools.
Such preventive safety measures reduce the
risk of starting the power tool accidentally.
4. Store idle power tools out of the reach of
children and do not allow persons unfamiliar
with the power tool or these instructions
to operate the power tool. Power tools are
dangerous in the hands of untrained users.
5. Maintain power tools. Check for misalignment
or binding of moving parts, breakage of parts
and any other condition that may affect the
power tool’s operation. If damaged, have the
power tool repaired before use. Many accidents
are caused by poorly maintained power tools.
6. Keep cutting tools sharp and clean.
Properly maintained cutting tools with
sharp cutting edges are less likely to
bind and are easier to control.
SAFETYOPERATIONMAINTENANCE SETUP

Page 4 For technical questions, please call 1-888-866-5797. Item 68284 68285
7. Use the power tool, accessories and
tool bits etc. in accordance with these
instructions, taking into account the working
conditions and the work to be performed.
Use of the power tool for operations different from
those intended could result in a hazardous situation.
Service
Have your power tool serviced by a qualified repair person using only identical replacement parts.
This will ensure that the safety of the power tool is maintained.
Drain Cleaner Safety Warnings
1. Maintain labels and nameplates on the tool.
These carry important safety information.
If unreadable or missing, contact
Harbor Freight Tools for a replacement.
2. Wear ANSI-approved safety impact eye
goggles and heavy duty LEATHER work gloves
when using the Drain Cleaner. Never grasp
a rotating cable with a rag or cloth glove. Using
personal safety devices reduce the risk for injury.
Safety impact eye goggles and heavy work gloves
are available from Harbor Freight Tools.
3. Avoid unintentional starting.
Prepare to begin work before turning on the tool.
4. Do not force the Drain Cleaner. This tool
will do the work better and safer at the speed
and capacity for which it was designed.
5. Maintain a safe working environment. Keep the
work area well lit. Make sure there is adequate
surrounding workspace. Always keep the work
area free of obstructions, grease, oil, trash, and
other debris. Do not use a power tool in areas
near flammable chemicals, dusts, and vapors
6. Unplug the Drain Cleaner from its electrical
outlet before performing any inspection,
maintenance, or cleaning procedures.
7. Do not leave the Drain Cleaner unattended
while running. Turn power off if you
have to leave the Drain Cleaner.
8. Do not allow the cutter to stop turning while
the machine is running. This can overstress
the cable and may cause twisting, kinking or
breaking of the cable. Twisting, kinking or breaking
cable may cause striking or crushing injuries.
9. Keep gloved hand on the cable whenever the
machine is running. This provides better control
of the cable and helps prevent twisting, kinking and
breaking of the cable. Twisting, kinking or breaking
cable may cause striking or crushing injuries
10. Before each use, check all nuts, bolts,
and screws for tightness. Vibration during
operation may cause these to loosen.
11. Avoid electrical shock. Do not operate the
Drain Cleaner if sitting in standing water, and if
the operator is in standing water. Keep extension
cord off the ground and away from water.
Water increases the risk of electric shock.
12. Install this product on a proper surface. Locate
on a flat, level, and solid surface that is capable
of supporting the weight of the Drain Cleaner.
13. Do not operate the Drain Cleaner with
the belt guard removed. Fingers can get
caught between the drive belt and pulley.
14. Do not put too much stress on cable. Keep
gloved hand on the cable for control when
machine is running. In the course of drain
cleaning, if the cable encounters an obstruction,
it may stress the cable and cause the cable to
twist, kink, or break. This may result in serious
injury, and damage the equipment or pipes.
15. Position Drain Cleaner within two feet
of drain opening. Greater distances can
result in the cable twisting or kinking.
16. One person must control both the cable and
the Foot Switch. If the cutter stops rotating, the
operator must be able to turn the machine motor
off to prevent twisting, kinking and breaking of
the cable. Twisting, kinking or breaking cable
may cause striking or crushing injuries.
17. Reverse Motor direction only when pulling
the Cable off an obstruction. Trying to push the
Cable down the pipe or pull it out of a pipe while
in reverse operation can result in Cable damage.
Make sure Drum has stopped turning
before changing the Rotation Switch.
18. Keep hands away from the rotating Drum and
Distributor Tube. Do not reach into Drum unless
the Drain Clean power cord is unplugged.
SAFETY OPERATION MAINTENANCESETUP

Page 5For technical questions, please call 1-888-866-5797.Item 68284 68285
19. Use appropriate personal protective equipment
while handling and using drain cleaning
equipment. Drains may contain chemicals,
bacteria and other substances that may be toxic,
infectious, cause burns or other issues. Appropriate
personal protective equipment always includes
ANSI-approved safety glasses and heavy-duty work
gloves, and may include equipment such as latex
or rubber gloves, face shields, goggles, protective
clothing, respirators and steel toed footwear.
20. Wash hands after use. Use hot, soapy water
to wash hands and other exposed body parts
exposed to drain contents after handling or
using drain cleaning equipment. Do not eat
or smoke while operating or handling drain
cleaning equipment. This will help prevent
contamination with toxic or infectious material.
21. Do not operate this machine if operator or
machine is standing in water. Operating machine
while in water increases the risk of electrical shock.
22. Only use drain cleaning machine to clean
drains of recommended sizes according
to these instructions. Other uses or
modifying the drain cleaning machine for other
applications may increase the risk of injury.
23. Be aware of possible damage to drain
lines that may result from the discovery
of roots and other obstacles.
24. WARNING! TO PREVENT SERIOUS INJURY:
People with pacemakers should consult
their physician(s) before using this product.
Electromagnetic fields in close proximity to a heart
pacemaker could cause interference to or failure of
the pacemaker. In addition, people with pacemakers
should adhere to the following:
• Avoid operating power tools alone.
• Properly maintain and inspect all tools
before use to avoid electrical shock.
25. The warnings, precautions, and instructions
discussed in this instruction manual cannot
cover all possible conditions and situations
that may occur. It must be understood by the
operator that common sense and caution are
factors which cannot be built into this product,
but must be supplied by the operator.
Vibration Safety
This tool vibrates during use.
Repeated or long-term exposure to vibration may
cause temporary or permanent physical injury,
particularly to the hands, arms and shoulders.
To reduce the risk of vibration-related injury:
1. Anyone using vibrating tools regularly or for
an extended period should first be examined
by a doctor and then have regular medical
check-ups to ensure medical problems are not
being caused or worsened from use. Pregnant
women or people who have impaired blood
circulation to the hand, past hand injuries,
nervous system disorders, diabetes, or
Raynaud’s Disease should not use this tool.
If you feel any symptoms related to vibration (such
as tingling, numbness, and white or blue fingers),
seek medical advice as soon as possible.
2. Do not smoke during use. Nicotine reduces
the blood supply to the hands and fingers,
increasing the risk of vibration-related injury.
3. Wear suitable gloves to reduce the
vibration effects on the user.
4. Use tools with the lowest vibration
when there is a choice.
5. Include vibration-free periods each day of work.
6. Grip tool as lightly as possible (while still keeping
safe control of it). Let the tool do the work.
7. To reduce vibration, maintain the tool as
explained in this manual. If any abnormal
vibration occurs, stop use immediately.
SAVE THESE INSTRUCTIONS.
Drain Cleaner Safety Warnings (cont.)
SAFETYOPERATIONMAINTENANCE SETUP

Page 6 For technical questions, please call 1-888-866-5797. Item 68284 68285
Grounding
TO PREVENT ELECTRIC SHOCK AND DEATH FROM INCORRECT GROUNDING
WIRE CONNECTION:
Check with a qualified electrician if you are in doubt as to whether the outlet is properly
grounded. Do not modify the power cord plug provided with the tool. Never remove the
grounding prong from the plug. Do not use the tool if the power cord or plug is damaged. If damaged, have
it repaired by a service facility before use. If the plug will not fit the outlet, have a proper outlet installed by
a qualified electrician.
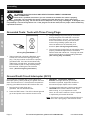
Grounded Tools: Tools with Three Prong Plugs
3-Prong Plug and Outlet
1. Tools marked with “Grounding Required” have
a three wire cord and three prong grounding
plug. The plug must be connected to a properly
grounded outlet. If the tool should electrically
malfunction or break down, grounding provides
a low resistance path to carry electricity away
from the user, reducing the risk of electric
shock. (See 3-Prong Plug and Outlet.)
2. The grounding prong in the plug is connected
through the green wire inside the cord to the
grounding system in the tool. The green wire
in the cord must be the only wire connected
to the tool’s grounding system and must
never be attached to an electrically “live”
terminal. (See 3-Prong Plug and Outlet.)
3. The tool must be plugged into an appropriate outlet,
properly installed and grounded in accordance
with all codes and ordinances. The plug and outlet
should look like those in the preceding illustration.
(See 3-Prong Plug and Outlet.)
Ground Fault Circuit Interrupter (GFCI)
Your machine is equipped with a ground fault circuit
interrupter (GFCI), which protects you against shock if a
short circuit should occur. Check that the receptacle is
properly grounded and test the GFCI before each use.
1. Plug the GFCI Power Plug into a
grounded, 120 VAC electrical outlet.
2. Press the TEST button. The GFCI indicator light will
go out and power to the machine should cut off.
3. WARNING! TO PREVENT SERIOUS
INJURY: If the light does not go out when
test button is pushed, equipment should not
be used until proper repairs can be made.
4. To restore power after test, push the reset button.
CAUTION! If the machine doesn’t start, stops
while running, or if you experience a mild
shock, do not use the machine. Have it repaired
or replaced by a licensed electrician.
Note: The Power Cord is not GFCI protected from the
GFCI unit to the 3-prong plug in the electrical outlet.
SAFETY OPERATION MAINTENANCESETUP

Page 7For technical questions, please call 1-888-866-5797.Item 68284 68285
Extension Cords
1. Grounded tools require a three wire extension cord.
Double Insulated tools can use either
a two or three wire extension cord.
2. As the distance from the supply outlet increases,
you must use a heavier gauge extension cord.
Using extension cords with inadequately sized
wire causes a serious drop in voltage, resulting
in loss of power and possible tool damage.
(See Table A on page 7.)
3. The smaller the gauge number of the wire, the
greater the capacity of the cord. For example,
a 14 gauge cord can carry a higher current
than a 16 gauge cord. (See Table A.)
4. When using more than one extension cord
to make up the total length, make sure
each cord contains at least the minimum
wire size required. (See Table A.)
5. If you are using one extension cord for more
than one tool, add the nameplate amperes
and use the sum to determine the required
minimum cord size. (See Table A.)
6. If you are using an extension cord outdoors, make
sure it is marked with the suffix “W-A” (“W” in
Canada) to indicate it is acceptable for outdoor use.
7. Make sure the extension cord is properly wired
and in good electrical condition. Always replace
a damaged extension cord or have it repaired
by a qualified electrician before using it.
8. Protect the extension cords from sharp objects,
excessive heat, and damp or wet areas.
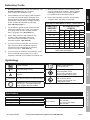
TABLE A: RECOMMENDED MINIMUM WIRE
GAUGE FOR EXTENSION CORDS* (120/240 VOLT)
NAMEPLATE
AMPERES
(at full load)
EXTENSION CORD
LENGTH
25´ 50´ 75´ 100´ 150´
0 – 2.0 18 18 18 18 16
2.1 – 3.4 18 18 18 16 14
3.5 – 5.0 18 18 16 14 12
5.1 – 7.0 18 16 14 12 12
7.1 – 12.0 18 14 12 10 -
12.1 – 16.0 14 12 10 - -
16.1 – 20.0 12 10 - - -
* Based on limiting the line voltage drop to five volts at
150% of the rated amperes.
Symbology
Double Insulated
V~
Volts Alternating Current
A
Amperes
n
0
xxxx/min.
No Load Revolutions per Minute (RPM)
WARNING marking concerning Risk
of Eye Injury. Wear ANSI-approved
safety goggles with side shields.
Read the manual before
set-up and/or use.
WARNING marking
concerning Risk of Fire.
Do not cover ventilation ducts.
Keep flammable objects away.
WARNING marking concerning
Risk of Electric Shock.
Properly connect power cord
to appropriate outlet.
Specifications
Electrical Rating 120V~, 60Hz, 5.3A
Motor Speed 1716 RPM
Power Cord 6′
Cable Type 1/2″ Dia. x 50′ Long
Drain Pipe Capacity 2″ to 4″ I.D.
Drum Dimensions 13″ x 6.3″
Drum Capacity
up to 75′ of 1/2″ Cable
(Not Included)
up to 100′ of 3/8″ Cable
(Not Included)
68284 68285 includes Power Feed
SAFETYOPERATIONMAINTENANCE SETUP

Page 8 For technical questions, please call 1-888-866-5797. Item 68284 68285
Setup - Before Use:
Read the ENTIRE IMPORTANT SAFETY INFORMATION section at the beginning of this
manual including all text under subheadings therein before set up or use of this product.
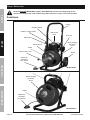
Functions
Rotation Switch
Model 68284
Quick-Change
Enclosed
Drum
Cable
Sealed Air
Activated
Foot Switch
Frame
Belt Guard
Knob
Belt Guard
Tool Tray
Wheel
Power-Feed Lever
Tension Knob
Handle Locking Knobs
Cable
Belt Guard
Frame
Tool Tray
Model 68285
Belt Guard Knob
Quick-Change
Enclosed
Drum
Sealed Air
Activated
Foot Switch
SAFETY OPERATION MAINTENANCESETUP

Page 9For technical questions, please call 1-888-866-5797.Item 68284 68285
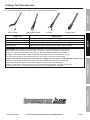
Cutting Tool Accessories
There are four Cutting Tools included with each Drain Cleaner. Select the appropriate tool
for the cleaning job and attach to Cable. Each is described in the table below.
Arrow Cutter Boring Bulb Cutter C-Cutter Spade Cutter
Cutter Tool Applications
Arrow Cutter (2 pieces) Starting tool; ideal for cutting and scraping
Boring Bulb Cutter Starting tool; ideal for removing loose objects
C-Cutter Finishing tool; ideal for grease stoppages and cleaning pipe walls.
Spade Cutter Finishing tool; used for scraping the inside edges of pipes.
NOTICE: If the cause of the obstruction is unknown, use the Boring Bulb Cutter to explore
the obstruction and, if possible, retrieve a piece to inspect. Once you can see the cause of the
obstruction, select the appropriate tool for the job. Run the smallest available tool through the
blockage to allow the backed up water to flow and carry away the debris as the drain is cleaned.
Once the drain is flowing, more appropriate tools can be used on the rest of the blockage.
Keep in mind that the largest tool used should be no bigger than the drain’s inside diameter, minus an inch.
If properly used, the Drain Cleaners and assorted Drain Cleaner Accessories will not damage
a drain that is in good condition and properly designed, constructed, and maintained.
However, if the drain is in poor condition or has not been properly designed, the drain cleaning work
may damage the drain. If possible, visually inspect the drain’s quality before operation.
SAFETYOPERATIONMAINTENANCE SETUP

Page 10 For technical questions, please call 1-888-866-5797. Item 68284 68285
Assembly for 68284 68285
Note: No assembly needed for Model 68285.
TO PREVENT SERIOUS INJURY FROM ACCIDENTAL OPERATION:
Turn the Rotation Switch of the tool to its “OFF” position and unplug the tool from its
electrical outlet before assembling or making any adjustments to the tool.
Note: For additional information regarding the parts listed in the following pages,
refer to the Assembly Diagram near the end of this manual.
Step 1: Slide Handles
into slots
Step 2: Lock Handles into
place using
locking knobs
SAFETY OPERATION MAINTENANCESETUP

Page 11For technical questions, please call 1-888-866-5797.Item 68284 68285
Operating Instructions
Read the ENTIRE IMPORTANT SAFETY INFORMATION section at the beginning of this
manual including all text under subheadings therein before set up or use of this product.
Tool Set Up
TO PREVENT SERIOUS INJURY FROM ACCIDENTAL OPERATION:
Turn the Rotation Switch of the tool to its “OFF” position and unplug the tool from its
electrical outlet before assembling or making any adjustments to the tool.
TO PREVENT SERIOUS INJURY:
DO NOT OPERATE WITH ANY GUARD DISABLED, DAMAGED, OR REMOVED.
Wear ANSI-approved safety goggles, heavy-duty LEATHER workgloves, and other appropriate
protective equipment when setting up your Drain Cleaner. For extra protection from chemicals and
bacteria on the machine and in the work area, we recommend wearing latex, rubber or other liquid
barrier gloves under the heavy-duty work gloves. Before use, inspect gloves to be sure they are
free of defects or loose sections that could be caught in the Drain Cleaner. Rubber soled, non-slip shoes
can help prevent slipping and electric shock, especially on wet surfaces.
TO PREVENT SERIOUS INJURY FROM ELECTRIC SHOCK, TWISTED/BROKEN CABLES, CHEMICAL BURNS,
INFECTIONS AND OTHER CAUSES AND PREVENT DRAIN CLEANER DAMAGE:
Before each use, inspect Drain Cleaner and correct any problems.
1. Once the Drain Cleaner is assembled, check
the device and cutters for any signs of wear and
damage. If necessary, replace worn or damaged
parts prior to using the drain cleaning machine.
Dull or damaged cutting tools can lead to binding,
cable breakage, and slow the drain cleaning.
2. Verify Drain Cleaner is unplugged and inspect
the power cord, Ground Fault Circuit Interrupter
(GFCI) and plug for damage. If the plug has
been modified, is missing the grounding prong
or if the cord is damaged, to avoid electrical
shock, do not use the machine until the cord
has been replaced by a qualified electrician.
3. Clean any oil, grease or dirt from all equipment
handles and controls. This helps prevent the
machine or control from slipping during use.
4. Verify Foot Switch is attached to Drain Cleaner.
5. Verify Drain Cleaner is properly assembled.
Inspect the machine for broken, worn, missing,
misaligned or binding parts or any other condition
which may prevent safe and normal operation.
6. Make sure that switches and handles move
smoothly between positions and lock in place,
and that the bumpers at the bottom of the
handle are present and firmly attached.
SAFETYOPERATIONMAINTENANCE SETUP

Page 12 For technical questions, please call 1-888-866-5797. Item 68284 68285
7. Rotate the drum and make sure that
it turns freely without binding.
8. Check that all warning labels are present,
firmly attached and readable.
9. Make sure Belt Guard is securely
fastened to the Drain Cleaner.
10. Check the cable for any wear and damage.
If any section of the cable is worn or
flattened, replace cable before use.
11. Verify cable does not have multiple or excessive
kinks (greater than 15°). Kinks weaken the cable
and can cause cable failure. Replace any cables
that have multiple or excessively large kinks.
12. Look for spaces between the cable coils.
Kinking, stretching (pulling cable by hand) or running
the cable in reverse can deform the cable. Cables
with spaces between the coils should be replaced.
13. Check for signs of excessive corrosion.
Corrosion weakens the cable, making it brittle.
This can be caused by storing the cable wet
or using the cable with corrosive chemicals
(often found in chemical clog removers).
Excessively corroded cable should be replaced.
14. Before use, fully retract the cable with no
more than 2″ of cable outside of the machine.
This will the keep the cable from “whipping”
when the machine is turned on.
15. Set the Rotation Switch to the OFF position.
16. With dry hands, plug cord into properly
grounded outlet and move the Rotation Switch
into the Forward position.
17. Move Feed Lever to exactly between
F and R settings, otherwise cable will
start moving in or out during this test.
18. Press the Foot Switch and note the direction
of rotation of the drum. If the Foot Switch
does not control the Drain Cleaner’s
operation, do not use the machine until
the Foot Switch has been repaired.
19. The drum should rotate clockwise when seen from
the front of the drum. It will match the drum direction
shown on the warning label and the arrow on
the drum. If the rotation is not correct, do not use
the machine until it has been repaired.
20. After inspection, set the Rotation Switch to OFF,
dry off your hands, and unplug the Drain Cleaner.
21. Once you’ve verified that the Drain Cleaner
is in good working order, inspect the work
area where you will be using the machine.
SAFETY OPERATION MAINTENANCESETUP

Page 13For technical questions, please call 1-888-866-5797.Item 68284 68285
Work Area Set-Up
1. Verify that work area has adequate
lighting for the job.
2. Make sure work area is free of flammable liquids,
vapors or dust that may ignite. Sparks can be
generated during Drain Cleaner operation.
Do not work in area until these sources of
ignition have been identified and corrected.
3. Choose a firm, stable location for the machine
and operator that will remain relatively dry.
Do not use the machine while standing in water.
If needed, remove the water from the work area.
4. Verify the electrical outlet is properly grounded.
A three-prong or GFCI outlet may not be
properly grounded. If in doubt, have outlet
inspected by a licensed electrician.
5. Make sure there is a clear, unobstructed path
from the Drain Cleaner to the electrical outlet.
6. Inspect the drain to be cleaned. If possible,
determine the best access point(s) to the drain, the
size(s) and length(s) of the drain, distance to tanks
or mainlines, the nature of the blockage, presence
of drain cleaning chemicals or other chemicals, etc.
7. If there are chemicals present in the drain, read
and adhere to the specific safety measures
required to work around those chemicals.
Contact the chemical manufacturer for required
safety instructions and information.
8. If necessary, remove fixture (toilet, sink, etc.) to
allow access to the drain. Do not feed the cable
through a fixture. This could damage
the Drain Cleaner and the fixture.
9. Determine the correct drain cleaning
cable size for the drain cleaning job.
See Cable/Pipe Size chart below.
Cable Size
Pipe
Size
Typical Applications
1/2″ (included) 2″ to 4″ Roof stacks and small
floor drains (no roots)
3/8″ 1-1/2″ to 3″ Roof stacks, laundry lines
and small drains (no roots)
10. If needed, place protective covers over
the work area floor. Cleaning the clogged
drain can be a messy operation.
11. Make sure that the Drain Cleaner handle is
locked into the upright position for transport.
If the Drain Cleaner needs to be lifted, use
proper lifting techniques or seek assistance if
needed. Use caution when moving equipment
up and down stairs. Wear appropriate
footwear to help prevent slipping on floor.
12. Set the Drain Cleaner so that the drum
opening is within 2 feet of the drain
access. The greater the distance from
the drain access, the higher the risk
of the cable twisting or kinking.
13. If the machine cannot be placed with the
drum opening within 2′ of the drain access,
use appropriate-sized pipes and fittings to
extend the drain access back to within 2′ of
the drum opening. Improper cable support
can allow the cable to kink and twist and can
damage the cable or injure the operator.
14. If needed, set up barriers to keep
bystanders away from the Drain Cleaner
and work area during operation.
15. Select proper cutting tool.
(See Cutting Tool Accessories on page 9).
16. Install the tool to the end of the cable. Slide the
base of the Cutter Tool into the slot at the end of
the cable. Fasten together using a screwdriver.
17. Position the Foot Switch for easy accessibility. You
must be able to hold and control the cable, control
the Foot Switch, and reach the Rotation Switch.
18. Confirm that the Rotation Switch
is in the OFF position.
19. Run the cord along the clear path. With dry hands,
plug the Drain Cleaner into a properly grounded
outlet. Keep all connections dry and off the ground.
20. If the power cord is not long enough, use an
extension cord that is in good condition and has
a three prong plug similar to the one supplied on
the Drain Cleaner. Keep the connection off the
ground to prevent it from accidentally getting wet.
21. Also verify that the extension cord is rated
for outdoor use and contains a W or W-A
in the cord designation (i.e. SOW).
22. Verify the extension cord has sufficient wire size
(16 AWG for 50′ or less, 14 AWG for 50′ – 100′ long).
Undersized wires can overheat, melting the
insulation or causing a fire or other damage.
23. When using an extension cord, the GFCI
on the Drain Cleaner does not protect the
extension cord. If the outlet is not GFCI protected,
use a plug-in type GFCI between the outlet and
the extension cord. This will reduce the risk of
shock if there is a fault in the extension cord.
SAFETYOPERATIONMAINTENANCE SETUP

Page 14 For technical questions, please call 1-888-866-5797. Item 68284 68285
Manual Feed Operation (For Item 68285)
TO PREVENT SERIOUS INJURY FROM TWISTED OR BROKEN CABLES, CABLE ENDS WHIPPING AROUND,
MACHINE TIPPING, CHEMICAL BURNS, INFECTIONS, ELECTRIC SHOCK AND OTHER CAUSES:
Follow operating instructions for your model explicitly.
Since drains likely contain hazardous chemicals or bacteria, wear
appropriate protective equipment, such as:
• ANSI-approved splash-resistant safety goggles and respirator under face shield.
• Latex, rubber or other liquid barrier gloves under heavy-duty LEATHER work gloves.
Do not use a glove you are not currently wearing or a rag to hold the rotating cable. Cloth materials
can tangle in the rotating cable, leading to serious personal injury. Before use, inspect gloves
to be sure they are free of defects or loose sections that could get caught in Drain Cleaner.
• Rubber soled, non-slip shoes to help prevent slipping and electric shock.
1. Position the Drain Cleaner two feet from the drain.
2. Position the Drain Cleaner so that you can
operate Foot Switch while having one hand on
cable at all times. This will keep cable from
hazardously “whipping” when activating the
Drain Cleaner. Also, make sure Rotation Switch
on top of Drain Cleaner is within reach.
WARNING! Only one person should feed cable
and operate Foot Switch. Do not operate
Drain Cleaner with one person controlling cable
and another person controlling Foot Switch.
This can cause cable to kink, twist, or break,
which can also lead to serious personal injury.
3. Make sure Rotation Switch is in Forward position.
4. With the Drain Cleaner off, pull the cable out
of drum and feed into the drain. Gradually
work the cable as far into the drain as it will go.
5. Step on the Foot Switch and continue
feeding cable into the drain.
6. As you feed cable, you may feel and see cable slow
down and/or start to wind or load up (a “twisting” or
“squirming” motion). This may indicate a change
in drain line (such as a drain trap, elbow, etc.),
a build up in the drain (mud or grease), or the
actual blockage. Continue to slowly feed the
cable until the cable reaches the blockage.
CAUTION! Do not allow cable to build up
outside drain. This can cause cable to
twist, kink or break. When working with larger
sewers or septic tanks, minimize the amount of
cable fed to prevent kinking and knotting of cable.
7. If the cable becomes lodged in a narrow part of
the drain or in a drain trap, allow the cable to try
and work itself past the obstruction. If cable still
won’t pass obstruction, release pressure from
the Foot Switch and use sharp downward thrusts
to try and pass obstruction. Once cable is past,
press the Foot Switch and continue feeding.
NOTICE
Rotation Switch controls rotation of drum only. DO NOT USE ROTATION SWITCH
REVERSE POSITION WHILE REMOVING CABLE FROM PIPE. Use reverse direction
only momentarily for relieving pressure or untangling cable from a blockage.
Warranty void if cable damaged from allowing motor to twist excessively against blockage,
or if drum is run in reverse long enough to unwind cable.
SAFETY OPERATION MAINTENANCESETUP

Page 15For technical questions, please call 1-888-866-5797.Item 68284 68285
Working Through a Blockage
1. If cutting tool becomes lodged in blockage and
Drain Cleaner is still operating, the cable will start
to wind up or twist. If so, immediately turn off,
let tension release, and then pull back on cable
to free cutting tool from the drain blockage.
If cable cannot be freed by pulling back, briefly
turn the motor on in REV setting to free the tool.
WARNING! Do not keep cable rotating
if tool is lodged in a blockage.
If tool stops turning and drum keeps rotating,
cable can twist, kink, break, or tangle in the drain.
2. Once tool is free of blockage and is turning again,
slowly feed rotating cutting tool back into blockage.
Do not force tool through blockage.
3. Allow the spinning and cutting to break up
and work its way through the blockage.
NOTICE: While working through the blockage, the tool
and cable can get clogged with debris and cuttings from
blockage, preventing further cleaning. The cable and
tool will then need to be retrieved from drain and the
debris removed. See “Retrieving the Cable” section.
If Cutting Tool Lodges in Drain:
1. If cutting tool stops turning and cable cannot
be pulled from blockage, release Foot Switch
while holding cable with both hands.
CAUTION! Do not remove hands from cable
or cable may kink, twist and break.
2. The Drain Cleaner motor will stop and
cable and drum will turn backwards
until tension in cable is released.
WARNING! Do not remove hands from
cable until all the tension is released.
3. Place Rotation Switch in OFF position.
Freeing Lodged Cutting Tool
1. Release Foot Switch and turn the
Rotation Switch to OFF position.
2. Pull back on the cable to free it from the blockage.
If the tool will not come free,
place the Rotation Switch in Reverse position.
WARNING! Do not operate Drain Cleaner
in Reverse for any longer than is needed
to free the cutting tool from blockage
(for no more than several seconds at a time).
3. Hold the cable with both gloved hands, press the
Foot Switch for several seconds, then release, and
pull on the cable until it is free of the blockage.
4. Place the Rotation Switch in the Forward
position and continue cleaning the drain.
Retrieving Drain Cleaner Cable
1. Once the drain is clear, turn on the faucet
or use a hose to flush the debris out.
NOTE: Pay attention to the water level.
There could be blockages farther down in the drain.
WARNING! Do not pull cable from
drain while cable is still rotating. Cable end
can whip around, causing serious injury.
2. Pull the cable from the drain by hand and
feed into the Drain Cleaner until the cable
is a couple of feet from the drain opening.
A flow of water down the line will help to clean
the cable as it is retrieved. (If necessary, change
the cutting tool and continue cleaning.)
3. Set the Rotation Switch to the OFF position, dry your
hands, and unplug the machine before removing
end of cable from drain and returning it to the drum.
NOTICE
Rotation Switch controls rotation of drum only. DO NOT USE ROTATION SWITCH
REVERSE POSITION WHILE REMOVING CABLE FROM PIPE. Use reverse direction
only momentarily for relieving pressure or untangling cable from a blockage.
Warranty void if cable damaged from allowing motor to twist excessively against blockage,
or if drum is run in reverse long enough to unwind cable.
SAFETYOPERATIONMAINTENANCE SETUP

Page 16 For technical questions, please call 1-888-866-5797. Item 68284 68285
Power Feed Operation (For Item 68284 68285)
TO PREVENT SERIOUS INJURY FROM TWISTED OR BROKEN CABLES, CABLE ENDS WHIPPING AROUND,
MACHINE TIPPING, CHEMICAL BURNS, INFECTIONS, ELECTRIC SHOCK AND OTHER CAUSES:
Follow operating instructions for your model explicitly.
Since drains likely contain hazardous chemicals or bacteria, wear
appropriate protective equipment, such as:
• ANSI-approved splash-resistant safety goggles and respirator under face shield.
• Latex, rubber or other liquid barrier gloves under heavy-duty LEATHER work gloves.
Do not use a glove you are not currently wearing or a rag to hold the rotating cable. Cloth materials
can get wrapped around the moving cable, leading to serious personal injury. Before use, inspect
gloves to be sure they are free of defects or loose sections that could get caught in Drain Cleaner.
• Rubber soled, non-slip shoes to help prevent slipping and electric shock.
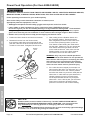
1. Position the Drain Cleaner two feet from the drain.
2. Release all tension from the Tension Knob,
then grab the cable with both gloved hands and
push the cable into the drain until at least one foot
of cable is in the drain. Retighten Tension Knob.
Power Feed Lever
Tension
Knob
3. After making sure the Rotation Switch is in
the “Forward” position, Tension Knob has
been retightened, and the Power Feed Lever
is in the down (forward) position, press the
Foot Switch to start feeding the cable further
into the drain. Make sure you can operate the
Foot Switch while having at least one hand
on the cable at all times. Also make sure the
Rotation Switch on top of the Drain Cleaner
and Power Feed Lever are within reach.
WARNING! Only one person should operate the
cable feed and the Foot Switch. Do not operate the
Drain Cleaner with one person controlling the cable
and another person controlling the Foot Switch.
This can cause the cable to kink, twist, and break,
which can also lead to serious personal injury.
4. If the cable becomes lodged (for example: in a
narrow part of the drain, in a drain trap, etc.), put
the Power Feed Lever in the “neutral” position
and allow the cable to try and work itself past the
obstruction. If cable still won’t pass obstruction,
release pressure from the Foot Switch and
use sharp downward thrusts to try and pass
obstruction. Once cable is past, put the Power
Feed Lever in the down (forward) position,
press the Foot Switch, and continue feeding.
NOTICE
Rotation Switch controls rotation of drum only. DO NOT USE ROTATION SWITCH
REVERSE POSITION WHILE REMOVING CABLE FROM PIPE. Use reverse direction
only momentarily for relieving pressure or untangling cable from a blockage.
Warranty void if cable damaged from allowing motor to twist excessively against blockage,
or if drum is run in reverse long enough to unwind cable.
SAFETY OPERATION MAINTENANCESETUP

Page 17For technical questions, please call 1-888-866-5797.Item 68284 68285
Working Through a Blockage
1. If cutting tool becomes lodged in a blockage and
Drain Cleaner is still operating, cable will start
to wind up or twist. If so, release pressure from
Foot Switch and Drain Cleaner motor will stop.
CAUTION! Do not let cable build up outside drain.
2. The cable and drum will turn backwards
until the tension in the cable is released.
WARNING! Do not remove gloved hand from
cable until all the tension is released.
3. Put Power Feed Lever in “reverse” position to pull
cable back and free cutting tool from blockage.
4. If motor can’t pull cable out, release pressure from
Foot Switch and allow cable to stop spinning.
Once cable has stopped spinning, grab cable
with both gloved hands and pull cable free.
5. Once tool is free of blockage and is turning again,
slowly feed rotating cutting tool back into blockage.
Do not force tool through blockage.
Allow cutting tip to break up and
work through blockage.
NOTICE: While working through the blockage, tool
and cable can get clogged with debris from blockage,
preventing further cleaning. The cable and tool will then
need to be retrieved from drain and debris removed.
Retrieving Drain Cleaner Cable
1. Once drain is clear, turn on faucet or
use a hose to flush debris out.
NOTE: If water flow slows or stops, resume
using the drain cleaner to locate and clear
blockage further down the drain.
2. To retrieve cable, set Power Feed Lever
in reverse (up) position but make sure
Rotation Switch is still in Forward position.
WARNING! Do not retrieve cable with
Rotation Switch set in Reverse position.
3. Keep one hand on cable. The cable can
get caught while being retrieved.
4. Continue retrieving cable until you can pull cable
by hand. Release foot from Foot Switch.
WARNING! Do not pull cable from drain
while cable is still rotating. The cable can
whip around, causing serious injury.
5. Place Rotation Switch in OFF position,
dry your hands, unplug machine.
6. Release Tension Knob tension and pull
remaining cable from drain by hand and
feed into Drain Cleaner. If needed, change
cutting tool and continue cleaning.
NOTICE
Rotation Switch controls rotation of drum only. DO NOT USE ROTATION SWITCH
REVERSE POSITION WHILE REMOVING CABLE FROM PIPE. Use reverse direction
only momentarily for relieving pressure or untangling cable from a blockage.
Warranty void if cable damaged from allowing motor to twist excessively against blockage,
or if drum is run in reverse long enough to unwind cable.
SAFETYOPERATIONMAINTENANCE SETUP

Page 18 For technical questions, please call 1-888-866-5797. Item 68284 68285
Maintenance and Servicing
Procedures not specifically explained in this manual must
be performed only by a qualified technician.
TO PREVENT SERIOUS INJURY FROM ACCIDENTAL OPERATION:
Turn the Rotation Switch of the tool to its “OFF” position and unplug the tool from its electrical
outlet before performing any inspection, maintenance, or cleaning procedures.
TO PREVENT SERIOUS INJURY FROM TOOL FAILURE:
Do not use damaged equipment. If abnormal noise or vibration
occurs, have the problem corrected before further use.
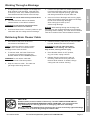
Cleaning Drain Cleaner Cables
1. Thoroughly flush Drain Cleaner cables with
clean water after every use. Doing so will
help prevent the build-up of sediment and any
drain cleaning chemicals still in the cable.
2. Once cables have been flushed,
carefully tip the Drain Cleaner forward
to empty out any remaining debris.
3. Once the cable is clean and dry,
pull the cable from the drum.
4. Lubricate with oily rag as you feed
cable back into drum.
WARNING! Do not attempt to
remove a rotating cable.
Cleaning/Lubricating Housing
1. The Drain Cleaner should be cleaned as needed
with hot, soapy water and/or disinfectants.
WARNING! Risk of shock! Do not allow water to get
into the motor or any other electrical components.
2. Dry Drain Cleaner before storing or using again.
3. For Model 68284 68285 (Power Feed
Drain Cleaner), hose out the power-
feed assembly with clean water.
4. Once dry, thoroughly lubricate with
a lightweight machine oil.
5. If Drain Cleaner drum is removed or changed,
grease bearings with good general purpose grease.
Removing and Installing Belt
1. Loosen Belt Guard Knob and slide Belt Guard
off from top of Drain Cleaner motor.
2. Use screwdriver to slide belt off
back of Drain Cleaner drum.
3. Slide new belt into belt pulley above drum.
4. Slide new belt onto rear of drum
until securely in place.
5. Slide Belt Guard pack into place above
Drain Cleaner drum. Tighten Belt Guard
Knob to lock Belt Guard back into place.
WARNING! TO PREVENT SERIOUS
INJURY: Do not operate the Drain Cleaner
without the Belt Guard in place.
Installing Replacement Cable
1. Remove old cable by pulling cable completely out.
Separate cable from drum-connecting cable.
2. Connect new cable to drum-connecting
cable and feed cable back into drum.
SAFETY OPERATION MAINTENANCESETUP

Page 19For technical questions, please call 1-888-866-5797.Item 68284 68285
General Cleaning, Maintenance, and Lubrication
1. BEFORE EACH USE, inspect the general
condition of the tool. Check for:
• loose hardware,
• misalignment or binding of moving parts,
• cracked or broken parts,
• damaged electrical wiring, and
• any other condition that may
affect its safe operation.
2. AFTER USE, wipe external surfaces
of the tool with clean cloth.
3. WARNING! If the supply cord of this
power tool is damaged, it must be replaced
only by a qualified service technician.
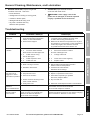
Troubleshooting
Problem Probable Cause(s) Solution(s)
Motor shuts off
during use.
1. The motor may have been shut off
by its internal thermal protection
switch, or auto reset breaker.
2. GFCI breaker tripped.
1. Turn motor off. Allow motor to cool off
completely before restarting and stay clear
of cable when turning motor back on.
2. Make sure all electrical components are dry and
all insulation is in good repair. Press reset button.
If GFCI trips again, have machine serviced
by qualified electrician before further use.
Cable kinks, twists,
or breaks.
1. 1. Too much force on the cable.
2. 2. Too much slack between
Drain Cleaner and drainpipe inlet.
3. 3. Cable used is wrong
size for drain pipe.
4. 4. Cable exposed to acid.
5. 5. Cable worn out.
1. 1. Do not force cable. Let cutter do the work.
2. 2. Move Drain Cleaner to within
two feet of drainpipe inlet.
3. 3. Change cable size.
4. 4. Clean and oil cable regularly.
5. 5. Replace cable.
Cable tangles in drum. 1. Too much force on the cable.
2. Motor running in reverse.
3. Distributor tube frozen.
1. Do not force cable. Let cutter tool do the work.
2. Retract Cable with the Motor Direction
Switch in the Forward position.
3. Technician should lubricate
distributor tube bearings.
Power Cord GFCI
trips when unit is
plugged in or when
Foot Pedal is pressed.
1. Motor Direction Switch defective.
2. Frayed Power Cord.
3. Short circuit in Motor.
4. Excess moisture touching Power
Cord or Drain Cleaner.
5. Faulty GFCI unit.
1. Repair or replace Motor Direction Switch.
2. Repair or replace the Power Cord.
3. Have Motor repaired by a qualified
technician; Replace Motor.
4. Dry cord and unit.
5. Electrician must Replace Power Cord with GFCI.
Motor does not
operate or
the Foot Pedal sticks.
Pneumatic Foot Pedal may have a leak. Check for leaks in air line leading from
Foot Pedal. Check for tears and holes
in Foot Pedal. Replace if needed.
The “Forward/
Reverse” Switch
does not work.
The centrifugal switch requires the
motor to come to a complete stop
before it will allow the direction
of the motor to be changed.
Move the “Forward/Reverse” Switch to the “Off”
position and allow the motor to stop before changing
from “Forward” to “Reverse” or vice versa.
SAFETYOPERATIONMAINTENANCE SETUP

Page 20 For technical questions, please call 1-888-866-5797. Item 68284 68285
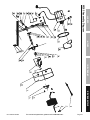
Part Description
1 Drum Connecting Cable
2 Bolt
3 Spring Washer
4 Cable
5 Bolt
6 Front Hub Bushing
7 Drum Shell
8 Bolt
9 Fiber Washer
10 Distributor Tube/Inner Drum
11 Flat Washer
12 Rear Shaft Retaining Ring
13 Flat Washer
14 Flat Washer
15 Rear Hub
16 Drum Shaft
17 Frame
18 Rubber Foot
19 Bolt
20 Flat Washer
Part Description
21 Shaft Spacer
22 Bolt
23 Motor Support Spring
24 Bolt
25 Motor Support
26 Motor
27 V-Belt Pulley
28 Bolt
29 V-Belt (A1118)
30 Belt Guard
31 Belt Guard Retaining Knob
32 Bolt
33 Nut
34 Tool Holder
35 Bolt
36 Retaining Pin Collar & Set Screw
37 Retaining Pin Spring
38 Drum Shaft Retaining Pin
39 Rubber Leg Tip
40 Bolt
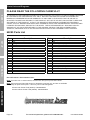
Parts Lists and Diagrams
PLEASE READ THE FOLLOWING CAREFULLY
THE MANUFACTURER AND/OR DISTRIBUTOR HAS PROVIDED THE PARTS LIST AND ASSEMBLY DIAGRAM
IN THIS MANUAL AS A REFERENCE TOOL ONLY. NEITHER THE MANUFACTURER OR DISTRIBUTOR
MAKES ANY REPRESENTATION OR WARRANTY OF ANY KIND TO THE BUYER THAT HE OR SHE IS
QUALIFIED TO MAKE ANY REPAIRS TO THE PRODUCT, OR THAT HE OR SHE IS QUALIFIED TO REPLACE
ANY PARTS OF THE PRODUCT. IN FACT, THE MANUFACTURER AND/OR DISTRIBUTOR EXPRESSLY
STATES THAT ALL REPAIRS AND PARTS REPLACEMENTS SHOULD BE UNDERTAKEN BY CERTIFIED AND
LICENSED TECHNICIANS, AND NOT BY THE BUYER. THE BUYER ASSUMES ALL RISK AND LIABILITY
ARISING OUT OF HIS OR HER REPAIRS TO THE ORIGINAL PRODUCT OR REPLACEMENT PARTS
THERETO, OR ARISING OUT OF HIS OR HER INSTALLATION OF REPLACEMENT PARTS THERETO.
68285 Parts List
Record Product’s Serial Number Here:
Note: If product has no serial number, record month and year of purchase instead.
Note: Some parts are listed and shown for illustration purposes only, and are not available
individually as replacement parts. Parts may not be interchangeable.
Cleaner with Power Feed (68284): 792363682848
Cleaner without Power Feed (68285): 792363682855
SAFETY OPERATION MAINTENANCESETUP
Page is loading ...
Page is loading ...
Page is loading ...
Page is loading ...
-
 1
1
-
 2
2
-
 3
3
-
 4
4
-
 5
5
-
 6
6
-
 7
7
-
 8
8
-
 9
9
-
 10
10
-
 11
11
-
 12
12
-
 13
13
-
 14
14
-
 15
15
-
 16
16
-
 17
17
-
 18
18
-
 19
19
-
 20
20
-
 21
21
-
 22
22
-
 23
23
-
 24
24


Pacific hydrostar Item 68284-UPC 792363682848 Owner's manual
- Category
- Power tools
- Type
- Owner's manual
- This manual is also suitable for
Ask a question and I''ll find the answer in the document
Finding information in a document is now easier with AI
Related papers


Other documents
-
WEG Cooling Tower Motor Drain Positions User manual
-
Husky 82-969-111 Operating instructions
-
Klutch 100ft. Electric Drain Cleaner Owner's manual
-
 Luminar Outdoor 63483 Owner's manual
-
General Pipe Cleaners Speedrooter 92 Operating Instructions Manual
-
PROPOINT 9083577 Owner's manual
-
CEN-TECH 61652 Owner's manual
-
-
Pittsburgh Automotive Item 6530-UPC 792363065306 Owner's manual
-
