
USER
MANUAL
EN User Manual
Cooker
CIB6646ABM

CONTENTS
1. SAFETY INFORMATION......................................................................................2
2. SAFETY INSTRUCTIONS.................................................................................... 5
3. INSTALLATION.....................................................................................................8
4. PRODUCT DESCRIPTION.................................................................................10
5. BEFORE FIRST USE..........................................................................................10
6. HOB - DAILY USE.............................................................................................. 11
7. HOB - HINTS AND TIPS.....................................................................................17
8. HOB - CARE AND CLEANING........................................................................... 18
9. OVEN - DAILY USE ...........................................................................................19
10. OVEN - CLOCK FUNCTIONS.......................................................................... 22
11. OVEN - HINTS AND TIPS................................................................................ 23
12. OVEN - CARE AND CLEANING.......................................................................35
13. TROUBLESHOOTING......................................................................................38
14. ENERGY EFFICIENCY.....................................................................................40
FOR PERFECT RESULTS
Thank you for choosing this AEG product. We have created it to give you
impeccable performance for many years, with innovative technologies that help
make life simpler – features you might not find on ordinary appliances. Please
spend a few minutes reading to get the very best from it.
Visit our website to:
Get usage advice, brochures, trouble shooter, service and repair information:
www.aeg.com/support
Register your product for better service:
www.registeraeg.com
Buy Accessories, Consumables and Original spare parts for your appliance:
www.aeg.com/shop
CUSTOMER CARE AND SERVICE
Always use original spare parts.
When contacting our Authorised Service Centre, ensure that you have the
following data available: Model, PNC, Serial Number.
The information can be found on the rating plate.
Warning / Caution-Safety information
General information and tips
Environmental information
Subject to change without notice.
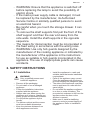
1. SAFETY INFORMATION
Before the installation and use of the appliance, carefully
read the supplied instructions. The manufacturer is not
www.aeg.com2

responsible for any injuries or damage that are the result
of incorrect installation or usage. Always keep the
instructions in a safe and accessible location for future
reference.
1.1 Children and vulnerable people safety
• This appliance can be used by children aged from 8
years and above and persons with reduced physical,
sensory or mental capabilities or lack of experience
and knowledge if they have been given supervision or
instruction concerning the use of the appliance in a
safe way and understand the hazards involved.
Children of less than 8 years of age and persons with
very extensive and complex disabilities shall be kept
away from the appliance unless continuously
supervised.
• Do not let children play with the appliance.
• Keep all packaging away from children and dispose of
it appropriately.
• WARNING: Keep children and pets away from the
appliance when it operates or when it cools down.
Accessible parts become hot during use.
• If the appliance has a child safety device, it should be
activated.
• Children shall not carry out cleaning and user
maintenance of the appliance without supervision.
1.2 General Safety
• Only a qualified person must install this appliance and
replace the cable.
• This appliance must be connected to the mains with a
H05VV-F type cable to withstand the temperature of
the rear panel.
• This appliance is intended for use up to an altitude of
2000 m above sea level.
• This appliance is not intended to be used on ships,
boats or vessels.
ENGLISH 3

• Do not install the appliance behind a decorative door
in order to avoid overheating.
• Do not install the appliance on a platform.
• Do not operate the appliance by means of an external
timer or separate remote-control system.
• WARNING: Unattended cooking on a hob with fat or
oil can be dangerous and may result in fire.
• NEVER try to extinguish a fire with water, but switch
off the appliance and then cover flame e.g. with a lid
or a fire blanket.
• CAUTION: The cooking process has to be supervised.
A short term cooking process has to be supervised
continuously.
• WARNING: Danger of fire: Do not store items on the
cooking surfaces.
• Do not use a steam cleaner to clean the appliance.
• Do not use harsh abrasive cleaners or sharp metal
scrapers to clean the glass door or the glass of hinged
lids of the hob since they can scratch the surface,
which may result in shattering of the glass.
• Metallic objects such as knives, forks, spoons and lids
should not be placed on the hob surface since they
can get hot.
• If the glass ceramic surface / glass surface is cracked,
switch off the appliance and unplug it from the mains.
In case the appliance is connected to the mains
directly using junction box, remove the fuse to
disconnect the appliance from power supply. In either
case contact the Authorised Service Centre.
• After use, switch off the hob element by its control and
do not rely on the pan detector.
• WARNING: The appliance and its accessible parts
become hot during use. Care should be taken to avoid
touching heating elements.
• Always use oven gloves to remove or put in
accessories or ovenware.
• Before maintenance, cut the power supply.
www.aeg.com4

• WARNING: Ensure that the appliance is switched off
before replacing the lamp to avoid the possibility of
electric shock.
• If the mains power supply cable is damaged, it must
be replaced by the manufacturer, its Authorised
Service Centre or similarly qualified persons to avoid
an electrical hazard.
• Be careful when you touch the storage drawer. It can
get hot.
• To remove the shelf supports first pull the front of the
shelf support and then the rear end away from the
side walls. Install the shelf supports in the opposite
sequence.
• The means for disconnection must be incorporated in
the fixed wiring in accordance with the wiring rules.
• WARNING: Use only hob guards designed by the
manufacturer of the cooking appliance or indicated by
the manufacturer of the appliance in the instructions
for use as suitable or hob guards incorporated in the
appliance. The use of inappropriate guards can cause
accidents.
2. SAFETY INSTRUCTIONS
2.1 Installation
WARNING!
Only a qualified person must
install this appliance.
• Remove all the packaging.
• Do not install or use a damaged
appliance.
• Follow the installation instructions
supplied with the appliance.
• Always take care when moving the
appliance as it is heavy. Always use
safety gloves and enclosed footwear.
• Do not pull the appliance by the
handle.
• The kitchen cabinet and the recess
must have suitable dimensions.
• Keep the minimum distance from
other appliances and units.
• Install the appliance in a safe and
suitable place that meets installation
requirements.
• Parts of the appliance carry current.
Close the appliance with furniture to
prevent touching the dangerous parts.
• The sides of the appliance must stay
next to appliances or units with the
same height.
• Do not install the appliance adjacent
to a door or under a window. This
prevents hot cookware to fall from the
appliance when the door or the
window is opened.
• Make sure to install a stabilizing
means in order to prevent tipping of
the appliance. Refer to Installation
chapter.
ENGLISH 5

2.2 Electrical Connection
WARNING!
Risk of fire and electric
shock.
• All electrical connections should be
made by a qualified electrician.
• The appliance must be earthed.
• Make sure that the parameters on the
rating plate are compatible with the
electrical ratings of the mains power
supply.
• Always use a correctly installed
shockproof socket.
• Do not use multi-plug adapters and
extension cables.
• Do not let mains cables touch or
come near the appliance door or the
niche below the appliance, especially
when it operates or the door is hot.
• The shock protection of live and
insulated parts must be fastened in
such a way that it cannot be removed
without tools.
• Connect the mains plug to the mains
socket only at the end of the
installation. Make sure that there is
access to the mains plug after the
installation.
• If the mains socket is loose, do not
connect the mains plug.
• Do not pull the mains cable to
disconnect the appliance. Always pull
the mains plug.
• Use only correct isolation devices: line
protecting cut-outs, fuses (screw type
fuses removed from the holder), earth
leakage trips and contactors.
• The electrical installation must have
an isolation device which lets you
disconnect the appliance from the
mains at all poles. The isolation
device must have a contact opening
width of minimum 3 mm.
• Fully close the appliance door before
you connect the mains plug to the
mains socket.
2.3 Use
WARNING!
Risk of injury and burns.
Risk of electrical shock.
• This appliance is for household use
only.
• Do not change the specification of this
appliance.
• Make sure that the ventilation
openings are not blocked.
• Do not let the appliance stay
unattended during operation.
• Deactivate the appliance after each
use.
• Be careful when you open the
appliance door while the appliance is
in operation. Hot air can release.
• Do not operate the appliance with wet
hands or when it has contact with
water.
• Do not use the appliance as a work
surface or as a storage surface.
• Users with a pacemaker must keep a
distance of minimum 30 cm from the
induction cooking zones when the
appliance is in operation.
WARNING!
Risk of fire and explosion
• Fats and oil when heated can release
flammable vapours. Keep flames or
heated objects away from fats and
oils when you cook with them.
• The vapours that very hot oil releases
can cause spontaneous combustion.
• Used oil, that can contain food
remnants, can cause fire at a lower
temperature than oil used for the first
time.
• Do not put flammable products or
items that are wet with flammable
products in, near or on the appliance.
• Do not let sparks or open flames to
come in contact with the appliance
when you open the door.
• Open the appliance door carefully.
The use of ingredients with alcohol
can cause a mixture of alcohol and
air.
WARNING!
Risk of damage to the
appliance.
• To prevent damage or discoloration to
the enamel:
– do not put ovenware or other
objects in the appliance directly
on the bottom.
www.aeg.com6

– do not put aluminium foil on the
appliance or directly on the
bottom of cavity.
– do not put water directly into the
hot appliance.
– do not keep moist dishes and
food in the appliance after you
finish the cooking.
– be careful when you remove or
install the accessories.
• Discoloration of the enamel or
stainless steel has no effect on the
performance of the appliance.
• Use a deep pan for moist cakes. Fruit
juices cause stains that can be
permanent.
• Do not keep hot cookware on the
control panel.
• Do not let cookware boil dry.
• Be careful not to let objects or
cookware fall on the appliance. The
surface can be damaged.
• Do not activate the cooking zones
with empty cookware or without
cookware.
• Cookware made of cast iron,
aluminium or with a damaged bottom
can cause scratches. Always lift these
objects up when you have to move
them on the cooking surface.
• This appliance is for cooking
purposes only. It must not be used for
other purposes, for example room
heating.
2.4 Care and Cleaning
WARNING!
Risk of injury, fire, or
damage to the appliance.
• Before maintenance, deactivate the
appliance.
Disconnect the mains plug from the
mains socket.
• Make sure the appliance is cold.
There is the risk that the glass panels
can break.
• Replace immediately the door glass
panels when they are damaged.
Contact the Authorised Service
Centre.
• Be careful when you remove the door
from the appliance. The door is
heavy!
• Fat and food remaining in the
appliance can cause fire.
• Clean regularly the appliance to
prevent the deterioration of the
surface material.
• Make sure the cavity and the door are
wiped dry after each use. Steam
produced during the operation of the
appliance condensates on cavity walls
and can cause corrosion. To
decrease the condensation operate
the appliance for 10 minutes before
cooking.
• Clean the appliance with a moist soft
cloth. Use only neutral detergents. Do
not use abrasive products, abrasive
cleaning pads, solvents or metal
objects.
• If you use an oven spray, follow the
safety instructions on the packaging.
• Do not clean the catalytic enamel (if
applicable) with any kind of detergent.
2.5 Internal lighting
WARNING!
Risk of electric shock.
• Concerning the lamp(s) inside this
product and spare part lamps sold
separately: These lamps are intended
to withstand extreme physical
conditions in household appliances,
such as temperature, vibration,
humidity, or are intended to signal
information about the operational
status of the appliance. They are not
intended to be used in other
applications and are not suitable for
household room illumination.
• Use only lamps with the same
specifications.
2.6 Service
• To repair the appliance contact the
Authorised Service Centre.
• Use original spare parts only.
2.7 Disposal
WARNING!
Risk of injury or suffocation.
• Disconnect the appliance from the
mains supply.
ENGLISH 7

• Cut off the mains electrical cable
close to the appliance and dispose of
it.
• Remove the door catch to prevent
children or pets from becoming
trapped in the appliance.
3. INSTALLATION
WARNING!
Refer to Safety chapters.
3.1 Technical data
Dimensions
Height 847 - 867 mm
Width 596 mm
Depth 600 mm
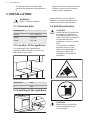
3.2 Location of the appliance
You can install your freestanding
appliance with cabinets on one or two
sides and in the corner.
A
Minimum distances
Dimension mm
A 685
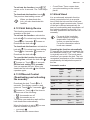
3.3 Levelling of the appliance
Use small feet on the bottom of
appliance to set the appliance top
surface level with other surfaces.
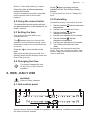
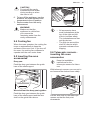
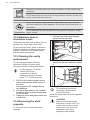
3.4 Anti-tilt protection
CAUTION!
Install the anti-tilt protection
to prevent the appliance
from falling under incorrect
loads. The anti-tilt protection
only works when the
appliance is put in a correct
area.
Your appliance has the
symbols shown on the
pictures (if applicable) to
remind you about the
installation of the anti-tilt
protection.
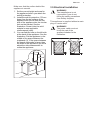
CAUTION!
Make sure you install the
anti-tilt protection at the
correct height.
www.aeg.com8

Make sure that the surface behind the
appliance is smooth.
1. Set the correct height and area for
the appliance before you attach the
anti-tilt protection.
2. Install the anti-tilt protection 176 mm
down from the top surface of the
appliance and 24 mm from the left
side of the appliance into the circular
hole on the bracket. See the
illustration. Screw it into the solid
material or use applicable
reinforcement (wall).
3. You can find the hole on the left side
at the back of the appliance. See the
illustration. Put the appliance in the
middle of the space between the
cupboards (1). If the space between
the bench cupboards is larger than
the width of the appliance, you must
adjust the side measurement to
centre the appliance.
1
24 mm
176 mm
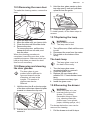
3.5 Electrical installation
WARNING!
The manufacturer is not
responsible if you do not
follow the safety precautions
from Safety chapters.
This appliance is supplied without a main
plug or a main cable.
WARNING!
The power cable must not
touch the part of the
appliance shaded in the
illustration.
ENGLISH 9

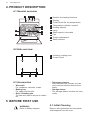
4. PRODUCT DESCRIPTION
4.1 General overview
5
4
3
2
1
5
8
10
1 3
2 4
6
7
9
1
Knob for the heating functions
2
Display
3
Control knob (for the temperature)
4
Temperature indicator / symbol
5
Heating element
6
Lamp
7
Shelf support, removable
8
Fan
9
Cavity embossment
10
Shelf positions
4.2 Hob overview
1 1
1
1
2
1
Induction cooking zone
2
Control Panel
4.3 Accessories
• Wire shelf
For cookware, cake tins, roasts.
• Baking tray
For cakes and biscuits.
• Grill- / Roasting pan
To bake and roast or as pan to collect
fat.
• Telescopic runners
With the telescopic runners you can
put in and remove the shelves more
easily.
• Storage drawer
The storage drawer is below the oven
cavity.
5. BEFORE FIRST USE
WARNING!
Refer to Safety chapters.
5.1 Initial Cleaning
Remove all accessories and removable
shelf supports from the oven.
www.aeg.com10

Refer to "Care and cleaning" chapter.
Clean the oven and the accessories
before the first use.
Put the accessories and the removable
shelf supports back to their initial
position.
5.2 Using the sensor fields
To activate the function press and hold
the selected symbol on the display for at
least 1 second.
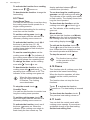
5.3 Setting the time
You must set the time before you
operate the oven.
The
flashes when you connect the
appliance to the electrical supply, when
there was a power cut or when the timer
is not set.
Press the
or to set the correct
time.
After approximately five seconds, the
flashing stops and the display shows the
time of day you set.
5.4 Changing the time
You cannot change the time
of day if any of the functions
operates.
Press again and again until the
indicator for the Time of Day function
flashes.
To set a new time, refer to "Setting the
time".
5.5 Preheating
Preheat the empty oven before first use.
1. Set the function
.Set the maximum
temperature.
2. Let the oven operate for 1 hour.
3. Set the function . Set the
maximum temperature.
4. Let the oven operate for 15 minutes.
5. Set the function
. Set the
maximum temperature.
6. Let the oven operate for 15 minutes.
7. Turn off the oven and let it cool
down.
Accessories can become hotter than
usual. The oven can emit an odour and
smoke. Make sure that the airflow in the
room is sufficient.
6. HOB - DAILY USE
WARNING!
Refer to Safety chapters.
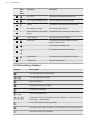
6.1 Hob control panel
6 742 3
8
1
11 910
5
Use the sensor fields to operate the appliance. The displays, indicators and sounds
tell which functions operate.
ENGLISH 11

Sen‐
sor
field
Function Comment
1
ON / OFF To activate and deactivate the hob.
2
Lock / Child Safety Device To lock / unlock the control panel.
3
Pause To activate and deactivate the function.
4
- Heat setting display To show the heat setting.
5
- Timer indicators of cooking
zones
To show for which zone you set the time.
6
- Timer display To show the time in minutes.
7
Hob²Hood To activate and deactivate the manual
mode of the function.
8
- To select the cooking zone.
9
/
- To increase or decrease the time.
10
PowerBoost To activate and deactivate the function.
11
- Control bar To set a heat setting.
6.2 Heat setting displays
Display Description
The cooking zone is deactivated.
-
The cooking zone operates.
Pause operates.
Automatic Heat Up operates.
PowerBoost operates.
+ digit
There is a malfunction.
/ /
OptiHeat Control (3 step Residual heat indicator): continue cooking /
keep warm / residual heat.
Lock / Child Safety Device operates.
Incorrect or too small cookware or no cookware on the cooking zone.
Automatic Switch Off operates.
www.aeg.com12

6.3 OptiHeat Control (3 step
Residual heat indicator)
WARNING!
/ / There is a risk of
burns from residual heat.
The indicators show the level of the
residual heat for the cooking zones you
are currently using. The indicators may
also come on for the neighbouring
cooking zones even if you are not using
them.
The induction cooking zones produce the
heat necessary for the cooking process
directly in the bottom of the cookware.
The glass ceramic is heated by the heat
of the cookware.
6.4 Activating and
deactivating
Touch for 1 second to activate or
deactivate the hob.
6.5 Automatic Switch Off
The function deactivates the hob
automatically if:
• all cooking zones are deactivated,
• you do not set the heat setting after
you activate the hob,
• you spill something or put something
on the control panel for more than 10
seconds (a pan, a cloth, etc.). An
acoustic signal sounds and the hob
deactivates. Remove the object or
clean the control panel.
• the hob gets too hot (e.g. when a
saucepan boils dry). Let the cooking
zone cool down before you use the
hob again.
• you use incorrect cookware. The
symbol comes on and the cooking
zone deactivates automatically after 2
minutes.
• you do not deactivate a cooking zone
or change the heat setting. After some
time
comes on and the hob
deactivates.
The relation between the heat setting
and the time after which the hob
deactivates:
Heat setting The hob deacti‐
vates after
, 1 - 3
6 hours
4 - 7 5 hours
8 - 9 4 hours
10 - 14 1.5 hour
6.6 The heat setting
To set or change the heat setting:
Touch the control bar at the correct heat
setting or move your finger along the
control bar until you reach the correct
heat setting.
6.7 Automatic Heat Up
Activate this function to get a desired
heat setting in a shorter time. When it is
on, the zone operates on the highest
setting in the beginning and then
continues to cook at the desired heating
setting.
To activate the function the
cooking zone must be cold.
To activate the function for a cooking
zone: touch ( comes on).
Immediately touch a desired heat setting.
After 3 seconds
comes on.
To deactivate the function: change the
heat setting.
6.8 PowerBoost
This function makes more power
available to the induction cooking zones.
The function can be activated for the
induction cooking zone only for a limited
period of time. After this time the
induction cooking zone automatically
sets back to the highest heat setting.
ENGLISH 13

To activate the function for a cooking
zone: touch . comes on.
To deactivate the function: change the
heat setting.
6.9 Timer
Count Down Timer
You can use this function to set how long
the cooking zone should operate for a
single cooking session.
First set the heat setting for the cooking
zone then set the function.
To set the cooking zone: touch
again and again until the indicator of a
necessary cooking zone comes on.
To activate the function: touch of
the timer to set the time (00 - 99
minutes). When the indicator of the
cooking zone starts to flash slowly the
time counts down.
To see the remaining time: set the
cooking zone with
. The indicator of
the cooking zone starts to flash quickly.
The display shows the remaining time.
To change the time: set the cooking
zone with . Touch or .
To deactivate the function: set the
cooking zone with and touch . The
remaining time counts back to 00. The
indicator of the cooking zone goes out.
When the time comes to an
end, the sound operates and
00 flashes. The cooking
zone deactivates.
To stop the sound: touch .
CountUp Timer
You can use this function to monitor how
long the cooking zone operates.
To set the cooking zone: touch
again and again until the indicator of a
necessary cooking zone comes on.
To activate the function: touch of
the timer.
comes on. When the
indicator of the cooking zone starts to
flash slowly the time counts up. The
display switches between and
counted time (minutes).
To see how long the cooking zone
operates: set the cooking zone with .
The indicator of the cooking zone starts
to flash quickly. The display shows how
long the zone operates.
To deactivate the function: set the
cooking zone with
and touch or
. The indicator of the cooking zone
goes out.
Minute Minder
You can use this function as a Minute
Minder when the hob is activated and
the cooking zones do not operate. The
heat setting display shows .
To activate the function: touch
.
Touch or of the timer to set the
time. When the time comes to an end,
the sound operates and 00 flashes.
To stop the sound: touch .
The function has no effect
on the operation of the
cooking zones.
6.10 Pause
This function sets all cooking zones that
operate to the lowest heat setting.
When the function operates, all other
symbols on the control panels are
locked.
The function does not stop the timer
functions.
Touch
to activate the function.
comes on. The heat setting is lowered
to 1.
To deactivate the function, touch
.
The previous heat setting comes on.
6.11 Lock
You can lock the control panel while
cooking zones operate. It prevents an
accidental change of the heat setting.
Set the heat setting first.
www.aeg.com14

To activate the function: touch .
comes on for 4 seconds. The Timer stays
on.
To deactivate the function: touch .
The previous heat setting comes on.
When you deactivate the
hob, you also deactivate this
function.
6.12 Child Safety Device
This function prevents an accidental
operation of the hob.
To activate the function: activate the
hob with
. Do not set any heat setting.
Touch for 4 seconds. comes on.
Deactivate the hob with .
To deactivate the function: activate the
hob with
. Do not set any heat setting.
Touch for 4 seconds. comes on.
Deactivate the hob with .
To override the function for only one
cooking time: activate the hob with .
comes on. Touch for 4 seconds.
Set the heat setting in 10 seconds.
You can operate the hob. When you
deactivate the hob with the function
operates again.
6.13 OffSound Control
(Deactivating and activating
the sounds)
Deactivate the hob. Touch for 3
seconds. The display comes on and
goes out. Touch for 3 seconds. or
comes on. Touch of the timer to
choose one of the following:
• - the sounds are off
• - the sounds are on
To confirm your selection wait until the
hob deactivates automatically.
When the function is set to you can
hear the sounds only when:
• you touch
• Minute Minder comes down
• Count Down Timer comes down
• you put something on the control
panel.
6.14 Hob²Hood
It is an advanced automatic function
which connects the hob to a special
hood. Both the hob and the hood have
an infrared signal communicator. Speed
of the fan is defined automatically on
basis of mode setting and temperature of
the hottest cookware on the hob. You
can also operate the fan from the hob
manually.
For most of the hoods the
remote system is originally
deactivated. Activate it
before you use the function.
For more information refer to
hood user manual.
Operating the function automatically
To operate the function automatically set
the automatic mode to H1 – H6. The hob
is originally set to H5. The hood reacts
whenever you operate the hob. The hob
recognizes temperature of the cookware
automatically and adjusts the speed of
the fan.
Automatic modes
Auto‐
matic
light
Boil‐
ing
1)
Frying
2)
Mode H0 Off Off Off
Mode H1 On Off Off
Mode
H2
3)
On Fan
speed 1
Fan
speed 1
Mode H3 On Off Fan
speed 1
Mode H4 On Fan
speed 1
Fan
speed 1
Mode H5 On Fan
speed 1
Fan
speed 2
ENGLISH 15

Auto‐
matic
light
Boil‐
ing
1)
Frying
2)
Mode H6 On Fan
speed 2
Fan
speed 3
1)
The hob detects the boiling process and acti‐
vates fan speed in accordance with automatic
mode.
2)
The hob detects the frying process and acti‐
vates fan speed in accordance with automatic
mode.
3)
This mode activates the fan and the light and
does not rely on the temperature.
Changing the automatic mode
1. Deactivate the appliance.
2. Touch for 3 seconds. The display
comes on and goes off.
3. Touch for 3 seconds until or
comes on.
4. Touch
a few times until comes
on.
5. Touch of the Timer to select an
automatic mode.
To operate the hood directly
on the hood panel deactivate
the automatic mode of the
function.
When you finish cooking and
deactivate the hob, the hood
fan may still operate for a
certain period of time. After
that time the system
deactivates the fan
automatically and prevents
you from accidental
activation of the fan for the
next 30 seconds.
Operating the fan speed manually
You can also operate the function
manually. To do that touch when the
hob is active. This deactivates automatic
operation of the function and allows you
to change the fan speed manually. When
you press you raise the fan speed by
one. When you reach an intensive level
and press
again you will set fan speed
to 0 which deactivates the hood fan. To
start the fan again with fan speed 1 touch
.
To activate automatic
operation of the function,
deactivate the hob and
activate it again.
Activating the light
You can set the hob to activate the light
automatically whenever you activate the
hob. To do so set the automatic mode to
H1 – H6.
The light on the hood
deactivates 2 minutes after
deactivating the hob.
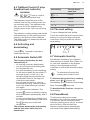
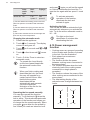
6.15 Power management
function
• Cooking zones are grouped according
to the location and number of phases
in the hob. See the illustration.
• Each phase has a maximum
electricity load.
• The function divides the power
between cooking zones connected to
the same phase.
• The function activates when the total
electricity load of the cooking zones
connected to a single phase is
exceeded.
• The function reduces the power of the
other cooking zones connected to the
same phase.
• The heat setting display of the
reduced zones changes between two
levels.
www.aeg.com16

7. HOB - HINTS AND TIPS
WARNING!
Refer to Safety chapters.
7.1 Cookware
For induction cooking zones
a strong electro-magnetic
field creates the heat in the
cookware very quickly.
Use the induction cooking
zones with suitable
cookware.
Cookware material
• correct: cast iron, steel, enamelled
steel, stainless steel, multi-layer
bottom (with a correct marking from a
manufacturer).
• not correct: aluminium, copper,
brass, glass, ceramic, porcelain.
Cookware is suitable for an induction
hob if:
• water boils very quickly on a zone set
to the highest heat setting.
• a magnet pulls on to the bottom of the
cookware.
The bottom of the cookware
must be as thick and flat as
possible.
Ensure pan bases are clean
and dry before placing on
the hob surface.
Cookware dimensions
Induction cooking zones adapt to the
dimension of the bottom of the cookware
automatically.
The cooking zone efficiency is related to
the diameter of the cookware. The
cookware with a diameter smaller than
the minimum receives only a part of the
power generated by the cooking zone.
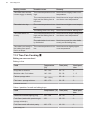
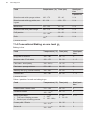
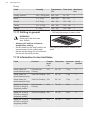
7.2 Minimum cookware
diameter
Cooking
zone
Cookware di‐
ameter (mm)
Power (W)
Left rear 125 - 140 1400/2500
Right rear 145 - 180 1800/2800
Right
front
145 - 180 1800/2800
Left front 180 - 210 2300/3600
7.3 The noises during
operation
If you can hear:
• crack noise: cookware is made of
different materials (a sandwich
construction).
• whistle sound: you use a cooking
zone with a high power level and the
cookware is made of different
materials (a sandwich construction).
• humming: you use a high power level.
• clicking: electric switching occurs.
• hissing, buzzing: the fan operates.
The noises are normal and do not
indicate any malfunction.
7.4 Öko Timer (Eco Timer)
To save energy, the heater of the
cooking zone deactivates before the
count down timer sounds. The difference
in the operation time depends on the
heat setting level and the length of the
cooking operation.
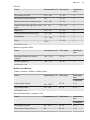
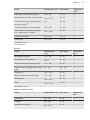
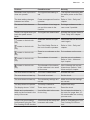
7.5 Examples of cooking
applications
The correlation between the heat setting
of a zone and its consumption of power
is not linear. When you increase the heat
setting, it is not proportional to the
increase of the consumption of power. It
means that a cooking zone with the
medium heat setting uses less than a
half of its power.
ENGLISH 17

The data in the table is for
guidance only.
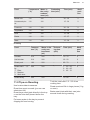
Heat setting Use to: Time
(min)
Hints
- 1
Keep cooked food warm. as nec‐
essary
Put a lid on the cookware.
1 - 3 Hollandaise sauce, melt: but‐
ter, chocolate, gelatine.
5 - 25 Mix from time to time.
1 - 3 Solidify: fluffy omelettes, baked
eggs.
10 - 40 Cook with a lid on.
3 - 5 Simmer rice and milkbased
dishes, heat up ready-cooked
meals.
25 - 50 Add at least twice as much liq‐
uid as rice, mix milk dishes
halfway through the proce‐
dure.
5 - 7 Steam vegetables, fish, meat. 20 - 45 Add a couple of tablespoons
of liquid.
7 - 9 Steam potatoes. 20 - 60 Use max. ¼ l of water for 750
g of potatoes.
7 - 9 Cook larger quantities of food,
stews and soups.
60 - 150 Up to 3 l of liquid plus ingredi‐
ents.
9 - 12 Gentle fry: escalope, veal cor‐
don bleu, cutlets, rissoles,
sausages, liver, roux, eggs,
pancakes, doughnuts.
as nec‐
essary
Turn halfway through.
12 - 13 Heavy fry, hash browns, loin
steaks, steaks.
5 - 15 Turn halfway through.
14 Boil water, cook pasta, sear meat (goulash, pot roast), deep-fry chips.
Boil large quantities of water. PowerBoost is activated.
8. HOB - CARE AND CLEANING
WARNING!
Refer to Safety chapters.
8.1 General information
• Clean the hob after each use.
• Always use cookware with a clean
base.
• Scratches or dark stains on the
surface have no effect on how the hob
operates.
• Use a special cleaner suitable for the
surface of the hob.
• Use a special scraper for the glass.
8.2 Cleaning the hob
• Remove immediately: melted plastic,
plastic foil, sugar and food with sugar,
otherwise, the dirt can cause damage
to the hob. Take care to avoid burns.
Use a special hob scraper on the
glass surface at an acute angle and
move the blade on the surface.
www.aeg.com18

• Remove when the hob is
sufficiently cool: limescale rings,
water rings, fat stains, shiny metallic
discoloration. Clean the hob with a
moist cloth and a non-abrasive
detergent. After cleaning, wipe the
hob dry with a soft cloth.
• Remove shiny metallic
discoloration: use a solution of water
with vinegar and clean the glass
surface with a cloth.
9. OVEN - DAILY USE
WARNING!
Refer to Safety chapters.
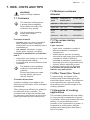
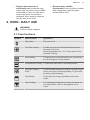
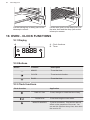
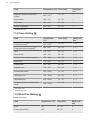
9.1 Oven functions
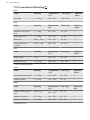
Symbol Oven function Application
Off position The oven is off.
True Fan Cooking To bake on up to two shelf positions at the same
time and to dry food.
Set the temperature 20 - 40 °C lower than for Con‐
ventional Cooking.
Pizza Setting To bake food on one shelf position for a more inten‐
sive browning and a crispy bottom.
Conventional Cooking To bake and roast food on one shelf position.
True Fan Cooking
PLUS
To add humidity during the cooking. To get the right
colour and crispy crust during baking. To give more
juiciness during reheating.
Fast Grilling To grill flat food in large quantities and to toast
bread.
Turbo Grilling To roast larger meat joints or poultry with bones on
one shelf position. Also to make gratins and to
brown.
ENGLISH 19

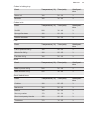
Symbol Oven function Application
Moist Fan Baking This function is designed to save energy during
cooking. For the cooking instructions refer to "Hints
and tips" chapter, Moist Fan Baking. The oven door
should be closed during cooking so that the function
is not interrupted and to ensure that the oven oper‐
ates with the highest energy efficiency possible.
When you use this function, the temperature in the
cavity may differ from the set temperature. The
heating power may be reduced. For general energy
saving recommendations refer to "Energy Efficien‐
cy" chapter, Energy Saving. This function was used
to comply with the energy efficiency class according
to EN 60350-1.
When you use this function the lamp automatically
turns off.
You can defrost food by
choosing Moist Fan Baking
function without setting the
temperature.
9.2 Activating and
deactivating the oven
It depends on the model if
your appliance has knob
symbols, indicators or
lamps:
• The indicator comes on
when the oven heats up.
• The lamp comes on when
the oven operates.
• The symbol shows
whether the knob controls
one of the cooking zones,
the oven functions or the
temperature.
1. Turn the knob for the oven functions
to select an oven function.
2. Turn the knob for the temperature to
select a temperature.
3. To deactivate the oven turn the
knobs for the oven functions and
temperature to the off position.
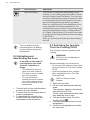
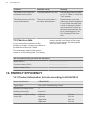
9.3 Activating the function:
True Fan Cooking PLUS
This function increases humidity while
cooking.
WARNING!
Risk of burns and damage to
the appliance.
Released humidity can cause burns:
• Do not open the appliance door when
using the function: True Fan Cooking
PLUS.
• Open the appliance door carefully
after using the function: True Fan
Cooking PLUS.
Refer to “Hints and tips”
chapter.
1. Open the oven door.
2. Fill the cavity embossment with tap
water.
The maximum capacity of the cavity
embossment is 250 ml.
Fill the cavity embossment with water
only when the oven is cold.
3. Turn the function knob: True Fan
Cooking PLUS .
4. Turn the temperature knob to set a
temperature.
5. Put food in the appliance and close
the oven door.
www.aeg.com20
Page is loading ...
Page is loading ...
Page is loading ...
Page is loading ...
Page is loading ...
Page is loading ...
Page is loading ...
Page is loading ...
Page is loading ...
Page is loading ...
Page is loading ...
Page is loading ...
Page is loading ...
Page is loading ...
Page is loading ...
Page is loading ...
Page is loading ...
Page is loading ...
Page is loading ...
Page is loading ...
Page is loading ...
Page is loading ...
Page is loading ...
Page is loading ...
-
 1
1
-
 2
2
-
 3
3
-
 4
4
-
 5
5
-
 6
6
-
 7
7
-
 8
8
-
 9
9
-
 10
10
-
 11
11
-
 12
12
-
 13
13
-
 14
14
-
 15
15
-
 16
16
-
 17
17
-
 18
18
-
 19
19
-
 20
20
-
 21
21
-
 22
22
-
 23
23
-
 24
24
-
 25
25
-
 26
26
-
 27
27
-
 28
28
-
 29
29
-
 30
30
-
 31
31
-
 32
32
-
 33
33
-
 34
34
-
 35
35
-
 36
36
-
 37
37
-
 38
38
-
 39
39
-
 40
40
-
 41
41
-
 42
42
-
 43
43
-
 44
44


