Denon VIERA TC-P65ZT60 User manual
- Category
- LCD TVs
- Type
- User manual
This manual is also suitable for

ZT60 series
M0413-0M0413-0

Watching TV
my Home Screen
Features 12
How to use 13
Settings 14
Cable / Satellite / Fiber Optic box
Initial setting 16
Antenna / Cable service without a box
Initial setting 17
Select channels 18
Favorite channels 19
Closed caption 20
SAP 21
Other 22
Blu-ray, DVD, Game Console, etc.
Connecting and viewing 23
HDMI connection notice 26
HDMI connection caution 27
Input signal 28
Useful features
Eco navigation 29
Voice guidance 30
Voice guidance features 31
Voice guidance settings 32
Voice control 33
How to use the voice control 34
Features 12Features 12
How to use 13How to use 13
Settings 14Settings 14
Initial setting 16Initial setting 16
Initial setting 17Initial setting 17
Select channels 18Select channels 18
Favorite channels 19Favorite channels 19
Closed caption 20Closed caption 20
SAP 21SAP 21
Other 22Other 22
Connecting and viewing 23Connecting and viewing 23
HDMI connection notice 26HDMI connection notice 26
HDMI connection caution 27HDMI connection caution 27
Input signal 28Input signal 28
Eco navigation 29Eco navigation 29
Voice guidance 30Voice guidance 30
Voice guidance features 31Voice guidance features 31
Voice guidance settings 32Voice guidance settings 32
Voice control 33Voice control 33
How to use the voice control 34How to use the voice control 34
2

Voice control settings 35
For best picture
Picture mode 36
Auto brightness (ECO) 38
Aspect 39
Aspect info. 41
Lock settings 42
Copy adjustments 43
Pro settings 44
For best audio
Basic settings 48
Advanced settings 50
3D
Notice 52
Parts name and functions 53
Registration 55
Replacing the battery 56
Viewing 3D 57
Change 3D ⇔ 2D 58
Adjust 3D images 59
3D settings 60
Using Internet services
Connect to network
Network connections 62
Network settings
Setting menu 64
Voice control settings 35Voice control settings 35
Picture mode 36Picture mode 36
Auto brightness (ECO) 38Auto brightness (ECO) 38
Aspect 39Aspect 39
Aspect info. 41Aspect info. 41
Lock settings 42Lock settings 42
Copy adjustments 43Copy adjustments 43
Pro settings 44Pro settings 44
Basic settings 48Basic settings 48
Advanced settings 50Advanced settings 50
Notice 52Notice 52
Parts name and functions 53Parts name and functions 53
Registration 55Registration 55
Replacing the battery 56Replacing the battery 56
Viewing 3D 57Viewing 3D 57
Change 3D ⇔ 2D 58Change 3D ⇔ 2D 58
Adjust 3D images 59Adjust 3D images 59
3D settings 603D settings 60
Network connections 62Network connections 62
Setting menu 64Setting menu 64
3

Network connection/Network status 65
VIERA remote settings 66
Network link 67
Software update 68
New software notice 69
How to use
Operate 70
Home network "DLNA"
Get started
Information 71
Connect to network
Network connections 72
Network settings
Setting menu 75
Network connection/Network status 76
VIERA remote settings 77
Network link 78
Software update 79
New software notice 80
Photos
Viewing Photos 81
Photo view 82
Options menu 83
Using slideshow 84
Slideshow settings 85
Videos
Network connection/Network status 65Network connection/Network status 65
VIERA remote settings 66VIERA remote settings 66
Network link 67Network link 67
Software update 68Software update 68
New software notice 69New software notice 69
Operate 70Operate 70
Information 71Information 71
Network connections 72Network connections 72
Setting menu 75Setting menu 75
Network connection/Network status 76Network connection/Network status 76
VIERA remote settings 77VIERA remote settings 77
Network link 78Network link 78
Software update 79Software update 79
New software notice 80New software notice 80
Viewing Photos 81Viewing Photos 81
Photo view 82Photo view 82
Options menu 83Options menu 83
Using slideshow 84Using slideshow 84
Slideshow settings 85Slideshow settings 85
4

Viewing Videos 86
Video view 87
Options menu 88
Music
Playing Music 89
Music view 90
Options menu 91
Data information
Compatible Data format 92
Notice 94
Media player
Get started
Information 95
Media warning messages 96
SD card handling cautions 97
Photos
Viewing Photos 98
Photo view 99
Sort the photos 100
Options menu 101
Multi shot 3D 102
Thumbnails size 103
Using slideshow 104
Slideshow settings 105
Soundtrack settings 107
Videos
Viewing Videos 86Viewing Videos 86
Video view 87Video view 87
Options menu 88Options menu 88
Playing Music 89Playing Music 89
Music view 90Music view 90
Options menu 91Options menu 91
Compatible Data format 92Compatible Data format 92
Notice 94Notice 94
Information 95Information 95
Media warning messages 96Media warning messages 96
SD card handling cautions 97SD card handling cautions 97
Viewing Photos 98Viewing Photos 98
Photo view 99Photo view 99
Sort the photos 100Sort the photos 100
Options menu 101Options menu 101
Multi shot 3D 102Multi shot 3D 102
Thumbnails size 103Thumbnails size 103
Using slideshow 104Using slideshow 104
Slideshow settings 105Slideshow settings 105
Soundtrack settings 107Soundtrack settings 107
5

Viewing Videos 108
Video view 109
Options menu 110
Music
Playing Music 111
Music view 112
Options menu 113
Data information
Compatible Data format 114
Notice 116
Convenience features
Using Apps list
Features 117
How to use 118
Settings 119
Timer
Setting menu 120
Timer (On/Off timer) 121
Sleep (Off timer) 122
Parental control
Setting menu 123
Parental control 124
Password setting 126
Parental control ratings 127
Closed caption
Setting menu 129
Viewing Videos 108Viewing Videos 108
Video view 109Video view 109
Options menu 110Options menu 110
Playing Music 111Playing Music 111
Music view 112Music view 112
Options menu 113Options menu 113
Compatible Data format 114Compatible Data format 114
Notice 116Notice 116
Features 117Features 117
How to use 118How to use 118
Settings 119Settings 119
Setting menu 120Setting menu 120
Timer (On/Off timer) 121Timer (On/Off timer) 121
Sleep (Off timer) 122Sleep (Off timer) 122
Setting menu 123Setting menu 123
Parental control 124Parental control 124
Password setting 126Password setting 126
Parental control ratings 127Parental control ratings 127
Setting menu 129Setting menu 129
6

Closed caption 130
Closed caption notice 132
VIERA Link ™ "HDAVI Control ™"
Basic feature 133
Connecting note 134
VIERA Link connections 136
VIERA Link settings 139
VIERA Link settings feature 140
VIERA Link 142
VIERA Link menu 143
Using Voice guidance
Voice guidance 145
Voice guidance features 146
Voice guidance settings 147
Using Voice control
Voice control 148
How to use the voice control 149
Voice control settings 150
Using Electronic Touch Pen
Information 151
Touch Pen settings 152
Using Touch Pen 153
Using Touch Pad Controller
Features 154
VIERA Touch Pad settings 155
Using Bluetooth devices
Closed caption 130Closed caption 130
Closed caption notice 132Closed caption notice 132
Basic feature 133Basic feature 133
Connecting note 134Connecting note 134
VIERA Link connections 136VIERA Link connections 136
VIERA Link settings 139VIERA Link settings 139
VIERA Link settings feature 140VIERA Link settings feature 140
VIERA Link 142VIERA Link 142
VIERA Link menu 143VIERA Link menu 143
Voice guidance 145Voice guidance 145
Voice guidance features 146Voice guidance features 146
Voice guidance settings 147Voice guidance settings 147
Voice control 148Voice control 148
How to use the voice control 149How to use the voice control 149
Voice control settings 150Voice control settings 150
Information 151Information 151
Touch Pen settings 152Touch Pen settings 152
Using Touch Pen 153Using Touch Pen 153
Features 154Features 154
VIERA Touch Pad settings 155VIERA Touch Pad settings 155
7

Settings 156
Bluetooth settings 157
Control by Smartphone, etc.
Smartphone remote 158
Remote control via IP 159
Using USB Keyboard / Gamepad
Keyboard 160
Gamepad 161
All settings
How to use
Setting menu 162
Picture
Basic settings 163
Pro settings 166
Advanced picture 170
Screen settings 172
3D settings 174
Other settings 176
Sound
Basic settings 177
Voice guidance settings 179
Advanced settings 180
DIGITAL AUDIO OUT terminal 182
Network
Network settings 183
Timer
Settings 156Settings 156
Bluetooth settings 157Bluetooth settings 157
Smartphone remote 158Smartphone remote 158
Remote control via IP 159Remote control via IP 159
Keyboard 160Keyboard 160
Gamepad 161Gamepad 161
Setting menu 162Setting menu 162
Basic settings 163Basic settings 163
Pro settings 166Pro settings 166
Advanced picture 170Advanced picture 170
Screen settings 172Screen settings 172
3D settings 1743D settings 174
Other settings 176Other settings 176
Basic settings 177Basic settings 177
Voice guidance settings 179Voice guidance settings 179
Advanced settings 180Advanced settings 180
DIGITAL AUDIO OUT terminal 182DIGITAL AUDIO OUT terminal 182
Network settings 183Network settings 183
8

Setting menu 185
Clock settings 186
Sleep (Off timer) 187
Auto turn off settings 188
Timer (On/Off timer) 189
Setup
Setting menu 190
Eco navigation 191
Voice control settings 192
USB device setup 193
Touch Pen setup 194
VIERA Touch Pad settings 195
Bluetooth settings 196
Parental control 197
Password setting 199
Parental control ratings 200
ANTENNA/Cable setup 202
Language settings 204
Display customization 205
Closed caption 206
Closed caption notice 208
VIERA Link settings 209
System settings 210
Other settings 211
Useful settings 212
Support / FAQ
Setting menu 185Setting menu 185
Clock settings 186Clock settings 186
Sleep (Off timer) 187Sleep (Off timer) 187
Auto turn off settings 188Auto turn off settings 188
Timer (On/Off timer) 189Timer (On/Off timer) 189
Setting menu 190Setting menu 190
Eco navigation 191Eco navigation 191
Voice control settings 192Voice control settings 192
USB device setup 193USB device setup 193
Touch Pen setup 194Touch Pen setup 194
VIERA Touch Pad settings 195VIERA Touch Pad settings 195
Bluetooth settings 196Bluetooth settings 196
Parental control 197Parental control 197
Password setting 199Password setting 199
Parental control ratings 200Parental control ratings 200
ANTENNA/Cable setup 202ANTENNA/Cable setup 202
Language settings 204Language settings 204
Display customization 205Display customization 205
Closed caption 206Closed caption 206
Closed caption notice 208Closed caption notice 208
VIERA Link settings 209VIERA Link settings 209
System settings 210System settings 210
Other settings 211Other settings 211
Useful settings 212Useful settings 212
9

Help menu
Using Help menu 213
FAQ
Picture - Viewing 214
Picture - Snowy / none 215
Picture - Distortion 216
Picture - Continue 217
Sound - None 218
Sound - Unusual 219
Networking 220
Software update 221
3D - Viewing 222
3D - Format 223
Voice guidance 224
Voice control 225
VIERA Touch Pad Controller 226
Electronic Touch Pen 227
Eco-Navigation (Eco-Navi) 228
Other 229
Menu - Gray-out or missing items 230
Factory defaults 231
Care and Cleaning
Display panel 232
Cabinet 233
Pedestal / Power cord 234
3D Eyewear 235
Using Help menu 213Using Help menu 213
Picture - Viewing 214Picture - Viewing 214
Picture - Snowy / none 215Picture - Snowy / none 215
Picture - Distortion 216Picture - Distortion 216
Picture - Continue 217Picture - Continue 217
Sound - None 218Sound - None 218
Sound - Unusual 219Sound - Unusual 219
Networking 220Networking 220
Software update 221Software update 221
3D - Viewing 2223D - Viewing 222
3D - Format 2233D - Format 223
Voice guidance 224Voice guidance 224
Voice control 225Voice control 225
VIERA Touch Pad Controller 226VIERA Touch Pad Controller 226
Electronic Touch Pen 227Electronic Touch Pen 227
Eco-Navigation (Eco-Navi) 228Eco-Navigation (Eco-Navi) 228
Other 229Other 229
Menu - Gray-out or missing items 230Menu - Gray-out or missing items 230
Factory defaults 231Factory defaults 231
Display panel 232Display panel 232
Cabinet 233Cabinet 233
Pedestal / Power cord 234Pedestal / Power cord 234
3D Eyewear 2353D Eyewear 235
10

Back panel (Cooling fan) 236
Meaning of signs :
Press the Remote control button
INFO Letters in box : Remote control button
MENU Letters in Cyan : Menus on screen display
Back panel (Cooling fan) 236Back panel (Cooling fan) 236
Meaning of signs :
Press the Remote control button
INFO Letters in box : Remote control button
MENU Letters in Cyan : Menus on screen display
Meaning of signs :
Press the Remote control button
INFO Letters in box : Remote control button
MENU Letters in Cyan : Menus on screen display
11

Watching TV
my Home Screen
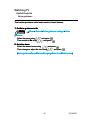
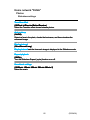
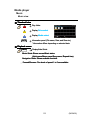
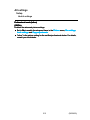
Features
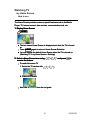
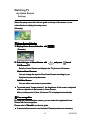
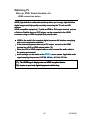
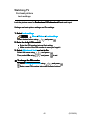
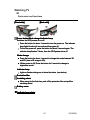
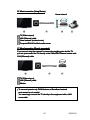
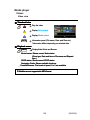
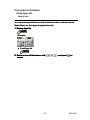
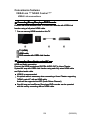
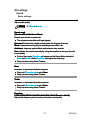
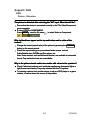
my Home Screen is a gateway to the TV, applications, and more. It provides
easy access to special features such as the Media Player, videos, games,
communication tools, etc.
Home Screen
(Example)
Home Screen
Selected content screen (TV, application, etc.)
Home Screen Selection
- Choose your preferred Home Screen layout.
my Home Screen is a gateway to the TV, applications, and more. It provides
easy access to special features such as the Media Player, videos, games,
communication tools, etc.
my Home Screen is a gateway to the TV, applications, and more. It provides
easy access to special features such as the Media Player, videos, games,
communication tools, etc.
Home ScreenHome ScreenHome ScreenHome Screen
(Example)(Example)
Home Screen
Selected content screen (TV, application, etc.)
Home Screen Selection
- Choose your preferred Home Screen layout.
Home Screen
Selected content screen (TV, application, etc.)
Home Screen Selection
- Choose your preferred Home Screen layout.
12 (0100101)

Watching TV
my Home Screen
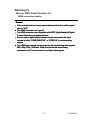
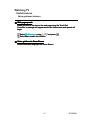
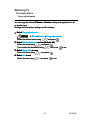
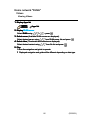
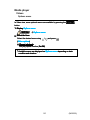
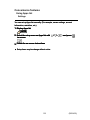
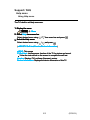
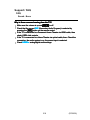
How to use
The Home Screen provides access to special features such as the Media
Player, TV, Internet content, data services, communication tools, etc.
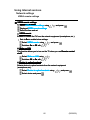
1. Display Home Screen
HOME
The last viewed Home Screen is displayed each time the TV is turned
on.
Press HOME again to return to Home Screen Selection.
You can change the default Home Screen when the TV is turned on.
(Watching TV > my Home Screen > Settings)
2. Select a Home Screen icon using / / / and press to
access the feature.
To watch full-screen TV
1. Select the TV window with / / /
2. Press OK to watch
Also refer to Tutorial from the tool guide.
The Home Screen provides access to special features such as the Media
Player, TV, Internet content, data services, communication tools, etc.
The Home Screen provides access to special features such as the Media
Player, TV, Internet content, data services, communication tools, etc.
1. Display Home Screen
HOME
1. Display Home Screen
HOME
1. Display Home Screen
HOMEHOME
The last viewed Home Screen is displayed each time the TV is turned
on.
Press HOME again to return to Home Screen Selection.
You can change the default Home Screen when the TV is turned on.
(Watching TV > my Home Screen > Settings)
The last viewed Home Screen is displayed each time the TV is turned
on.
Press HOME again to return to Home Screen Selection.HOMEHOME
You can change the default Home Screen when the TV is turned on.
(Watching TV > my Home Screen > Settings)
2. Select a Home Screen icon using / / / and press to
access the feature.
2. Select a Home Screen icon using / / / and press to
access the feature.
2. Select a Home Screen icon using / / / and press to
access the feature.
To watch full-screen TVTo watch full-screen TV
1. Select the TV window with / / /
2. Press OK to watch
1. Select the TV window with / / /1.
2. Press OK to watch2.
Also refer to Tutorial from the tool guide.Also refer to Tutorial from the tool guide.TutorialTutorial
13 (0100102)

Watching TV
my Home Screen
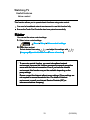
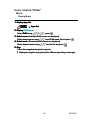
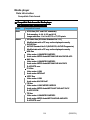
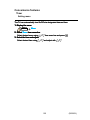
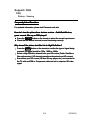
Settings
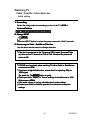
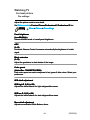
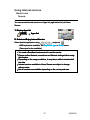
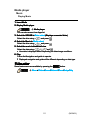
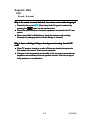
Select the setup menu from the tool guide on the top of the screen, or use
colored button to display the setup menu.
(Example)
Home Screen Selection
1. Display Home Screen Selection with HOME
(Example)
2. Select the type of Home Screen with / and press to set
Full Screen TV
Exits the Home Screen and displays the TV picture in full-screen.
Various Home Screens
You can change the layout of the Home Screen according to your
lifestyle and personal preferences.
Add New Screen
You can add a new screen to personalize.
To prevent panel "image retention", the brightness of the screen is adjusted
when no operation is performed on Home Screen.
After a certain period of time, full-screen TV is displayed automatically.
Face recognition
By using the Communication camera, you can select the registered Home
Screen with face recognition.
Please refer to Tutorial from the tool guide.
Communication camera is not included. Please purchase as necessary.
Select the setup menu from the tool guide on the top of the screen, or use
colored button to display the setup menu.
Select the setup menu from the tool guide on the top of the screen, or use
colored button to display the setup menu.
(Example)(Example)
Home Screen SelectionHome Screen SelectionHome Screen SelectionHome Screen Selection
1. Display Home Screen Selection with HOME
1. Display Home Screen Selection with HOME
1. Display Home Screen Selection with HOMEHOME
(Example)(Example)
2. Select the type of Home Screen with / and press to set
2. Select the type of Home Screen with / and press to set
2. Select the type of Home Screen with / and press to set
Full Screen TVFull Screen TVFull Screen TV
Exits the Home Screen and displays the TV picture in full-screen.Exits the Home Screen and displays the TV picture in full-screen.
Various Home ScreensVarious Home ScreensVarious Home Screens
You can change the layout of the Home Screen according to your
lifestyle and personal preferences.
You can change the layout of the Home Screen according to your
lifestyle and personal preferences.
Add New ScreenAdd New ScreenAdd New Screen
You can add a new screen to personalize.You can add a new screen to personalize.
To prevent panel "image retention", the brightness of the screen is adjusted
when no operation is performed on Home Screen.
After a certain period of time, full-screen TV is displayed automatically.
To prevent panel "image retention", the brightness of the screen is adjusted
when no operation is performed on Home Screen.
After a certain period of time, full-screen TV is displayed automatically.
Face recognitionFace recognitionFace recognitionFace recognition
By using the Communication camera, you can select the registered Home
Screen with face recognition.
Please refer to Tutorial from the tool guide.
By using the Communication camera, you can select the registered Home
Screen with face recognition.
Please refer to Tutorial from the tool guide.Tutorial
Communication camera is not included. Please purchase as necessary.Communication camera is not included. Please purchase as necessary.
14 (0100103)

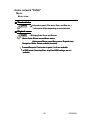
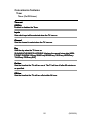
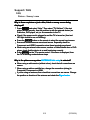
Settings
You can customize Home Screen. For example, you can change the wallpaper,
rename the screen, add / delete or set your preferred Home screen, edit
applications, etc.
1. Select Settings from the tool guide
2. Follow the on-screen instructions
Search function
You can search the content of various Home screen features.
1. Select Search from the tool guide
2. Follow the on-screen instructions
To use this function fully, you need a broadband network environment.
Ensure the network connections and network settings are completed.
Be sure to update the software when a software update notice is
displayed on the TV screen. If the software is not updated, you will not
be able to use my Home Screen. You can update the software later
manually.
SettingsSettingsSettingsSettings
You can customize Home Screen. For example, you can change the wallpaper,
rename the screen, add / delete or set your preferred Home screen, edit
applications, etc.
You can customize Home Screen. For example, you can change the wallpaper,
rename the screen, add / delete or set your preferred Home screen, edit
applications, etc.
1. Select Settings from the tool guide
2. Follow the on-screen instructions
1. Select Settings from the tool guide
1. SettingsSettings
2. Follow the on-screen instructions
2.
Search functionSearch functionSearch functionSearch function
You can search the content of various Home screen features.You can search the content of various Home screen features.
1. Select Search from the tool guide
2. Follow the on-screen instructions
1. Select Search from the tool guide
1. SearchSearch
2. Follow the on-screen instructions
2.
To use this function fully, you need a broadband network environment.
Ensure the network connections and network settings are completed.
Be sure to update the software when a software update notice is
displayed on the TV screen. If the software is not updated, you will not
be able to use my Home Screen. You can update the software later
manually.
15 (0100103)

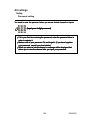
Watching TV
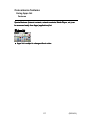
Cable / Satellite / Fiber Optic box
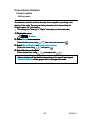
Initial setting
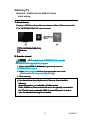
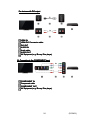
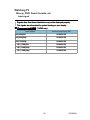
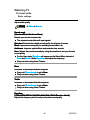
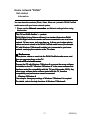
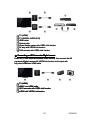
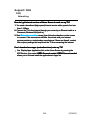
1. Connecting
Select the wiring method connecting your box to the TV, AV IN or
Antenna/Cable in.
Note: HDMI will provide the best HD picture
2. Change INPUT
INPUT
Press the INPUT button to select the proper connection. Wait 2 seconds.
3. Power on your Cable , Satellite or Fiber box
Use the box's remote control to change channels.
If the box is connected to the TV using a COAX cable (Antenna/Cable
in), then set the TV channel to CH3 or CH4. Note that the picture will
not be in HD.
CC/SAP is not available when watching TV with a Cable or Satellite box
connected via HDMI.
If you have a High Definition box, ensure that it is outputting 720p or
1080i signal.
Tip: press the TV's INFO button to verify.
Check your box's "aspect" or "format" settings. It should be set to 16:9,
Widescreen or FULL.
If the audio volume is too low, check the box's audio settings.
Contact your Cable or Satellite provider for instructions on any box
settings.
1. Connecting
1. Connecting
1. Connecting
Select the wiring method connecting your box to the TV, AV IN or
Antenna/Cable in.
Select the wiring method connecting your box to the TV, AV IN or
Antenna/Cable in.
AV IN
Antenna/Cable in
Note: HDMI will provide the best HD pictureNote: HDMI will provide the best HD pictureNote: HDMI will provide the best HD picture
2. Change INPUT
INPUT
2. Change INPUT
INPUT
2. Change INPUT
INPUTINPUT
Press the INPUT button to select the proper connection. Wait 2 seconds.Press the INPUT button to select the proper connection. Wait 2 seconds.
3. Power on your Cable , Satellite or Fiber box
3. Power on your Cable , Satellite or Fiber box
3. Power on your Cable , Satellite or Fiber box
Use the box's remote control to change channels.Use the box's remote control to change channels.
If the box is connected to the TV using a COAX cable (Antenna/Cable
in), then set the TV channel to CH3 or CH4. Note that the picture will
not be in HD.
If the box is connected to the TV using a COAX cable (Antenna/Cable
in), then set the TV channel to CH3 or CH4. Note that the picture will
not be in HD.
If the box is connected to the TV using a COAX cable (Antenna/Cable
in), then set the TV channel to CH3 or CH4. Note that the picture will
not be in HD.
CC/SAP is not available when watching TV with a Cable or Satellite box
connected via HDMI.
If you have a High Definition box, ensure that it is outputting 720p or
1080i signal.
Tip: press the TV's INFO button to verify.
Check your box's "aspect" or "format" settings. It should be set to 16:9,
Widescreen or FULL.
If the audio volume is too low, check the box's audio settings.
Contact your Cable or Satellite provider for instructions on any box
settings.
CC/SAP is not available when watching TV with a Cable or Satellite box
connected via HDMI.
If you have a High Definition box, ensure that it is outputting 720p or
1080i signal.
Tip: press the TV's INFO button to verify.INFOINFO
Check your box's "aspect" or "format" settings. It should be set to 16:9,
Widescreen or FULL.FULL
If the audio volume is too low, check the box's audio settings.
Contact your Cable or Satellite provider for instructions on any box
settings.
16 (0100201)

Watching TV
Antenna / Cable service without a box
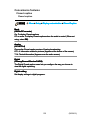
Initial setting
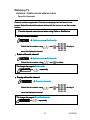
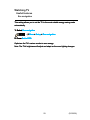
1. Connect coax
Connect a COAX wire from either an antenna or Basic Cable service to the
TV's "ANTENNA/CABLE IN" screw terminal.
TV (ANTENNA/CABLE IN)
Antenna
2. Scan the channel
MENU Menu > Setup > ANTENNA/Cable setup >
ANTENNA/Cable signal, Auto program
1. Select either Cable or Antenna programming source in
ANTENNA/Cable signal.
2. Select Auto program and then the appropriate scan mode:
(All channels / Analog only / Digital only).
3. Start scanning.
If no channels are found by the end of the scan, then check the
following:
Antenna's position - or availability of Cable service.
Cable, Satellite or Fiber services with a box are typically connected to
the TV's A/V inputs, preferably HDMI, for best HD picture. In such a
case, the channel scanning is not needed.
1. Connect coax
1. Connect coax
1. Connect coax
Connect a COAX wire from either an antenna or Basic Cable service to the
TV's "ANTENNA/CABLE IN" screw terminal.
Connect a COAX wire from either an antenna or Basic Cable service to the
TV's "ANTENNA/CABLE IN" screw terminal.
TV (ANTENNA/CABLE IN)
Antenna
TV (ANTENNA/CABLE IN)
Antenna
TV (ANTENNA/CABLE IN)
Antenna
2. Scan the channel
2. Scan the channel
2. Scan the channel
MENU Menu > Setup > ANTENNA/Cable setup >
ANTENNA/Cable signal, Auto program
MENU Menu > Setup > ANTENNA/Cable setup >
ANTENNA/Cable signal, Auto program
MENU Menu > Setup > ANTENNA/Cable setup >
ANTENNA/Cable signal, Auto program
MENU Menu > Setup > ANTENNA/Cable setup >
ANTENNA/Cable signal, Auto program
Menu Setup ANTENNA/Cable setup
ANTENNA/Cable signal, Auto programANTENNA/Cable signal Auto program
1. Select either Cable or Antenna programming source in
ANTENNA/Cable signal.
2. Select Auto program and then the appropriate scan mode:
(All channels / Analog only / Digital only).
3. Start scanning.
1. Select either Cable or Antenna programming source in
ANTENNA/Cable signal.
2. Select Auto program and then the appropriate scan mode:
(All channels / Analog only / Digital only).
3. Start scanning.
Cable Antenna
ANTENNA/Cable signalANTENNA/Cable signal
Auto programAuto program
All channelsAll channels Analog onlyAnalog only Digital onlyDigital only
If no channels are found by the end of the scan, then check the
following:
Antenna's position - or availability of Cable service.
Cable, Satellite or Fiber services with a box are typically connected to
the TV's A/V inputs, preferably HDMI, for best HD picture. In such a
case, the channel scanning is not needed.
17 (0100301)

Watching TV
Antenna / Cable service without a box
Select channels
Select desired channel
or
CH buttons are also available on the TV.
Select desired digital channel
To directly enter a digital channel number use
When tuning to a digital channel, press the button to enter the minor
number in a compound channel number.
(e.g. CH15-1 )
Select desired channelSelect desired channelSelect desired channel
or or
CH buttons are also available on the TV.CH buttons are also available on the TV.
Select desired digital channelSelect desired digital channelSelect desired digital channel
To directly enter a digital channel number use To directly enter a digital channel number use
When tuning to a digital channel, press the button to enter the minor
number in a compound channel number.
(e.g. CH15-1 )
When tuning to a digital channel, press the button to enter the minor
number in a compound channel number.
(e.g. CH15-1 )
18 (0100302)

Watching TV
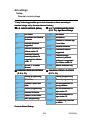
Antenna / Cable service without a box
Favorite channels
Channel numbers registered in Favorite are displayed on the favorite tune
screen. Select the desired broadcast station with the cursor or use the number
buttons.
Favorite channels cannot be set when using Cable or Satellite box
Set the Favorite channel
OPTION Options menu > Set favorite
Select the list number using / and or directly to
save the displayed channel.
Delete a Favorite channel
OPTION Options menu > Set favorite
Select the list number using / and to delete.
* To change the page in Set favorite
FAVORITE or / repeatedly
Display a Favorite channel
FAVORITE Favorite channels
Select the list number using / and or directly to
save the displayed channel.
* To change the page in Favorite channels
FAVORITE or / repeatedly
Channel numbers registered in Favorite are displayed on the favorite tune
screen. Select the desired broadcast station with the cursor or use the number
buttons.
Channel numbers registered in Favorite are displayed on the favorite tune
screen. Select the desired broadcast station with the cursor or use the number
buttons.
Favorite channels cannot be set when using Cable or Satellite boxFavorite channels cannot be set when using Cable or Satellite boxFavorite channels cannot be set when using Cable or Satellite box
Set the Favorite channelSet the Favorite channelSet the Favorite channel
OPTION Options menu > Set favorite OPTION Options menu > Set favoriteOPTION Options menu > Set favoriteOPTION Options menu Set favorite
Select the list number using / and or directly to
save the displayed channel.
Select the list number using / and or directly to
save the displayed channel.
Delete a Favorite channelDelete a Favorite channelDelete a Favorite channel
OPTION Options menu > Set favorite OPTION Options menu > Set favoriteOPTION Options menu > Set favoriteOPTION Options menu Set favorite
Select the list number using / and to delete.Select the list number using / and to delete.
* To change the page in Set favorite
FAVORITE or / repeatedly
* To change the page in Set favorite
FAVORITE or / repeatedly
* To change the page in Set favorite
FAVORITE or / repeatedly
Set favoriteSet favorite
FAVORITEFAVORITE
Display a Favorite channelDisplay a Favorite channelDisplay a Favorite channel
FAVORITE Favorite channels FAVORITE Favorite channelsFAVORITE Favorite channelsFAVORITE Favorite channels
Select the list number using / and or directly to
save the displayed channel.
Select the list number using / and or directly to
save the displayed channel.
* To change the page in Favorite channels
FAVORITE or / repeatedly
* To change the page in Favorite channels
FAVORITE or / repeatedly
* To change the page in Favorite channels
FAVORITE or / repeatedly
Favorite channelsFavorite channels
FAVORITEFAVORITE
19 (0100303)

Watching TV
Antenna / Cable service without a box
Closed caption
Viewing with Closed caption
CC
Switches the Closed caption mode.
( Off / On / On mute )
CC is not available when watching TV with a Cable or Satellite box
connected via HDMI.
Contact your Cable or Satellite operator for instructions on enabling CC
with their box.
The TV's CC button does not operate the Satellite or Cable box's CC
function.
For viewing the CC of digital broadcasting, set the aspect to FULL (If
viewing with H-FILL, JUST, ZOOM or 4:3; characters might be cut off).
If the CC is set to On on both the receiver and TV when the signal is
480i (except for the HDMI connection), the CC may overlap on the TV.
If a digital program is being output in analog format, the CC data will
also be output in analog format.
If the recorder or output monitor is connected to the TV, the CC needs
to be set up on the recorder or output monitor.
Viewing with Closed captionViewing with Closed captionViewing with Closed caption
CC
Switches the Closed caption mode.
( Off / On / On mute )
CC
Switches the Closed caption mode.
( Off / On / On mute )
CCCC
Off On On mute
CC is not available when watching TV with a Cable or Satellite box
connected via HDMI.
Contact your Cable or Satellite operator for instructions on enabling CC
with their box.
The TV's CC button does not operate the Satellite or Cable box's CC
function.
For viewing the CC of digital broadcasting, set the aspect to FULL (If
viewing with H-FILL, JUST, ZOOM or 4:3; characters might be cut off).
If the CC is set to On on both the receiver and TV when the signal is
480i (except for the HDMI connection), the CC may overlap on the TV.
If a digital program is being output in analog format, the CC data will
also be output in analog format.
If the recorder or output monitor is connected to the TV, the CC needs
to be set up on the recorder or output monitor.
20 (0100304)
Page is loading ...
Page is loading ...
Page is loading ...
Page is loading ...
Page is loading ...
Page is loading ...
Page is loading ...
Page is loading ...
Page is loading ...
Page is loading ...
Page is loading ...
Page is loading ...
Page is loading ...
Page is loading ...
Page is loading ...
Page is loading ...
Page is loading ...
Page is loading ...
Page is loading ...
Page is loading ...
Page is loading ...
Page is loading ...
Page is loading ...
Page is loading ...
Page is loading ...
Page is loading ...
Page is loading ...
Page is loading ...
Page is loading ...
Page is loading ...
Page is loading ...
Page is loading ...
Page is loading ...
Page is loading ...
Page is loading ...
Page is loading ...
Page is loading ...
Page is loading ...
Page is loading ...
Page is loading ...
Page is loading ...
Page is loading ...
Page is loading ...
Page is loading ...
Page is loading ...
Page is loading ...
Page is loading ...
Page is loading ...
Page is loading ...
Page is loading ...
Page is loading ...
Page is loading ...
Page is loading ...
Page is loading ...
Page is loading ...
Page is loading ...
Page is loading ...
Page is loading ...
Page is loading ...
Page is loading ...
Page is loading ...
Page is loading ...
Page is loading ...
Page is loading ...
Page is loading ...
Page is loading ...
Page is loading ...
Page is loading ...
Page is loading ...
Page is loading ...
Page is loading ...
Page is loading ...
Page is loading ...
Page is loading ...
Page is loading ...
Page is loading ...
Page is loading ...
Page is loading ...
Page is loading ...
Page is loading ...
Page is loading ...
Page is loading ...
Page is loading ...
Page is loading ...
Page is loading ...
Page is loading ...
Page is loading ...
Page is loading ...
Page is loading ...
Page is loading ...
Page is loading ...
Page is loading ...
Page is loading ...
Page is loading ...
Page is loading ...
Page is loading ...
Page is loading ...
Page is loading ...
Page is loading ...
Page is loading ...
Page is loading ...
Page is loading ...
Page is loading ...
Page is loading ...
Page is loading ...
Page is loading ...
Page is loading ...
Page is loading ...
Page is loading ...
Page is loading ...
Page is loading ...
Page is loading ...
Page is loading ...
Page is loading ...
Page is loading ...
Page is loading ...
Page is loading ...
Page is loading ...
Page is loading ...
Page is loading ...
Page is loading ...
Page is loading ...
Page is loading ...
Page is loading ...
Page is loading ...
Page is loading ...
Page is loading ...
Page is loading ...
Page is loading ...
Page is loading ...
Page is loading ...
Page is loading ...
Page is loading ...
Page is loading ...
Page is loading ...
Page is loading ...
Page is loading ...
Page is loading ...
Page is loading ...
Page is loading ...
Page is loading ...
Page is loading ...
Page is loading ...
Page is loading ...
Page is loading ...
Page is loading ...
Page is loading ...
Page is loading ...
Page is loading ...
Page is loading ...
Page is loading ...
Page is loading ...
Page is loading ...
Page is loading ...
Page is loading ...
Page is loading ...
Page is loading ...
Page is loading ...
Page is loading ...
Page is loading ...
Page is loading ...
Page is loading ...
Page is loading ...
Page is loading ...
Page is loading ...
Page is loading ...
Page is loading ...
Page is loading ...
Page is loading ...
Page is loading ...
Page is loading ...
Page is loading ...
Page is loading ...
Page is loading ...
Page is loading ...
Page is loading ...
Page is loading ...
Page is loading ...
Page is loading ...
Page is loading ...
Page is loading ...
Page is loading ...
Page is loading ...
Page is loading ...
Page is loading ...
Page is loading ...
Page is loading ...
Page is loading ...
Page is loading ...
Page is loading ...
Page is loading ...
Page is loading ...
Page is loading ...
Page is loading ...
Page is loading ...
Page is loading ...
Page is loading ...
Page is loading ...
Page is loading ...
Page is loading ...
Page is loading ...
Page is loading ...
Page is loading ...
Page is loading ...
Page is loading ...
Page is loading ...
Page is loading ...
Page is loading ...
Page is loading ...
Page is loading ...
Page is loading ...
Page is loading ...
Page is loading ...
Page is loading ...
Page is loading ...
Page is loading ...
-
 1
1
-
 2
2
-
 3
3
-
 4
4
-
 5
5
-
 6
6
-
 7
7
-
 8
8
-
 9
9
-
 10
10
-
 11
11
-
 12
12
-
 13
13
-
 14
14
-
 15
15
-
 16
16
-
 17
17
-
 18
18
-
 19
19
-
 20
20
-
 21
21
-
 22
22
-
 23
23
-
 24
24
-
 25
25
-
 26
26
-
 27
27
-
 28
28
-
 29
29
-
 30
30
-
 31
31
-
 32
32
-
 33
33
-
 34
34
-
 35
35
-
 36
36
-
 37
37
-
 38
38
-
 39
39
-
 40
40
-
 41
41
-
 42
42
-
 43
43
-
 44
44
-
 45
45
-
 46
46
-
 47
47
-
 48
48
-
 49
49
-
 50
50
-
 51
51
-
 52
52
-
 53
53
-
 54
54
-
 55
55
-
 56
56
-
 57
57
-
 58
58
-
 59
59
-
 60
60
-
 61
61
-
 62
62
-
 63
63
-
 64
64
-
 65
65
-
 66
66
-
 67
67
-
 68
68
-
 69
69
-
 70
70
-
 71
71
-
 72
72
-
 73
73
-
 74
74
-
 75
75
-
 76
76
-
 77
77
-
 78
78
-
 79
79
-
 80
80
-
 81
81
-
 82
82
-
 83
83
-
 84
84
-
 85
85
-
 86
86
-
 87
87
-
 88
88
-
 89
89
-
 90
90
-
 91
91
-
 92
92
-
 93
93
-
 94
94
-
 95
95
-
 96
96
-
 97
97
-
 98
98
-
 99
99
-
 100
100
-
 101
101
-
 102
102
-
 103
103
-
 104
104
-
 105
105
-
 106
106
-
 107
107
-
 108
108
-
 109
109
-
 110
110
-
 111
111
-
 112
112
-
 113
113
-
 114
114
-
 115
115
-
 116
116
-
 117
117
-
 118
118
-
 119
119
-
 120
120
-
 121
121
-
 122
122
-
 123
123
-
 124
124
-
 125
125
-
 126
126
-
 127
127
-
 128
128
-
 129
129
-
 130
130
-
 131
131
-
 132
132
-
 133
133
-
 134
134
-
 135
135
-
 136
136
-
 137
137
-
 138
138
-
 139
139
-
 140
140
-
 141
141
-
 142
142
-
 143
143
-
 144
144
-
 145
145
-
 146
146
-
 147
147
-
 148
148
-
 149
149
-
 150
150
-
 151
151
-
 152
152
-
 153
153
-
 154
154
-
 155
155
-
 156
156
-
 157
157
-
 158
158
-
 159
159
-
 160
160
-
 161
161
-
 162
162
-
 163
163
-
 164
164
-
 165
165
-
 166
166
-
 167
167
-
 168
168
-
 169
169
-
 170
170
-
 171
171
-
 172
172
-
 173
173
-
 174
174
-
 175
175
-
 176
176
-
 177
177
-
 178
178
-
 179
179
-
 180
180
-
 181
181
-
 182
182
-
 183
183
-
 184
184
-
 185
185
-
 186
186
-
 187
187
-
 188
188
-
 189
189
-
 190
190
-
 191
191
-
 192
192
-
 193
193
-
 194
194
-
 195
195
-
 196
196
-
 197
197
-
 198
198
-
 199
199
-
 200
200
-
 201
201
-
 202
202
-
 203
203
-
 204
204
-
 205
205
-
 206
206
-
 207
207
-
 208
208
-
 209
209
-
 210
210
-
 211
211
-
 212
212
-
 213
213
-
 214
214
-
 215
215
-
 216
216
-
 217
217
-
 218
218
-
 219
219
-
 220
220
-
 221
221
-
 222
222
-
 223
223
-
 224
224
-
 225
225
-
 226
226
-
 227
227
-
 228
228
-
 229
229
-
 230
230
-
 231
231
-
 232
232
-
 233
233
-
 234
234
-
 235
235
-
 236
236


Denon VIERA TC-P65ZT60 User manual
- Category
- LCD TVs
- Type
- User manual
- This manual is also suitable for
Ask a question and I''ll find the answer in the document
Finding information in a document is now easier with AI
Other documents
-
Panasonic E6X series User manual
-
Panasonic TC-L50E60 Owner's manual
-
-
-
-
-
Shenzhen Yuyuanxin Electronic Technology TP4-022 User manual
-
Panasonic TX-P65VT30E User manual
-
Panasonic VIERA TC-P55GT30 Owner's manual
-