ICOM IP100H Demonstration Setup Manual

Category
Networking
Type
Demonstration Setup Manual

The ICOM IP100H is a versatile and feature-rich device that offers a wide range of capabilities for seamless communication. With its advanced IP technology, it enables users to make calls, send messages, and share files over the internet or a private network. The device also supports full-duplex communication, allowing for simultaneous talking and listening, enhancing the overall communication experience. Additionally, the IP100H boasts a user-friendly interface and customizable settings, making it easy to set up and operate.

The ICOM IP100H is a versatile and feature-rich device that offers a wide range of capabilities for seamless communication. With its advanced IP technology, it enables users to make calls, send messages, and share files over the internet or a private network. The device also supports full-duplex communication, allowing for simultaneous talking and listening, enhancing the overall communication experience. Additionally, the IP100H boasts a user-friendly interface and customizable settings, making it easy to set up and operate.

Version 1.0
March 2014
IP Advanced Radio System
IP100H / IP1000C / IP100FS
Demonstration Setup
Guide
DGX-IP1000C/IP100H -V1.0
This guide is designed to provide demonstration setup guide about Icom’s IP ADVANCED RADIO SYSTEM,
based on the IP100H’s firmware Revision 1.02 and IP1000C’s firmware Revision 1.02.
If you have any questions about this guide, please contact your local Icom distributors.
Guide Revisions
Icom reserves the right to make changes to the content of this guide at any time without notice or obligation.
Trademarks
Icom, Icom Inc. and the Icom logo are registered trademarks of Icom Incorporated (Japan) in the United
States, the United Kingdom, Germany, France, Spain, Russia, Japan and/or other countries.
Windows and Windows Vista are either registered trademarks or trademarks of Microsoft Corporation in the
United States and/or other countries.
IDAS is a trademark of Icom Incorporated.
© 2014 Icom Inc.
OUTLINE
DGX-IP1000C/IP100H -V1.0
SECTION 1 REQUIRED EQUIPMENT ..................................................................................................... 1
SECTION 2 SETTING EXAMPLES .......................................................................................................... 2
2-1 STAND ALONE NETWORK CONNECTION AND IP ADDRESS SETTINGS ............ 2
2-2 IP NETWORK CONNECTIONS AND SETTING EXAMPLES ..................................... 9
2-3 HOW TO SET AND USE THE ID LIST ...................................................................... 16
2-4 HOW TO ENTER AND SEND A MESSAGE ............................................................. 21
2-5 HOW TO SET AND USE THE IP100FS .................................................................... 27
SECTION 3 Q & A ................................................................................................................................... 51
TABLE OF CONTENTS
DGX-IP1000C/IP100H -V1.0
1
The following equipment is required to demonstrate the system.
IP1000C
IP100H (2 units)
Access point
• IEEE802.11a/g
• Recommendation:
Optional AP-90M
PC
With one of the following OSs
installed.
• Windows 8 (32/64bit)
• Windows7 (32/64bit)
• Windows Vista(32bit)
(Home Premium / Professional /
Ultimate (or equivalent) editions
are supported.)
IP100FS
LAN cable (2 cables)
CLONING CABLES
(For IP100H, both cables are
required)
• OPC-2144
• OPC-478UC
CLONING SOFTWARE
(For IP100H)
CS-IP100H
SECTION 1 REQUIRED EQUIPMENT
DGX-IP1000C/IP100H -V1.0
2
Set an access point, PC, IP1000C and IP100H using the following steps.
STEP 1: CONNECTION EXAMPLE
See each equipment’s instruction manual for connection details.
SECTION 2 SETTING EXAMPLES
2-1 STAND ALONE NETWOR
K
CONNECTION AND IP ADDRESS SETTINGS
IMPORTANT! We recommend that you connect the access point, IP1000C and PC in a standalone
configuration. If you connect them to your local network with the following connection settings, your local
network may not operate correctly. (IP addresses may overlap.)
STEP 1: CONNECTION EXAMPLE
STEP 2: ACCESS POINT SETTINGS
STEP 5: DEMONSTRATION
STEP 3: IP1000C SETTINGS
STEP 4: IP100H SETTINGS
STEP 1 STEP 2 STEP 3 STEP 5 STEP 4
Access point
IP address: 192.168.0.50
Subnet mask: 255.255.255.0
IP1000C
IP address: 192.168.0.1
Subnet mask: 255.255.255.0
DHCP Server: Enable PC
IP address: 192.168.0.70
Subnet mask: 255.255.255.0
IP100H (TR 2)
DHCP Client: Enable IP100H (TR 1)
DHCP Client: Enable
[LAN]
[LAN 1]
[
LAN 2
]
[LAN]
LAN cable
DGX-IP1000C/IP100H -V1.0
3
STEP 2: ACCESS POINT SETTINGS
Set your access point’s IP address to 192.168.0.50, and SSID to WAVEMASTER-0.
[RECOMMENDATION]
We recommend that you set the access point’s authentication as follows:
For example:
• Authentication: WPA-PSK·WPA2-PSK
• Encryption Type: TKIP·AES
• PSK: 5cf97dgh6
STEP 3: IP1000C SETTINGS
Setting steps are as follows.
STEP 3-1 The DHCP Server settings
STEP 3-2 Common settings
STEP 3-3 The IP100H (TR 1) settings
STEP 3-4 The IP100H (TR 2) settings
STEP 3-1 The DHCP Server settings
IMPORTANT! If you turn ON the Hide SSID function when using IEEE802.11a, the IP100Hs may not
connect to the access point.
Select
Click
Click
Click
STEP 1 STEP 2 STEP 3 STEP 5 STEP 4
DGX-IP1000C/IP100H -V1.0
4
STEP 3-2 Common settings
Click
Click
Confirm
DGX-IP1000C/IP100H -V1.0
5
STEP 3-3 The IP100H (TR 1) settings
STEP 3-4 The IP100H (TR 2) settings
[Confirm the IP100H (TR 1 and TR 2) settings]
Click
Click
Enter
Enter
Click
Confirm
DGX-IP1000C/IP100H -V1.0
6
STEP 4: IP100H SETTINGS (A CS-IP100H is necessary to set up the IP100H)
BEFORE you use a CS-IP100H, the following procedures are required. See the CS-IP100H and OPC-
478UC instruction manuals for setting and installation details.
Install the CS-IP100H (Cloning software)
Install the OPC-478UC (Cloning cable)’s USB driver
Connect the OPC-478UC and the IP100H
• Run the CS-IP100H
The setting steps are as follows:
STEP 4-1 TR 1 settings
STEP 4-2 TR 2 settings
STEP 4-1 TR 1 settings
IP1000C’s setting screen
Enter the same SSID as the access point
Enter the same PSK as the access point
(Enter “5cf97dgh6” here)
Select
STEP 1 STEP 2 STEP 3 STEP 5
STEP 4
DGX-IP1000C/IP100H -V1.0
7
STEP 4-2 TR 2 settings
Enter the same SSID as the access point
Enter the same PSK as the access point
(Enter “5cf97dgh6” here)
Select
IP1000C’s setting screen
DGX-IP1000C/IP100H -V1.0
8
STEP 5: DEMONSTRATION [Talking between TR 1 and TR 2]
(1) Turn ON the IP100H’s power (TR 1 and TR 2).
(2) Hold down TR 1’s [PTT], and then speak into the microphone at a normal voice level.
Your voice is heard from TR 2’s speaker.
After speaking, release [PTT] to listen.
(3) Hold down TR 2’s [PTT], and then speak into the microphone at a normal voice level.
Your voice is heard from TR 1’s speaker.
After speaking, release [PTT] to listen.
CONVENIENT!
When you use the IP100H with optional HM-153LS or HM-166LS EARPHONE-MICROPHONE, you can use
the IP100H in hand-free operation (full duplex mode).
NOTE: When connection is finished, icon appears on the display.
If the icon does not appear on the display, check the following items.
Check the access point setting.
Check the IP100H’s cloning setting.
Check the IP1000C’s setting.
Full duplex communication can be made !
IP100H (TR 1) IP100H (TR 2)
Access
point
IP1000C
Talking and Listening Talking and Listening
TR 2
TR 1
Access point
IP1000C
STEP 1 STEP 2 STEP 3 STEP 5 STEP 4
DGX-IP1000C/IP100H -V1.0
9
If you want to connect the IP ADVANCED SYSTEM to an existing IP network, set an access point, PC,
IP1000C and IP100H as shown in the following steps.
STEP1: IP1000C’S IP ADDRESS SETTING
Before you connect the IP1000C to an IP network, ask your system administrator for the IP1000C’s IP
address.
Connect a PC and the IP1000C via a LAN cable, and then enter it into the field as follow.
IMPORTANT! Two static IP addresses are required for setting of the access point and the IP1000C. Ask
your system administrator for details for about the IP addresses.
If another DHCP server is already working in the IP network, turn OFF the IP1000C’s DHCP server
function.
2-2 IP NETWORK CONNECTIONS AND SETTING EXAMPLES
STEP 2: CONNECTION EXAMPLE
STEP 3: ACCESS POINT SETTINGS
STEP 6: DEMONSTRATION
STEP 4: IP1000C SETTINGS
STEP 5: IP100H SETTINGS
STEP 1: IP1000C’S IP ADDRESS SETTING
IP1000C
Ask your system administrator for
the IP address and subnet mask.
[LAN]
LAN cable
[
LAN1
]
PC
STEP 1 STEP 2 STEP 3 STEP 4 STEP 5 STEP 6
Click
Click
Enter
Enter
Click
DGX-IP1000C/IP100H -V1.0
10
STEP2: CONNECTION EXAMPLE
See each equipment’s instruction manual for connection details.
STEP3: ACCESS POINT SETTINGS
Ask your system administrator for the access point’s IP address, and then enter it into the access point field,
and then set the SSID to WAVEMASTER-0.
[RECOMMENDATION]
We recommend that you set the access point’s authentication as follows:
For example:
• Authentication: WPA-PSK·WPA2-PSK
• Encryption Type: TKIP·AES
• PSK: 5cf97dgh6
IMPORTANT! If you turn ON the Hide SSID function on IEEE802.11a, IP100H may not connect to the
access point.
STEP 1 STEP 2 STEP 3 STEP 4 STEP 5 STEP 6
Access point
Ask your system
administrator for the IP
address and subnet
mask.
IP1000C
Ask your system administrator for
the IP address and subnet mask.
PC
DHCP Client: Enable
[LAN]
[
LAN1
]
[LAN]
LAN cable
LAN cable
IP network
IP100H (TR 2)
DHCP Client: Enable
IP100H (TR 1)
DHCP Client: Enable
DHCP Server
DGX-IP1000C/IP100H -V1.0
11
STEP 4: IP1000C SETTINGS
The setting steps are as follows:
STEP 4-1 The DHCP Server confirming
STEP 4-2 Common settings
STEP 4-3 The IP100H (TR 1) setting
STEP 4-4 The IP100H (TR 2) setting
STEP 4-1 The DHCP Server confirming
If another DHCP server is already working in the IP network, confirm to turn OFF the IP1000C’s DHCP
server function as follows.
STEP 4-2 Common settings
Click
Confirm
Click
Click
Confirm
STEP 1 STEP 2 STEP 3 STEP 4 STEP 5 STEP 6
DGX-IP1000C/IP100H -V1.0
12
STEP 4-3 The IP100H (TR 1) settings
STEP 4-4 The IP100H (TR 2) settings
[Confirm the IP100H (TR 1 and TR 2) settings]
Click
Click
Enter
Click
Enter
Confirm
DGX-IP1000C/IP100H -V1.0
13
STEP 5: IP100H SETTINGS (A CS-IP100H is necessary to set up the IP100H)
The setting steps are as follows.
STEP 5-1 TR 1 settings
STEP 5-2 TR 2 settings
STEP 5-1 TR 1 settings
NOTE: Ask your system administrator for the
IP1000C’s IP address.
IP1000C’s setting screen
Enter the same SSID as the access point
Enter the same PSK as the access point
(Enter “5cf97dgh6” here)
Select
STEP 1 STEP 2 STEP 3 STEP 4 STEP 5 STEP 6
DGX-IP1000C/IP100H -V1.0
14
STEP 5-2 TR 2 settings
NOTE: Ask your system administrator for the
IP1000C’s IP address.
IP1000C’s setting screen
Enter the same SSID as the access point
Enter the same PSK as the access point
(Enter “5cf97dgh6” here)
Select
DGX-IP1000C/IP100H -V1.0
15
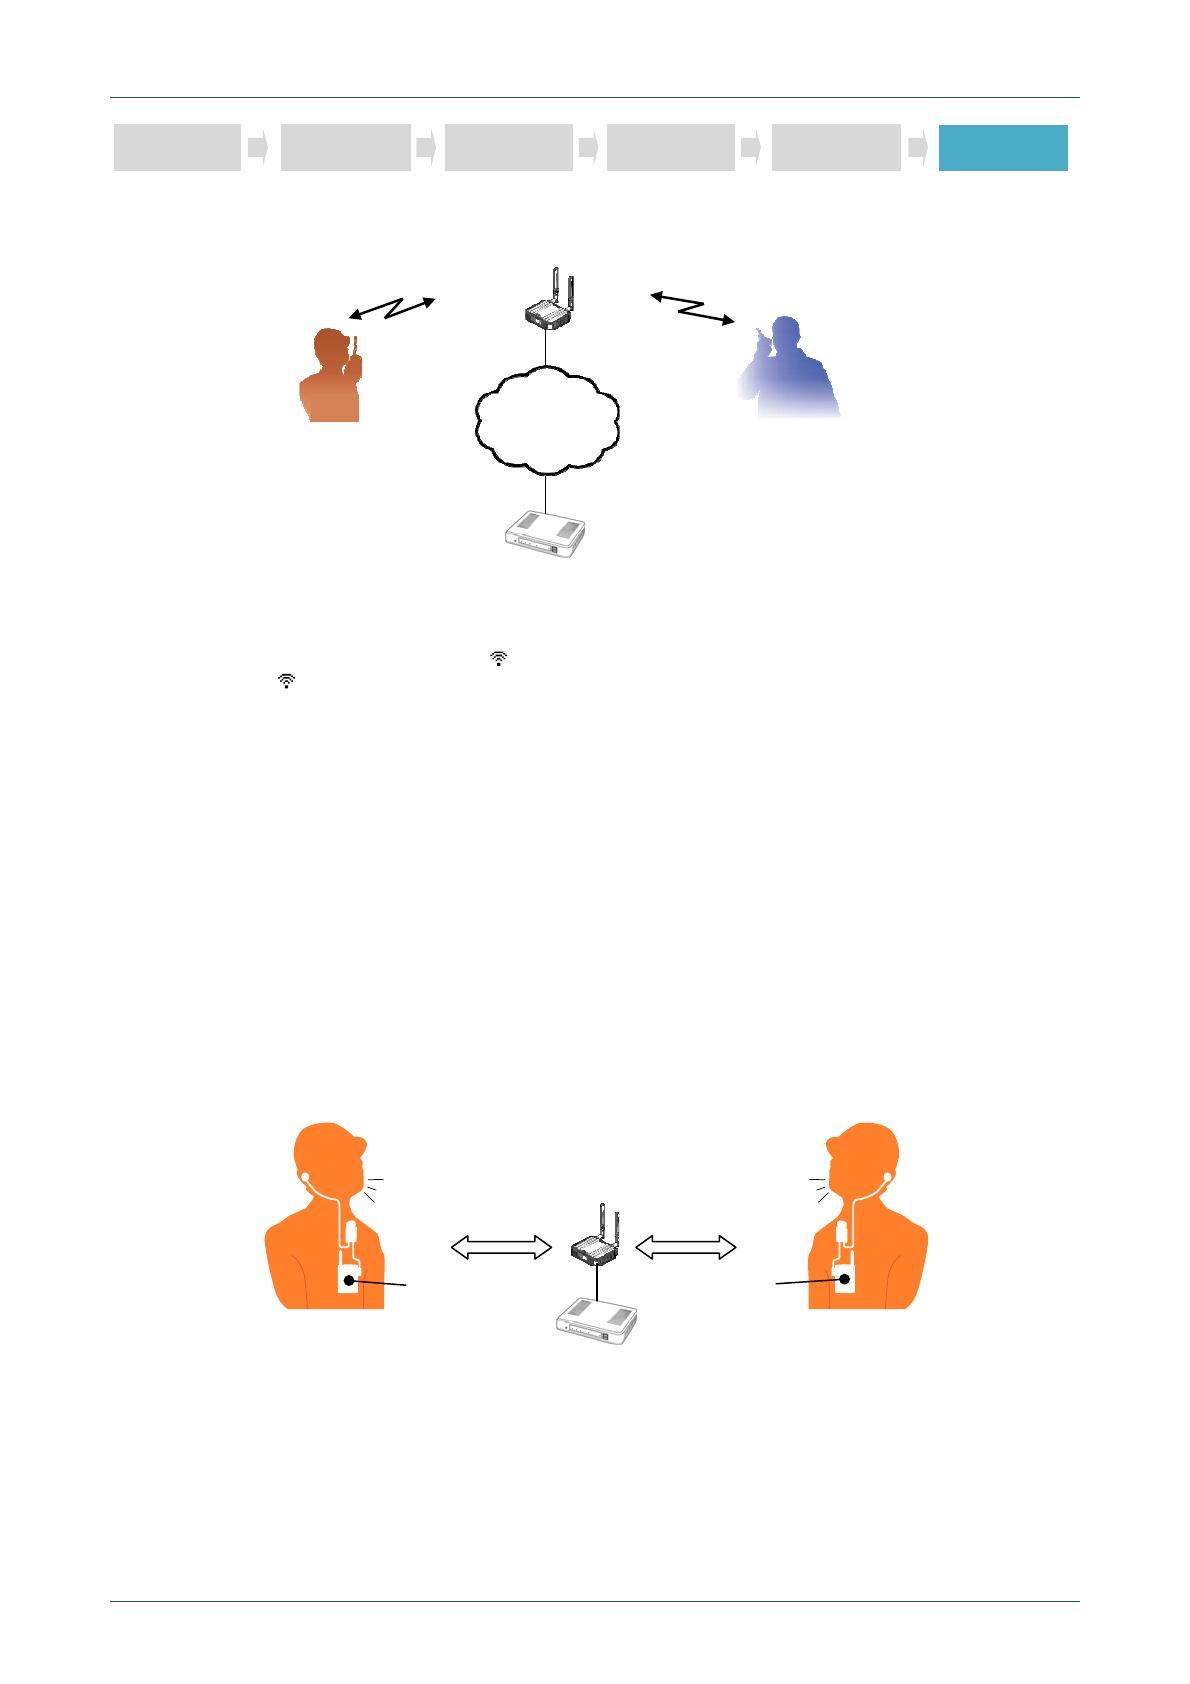
STEP 6: DEMONSTRATION [Talk between TR 1 and TR 2]
(1) Turn ON the IP100H’s power (TR 1 and TR 2).
(2) Hold down TR 1’s [PTT], and then speak into the microphone at a normal voice level.
Your voice is heard from TR 2’s speaker.
After speaking, release [PTT] to listen.
(3) Hold down TR 2’s [PTT], and then speak into the microphone at a normal voice level.
Your voice is heard from TR 1’s speaker.
After speaking, release [PTT] to listen.
CONVENIENT!
When you use the IP100H with optional HM-153LS or HM-166LS EARPHONE-MICROPHONE, you can use
the IP100H in hand-free operation (full duplex mode).
TR 2
TR 1
NOTE: When connection is finished, icon appears on the display.
If the icon does not appear on the display, check the following items.
Check the access point setting.
Check the IP100H’s cloning setting.
Check the IP1000C’s setting.
Full duplex communication can be made !
IP100H (TR 1) IP100H (TR 2)
Access
point
IP1000C
Taking and Listening Taking and Listening
Access point
IP1000C
IP Network
STEP 1 STEP 2 STEP 3 STEP 4 STEP 5 STEP 6
DGX-IP1000C/IP100H -V1.0
16
BEFORE you set the ID list, you must first complete the steps in 2-1 STAND ALONE NETWORK
CONNECTION AND IP ADDRESS or 2-2 IP NETWORK CONNECTIONS AND SETTING EXAMPLES.
The IP1000C has an ID list function. If you want to initiate a group call or an individual call, register the name
and ID into the list.
STEP 1: GROUP ID SETTINGS (IF REQUIRED)
NOTE: If you want to use the IP ADVANCED SYSTEM to make only individual calls, skip this step and go to
STEP 2.
Set the ID list group to make group calls.
Enter the group call number and select the group members into this step.
(Setting example)
• Group name: Group1
• Group number: 0001
Group member: 0001 (Sales1), 0002 (Sales2)
Click
Enter the Group call number
Select the Group member
Click
Select
Enter the Group name
Confirm
STEP 1: GROUP ID SETTINGS (IF REQUIRED)
STEP 2: ENTER THE DESTINATION ID
STEP 3: ID LIST GROUP NUMBER SETTING
STEP 5: DEMONSTRATION
STEP 4: USE ID LIST SETTING
2-3 HOW TO SET AND USE THE ID LIST
STEP 1 STEP 2 STEP 3 STEP 5 STEP 4
DGX-IP1000C/IP100H -V1.0
17
STEP 2: ENTER THE DESTINATION ID
Select the individual and group numbers in the ID list.
If you want to enter two or more destination IDs, repeat STEP 2.
(Setting example)
No. Name Call Type Destination ID
1 Sales1 Individual 0001
2 Sales2 Individual 0002
3 Group call Group 0001
Repeat the above settings twice for entering No. 2 and No. 3 destination IDs.
Confirm
Click
Enter the Individual ID number
Select
Enter the ID name
Select
Click
STEP 1 STEP 2 STEP 3 STEP 5 STEP 4
  • Page 1 1
  • Page 2 2
  • Page 3 3
  • Page 4 4
  • Page 5 5
  • Page 6 6
  • Page 7 7
  • Page 8 8
  • Page 9 9
  • Page 10 10
  • Page 11 11
  • Page 12 12
  • Page 13 13
  • Page 14 14
  • Page 15 15
  • Page 16 16
  • Page 17 17
  • Page 18 18
  • Page 19 19
  • Page 20 20
  • Page 21 21
  • Page 22 22
  • Page 23 23
  • Page 24 24
  • Page 25 25
  • Page 26 26
  • Page 27 27
  • Page 28 28
  • Page 29 29
  • Page 30 30
  • Page 31 31
  • Page 32 32
  • Page 33 33
  • Page 34 34
  • Page 35 35
  • Page 36 36
  • Page 37 37
  • Page 38 38
  • Page 39 39
  • Page 40 40
  • Page 41 41
  • Page 42 42
  • Page 43 43
  • Page 44 44
  • Page 45 45
  • Page 46 46
  • Page 47 47
  • Page 48 48
  • Page 49 49
  • Page 50 50
  • Page 51 51
  • Page 52 52
  • Page 53 53
  • Page 54 54
  • Page 55 55
  • Page 56 56
  • Page 57 57

ICOM IP100H Demonstration Setup Manual

Category
Networking
Type
Demonstration Setup Manual

The ICOM IP100H is a versatile and feature-rich device that offers a wide range of capabilities for seamless communication. With its advanced IP technology, it enables users to make calls, send messages, and share files over the internet or a private network. The device also supports full-duplex communication, allowing for simultaneous talking and listening, enhancing the overall communication experience. Additionally, the IP100H boasts a user-friendly interface and customizable settings, making it easy to set up and operate.

Ask a question and I''ll find the answer in the document

Finding information in a document is now easier with AI