Page is loading ...

NL50 INSTALLATION/OPERATION MANUAL
DO NOT PLUG LIGHT IN UNTIL INSTRUCTED IN MANUAL
READ ALL DIRECTIONS FIRST THEN REFER TO EXAMPLE IMAGES BEFORE PERFORMING THAT STEP
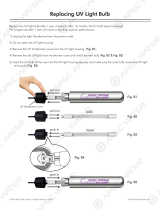
A. To install bulb, place the light on a table or similar flat, dry working surface.
Use the supplied seal ring lock key to loosen the seal ring. Insert the key into
the locking latch on the bottom of the light as shown in FIG 1. Turn and hold
the key to the left to release the locking mechanism. At the same time rotate
the seal ring in a counter clockwise direction to loosen. Remove ring and lens.
(See FIG 2)
2007 NLMC Manual:Layout 1 1/17/07 11:43 AM Page 1

B. Use a Phillips head screwdriver to remove the three screws
retaining the heat diffuser/heat shield. (See Fig 3) Place the
screws in an area where they will not be lost. Carefully re-
move the round
diffuser/heat shield.
C. Remove one of the three colored bulbs from its box being
careful not to touch the face of the bulb. Place the legs of the
bulb into one of the three ceramic outlets as shown in Figure
3. Repeat for the other two bulbs. NOTE: It does not matter
which bulb goes where.
D. Remove the bulb from its box being careful not to touch the
lens of the bulb. Install the bulb by pressing the two bronze
legs of the bulb into the ceramic socket in the light housing as
shown in FIG. 4. Repeat for the other two bulbs and sockets.
E. Be sure that the bulbs are firmly pressed into the socket.
F. BE CAREFUL NOT TO BURN YOURSELF, AS THE BULBS
GET HOT QUICKLY AND SHOULD BE TURNED OFF IMMEDI-
ATELY UPON SUCESSFUL TEST. OPERATION OF THIS FIX-
TURE OUT OF WATER FOR ANY PROLONGED TIME WILL
DAMAGE UNIT AND VOID WARRANTY.
Plug the light into wall outlet. Turn switch on. If light comes on,
press color selector switch (FIG 6) and be sure all bulbs are
working, if so test successful. Unplug the unit. Move to step G.
If light does not turn on, unplug unit from wall and reinstall light
bulb. Repeat test again, if still not working call Smartpool cus-
tomer service at 732- 730-9880.
G. Carefully install the round diffuser/heat shield into the light box as
shown in figure 5. Be sure that the glass has its textured (rough)
side facing away from the bulb. Reinstall all three screws
H. Carefully replace the lens making sure that there is an even flat
fit in the light body.
I. Place the seal ring carefully over the lens making sure it is on
straight. Now turn in a clockwise direction until the ring begins
to tighten up. You may hear a clicking sound which is normal.
This is a safety feature designed to not allow the light seal to
loosen up or be removed without the key.
J. Continue to turn clockwise until the index mark on the seal ring
is even with the light body as shown in Figure 4. NOTE DO
NOT OVERTIGHTEN OR TURN BACK SEAL RING IN A
COUNTER CLOCKWISE FASHION AS THIS WILL CAUSE
LEAKAGE!
K. Light is ready to install.
2007 NLMC Manual:Layout 1 1/17/07 11:43 AM Page 2

INSTALLATION
A. Remove top cap of pool vertical post nearest your installation.
B. Lift one end of your poolʼs top ledge. The top ledge is comprised of flat sections that extend
around the top of the pool wall.
C. Slide the pool light onto the pool wall submerging the light in the water. Locate the light in the
middle of the top rail to allow for easier installation.
D. Hold the light down so that the top of the mounting bracket is flush with the top of pool wall. Turn
thumbwheel in a clockwise direction to tighten securely to the wall.
E. Be sure that wire runs completely through the channel of the mounting bracket.
F. Replace top rail and cap.
G. Make sure that water level is above the minimum water line on the light. If not add water to pool.
H. The transformer should be mounted on a nearby vertical surface using the screws provided.
Mount the transformer a minimum of 18 inches from the ground.
I. Plug unit only into a GFCI 110V socket. DO NOT USE EXTENSION CORDS.
OPERATION
Plug light into GFI protected outlet. Push switch on power supply to turn on. This light has a built in timer
that will automatically turn the light off 3 hours after the light has been turned on. When turning the light
on again, simply push the color selector switch (Fig 7) to “wake it up”!
CHANGING COLORS
CHOOSING A SINGLE COLOR
This multi-colored light has either a constant color selection, or automatic
color rotation. To select a color, simply press the color selector switch lo-
cated near the thumbwheel (FIG 7) on the mounting bracket of the light.
Each time you press the button the light will switch to a new color. Stop
pushing the button when desired color is reached.
AUTOMATIC COLOR ROTATION
To have a continuous and automatic rotation of the light colors, simply
press and hold the color selection switch for 3 seconds. This will put the
unit into automatic mode, and the unit will cycle through all of its colors in roughly 10 second intervals.
To exit the automatic mode, simply press and hold the color selector switch for 3 seconds. Your light is
now in single color mode.
2007 NLMC Manual:Layout 1 1/17/07 11:43 AM Page 3

SIX MONTH LIMITED WARRANTY
Electronics Products
Six month limited warranty from date of original purchase for manufacturing defects under normal and reasonable use,
and subject to the maintenance requirements and installation guidelines set forth in the product instruction manual.
THIS WARRANTY IS SUBJECT TO THETERMS, LIMITATIONS AND EXCLUSIONS DESCRIBED BELOW, ANDTHERE ARE NO OTHER WARRANTIES
OR REPRESENTATIONS, EITHER EXPRESS OR IMPLIED, WHETHER OF MERCHANTABILITY, FITNESS FOR A PARTICULAR PURPOSE, OR
OTHER, MADE BY THE MANUFACTURER, OTHER THAN THOSE SPECIFICALLY SET FORTH IN THIS WRITTEN WARRANTY
What is Covered: SmartPool, Inc. warrants its electronic product to be free from defects in material and workmanship when leaving the factory.
What is not Covered: Any type of damage to the product due to improper installation, maintenance, or failure to provide necessary and reasonable maintenance; any damage
or injury caused by misuse and/or unreasonable use of the product; batteries (if applicable); damage due to or related to improper draining, winterizing, storage or Acts of
God; SmartPool, Inc. will not honor any claims for damage to any products in transit unless damage to the shipping container is noted at the time of delivery on the transfer
company’s delivery bill.
THE WARRANTY OBLIGATIONS OF SMARTPOOL, INC. ARE LIMITED TO REPAIR OR REPLACEMENT OF THE PRODUCT OR OF ANY DEFECTIVE
COMPONENT, AT THE OPTION OF SMARTPOOL. UNDER NO CIRCUMSTANCES WILL SMARTPOOL, INC. BE LIABLE OR RESPONSIBLE FOR
ANY CONSEQUENTIAL OR INCIDENTAL DAMAGES, AND/OR CHARGES FOR LABOR. SMARTPOOL SHALL NOT BE LIABLE OR RESPONSIBLE
UNDER ANY CIRCUMSTANCES OR ANY AMOUNT FOR ANY CONSEQUENTIAL OR INCIDENTAL DAMAGES, OR FOR ANY INJURIES OR DAM-
AGES TO PERSON OR PROPERTY USING OR USED IN CONNECTION WITH THE PRODUCT, OR FOR ANY OTHER LOSS OF PROFITS OR OTHER
COSTS OR EXPENSES OF ANY KIND OR CHARACTER. IF SMARTPOOL, INC. DETERMINES THAT EITHER REPAIR OR REPLACEMENT OF THE
PRODUCT IS NECESSARY, SMARTPOOL MAY EITHER REPAIR THE PRODUCT AT A NOMINAL CHARGE TO THE OWNER OR REPLACE THE
PRODUCT. THE OWNER BEARS THE SOLE RESPONSIBILITY FOR PRE-PAID RETURN OF THE PRODUCT TO SMARTPOOL, AND ALL REPAIRED
OR REPLACED PRODUCTS WILL BE RETURNED AT THE OWNER’S EXPENSE.
NO PERSON, FIRM, OR CORPORATION IS AUTHORIZED TO MAKE REPRESENTATIONS OR INCUR ANY OBLIGATIONS IN THE NAME OF OR ON
BEHALF OF SMARTPOOL, INC., EXCEPT AS STATED HEREIN.THE REMEDIES SET FORTH IN THIS WARRANTY ARE EXPRESSLY UNDERSTOOD
TO BE THE EXCLUSIVE REMEDIES AVAILABLE TOTHE OWNER, AND THIS WARRANTY CONTAINS THE FULL AND COMPLETE AGREEMENT BE-
TWEEN SMARTPOOL, INC. AND THE OWNER. THIS WARRANTY SETS FORTH THE ONLY OBLIGATIONS OF SMARTPOOL, INC., WITH REGARD
TO THIS PRODUCT, AND THERE ARE NO WARRANTIES WHICH EXTEND BEYOND THE DESCRIPTION ON THE FACE HEREOF.
The representations set forth herein are the only representations made by SmartPool, Inc., with respect to the product, and this warranty does not constitute
either a performance or satisfaction guarantee. It is the responsibility of the product owner to regularly test and check the product for proper function and
safety.
This warranty gives the original owner specific legal rights. You may have other rights depending on where you live.
What you must do to file a claim: Call 1-732-730-9880 to initiate a claim. You will receive an instruction package within 10 days.
IMPORTANT: FAILURE TO PROPERLY WINTERIZE YOUR LIGHT WILL
RESULT IN TERMINATION OF WARRANTY.
Begin by unplugging the power cord from its power source. Using the included
seal lock key, use the hex key side as shown in Fig 6. Insert tool into bolt head
and turn counter clockwise until it is completely loose. Then pull the bolt com-
pletely out and place in a safe place. Do the same for the other screw. Grasp
the light body with one hand and firmly pull down. Gently pull extra cord out
from inside light body, and pull the light out of the water and hang over top rail.
Use a string or bungee cord to secure for the winter. When spring arrives, sim-
ply reassemble unit being sure to tuck excess wire into light body. Enjoy sea-
son after season!
WINTERIZATION
www.smartpool.com
2007 NLMC Manual:Layout 1 1/17/07 11:43 AM Page 4
/