
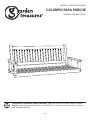
ITEM #0519033/0519034
MODEL #TA7004/TA7005
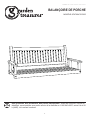
PORCH SWING
Questions, problems, missing parts? Before returning to your retailer, call our customer
service department at 1-800-643-0067, 8 a.m. - 8 p.m., EST, Monday - Friday.
Français p. 7
Español p. 13
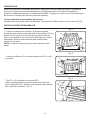
1
EB13649

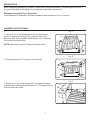
NOTE: Arms are marked left and right from the perspective of facing the swing, not sitting in it.
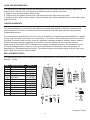
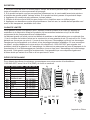
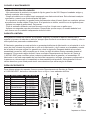
Part Description Quantity Picture Part Description Quantity Picture
AA
BB
CC
DD
EE
FF
GG
HH
II
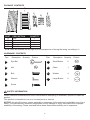
Eye Bolt
Nut
Bolt
Wrench
Screw
Small Button
Chain
Washer
Large Button
2
PACKAGE CONTENTS
HARDWARE CONTENTS
A Seat
B Back
C Arm
D Post
E Back Post
1
1
2
4
2
PART DESCRIPTION QUANTITY
6
1
4
6
NOTICE: As with all furniture, proper assembly is necessary for the safe and comfortable use of your
swing. The manufacturer cannot be responsible for any damage or injury that results from improper
assembly of the swing. Please read and follow these instructions carefully and in sequence.
Please read and understand this entire manual before attempting to assemble, operate or install the
product.
This product is intended for use on a covered porch or indoors.
SAFETY INFORMATION
A B
C
D
E

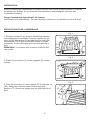
3
Fig. 1
A
D
BB
AA
HH
Fig. 2
C
D
Fig. 3
C
EE
D
Before beginning assembly of product, make sure all parts are present. Compare parts with lists. If
any part is missing or damaged, do not attempt to assemble the product.
Estimated Assembly Time: 45 minutes
Tools Required for Assembly: Phillips screwdriver and crescent or 9/16 in. wrench.
PREPARATION
2. Place swing arms (C) on top of (D) as shown.
ASSEMBLY INSTRUCTIONS
1. Lay seat (A) on the shipping box during assembly to
protect it. Attach posts (D) to (A) using eye bolts (AA),
washers (HH) and nuts (BB). Hand tighten only. Complete
for both left and right sides.
NOTE: Opening for eye bolt should be facing down.
Back Front
3. Attach (C) to (D) using screws (EE). Completely tighten
screws before inserting small buttons (FF). Complete this for
both left and right sides.

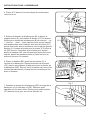
4
Fig. 4
FF
Fig. 5
CC
B
E
DD
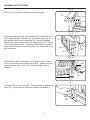
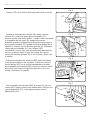
ASSEMBLY INSTRUCTIONS
7. Attach (B/E) to (A) using (EE). Complete this for both sides.
Push (FF) in the holes to cover the heads of the screws.
4. Place (FF) in holes in arms to cover the screws.
5. Stand up back (B) and align back post (E) and insert bolt
(CC). Note that (B) is marked “up” and “down”. Be sure the
hole pockets are facing outward so (CC) can be threaded
below the surface and covered with large buttons (II). Thread
(CC) in with wrench (DD). Complete for both bolts and both
sides. After all bolts are inserted, place (II) in holes and tap in
with a hammer.
6. Place back (B/E) in between (C) at back of swing. Place
(CC) in pre-drilled hole and align with (B/E). Tighten nut and
repeat for other side. Insert (II) in holes and tap in with a
hammer.
Fig. 6
B/E
C
CC
Fig. 7
B/E
EE
A

5
Fig. 8
GG
C AA
Fig. 9
ASSEMBLY INSTRUCTIONS
CARE AND MAINTENANCE
To extend the life of this product, protect it from severe weather conditions. To preserve the finish,
place indoors or in a protected environment, such as a covered porch. The finish will last longer and
look better if kept out of direct sunlight and rain. The finish on this furniture will last for a lifetime if
used indoors. The sun and rain will weather the varnished finish if left out in the elements over time
(six months to one year depending on the climate).Weekly cleaning with any quality household
furniture polish will keep your furniture looking new for many years to come. If your climate has high
humidity, even if you follow the recommended cleaning intervals above, you may have problems with
mold or mildew. To remove the mold and mildew, dilute one ounce of bleach into sixteen ounces of
water and apply with a soft cloth. More than one application may be necessary. Allow to dry and
apply furniture polish to protect the finish.
REFINISHING
1. Lightly hand-sand the product with 220 fine-grit sandpaper. Scuff the old finish and smooth out any
rough areas.
2. Wipe the furniture with a clean cloth, soaked with lacquer thinner. This will remove any build-up and
sawdust left behind from sanding.
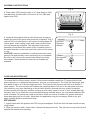
8. Place chain (GG) through holes in (C) and attach to (AA).
Complete this for both sides. Go back to all four (BB) and
tighten with (DD).
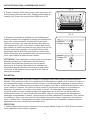
9 Locate a ceiling beam that is solid and sturdy enough to
handle the load of the porch swing and the occupants. Drill 2
vertical 5/32 inch pilot holes in the center of ceiling beam 50
inches apart. Insert ceiling hooks and screw into the holes
until no threads are exposed. The alignment of the hook
assembly should have the rotation of the movable hooks in
the same direction as the back and forth motion of the swing
in use.
CAUTION: Incorrect installation of ceiling hooks can cause
swing to fall and possibly cause serious injury to occupants.
Be sure to drill correct size vertical pilot holes into sturdy
wood beam. Screw hooks into board so no threads are
exposed.
Incorrect
Exposed
threads
Correct
No exposed
threads

6
LIMITED WARRANTY
This limited warranty is extended to the original purchaser and applies to defects in material and
workmanship of your item, provided the item is maintained with care and used for only personal,
residential purposes.
The manufacturer warrants this item to be free from defects in material and workmanship for a period
of one year from date of purchase on construction , 6 months on finish. Warranty does not cover the
following: Everyday wear and tear, incorrect assembly, damage caused by weather and/or exterior
climate, damage caused in shipping. If any defect is found, please call our customer service
department at 1-800-643-0067 to address any warranty or assembly issues, The manufacturer will
not cover transportation or delivery costs, or compensate the individual or any outside party for
assembling or disassembling the product. This warranty gives you certain rights, and you may have
other rights that vary from state to state.
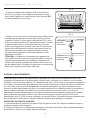
REPLACEMENT PARTS
For replacement parts,call our customer service department at 1-800-643-0067, 8 a.m. - 8 p.m., EST,
Monday - Friday.
Printed in China
CARE AND MAINTENANCE
3. If the product is painted it can be painted directly over the sanded varnish with any high-quality
exterior paint. Allow to dry. If the product is stained continue with the next step.
4. Apply a coat of polyurethane. Allow to dry.
5. Using a very fine grade of steel wool, rub down the finish. Wipe with a dry cloth.
6. Apply a second coat of polyurethane. After this dries, the furniture should look like new with a clear,
glass-like finish.
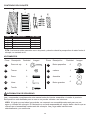
A
B
C
D
E
AA
BB
CC
DD
EE
FF
GG
HH
II
Eye Bolt
Nut
Bolt
Wrench
Screw
Small Button
Chain
Washer
Large Button
Seat
Back
Arm
Post
Back Post
TA-13PSA
TA-13PSB
TA-13PSC
TA-13PSD
TA-13PSE
TA-13PSAA
TA-13PSBB
TA-13PSCC
TA-13PSDD
TA-13PSEE
TA-13PSFF
TA-13PSGG
TA-13PSHH
TA-13SII
PART DESCRIPTION PART #
AA
II
HH
GG
FF
EEDDCC
BB
A B
C
D
E
Page is loading ...
Page is loading ...
Page is loading ...
Page is loading ...
Page is loading ...
Page is loading ...
Page is loading ...
Page is loading ...
Page is loading ...
Page is loading ...
Page is loading ...
Page is loading ...
-
 1
1
-
 2
2
-
 3
3
-
 4
4
-
 5
5
-
 6
6
-
 7
7
-
 8
8
-
 9
9
-
 10
10
-
 11
11
-
 12
12
-
 13
13
-
 14
14
-
 15
15
-
 16
16
-
 17
17
-
 18
18


Style Selections TA7005 Installation guide
- Type
- Installation guide
- This manual is also suitable for
Ask a question and I''ll find the answer in the document
Finding information in a document is now easier with AI
in other languages
Other documents
-
Swing-N-Slide Playsets WS 3030 Operating instructions
-
 Flexible Flyer 41550T User manual
-
-
-
Mattel P0097 User manual
-
-
Swing-N-Slide WS 4888 Installation guide
-
Swing-N-Slide Playsets WS 5007 Operating instructions
-
-
Graco ISPS035AB User manual
