
ENGLISH
Need help? www.sanyoctv.com 1-800-877-5032
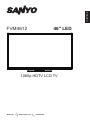
FVM4612 46" LED
1080pHDTVLCDTV

2
Need help? www.sanyoctv.com 1-800-877-5032
Thank you for choosing SANYO. Please read all
instructions to obtain maximum benet of your product.
CAUTION
RISK OF ELECTRIC SHOCK
DO NOT OPEN
THISSYMBOLINDICATESTHATDANGEROUS
VOLTAGECONSTITUTINGARISKOFELECTRIC
SHOCKISPRESENTWITHTHISUNIT.
CAUTION:TOREDUCETHERISKOFELECTRICSHOCK,DO
NOTREMOVECOVER(ORBACK).NOUSER-SERVICEABLE
PARTSINSIDE.REFERSERVICINGTOQUALIFIEDSERVICE
PERSONNEL.
THISSYMBOLINDICATESTHATTHEREARE
IMPORTANTOPERATINGANDMAINTENANCE
INSTRUCTIONSINTHEOWNER’SMANUALWITH
THISUNIT.
WARNING:TOREDUCETHERISKOFFIREORELECTRICSHOCK,DONOTEXPOSETHIS
APPLIANCETORAINORMOISTURE.
Important Safety Instructions
or where it can fall into such power lines or circuits. When
installing an outside antenna system, extreme care should be
taken to keep from touching such power lines or circuits as
contact with them might be fatal.
EXAMPLE OF ANTENNA GROUNDING ACCORDING
TO NATIONAL ELECTRICAL CODE, ANSI/NFPA 70
Note to CATV system installer: This reminder is provided to call the
CATV system installer's attention to Article 820-40 of the NEC that provides
guidelines for proper grounding and, in particular, species that the cable
ground shall be connected to the grounding system of the building, as close to
the point of cable entry as practical.
17. Wall or Ceiling Mounting - The product should be mounted to a
wall or ceiling only as recommended by the manufacturer and
listed by an independent laboratory (such as UL).
18. Apparatus shall not be exposed to dripping or splashing and no
objects filled with liquides, such as vases, shall be placed on
the apparatus.
19. When the MAINS plug is used as the disconnect device, the
disconnect device shall remain readily operable.
20. Install the LCD TV in a proper position. If not, it may result in a
fire hazard.
21. Provide appropriate space on the top, sides and rear of the
LCD TV cabinet for allowing air circulation and cooling the LCD
TV.
22. Minimum clearance must be maintained. If the LCD TV is to
be built into a compartment or similarly enclosed, the minimum
distances must be maintained. Do not cover the ventilation slot
on the LCD TV. Heat build-up can reduce the service life of your
LCD TV, and can also be dangerous.
1. Read these instructions.
2. Keep these instructions.
3. Heed all warnings.
4. Follow all instructions.
5. Do not use this apparatus near water.
6. Clean only with dry cloth.
7. Do not block any ventilation openings. Install in accordance
with the manufacturer's instructions.
8. Do not install near any heat sources such as radiators, heat
registers, stoves or other apparatus (including amplifiers) that
produce heat.
9. Do not defeat the safety purpose of the polarized or grounding-
type plug. A polarized plug has two blades with one wider than
the other. A grounding type plug has two blades and a third
grounding prong. The wide blade or the third prong are provided
for your safety. If the provided plug does not fit into your outlet,
consult an electrician for replacement of the obsolete outlet.
10. Protect the power cord from being walked on or pinched,
particularly at plugs, convenience receptacles, and at the point
where they exit from the apparatus.
11. Only use attachments/accessories specified by the
manufacturer.
12. Use only with the cart, stand, tripod, bracket
or table specified by the manufacturer or
sold with the apparatus. When a cart is used,
use caution when moving the cart/appliance
combination to avoid injury from tip-over.
13. Unplug this apparatus during lightning storms or when unused
for long periods of time.
14. Refer all servicing to qualified service personnel. Servicing is
required when the appliance has been damaged in any way,
such as power-supply cord or plug is damaged, liquid has been
spilled or objects have fallen into apparatus, the apparatus has
been exposed to rain or moisture, does not operate normally or
has been dropped.
15. If an outside antenna is connected to the television equipment,
be sure the antenna system is grounded so as to provide some
protection against voltage surges and built up static charges.
In the U.S. Selection 810-21 of the National Electrical Code
provides information with respect to proper grounding of the
mast and supporting structure, grounding of the lead-in wire
to an antenna discharge unit, size of grounding conductors,
location of antenna discharge unit, connection to grounding
electrodes, and requirements for the grounding electrodes.
16. An outside antenna system should not be located in the vicinity
of overhead power lines or other electrical light or power circuits

3
Need help? www.sanyoctv.com 1-800-877-5032
FCC Information
Thisequipmenthasbeentestedandfoundtocomply
withthelimitsforaClassBdigitaldevice,pursuantto
Part15oftheFCCRules.Theselimitsaredesigned
toprovidereasonableprotectionagainstharmful
interferenceinaresidentialinstallation.Thisequipment
generates,usesandcanradiateradiofrequency
energyand,ifnotinstalledandusedinaccordance
withtheinstructions,maycauseharmfulinterference
toradiocommunications.However,thereisno
guaranteethatinterferencewillnotoccurinaparticular
installation.Ifthisequipmentdoescauseharmful
interferencetoradioortelevisionreception,whichcan
bedeterminedbyturningtheequipmentoffandon,the
userisencouragedtotrytocorrecttheinterferenceby
oneormoreofthefollowingmeasures:
- Reorientorrelocatethereceivingantenna.
- Increasetheseparationbetweentheequipmentand
receiver.
- Connecttheequipmentintoanoutletonacircuit
differentfromthattowhichthereceiverisconnected.
- Consultthedealeroranexperiencedradio/TV
technicianforhelp.
FCC Warning
Changesormodicationsnotexpresslyapprovedby
thepartyresponsibleforcompliancewiththeFCC
Rulescouldvoidtheuser’sauthoritytooperatethis
equipment.
Cables
Connectionstothisdevicemustbemadewithshielded
cableswithmetallicRF/EMIconnectorhoodsto
maintaincompliancewithFCCRulesandRegulations.
Canadian Notice
CANICES-3(B)/NMB-3(B)
StandardTelevisionReceivingApparatus-Appareil
dereceptiontélévisionordinaire,CanadaBETS-7/
NTMR-7.
ENERGY STAR
®
User
Information
ENERGYSTARUserInformationStatement:the
factorydefaultsettingsofthistelevisionmeetENERGY
STARrequirements.ChangingPictureSettingsmay
increaseenergyconsumption,possiblybeyondthe
limitsrequiredforENERGYSTARqualication.
Toensureyourtelevisionisoperatingatanoptimal
energyefciency,selectdefaultpicturemode.
Trademarks
Manufacturedunderlicense
fromDolbyLaboratories.
Dolbyandthedouble-Dsymbol
aretrademarksofDolby
Laboratories.
HDMI,theHDMIlogoandHigh-
DenitionMultimediaInterface
aretrademarksorregistered
trademarksofHDMILicensing
LLCintheUnitedStatesand
othercountries.
AsanEnergyStar
®
Partner,
SanyoElectricco.,Ltd.has
determinedthatthisproduct
meetstheEnergyStar
®
guidelinesforenergyefciency.
Thissymbolonthenameplate
meanstheproductisListed
byIntertekTestingServices
TaiwanLtd.Itisdesignedand
manufacturedtomeetrigidU.L.
safetystandardsagainstrisk
ofre,casualtyandelectrical
hazards.
RECYCLING OF SANYO TELEVISIONS:
SANYOtelevisioncustomersshouldcontact
MRMRecyclingat888-769-0149orvisittheir
websiteatwww.mrmrecycling.comregarding
SANYO’swastemanagementplan.
Protecting the Screen
CAUTION:Thescreencanbedamagedifitisnot
maintainedproperly.
• Donotusehardobjectssuchashardclothorpaper
tocleanthescreen.
• Donotuseexcessivepressure
whencleaningthescreen;excessive
pressurecancausepermanent
discolorationordarkspots.
• NEVERsprayliquidsonthescreen.
Handling Precautions
• Handlebythecabinetonly.
• Handlingbytwoormorepeopleisrecommended.
• Nevertouchthescreenwhenhandling.
• Handlingdamageisnotcoveredunderwarranty.

4
Need help? www.sanyoctv.com 1-800-877-5032
Contents
Important Safety Instructions ................2
FCC Information .....................................3
FCCWarning.............................................. 3
Cables........................................................ 3
Canadian Notice .....................................3
ENERGY STAR
®
User Information.........3
Trademarks .............................................3
Protecting the Screen ............................3
Handling Precautions .............................3
Installation ...............................................5
Accessories................................................ 5
PositioningtheTV...................................... 5
CautionInstallingStand............................. 5
InstallingStand.................................... 6
WallMounting(Optional)............................ 6
Getting Started ........................................7
InstallBatteriesintheRemoteControl....... 7
OperatingRangeoftheRemoteControl.... 7
AntennaConnectionforOff-airSignals...... 7
ControlsandJacks..................................... 8
WirelessRemoteControl........................... 9
Connection............................................... 10
HDMItoHDMIConnection................ 10
Component(YPbPr)Connection....... 10
VideoConnection(SharedWith
Component-Y).................................. 11
DigitalAudioConnection.................... 11
PCConnection................................... 11
USBConnection................................ 12
PowerConnection............................. 12
InitialSetup.............................................. 12
OSD Menu Operation ...........................14
VideoMenu.............................................. 14
AudioMenu.............................................. 15
ChannelsMenu........................................ 15
SetupMenu.............................................. 16
PhotosMenu............................................ 17
Tocontrolwhileinphotofolder:......... 17
Tocontrolwhileinfull-screenphoto
show:................................................. 17
Tocontrolwhileinphotoslideshow:.. 17
DataFormatforUSBPhotoViewer... 17
Problems and Solutions ......................18
Specications .......................................19
SupportedTimingTable........................... 20

5
Need help? www.sanyoctv.com 1-800-877-5032
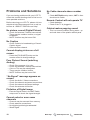
Positioning the TV
• Alwaysuseafirmandflatsurfacewhen
positioningyourHDTV.
• DonotpositiontheHDTVinaconfined
area.
• Allowadequatespaceforproperventilation.
• DonotpositiontheHDTVwhereitiseasily
reachablebysmallchildrenandmay
presentriskofinjury.
TheAmericanAcademyofPediatrics
discouragesmediausebychildrenyounger
thantwoyears.Formoreinformation,visit
www.aap.org.
Caution Installing Stand
• Handlingbytwopeopleisrecommendedwhen
installing.
• Whenholding(movingorlifting)theLCDTV,hold
thedisplay’sbody.DonothandletheLCDTVby
holdingtheattachedaccessoryparts(speakers),
otherwiseitmayresultindamage.
• Beforeinstalling,provideadesk(orapartofit)
whichisstrongenoughtosupporttheweightofthe
LCDTVanditsstand.Thedeskmustbelargerthan
theLCDTV’sscreensize.Thedesk’ssurfacemust
beflatandcoveredwithsoftmaterial(suchasa
blanket)forprotectingthescreensurface.
• BeforeputtingtheLCDTVonthedesk,makesure
thereisnoobjectonit.Leavinganyobjectunder
thescreenmaycausedamageonthescreen.
• TheLCDTVwiththisstandshouldbeinstalled
onaflatandlevelplace.Donotplaceitonnon
flat,unlevelorunstablecartorstand.Thedisplay
mayfall,causingnotonlyseriousdamagetothe
productsbutseriousinjurytoaperson.
Forcorrectinstalling,mountinganduninstallingofthe
LCDTVStand,itisstronglyrecommendedtousea
trained,authorizeddealer.Failuretofollowcorrect
procedurescouldresultindamagetotheequipmentor
injurytotheinstaller.
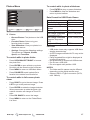
Installation
Accessories
• (1)StandBase
• (4)M4x10Screws
• (1)RemoteControl
• (1)PowerCord
• (1)UserManual
• (1)ReturntoPolicy

6
Need help? www.sanyoctv.com 1-800-877-5032
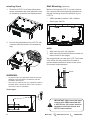
Installing Stand
1. PlacetheLCDTVonaflatsurfaceplace
wheremaintainedwithsoftmaterials(such
asablanket)toprotectthedisplayscreen.
2. Securethestand-basetotheLCDTVwith
4screws(M4x10)foundintheaccessory
bag.
WARNING:
• Topreventinjury,thisapparatusmustbesecurely
attachedtothefloor/wallinaccordancewiththe
installationinstructions.
• ThisLCDTVcouldfalloverifitispushed,pulledor
knockeddown.Itwouldbesafertouseascrewto
securetheLCDTVtodesktop.
Screw type:
20
Wall Mounting
(Optional)
BeforemountingtheLCDTVonwall,remove
the4screwsthatwereoriginallythreadedinto
thewallmountinginsertsonthebackofyour
LCDTV.
• VESAstandardinterface:400x400mm
• Screwtype:M6x20
NOTE:
1. Wallmountingkitisnotsupplied.
2. Wallmountingkitshallbeabletosustainat
least3timesofsetweight.
WesuggestthatyoukeepyourLCDTVatleast
2.36inches(60mm)awayfromthewallto
preventcableinterferenceandtomakeroom
forabetterheatdissipation.
60mm
wall
IMPORTANT: Wall mount kit must
comply with VESA standard 400
x 400. All four (4) screws must be
threaded to the wall mount and
HDTV's back cabinet.

7
Need help? www.sanyoctv.com 1-800-877-5032
Getting Started
Install Batteries in the Remote
Control
1. Openthebatterycoveroftheremotecontrol
bypressingdownandpullingit.
2. InserttwonewAAAsizebatteriesforthe
remotecontrol.Makesuretomatchthe
and signsonthebatterieswithmarks
insidetheremotecontrol.
3. Closethebatterycoveruntilitclicksshut.
• Donotuserechargeablestogetherwithdry
cells,othertypes,mixednewandoldor
batterieswithdifferentchargelevels.
• Donotexposetheremotecontrolor
batteriestomoistureorheatsuchas
sunshine.
• Pleaserecycleusedupbatteries.
• Removethebatteriesiftheremotecontrol
isnotgoingtobeusedforanextended
periodoftime.
• Dangerofexplosionifbatteriesare
incorrectlyreplaced.
• Replacebatteriesonlywiththesameor
equivalenttype.
Operating Range of the Remote
Control
Pointthetopoftheremotecontroltoward
theTV’ssensorwithinadistanceoflessthan
6m/20ft,andahorizontal/verticalangleofless
than30degrees.
Theremotecontrolmaynotfunctionproperly
iftheTV'ssensorisunderdirectsunlightor
strongillumination,orwhenthereisobstaclein
thepathofsignaltransmission.
30 30
Antenna Connection for Off-air
Signals.
ThetunerinthisLCDTVcanreceivedigital
andanalogoff-airsignalsfromanantenna,or
analogorclearQAMcablechannelsfroma
directCableTVconnection.
ANALOG/DIGITAL
ANTENNA IN
ANTENNA
CABLE
or
NOTES:
• YoumustusetheOn-screenMenutoSearchfor
ClearQAMCablechannels.(seep.14)
• Forthebestpicture,connectyourCableboxor
SatellitereceivertoHDMIorcomponentjacks.
• ThisLCDTVcanreceiveANTunscrambledRF
signalbeingbroadcasted.

8
Need help? www.sanyoctv.com 1-800-877-5032
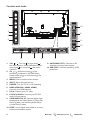
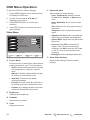
Controls and Jacks
1
2
3
4
5
12
6
11
10
6 7 8 9
1. VOL / :Turnup( )orturndown( )
theaudiovolume.IntheOSDMenumode,
moveright( )ormoveleft( )themenu
selection.
2. CH / :Selectthenext( )orthe
previous( )channel.IntheOSDMenu
mode,moveup( )ormovedown( )the
menuselection.
3. MENU:Enterorexitthemenuscreen.
4. INPUT:Selecttheinputsource.
5. POWER:TurntheTVOnorOff(standby).
6. HDMI (HDMI1/DVI, HDMI2, HDMI3):
ConnectyourHDMIdevices.
7. PC IN:ConnectyourPCvideo.
8. PC/DVI IN AUDIO:ConnectyourPC/DVI
audio(3.5mmstereo).
9. COMPONENT/AV IN:Connectdigitalvideo
equipmenttotheVideoGreen(Y),Blue(Pb),
Red(Pr)jacks,andmatchingAudioWhite
(L)andRed(R)jacks.
10. SPDIF:Useadigitalaudiocabletoconnect
stereohometheatersystem.
11. ANTENNA/DTV/TV:ConnectanRF
antennaorAnalogCablesystem.
12. USB PORT:UsedforaccessingJPEG
photofiles.

9
Need help? www.sanyoctv.com 1-800-877-5032
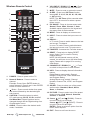
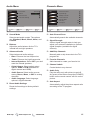
Wireless Remote Control
1
2
3
4
6
8
10
7
5
9
11
12
13
15
17
20
19
16
14
18
1. POWER-PresstopowerontheTV.
2. Numeric Buttons-Presstoselecta
channel.
Example:Press6thenENTERbuttonto
selectchannel6.Press6and1thenENTER
buttontoselectchannel61.
3. Button-Pressnumericbuttonthenpress
thisbuttonfollowedbythedesireddigital
sub-channel.
4. CAPTION-Pressthisbuttontoswitch
CCmodeamongCC Off,CC On,andCC
On When Mute.DigitalCaptionscanbe
changedthroughthetheDigitalsettingfrom
Closedcaptionmenu.
5. AUDIO-Presstoselectthedesiredaudio
mode,ifavailable.
6. VOLUME UP / DOWN(VOL / )-Press
todecreaseorincreasetheaudiovolume.
7. MUTE-Presstomuteorrestorethesound.
8. SLEEP-PresstosetOff Timerfunction
amongOff,5,10,15,30,60,90,120,180,
or240minutes.
NOTE:TheOff Timerwillbecanceledwhen
theLCDTVisturnedofforwhenapower
failureoccurs.
9. PIX SHAPE-Presstochooseaspectratio:
Normal,Zoom,Wide,Cinema,orAuto.
Availableoptionsdependonthesignaland
theaspectratioofthebroadcast.
10. MENU-Presstodisplayon-screenmenu.
11. INPUT-Presstoselecttheinputsourceto
view.
12. RECALL-
InTVmode:Presstoswitchbetweenthelast
andcurrentTVchannel.
Innone-TVmode:Presstoswitchbetween
thelastandcurrentnone-TVinput-source
13. FAVORITE-AccessestheFavoriteschannel.
14. RESET-PresstwicetodisplayRESET
menu.Select"Yes"toresettoFactory
Defaultsettings.
NOTE:Allthechannelmemorywillbe
erased.YouwillhavetoruntheInitialSetup
again.Pleaserefertopage12forrunning
InitialSetup.
15. CHANNEL UP / DOWN(CH / )-Press
toswitchtothepreviousornextchannel.
16. INFO-Presstodisplaychannelinformation
banner.
DigitalBannermaycontain:Channel
Number,ChannelTitle,VideoResolution,
andProgramRating.
AnalogBannermaycontain:Channel
Number,ChannelTitle,NTSC,andProgram
Rating.
17. SOUND-Presstoselectoneofthepreset
audiomodes:Standard,Movie,Music,
News,orCustom.
18. PICTURE-Presstoselectoneofthepreset
picturemodes:Vivid,Natural,Standard,
Cinema,orCustom.
19. Cursor (UP)and (DOWN)-Pressto
movethecursorupanddown.
Cursor (LEFT)and (RIGHT)-Pressto
movethecursorleftandright.
ENTER-Presstoselectanoptionfromthe
menu,whenrequired.
20. EXIT-Presstoexitfromthemenu.

10
Need help? www.sanyoctv.com 1-800-877-5032
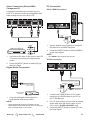
Connection
Thecablesinthesefollowingconnection
examplesareusedforillustrationonly,andare
notsuppliedinthepackage.
HDMI to HDMI Connection
ConnectcompatibleDigitaldevicessuchasHD
CableBox,HDSatelliteReceiver,DVDPlayer,
andGameSystem.
HDMI-High-DefinitionMultimediaInterface.
ThisisadigitalAVinterfacethataccepts
uncompressedvideosignalsforthebest
picturequalitypossible.ItsupportsHDCPcopy
protectionandallowstransmissionofcopy-
protecteddigitalcontent.
ThesignalcanalsoincludePCMaudio,when
available.
SATELLITE
RECEIVER
DVD PLAYER
1. ConnecttheHDMIinputandyourexternal
devicewithHDMIcable.
2. Pressthe[INPUT]buttontoselect[HDMI1],
[HDMI2],or[HDMI3]astheinputsignal.
Component (YPbPr) Connection
ConnectDigitaldevicessuchasaHDCable
Box,HDSatelliteReceiver,DVDPlayer,and
GameSystem.
SATELLITE
RECEIVER
DVD PLAYER
YPbPr
L/R
1. ConnectaCOMPONENTcabletothe
Green,Blue,andRedvideojackson
theLCDTVandtoyourdigitaldeviceas
shown.
2. ConnectanAUDIOcabletothematching
WhiteandRedaudiojacksasshown.
3. Pressthe[INPUT]buttontoselect
[Component]astheinputsignal.

11
Need help? www.sanyoctv.com 1-800-877-5032
Video Connection (Shared With
Component-Y)
Compositeconnectorsareincludedonyour
LCDTVtoprovidecontinuedcompatibilitywith
olderanalogdevicessuchasaVCR.
ANALOG DEVICE
Video
Audio L/R
1. ConnectanAVcabletothejackontheLCD
TVandtoyouranalogAVequipmentas
shown.
2. Pressthe[INPUT]buttontoselect[AV]as
theinputsignal.
Digital Audio Connection
MULTICHANNEL
RECEIVER
DIGITAL AUDIO CABLE
(Not supplied)
1. ConnecttheDigitalAudiooutputtoa
multichannelreceiverasshown.
NOTE:
• DolbyDigitalaudiosignalisavailablefromthe
DigitalAudiooutputterminalonlywhenreceivingas
partofaDigitalinputonthescreen.
PC Connection
DVI to HDMI Connection
PC
Audio Out
DVI
1. Useanadapter(notsupplied)toconnecta
DVIdevicetoanHDMIinputjack.
2. Pressthe[INPUT]buttontoselect[HDMI1]
astheinputsignal.
NOTE:
• OnlyHDMI1inputsupportsthisfunction.
D-Sub Connection
PC
Audio Out
D-Sub
1. ConnectwithRGB(D-Sub15Pin)video
cablefromtheRGBoutputofyourPCto
theTVPC INinput.
2. ForPCaudiosignal,connectwithananalog
audiocablefromtheaudiooutputofyour
PCtotheTVPC/DVI IN AUDIOinput.
3. Pressthe[INPUT]buttontoselect[PC]as
theinputsignal.

12
Need help? www.sanyoctv.com 1-800-877-5032
USB Connection
YourLCDTVfeaturesaJPEGPhotoViewer
thatallowswatchingdigitalstillpicturesfrom
yourUSBdiskpluggedtotheUSBslotatthe
sidepanel.
1. PlugyourUSBdisktotheUSBslotatthe
sidepanel.
2. Pressthe[INPUT]buttontoselect[USB]as
theinputsignal(seepage17fordetail).
Power Connection
1. PluginACpowercord(120VAC,60Hz)
2. Pressthe[POWER]button,(Followtheon-
screeninstructions).
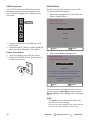
Initial Setup
ForthefirsttimeafterpoweringonyourLCD
TV,theSetupWizardappears.
1. SelectthelanguageusedfortheOSD(On-
Screen-Display)Menu.
Setup Wizard (1/6)
Please select language
Move Select
ENTER
English
Spanish
French
Cancel
2. SelecteitherHomeorShopmode.
Setup Wizard (2/6)
Previous Cancel
Please select Home/Shop
Home mode default settings are recommended for
in-home use. ENERGY STAR
®
qualified.
Shop mode is intended for in-store display and resets
video settings at Power On.
Select
Home Mode
Shop Mode
Move
ENTER
Iflateryouwanttochangethemode,youcan
changeitviatheHome/Shopselectionunder
Energy OptionsontheSetupmenu(Seepage
16).
NOTE:
• TheHomemodeisintendedforhomeuse,
andwillsavemuchenergy.
• AnymenuorcontrolchangesintheShopmodewill
notbesavedwhentheLCDTVisturnedoff.

13
Need help? www.sanyoctv.com 1-800-877-5032
3. Selectthetuningband:Antennafor
externalantenna,Cableforcablesystem,
orthroughyourSet Top Box.
Setup Wizard (3/6)
Please select TV RF tuning band
Move Select
Antenna
Cable
Set Top Box
Previous Cancel
ENTER
4. Press[ENTER]buttontostartthechannel
scan.
Setup Wizard (4/6)
Please check that the RF cable is connected properly.
Scan time may take over 20 minutes.
Move Select
START
Previous Cancel
ENTER
5. Thechannelscanningisnowinprocess.
TheSetupWizardshowsthescanning
processofdigitalchannelsfirst,andthen
theanalogchannelsnext.
Thescanningprocesswillshowhow
manychannelsintotalhavebeenfound.
Pleasewaitwhilethescanningprocessis
searchingfortheavailablechannelsinyour
area.
Tocanceltheprocess,press[ENTER]
buttonontheremotecontrol.
Setup Wizard (5/6)
Searching CH
Digital Channels Found
Analog Channels Found
Channel 4
8
8
Searching. Please wait
Select
Cancel
50%
ENTER
NOTE:
• OnceyoucanceltheSetupWizard,itwillnotbe
shownagain.
6. TheSetup Wizardisdonenow.Youmay
press[EXIT]buttonontheremotecontrolto
tunetothefirstdetectedchannelrightaway.
Setup Wizard (6/6)
Congratulations. TV Setup is done.
Exit
EXIT
NOTE:
• TheSetup Wizardwillnotappearagainonceyou
havecompleted.Forupdatingoraddingchannels,
refertotheAdd/Skip Channels featureonpage15.

14
Need help? www.sanyoctv.com 1-800-877-5032
OSD Menu Operation
ToentertheOSD(On-ScreenDisplay):
1. Press[MENU]buttonontheremotecontrol
todisplaytheOSDnenu.
2. Usethecursorbuttons(▲▼◄►)to
highlightyourselection.
3. Press[ENTER]buttontoconfirmyour
selection.
4. Press[EXIT]buttontoexitfromanymenu
layerinstantly.
Video Menu
Video
Audio
Channels
Setup
Photos
Picture Mode Standard
60
55
50Brightness
Contrast
Color
Advanced Video
Reset Video Settings
Adjust settings to affect picture quality
Move
Select
ENTER MENU
Previous Exit
EXIT
Picture Mode
Enterthismenutoselectfrompresetpicture
settingstooptimizeyourTV’sperformance.
• Vivid:Providesenhancedpicturecontrast
andsharpnessforviewinginawell-lit
room.
• Natural:Providesahighlydenedimage
forviewinginanormally-litroom.
• Standard:Providesalesspower
consumingsettings.
• Cinema:Providesasoft,lm-likepicture
forwatchingmoviesinadarkenedroom.
• Custom:Anychangesmadetotheother
modeswillbeappliedtothismode.
Brightness
Adjustpicturebrightness.
Contrast
Adjustpicturecontrast.
Color
Adjustpicturecolor.
Advanced Video
Selectadvancedvideosettings.
• Color Temperature:Selectsachoice
ofCool(blue),Normal,orWarm(red)
color.
• Noise Reduction:Settoreducevideo
noise.
• Tint:Adjustthehue(red,green,blue)of
thepicture.
• Sharpness:Settoenhancethepicture
detail.
• Adaptive Contrast:Settoautomatically
adjustthepicturedetailandbrightness.
• Aspect Ratio:Adjusthowthepicturells
thescreen.
• Overscan:SetOFFtoshowthefull
imageontheTVwhenconnectinga
computer.SetONtoshowthefullimage
ontheTVwhennotconnectedwitha
computer.
• Backlight:Setthebacklightbrightness.
Reset Video Settings
ResetVideosettingstofactorydefault
settings.

15
Need help? www.sanyoctv.com 1-800-877-5032
Audio Menu
Video
Audio
Channels
Setup
Photos
Sound Mode Standard
0Balance
Advanced Audio
Reset Audio Settings
Adjust settings to affect sound quality
Move
Select
ENTER MENU
Previous Exit
EXIT
Sound Mode
Selectpresetaudiomodes.Theoptions
are:Standard,Movie,Music,News,and
Custom.
Balance
AdjusttheaudiobalancefortheTV's
internalleftandrightspeakers.
Advanced Audio
Selectadvancedaudiosettings.
• Bass:Enhancethelowfrequencies.
• Treble:Enhancethehighfrequencies.
• Internal Speakers:SelectOffifyoudon't
needtheinternalspeakers.
• Digital Output:Selectopticaloutput
options:RAWorPCM(availablefor
digitalchannelandHDMI).
• Audio Source:Selectaudiosources
amongStereo,Mono,orSAPinanalog
channels.
• Audio Language:Selectlanguage
optionsindigitalchannels.
Reset Audio Settings
ResetAudiosettingstofactorydefault
settings.
Channels Menu
Video
Audio
Channels
Setup
Photos
Auto Channel Scan
Signal Strength
Add/Skip Channels
Favorite Channels
Channel Labels
Audio Only
Auto Aspect On
Off
Adjust channel options
Move
Select
ENTER MENU
Previous Exit
EXIT
Auto Channel Scan
Automaticallysearchtheavailablechannels.
Signal Strength
Accesssignalstrengthmetertohelpyou
adjustyourantennainstallationtooptimize
signalreception.(availablefordigital
channel).
Add/Skip Channels
ManuallyaddorskipchannelstotheTV's
programlist.
Favorite Channels
Addchannelstocreateyourfavoritelist.
Channel Labels
Createlabelstoanychannel.
Audio Only
Playtheaudioonlywithpictureturnedoff.
Anypressofthebuttonexceptthe[POWER]
buttonontheremotecontrolwillturnonthe
picture.
Auto Aspect
Automaticallyadjustthepictureaspectratio
accordingtotheTVprogram.

16
Need help? www.sanyoctv.com 1-800-877-5032
Setup Menu
Video
Audio
Channels
Setup
Photos
Menu Language English
Parental Conrtrols
Closed Caption
Sleep Timer
Input Labels
PC Options
System Info
Set various TV options
Move
Select
ENTER MENU
Previous Exit
EXIT
Off
Menu Language
ChooseEnglish,Spanish,orFrenchfor
OSDlanguage.
Parental Controls
SetTVparentalcontrols.Thisfunction
blocksoutthepictureandsoundofthe
selectedratinglevels.
Thefactorypresetpasswordtoenterthe
Parental Controlsfeatureisa4-digit
number
0000
.
• Button Lock:Lockorunlockallbuttons
ontheTV'spanel.
• Block Unrated TV:Blockorunblockthe
unratedprograms.
• US:Settheparentalcontrollevelusing
theMovieRatingsorTVRatings.
• Canada:Settheparentalcontrollevel
usingtheEnglishRatingorFrench
Rating.
• Change Password:Changethe4-digit
password.Youwillhavetoenterthenew
passwordrstandthenenteragainthe
newpasswordtoconrm.Makesureto
keepyournewpassword.
• Region 5:UseRegion5toblockvarious
typesofmoviesandtelevisionprograms
basedonratingssystemsusedinthe
USAthatyoufeelmaybeinappropriate
duetoitscontent.TheRegion5option
willoperateforDigitalChannels(ATSC)
only.
• Reset Region 5:Clearthedownloaded
RRT5ratinginformationandrestoreto
thefactorydefaultsettings.
Closed Caption
AdjusttheClosedCaptionsettings.The
optionsare:CC Mode,Analog Captions,
Digital Captions,Digital CC Settings.
Sleep Timer
SelecthowlongtheTVwilltaketo
automaticallyturnitselfoff.Theoptionsare:
Off,5,10,15,30,60,90,120,180,and240
minutes.
Input Labels
CreatelabelsthatmatchyourTV'sinputsto
yourexternaldevicesforeasyidentification.
PC Options
OnlyavailableforPCinputwithPCsignal.
YoucanadjustthePCinputtomatchyour
PCorLaptopoutputwithyourTV.The
optionsare:Auto Adjust,H-Position,
V-Position,Clock,Phase,andReset PC
Options.
System Info
DisplaystheTVinformation.
Energy Options
Selectthepowersavingmodes.The
optionsareHome ModeandShop Mode.
TheHome Modeisintendedforhomeuse,
andwillsavemuchenergy.TheShop Mode
setstheTVtoamoreenergyconsuming
mode.
Demo Mode
TurntheTVdemomodeonoroff.
Reset AV & Setup
ResetAudio,Video,andSetupsettingsto
factorydefaultsettings.

17
Need help? www.sanyoctv.com 1-800-877-5032
Photos Menu
Video
Audio
Channels
Setup
Photos
Photos
View files from a USB flash drive that is connected to the TV
Move
Select
ENTER MENU
Previous Exit
EXIT
Photos
• Browse Photos:FindphotosontheUSB
drive.
• Favorite Photos:Selectonlyyour
favoritephotostoshow.
• View Slideshow:Viewyourphotosina
slideshowmanner.
• Settings:Changetheslidwshowsettings.
Theoptionsare:Repeat,Shufe,
Speed,andTransition.
To control while in photo folder:
• PressUP/DOWN/LEFT/RIGHTtobrowse
thephotofiles.
• PressENTERtoopenafolderoraphoto
filewhichwillbeviewedonthefullscreen.
• PressMENUtoreturntoUSBMainMenu.
• PressFAVORITEtoaddaphotofileto
favoritelistordeletefromfavoritelist.
To control while in full-screen photo
show:
• PressRIGHTtogotothenextimage.Press
LEFTtogotothepreviousimage.
• PressENTERtorotatetheimageclockwise.
Whenpressentertorotatethephoto,the
rotationsituationwillchangetoZoomFill
style.
• PressPIX SHAPEtozoomtheimage.
• PressMENUtoreturntotheFolder/Photo
ListView.
To control while in photo slideshow:
• PressENTERtoplayorpauseslideshow.
• PressMENUtostoptheslideshowand
returntophotobrowser.
Data Format for USB Photo Viewer
Data format JPEG,JPG,JPE
Max. folder layer 9
Max. number of photos 700
Max. number of favorite
photos
200
Min. image resolution 75x75pixels
Max. image resolution
(ProgressiveDCT)
1024x768pixels
Max. image resolution
(BaselineSequential
DCT)
15360x8640pixels
Supported file system FAT32
CAUTION:
• USBphotovieweronlysupportsUSBMass
storageclassdevices.
• AJPEGimagemodifiedwithPCmaynotbe
displayed.
• Partlydegradedfilesmightbedisplayedat
areducedresolution.
• NotguaranteedtosupportallUSBdevices.
• DonotuseaUSBHub.
• Donotsupportmulti-partitionUSB.
NOTES:
• Thefolderandfilenamesmaybedifferent
dependingonthedigitalcameraused.
• SupportUSB2.0TypeAconnector(DC5V,
max.500mA)

18
Need help? www.sanyoctv.com 1-800-877-5032
No Cable channels above number
13
• CheckANT/Cablesetupmenu,ANTinitem
shouldsettoCable.
Remote Control will not operate TV
• Checkbatteries.
• CheckiftheTVispluggedin.
Cabinet makes popping sound
• Thisisanormalconditionduringwarm-up
andcooldownoftheplasticcabinetparts.
Problems and Solutions
IfyouarehavingproblemswithyourLCDTV,
checkthistroubleshootingcharttofindoneor
morepossiblesolutions.
BeforereturningyourLCDTV,pleasevisitour
websiteathttp://www.sanyoctv.comorcallus
tollfreeat1-800-877-5032WecanHelp!
No picture, sound (Digital Picture)
• Checktheantenna/externalconnections.
• Theremaybeastationtrouble,nosignal
broadcast.
• MUTEfunctionmaybeturnedON.
No Caption
• CheckifstationisbroadcastingaClosed-
Captionsignal.
• Selectanotherchannel.
Cannot display picture on a full
screen
• Pressthe[PIXSHAPE]buttononthe
remotecontroltochangesettings.
Poor Picture/ Sound (watching
Analog)
• Checkiftheprogramisincolor.
• Checktheantenna/externalconnections.
• ColororTintmaybemisadjusted.
• Theremaybeastationtrouble.
• MUTEfunctionmaybeturnedON.
“No Signal” message appears on
screen
• ChecktheAudio/Videoconnections.
• Checktheexternalequipmentconnections.
• Checktheexternalequipmentsettings.
• Checktheantennaconnection.
Pixilation of Digital image
• ExecuteSignalmeterintheANT/Cable
setupmenutocheckthesignalstrength.
Cannot select or scan some
channels
• Channelmayberemovedfrommemory.
• Checkantennaconnections.
• Nodigitalsignalbeingbroadcasted.
• WeakSignal.

19
Need help? www.sanyoctv.com 1-800-877-5032
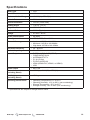
Specifications
Panel Type • LCD
Panel Size • 46"
Maximum Visible Range • 1018.08(H)×572.67(V)
Refresh Rate • 60Hz
Picture Resolution • FullHD(1920x1080)
Viewing Angle • 178°(H),178°(V)
Brightness • 350cd/m
2
Contrast Ratio • 3000:1(Typical)
Voltage • AC120V~60Hz
Power Consumption • 98Watts
Color System • NTSC,ATSC,ClearQAM
Channel Coverage • Lowband:55.25to144.00MHz
• Midband:145.00to424.00MHz
• Highband:425.00to861.00MHz
Horizontal frequency • 30~80KHz
Vertical frequency • 56~75Hz
Inputs/Outputs • DIGITALAUDIOOUT(S/PDIF)
• COMPONENT/AVIN
• ANTENNA/DTV/TV
• PCIN(D-Sub)
• PC/DVI(AUDIOIN)
• HDMI(HDMI1/DVI,HDMI2,orHDMI3)
• USB
Audio Output • 8W+8W
Dimensions
(Including Stand)
• 1056.2(L)x214.9(W)x673.3(H)mm
Net Weight
(Including Stand)
• 15.8kg
Operating Environment • OperatingTemperature:0°Cto35°C
• OperatingHumidity:10%to90%(non-condensing)
• StorageTemperature:-20°Cto60°C
• StorageHumidity:30%to90%(non-condensing)
• Specificationsaresubjecttochangewithoutnotice.

20
Need help? www.sanyoctv.com 1-800-877-5032
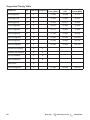
Supported Timing Table
Resolution PC HDMI-DVI
Component
Horizontal
Freq. (KHz)
Vertical Freq.
(Hz)
Nominal Pixel
Clock (MHz)
640x480@60Hz ● ● 31.469 59.940 25.175
720x400@70Hz ● ● 31.469 70.087 28.322
800x600@60Hz ● ● 37.879 60.317 40.000
1024x768@60Hz ● ● 48.363 60.004 65.000
1280x720@60Hz ● ● 44.772 59.855 74.500
1280x768@60Hz ● ● 47.396 59.995 68.250
1280x1024@60Hz ● ● 63.981 60.020 108.000
1440x900@60Hz ● ● 55.469 59.901 88.750
1680x1050@60Hz ● ● 65.290 59.954 146.250
720x480i59.94/60Hz ● ●
720x480P59.94/60Hz ● ●
720P59.94/60Hz ● ●
1080i59.94/60Hz ● ●
1080P24Hz ●
1920x1080@60Hz ● ● 67.500 60.000 148.500
Page is loading ...
Page is loading ...
-
 1
1
-
 2
2
-
 3
3
-
 4
4
-
 5
5
-
 6
6
-
 7
7
-
 8
8
-
 9
9
-
 10
10
-
 11
11
-
 12
12
-
 13
13
-
 14
14
-
 15
15
-
 16
16
-
 17
17
-
 18
18
-
 19
19
-
 20
20
-
 21
21
-
 22
22


Ask a question and I''ll find the answer in the document
Finding information in a document is now easier with AI
Related papers
-
Sanyo FVM4612 User manual
-
-
-
Sanyo DP26640 User manual
-
-
-
-
-
-
Other documents
-
 Curtis Computer LCD1701A User manual
-
AOC LC27H060 User manual
-
-
Vivitek LCD-TV User manual
-
Westinghouse 1080P User manual
-
-
Philips 20PF5120/98 Quick start guide
-
-
-
Tote Vision LCD-900HDT User manual
