BBQ 15897 Owner's manual
- Category
- Barbecues & grills
- Type
- Owner's manual
This manual is also suitable for

Read and follow all Safety, Assembly,
and Use and Care Instructions in this
Guide before assembling and cooking
with this grill.
Failure to follow all instructions in this
Use and Care Guide may lead to fire or
explosion, which could result in property
damage, personal injury or death.
Do not assemble without assistance.
Grill will require at least 2 people for
assembly.
· Safety
· Parts
Assembly
Use and Care
Español p.19
Assembly Questions?
Call 1-800-489-1581
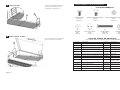
Tools needed for assembly:
Adjustable wrench (not provided)
Screwdriver (not provided)
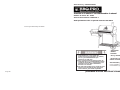
Use and Care Guide
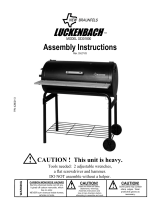
Charcoal Grill with Offset Smoker Box
Sears Model No. 15897
Kmart Item No. 08420711-7
This Grill is for Outdoor Use Only
See our extensive assortment of outdoor living products on-line at
www.sears.com and www.kmart.com
Sears, Roebuck and Co., Hoffman IL 60179, USA
SAVE THESE INSTRUCTIONS!
Manual Code: 04080031 090911-04

CAUTION: Indicates a potentially hazardous situation or
unsafe practice which, if not avoided, may result in minor
or moderate injury.
WARNING: Indicates a potentially hazardous situation
which, if not avoided, could result in death or serious
injury.
DANGER: Indicates an imminently hazardous situation
which, if not avoided, will result in death or serious injury.
Page 2
c
Sears Brands, LLC
TABLE OF CONTENTS
Customer Service Center....................................................2
Safety Symbols...................................................................2
Warranty..............................................................................2
Parts List, Exploded View....................................................4
Hardware List, Replacement Parts List...............................5
Assembly........................................................................6-15
Use and Care....................................................................16
Customer Service Center - Call for Help and Parts
Safety Symbols
The symbols and boxes shown below explain what each
heading means. Read and follow all of the messages found
throughout the manual.
DANGER
CAUTION
• For Assembly Assistance, Missing or Damaged Parts
Call: 1-800-489-1581
• Keep a fire extinguisher accessible at all times
while operating grill.
• Never leave grill unattended while in use.
• Never use inside an enclosed area such as a
patio, garage, building or tent.
• Never use inside a vehicle, a recreational
vehicle such as a motorhome, camper, or truck
bed.
• Never operate this grill under any overhead
construction such as roof coverings, carports,
awnings or overhangs.
• Maintain a minimum distance of 3 feet from all
structures.
• Keep area clear of all combustible materials
such as wood, dry plants, grass, brush, paper or
canvas.
• Never operate this grill within 25 feet of
flammable liquids.
• Never operate this grill within 3 feet of a gas
cylinder.
• Never use this grill as a heater.
• Use this grill only on a stable, level surface to
prevent tipping.
• Use on non-combustible surfaces such as dirt,
concrete, brick or rock.
• Keep children and pets away from grill at all
times. Do not allow children to use grill.
• Only use charcoal lighting fluid. Never use
gasoline, alcohol or other highly volatile fluids
to ignite charcoal.These fluids can explode
causing injury or death.
• Grill is HOT while in use and will remain HOT for
a period of time afterwards. Do not touch any
part of the grill without wearing protective
gloves.
• Never move grill when in use. Allow grill to cool
completely before moving or storing.
• Never leave HOT coals or ashes unattended.
• Do not store grill with HOT ashes or charcoal
inside grill. Store only when fire is completely
out and all surfaces are cold.
• Dispose of cold ashes by placing them in
aluminum foil, soaking with water and
discarding in a non-combustible container.
• Never use this product for anything other than
its intended purpose. This grill is not for
commercial use.
• Always use this grill in accordance with all
applicable local, state and federal fire codes.
Página 35
Esta Página Se Dejó En Blanco
Page is loading ...

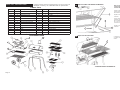
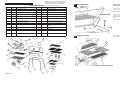
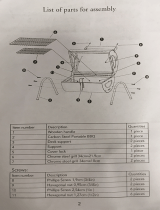
PARTS LIST - EXPLODED VIEW
Item No. Quantity Description
1 1 Grill Lid
2 1 Grill Body
3 1 Smoker Box Top
4 1 Smoker Box Bottom
5 1 Front Shelf
6 1 Storage Shelf
7 2 Shelf Support Bracket
8 1 Smoker Box Bracket
9 2 Leg Bracket
10 2 Wheels
11 1 Axle
12 1 Rear Long Leg
13 1 Front Long Leg
Item No. Quantity Description
14 1 Rear Short Leg
15 1 Front Short Leg
16 3 Handle
17 1 Smoker Box Charcoal Grate
18 1 Grill Charcoal Grate
19 2 Smoker Box Cooking Grate
20 2 Grill Cooking Grate
21 1 Warming Rack
22 2 Charcoal Grate Lifter
23 1 Temperature Gauge
24 1 Smoke Stack
25 1 Smoker Box Door Stop
26 1 Smoker Box Charcoal Access Door
EXPLODED VIEW
24
25
Page 4
5
26
Unpack all parts and check against Parts List. If any parts are
damaged or missing, call 1-800-489-1581 for replacement.
PARTS LIST
Página 33
Nota: No apriete demasiado la
reji-lla para calentar. Ésta debe
moverse libremente.
Inserte el perno del soporte de la
reji-lla para calentar (21) en el orificio
del extremo de la tapa (1).
Repita el mismo paso en el extremo
contrario.
Fije el soporte de la rejilla para
calentar (21) en el interior del cuerpo
de la parrilla (2) con un tornillo Phillips
(A) y una contratuerca hexagonal (H),
como se ilustra.
Repita el mismo paso en el extremo
contrario.
19
1
2
21
Coloque las rejillas de cocción (20) en
el cuerpo de la parrilla (2), como se
ilustra.
20
20
2
YA PUEDE USAR LA PARRILLA.
A
H
REJILLA PARA CALENTAR ALIMENTOS
REJILLAS DE COCCIÓN

Page 5
HARDWARE LIST - REPLACEMENT PARTS LIST
(A)
M6x12
Phillips Head Screw
Qty: 37
(B)
M6x12
Carriage Bolt
Qty: 2
(C)
M6
Hex Flange Nut
Qty: 37
(D)
Hair Pin
Qty: 2
(E)
M6
Washer
Qty: 6
(F)
M12
Crown Nut
Qty: 2
(G)
M6x45
Phillips Head Screw
Qty: 16
(H)
M6
Lock Nut
Qty: 2
(I)
Axle Bushing
Qty: 2
REPLACEMENT PARTS LIST
HARDWARE LIST
Item No. Description
99040014 Hinge Kit
99040015 Handle Kit
99040016 Smoker Box Kit
99040017 Smoker Box Air Damper Kit
99040018 Smoker Box Bracket Kit
04080007 Temperature Gauge
04080025 Grill Cooking Grate
04080016 Warming Rack
04080027 Charcoal Grate Lifter
04080028 Storage Shelf
04080029 Smoker Box Cooking Grate
04080003 Hardware Pack
Item No. Description
99040001 Grill Lid Kit
99010002 Grill Body Kit
99040003 Smoke Stack Kit
99040004 Front Shelf Kit
99040005 Front Shelf Bracket Kit
99040006 Front Long Leg Kit
99050008 Front Short Leg Kit
99040007 Rear Long Leg Kit
99040009 Rear Short Leg Kit
99040010 Leg Bracket Kit
99040011 Axle Kit
99040012 Wheel Kit
99040013 Warming Rack Kit
To purchase replacement parts, call 1-800-489-1581.
Página 32
Coloque la pieza para regular la altura
de la rejilla del carbón (22) sobre la
rejilla (18), según se ilustra.
Repita el mismo paso en el extremo
contrario.
17
22
18
Eleve y coloque las piezas para regular
la altura de la rejilla para el carbón (22)
en los puntos de apoyo laterales del
cuerpo de la parrilla.
18
22
ASAS PARA LEVANTAR LA PARRILLA
INSTALE LAS ASAS PARA LEVANTAR LA PARRILLA

ASSEMBLY
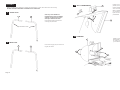
Before assembly read instructions carefully. Assemble grill on a clean, flat surface. This unit is heavy.
DO NOT ASSEMBLE WITHOUT ASSISTANCE. GET A HELPER!
Insert rear long leg (12) into rear short
leg (14) as shown.
Note: Pay close attention to
hardware holes when assembling
grill legs. Front legs have holes
near top to attach front shelf.
Insert front long leg (13) into front
short leg (15) as shown.
14
12
1
2
15
13
Page 6
FRONT LEGS
Shelf Attach Holes
REAR LEGS
Página 31
Instale el asa (16) en la tapa de la
parrilla (1) con tornillos Phillips (A) y
tuercas hexagonales con brida (C)
como se ilustra.
Meta el vástago del termómetro (23)
por el agujero en la tapa de la parrilla.
Fíjelo con la tuerca del quemador
preinstalada.
15
1
C
A
Instale la chimenea (24) desde la
parte interior de la tapa de la parrilla
(1). Fíjelos con un tornillo Phillips (A)
y una contratuerca hexagonal (C).
16
23
ASA Y TERMÓMETRO
CHIMENEA
16
24
A
C
1

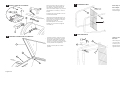
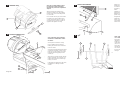
Note: Do not fully tighten screws at
this time.
Attach leg bracket (9) to legs (12) and
(13) as shown using phillips head
screws (G) and hex flange nuts (C).
Repeat assembly step on
opposite end for legs (14) and (15).
G
9
12
12
13
13
6
C
3
4
Page 7
Note: Steps 3-4 require assistance.
Get a helper!
Insert storage shelf (6) into holes of
assembled grill legs as shown.
STORAGE SHELF
LEG BRACKETS
Storage Shelf
Insertion Hole
Página 30
Coloque la tapa (1) sobre el cuerpo
de la misma (2).Enrosque un perno
de cabeza redonda (B) a través de
los orificios ubicados a cada lado de
la tapa y el cuerpo de la parrilla. Fíjelo
con un pasador de horquilla (D).
Repita el mismo paso en el lado
opuesto.
13
14
Alinee los orificios del asa (16) con
los orificios de la parte superior del
ahumador (3). Instale el asa en la
tapa con tornillos Phillips (A) y tuercas
hexagonales con brida (C), como se
ilustra.
Repita el paso para instalar el asa en
el lado del ahumador.
Introduzca la lengüeta del tope de la
puerta Alinee el orificio del tope de la
puerta (25) con el orificio de la parte
posterior de la tapa del
ahumador.Fíjelos con un tornillo
Phillips (A) y una tuerca hexagonal
con brida (C).
16
3
C
C
A
A
16
A
25
C
3
1
D
B
2
ASAS Y TOPE DE LA PUERTA
TAPA DEL CUERPO DE LA PARRILLA

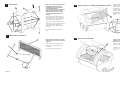
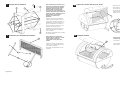
Note: Position brackets so sharper
angled ends are used to connect to
grill legs.
Attach shelf support brackets (7) to
front shelf (5) using phillips head
screws (A).
Do not fully tighten at this time.
5
6
Page 8
Note: Be sure legs (13) and (15) are
assembled correctly showing
hardware holes in front to allow
front shelf attachment.
Legs (14) and (15) have 2 additional
holes to allow wheel assembly.
Make sure these legs are on the
opposite end of the smoker box
opening.
Place grill body (2) with smoker box
opening to the left, onto assembled
legs. Tightly secure grill body to legs
using washers (E), phillips head
screws (G), and hex flange nuts (C).
Attach grill body (2) to leg brackets (9)
using washers (E), phillips head
screws (A), and hex flange nuts (C)
as shown.
Do not fully tighten screws at this
time.
G
A
G
C
9
13
15
14
E
E
A
5
7
GRILL BODY
FRONT SHELF BRACKETS
2
Página 29
Algunas piezas no se ilustran para
mayor claridad.
Introduzca la parrilla de cocción (17) en
el cuerpo del ahumador, como se ilustra.
Coloque la puertecilla de acceso del
carbón del ahumador (26) en las
bisagras ubicadas al lado de la parte
inferior del ahumador (4) como se
ilustra.
17
26
4
11
12
19
Nota: El extremo más corto de la
rejilla de cocción debe quedar
ubicado hacia las esquinas.
Algunas piezas no se ilustran para
mayor claridad.
Introduzca la parrilla de cocción (19)
en el cuerpo del ahumador, como se
ilustra.
REJILLA PARA EL CARBÓN Y PUERTA DE ACCESO
REJILLAS DE COCCIÓN

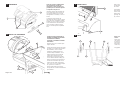
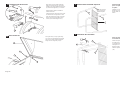
Align holes on assembled front shelf
(5) with holes on grill body and legs
as shown.
Insert phillips head screw (A) through
holes on front shelf (5) into grill body.
Secure using hex flange nuts (C).
Attach shelf support brackets (7) to
grill legs using phillips head screws
(G). Secure using hex flange nuts (C).
G
7
5
A
Page 9
Note: Carefully reposition grill as
shown.
Insert axle (11) through holes on legs
(14) and (15) then attach axle bushing
(I) onto each end.Slide wheels (10)
onto axle as shown (wide side of
wheel hub faces in). Secure with
crown nut (F).
Fully tighten all hardware at this time.
10
I
14
15
11
F
7
8
C
FRONT SHELF
AXLE
Página 28
Nota: No apriete completamente
los tornillos del soporte del
ahumador en este momento. Es
posible que sea necesario ajustar
el soporte en el paso 13.
Instale el soporte del ahumador (8)
en la parte inferior de la misma (4)
con tornillos Phillips (A) y tuercas
hexagonales con brida (C) como se
ilustra.
Coloque la parte superior del
ahumador (3) sobre la parte superior
de la misma (4). Introduzca tornillos
Phillips (A) por los orificios ubicados
en el borde exterior del ahumador,
como se ilustra. Repita el mismo
paso en el lado opuesto. Apriételos
bien.
9
10
A
A
2
C
G
8
1213
¡PIDA QUE OTRA PERSONA LE
AYUDE! LA UNIDAD ES PESADA.
CON MUCHO CUIDADO,
COLOQUE LA PARRILLA SOBRE
SUS PATAS.
Algunas piezas no se ilustran para
mayor claridad.
Inserte dos tornillos Phillips (A) hasta
la mitad, en los orificios de conexión
del ahumador, como se ilustra.
Introduzca cuidadosamente los
tornillos Phillips instalados, en los
orificios ubicados a los lados del
cuerpo de la parrilla (2).Fije el
ahumador al cuerpo de la parrilla,
con los demás tornillos Phillips (A).
Alinee los orificios del soporte de la
cámara de combustión (8) con los
orificios de las patas de la parrilla
(12) y (13). Fije con tornillos Phillips
(G) y tuercas con brida (C).
Ahora apriete todos los herrajes,
incluyendo los 2 tornillos introducidos
parcialmente.
A
8
4
3
C
A
AHUMADOR
INSTALE EL AHUMADOR

Page 10
Note: Do not fully tighten smoker
box bracket screws at this time.
Bracket may need to be adjusted in
Step 13.
Attach smoker box bracket (8) to
smoker box bottom (4) using phillips
head screws (A) and hex flange nuts
(C) as shown.
Place smoker box top (3) onto smoker
box bottom (4). Insert phillips head
screws (A) through holes in outer lip
of smoker box as shown. Repeat on
opposite side.Tighten securely.
GET A HELPER! UNIT IS HEAVY.
CAREFULLY TURN GRILL ONTO
ITS LEGS.
Some parts not shown for clarity.
Insert 2 phillips head screws (A)
halfway into smoker box connection
holes as shown.
Carefully insert attached phillips head
screws into keyholes on side of grill
body (2). Secure smoker box to grill
body with remaining phillips head
screws (A).
Align holes in firebox bracket (8) with
holes in grill legs (12) and (13). Use
phillips head screws (G) and flange
nuts (C) to secure.
Fully tighten all hardware at this time,
including the 2 halfway inserted
screws.
10
9
A
A
8
4
3
C
A
A
2
C
G
8
12
13
SMOKER BOX
ATTACH SMOKER BOX
Alinee los orificios ubicados en la
unidad de la repisa delantera (5) con
los orificios ubicados en el cuerpo de
la parrilla y en las patas, como se
ilustra.
Introduzca tornillos Phillips (A) por los
orificios ubicados en la repisa
delantera (5) y en el cuerpo de la
parrilla. Fíjelos con tuercas
hexagonales con brida (C).
Instale los soportes de apoyo de la
repisa (7) en las patas de la parrilla
con tornillos Phillips (G). Fíjelos con
tuercas hexagonales con brida (C).
G
7
5
A
Página 27
Nota: Vuelva a colocar la parrilla
con cuidado, según se ilustra.
Introduzca el eje (11) por los orificios
ubicados en las patas (14) y (15) e
instale un manguito para eje (I) en
cada extremo.Introduzca las ruedas
(10) en el eje, como se ilustra (el lado
ancho del cubo de la rueda debe
quedar orientado hacia dentro). Fíjela
con una tuerca de corona (F).
En este momento, apriete todos los
herrajes.
7
8
C
10
I
14
15
11
F
REPISA DELANTERA
EJE

Page 11
Note: Shorter end of cooking grate
should be placed near corners.
Some parts not shown for clarity.
Insert smoker box cooking grates (19)
into smoker box as shown.
Some parts not shown for clarity.
Insert smoker box charcoal grate (17)
into smoker box body as shown.
12
11
17
Set smoker box charcoal access door
(26) into hinges on side of smoker box
bottom (4) as shown.
26
4
19
CHARCOAL GRATE AND ACCESS DOOR
COOKING GRATES
Nota: Ubique los soportes de
manera que los extremos a menor
ángulo agudo sirvan para
conectarse con las patas de la
parrilla.
Instale los soportes de apoyo de la
repisa (7) en la repisa delantera (5)
con tornillos Phillips (A).
No apriete completamente en este
momento.
5
6
Página 26
Nota: Verifique que las patas (13) y
(15) estén correctamente armadas,
con los orificios para los herrajes
orientados hacia el frente, para
poder instalar la repisa frontal.
Las patas (14) y (15) cuentan con 2
orificios adicionales para instalar la
unidad de ruedas. Verifique que las
patas queden en el extremo
opuesto a la abertura del
ahumador.
Coloque el cuerpo de la parrilla (2)
sobre las patas armadas. Instale el
cuerpo de la parrilla en las patas con
arandelas (E), tornillos Phillips (G), y
tuercas hexagonales con brida (C).
Fije el cuerpo de la parrilla (2) a los
soportes de las patas (9) con
arandelas (E), tornillos Phillips (A), y
tuercas hexagonales con brida(C),
como se ilustra.
No apriete completamente los tornillos
en este momento.
A
5
7
CUERPO DE LA PARRILLA
SOPORTES DE LA REPISA DELANTERA
G
A
G
C
9
13
15
14
E
E
2

Page 12
Place grill lid (1) on top of grill body
(2). Screw a carriage bolt (B) through
hole in each side of grill lid and grill
body. Secure using hair pin (D).
14
1
D
B
2
Align holes in one handle (16) with
holes in smoker box top (3). Secure
handle to lid using phillips head screw
(A) and hex flange nut (C) as shown.
Repeat step to attach a handle to
smoker box side.
Insert tab of door stop into slot in back
of smoker box lid. Align hole in door
stop (25) with hole in back of smoker
box lid. Secure using phillips head
screw (A) and hex flange nut (C).
13
16
3
C
C
A
A
16
A
25
C
3
HANDLES AND DOOR STOP
GRILL BODY LID
Nota: No apriete completamente
los tornillos en este momento.
Instale el soporte de las patas (9) a
las patas (12) y (13), como se ilustra,
con tornillos Phillips (G) y tuercas
hexagonal con brida (C).
Repita el paso de armado en el
extremo opuesto para las patas (14) y
(15).
G
9
12
13
C
4
Página 25
Nota: Necesitará ayuda en los
pasos 3-4. ¡Pida que otra persona
le ayude!
Introduzca la repisa para guardar
objetos (6) en los orificios ubicados
en las patas de la parrilla, como se
ilustra.
12
13
6
REPISA PARA GUARDAR OBJETOS
SOPORTES DE LAS PATAS
Orificio de inserción
de la repisa para
guardar objetos
3

Page 13
Secure handle (16) to grill lid (1) using
phillips head screws (A) and hex
flange nuts (C) as shown.
Insert temperature gauge (23) stem
through hole in grill lid. Secure with
pre-attached nut.
15
1
C
A
Insert smoke stack (24) from inside of
grill lid (1). Secure with phillips head
screw (A) and hex flange nut (C).
16
24
A
C
23
HANDLE AND TEMPERATURE GAUGE
SMOKE STACK
16
1
ARMADO
Antes de armarla, lea detenidamente las instrucciones.Arme la parrilla en una superficie limpia y plana. Esta
unidad es pesada.
NO ARME ESTA UNIDAD SIN LA AYUDA DE OTRA PERSONA. ¡PIDA QUE OTRA PERSONA LE AYUDE!
Introduzca la pata trasera larga (12)
en la pata trasera corta (14) como se
ilustra.
Nota: Preste atención a los
orificios de los herrajes cuando
arme las patas de la parrilla.La
parte delantera tiene orificios cerca
de su parte superior, para fijarlas a
la repisa delantera.
Introduzca la pata delantera larga (13)
en la pata delantera corta (15), como
se ilustra.
1
2
Página 24
14
12
15
13
PATAS DELANTERAS
Orificios para fijar
la repisa
PATAS TRASERAS
Page is loading ...

Page 15
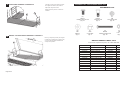
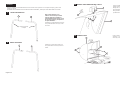
Note: Do not over-tighten, warming
rack should move freely.
Insert warming rack (21) tab into hole
of grill lid (1) end.
Repeat step on opposite end.
Attach warming rack (21) support arm
onto inner grill body (2) with phillips
head screw (A) and lock nut (H) as
shown.
Repeat step on opposite end.
19
1
2
21
Place cooking grates (20) in grill body
(2) as shown.
20
20
2
GRILL IS READY FOR USE.
A
H
WARMING RACK
COOKING GRATES
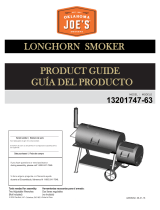
LISTA DE PIEZAS, VISTA ESQUEMÁTICA
VISTA ESQUEMÁTICA
24
25
Página 22
5
26
Art. No. Cantidad Descripción
1 1 Tapa de la parrilla
2 1 Cuerpo de la parrilla
3 1 Parte superior del ahumador
4 1 Parte inferior del ahumador
5 1 Repisa delantera
6 1 Repisa para guardar objetos
7 2 Soporte para la repisa
8 1 Soporte del ahumador
9 2 Soporte de pata
10 2 Ruedas
11 1 Eje
12 1 Pata trasera larga
13 1 Pata delantera larga
Art. No. Cantidad Descripción
14 1 Pata trasera corta
15 1 Pata delantera corta
16 3 Asa
17 1 Rejilla para el carbón del ahumador
18 1 Rejilla para el carbón de la parrilla
19 2 Rejilla de cocción del ahumador
20 2 Rejilla de cocción de la parrilla
21 1 Rejilla para calentar alimentos
22 2 Pieza para regular la altura de la rejilla del
carbón
23 1 Termómetro
24 1 Chimenea
25 1 Bloque de tope del ahumador
26 1 Tope para la puerta del ahumador
Saque todas las piezas y verifíquelas según el
listado que viene con la parrilla. Si faltan piezas
o si están dañadas, llame al 1-800-489-1581
para que le envíen un repuesto.
LISTA DE PIEZAS

Page 16
GARANTÍA
GARANTÍA DE LA PARRILLA BBQ-PRO
Garantía completa de 90 días
Si este producto BBQ-Pro falla debido a un defecto de
material o de mano de obra dentro del plazo de 90 días
de la compra, devuélvalo a cualquier tienda Sears o
Kmart u otro punto de venta de BBQ-Pro en los Estados
Unidos con su comprobante de compra para que se lo
cambien gratis.
Esta garantía expresa le otorga derechos específicos; es
posible que usted tenga otros derechos que pueden
variar de un estado a otro.
Sears, Roebuck and Co., Hoffman Estates, IL 60179
PROPOSICION 65 DEL ESTADO DE CALIFORNIA
1. Los subproductos que se generan por combustión
al usar este aparato, contienen substancias químicas
que, en el estado de California, se sabe que producen
defectos congénitos, daños al aparato reproductor o
cáncer.
2.Este producto puede contener plomo, una
substancia química que en el estado de California se
considera causante de defectos congénitos y de
otros trastornos al sistema reproductor.
Este manual contiene información importante
necesaria para usar esta parrilla de forma segura y correcta.
Antes de empezar a armar y a usar la parrilla, lea y siga
todas las advertencias y las instrucciones de armado.
Guarde este manual, para que lo pueda consultar en el
futuro.
La combustión del carbón produce monóxido de
carbono, que es inodoro y que puede causar la muerte.
NO queme carbón dentro de las casas, los vehículos,
as carpas, los garajes o en áreas cerradas. Use este
aparato únicamente al aire libre, en lugares bien
ventilados.
El no seguir debidamente estas advertencias e
instrucciones puede ocasionar incendios o
explosiones, que pueden causar daños materiales,
lesiones o la muerte.
USE AND CARE
BEFORE FIRST USE
Before cooking with your BBQ PRO Grill/Smoker, follow
these steps closely to both cure the finish and season the
interior of your grill/smoker. Improper preparation of your
grill may affect the finish and/or add metallic flavors to your
first foods.
· Brush or wipe all interior surfaces including grills and
grates with vegetable cooking oil.
· Using charcoal, build a small fire on the charcoal grate
in the Smoker Box, being sure not to lay coals against
the walls.
· Close doors. Open butterfly damper in Smoker Box and
Smokestack damper approximately one quarter.
· Continue burning charcoal for two hours or more. After
at least 2 hours, begin increasing temperature by
opening the butterfly damper and smoke stack damper
half-way, and adding more charcoal until the
temperature gauge increases by about 50-75 degrees.
Hold it at that temperature for about 15-30 minutes.
Your BBQ-PRO Grill/Smoker is now ready for use.
GRILLING IN THE MAIN COOKING CHAMBER
WARNING: Failure to read and follow instructions for
lighting charcoal may result in serious personal injury
and/or property damage.
· Charcoal is recommended, however a combination of
wood chunks or wood chips mixed in with the charcoal
may be used as the fuel source for grilling.
· Remove the cooking grates and place charcoal on the
charcoal grate in the main cooking chamber. Do not
build too large of a fire. We recommend starting a fire
with no more than 4 pounds of charcoal (approximately
60 briquets) and adding more as needed during cooking.
· After allowing the fire to burn down, place the cooking
grates in the main cooking chamber.
SMOKING AND SLOW COOKING
· If using the unit as a smoker, remove the cooking grates
from the smoker box and build your fire on top of the
smoker box charcoal grate. Either charcoal or wood may
be used, but wood is the recommended fuel for the
flavor it imparts through the smoke. Most seasoned
hardwoods are good for smoking, such as hickory,
mesquite, pecan, oak, apple, etc. It's best to remove
bark before burning, as it contains a high acid content
and imparts an acrid flavor.
· After allowing the fire to burn down, close the doors and
control the temperature and smoke with the dampers of
the smoker box and smoke stack. Since heat and smoke
rise, a natural airflow will be maintained from the air
damper near the heat source up to the smoke stack.
This is known as "air draw." Do not operate the unit with
temperatures exceeding 450 degrees in the smoker box.
· Place the food in the main cooking chamber and use the
temperature gauge to monitor temperature. Cooking and
smoking are taking place using indirect heat. Because of
this, there is no worry of a grease fire flare-up ruining the
food. Do not place food within 6" of the opening from the
main cooking chamber into the smoker box.
· A general rule of thumb for cooking is about 1 hour per
pound for smoking large cuts of meat. Refer to a cook
book for specific cuts of meats. Limit the number of times
you open the smoker box door, as this will allow heat to
escape and extend the cooking time. If food seems to
be getting too smoky or brown before the cooking time is
finished, cover it loosely with heavy duty aluminum foil.
GRILL MAINTENANCE
· Surface rust can form on the inside of your smoker. To
prevent this, always make sure to apply a light coat of
vegetable oil on interior surfaces after cleaning. This will
aid in the protection of your unit. Exterior surfaces may
need occasional touch-up. We recommend the use of a
commercially available black high temperature spray
paint.
NEVER PAINT THE INSIDE OF YOUR GRILL/SMOKER!
· Make sure coals are completely extinguished before
cleaning inside of smoker, and always remove the ash
after each use. Inside surfaces may be cleaned with a
solution of detergent and water applied with a scrub
brush. Thoroughly rinse with water and allow to air dry.
Coat with vegetable oil before using again.
Página 21
THE HEAT OF THE COALS
barely covered with gray
ash; deep red glow
thin coating of gray ash;
deep red glow
significant coating of gray
ash; red glow
thick coating of gray ash;
dull red glow
temperature
range (F°)
visual cues
HOT COALS
MODERATELY HOT
TO HOT COALS
MODERATELY
HOT COALS
MODERATELY
COOL COALS
400 to 450
375 to 450
325 to 375
300 to 325
To ensure that it is safe to eat, food must be
cooked to the minimum internal temperatures
listed in the table below.
Fish 145° F
Pork 160° F
Egg Dishes 160° F
Steaks and Roasts of Beef, Veal or Lamb 145° F
Ground Beef, Veal or Lamb 160° F
Whole Poultry (Turkey, Chicken, Duck, etc.) 165° F
Ground or Pieces Poultry (Chicken Breast, etc.) 165° F
USDA* Safe Minimum Internal Temperatures
* United States Department of Agriculture
Page is loading ...
Page is loading ...
-
 1
1
-
 2
2
-
 3
3
-
 4
4
-
 5
5
-
 6
6
-
 7
7
-
 8
8
-
 9
9
-
 10
10
-
 11
11
-
 12
12
-
 13
13
-
 14
14
-
 15
15
-
 16
16
-
 17
17
-
 18
18


BBQ 15897 Owner's manual
- Category
- Barbecues & grills
- Type
- Owner's manual
- This manual is also suitable for
Ask a question and I''ll find the answer in the document
Finding information in a document is now easier with AI
in other languages
- español: BBQ 15897 El manual del propietario
Related papers
Other documents
-
Viking Range VCFS364 Reference guide
-
 Gibson Home 985101045M Operating instructions
-
Charbroil 12201570 Owner's manual
-
-
LANDMANN 591320 User manual
-
Brinkmann 855-6305-S Owner's manual
-
 BBQ Pro Charcoal Grill 0-03946586-9 User manual
-
 Oklahoma Joe's 13201747-63 User guide
-
 Oklahoma Joe's 15202031 User guide
-
 New Braunfels 03301800 Owner's manual


