LG MS2535GIS Owner's manual

Category
Microwaves
Type
Owner's manual
OWNER’S MANUAL
MICROWAVE OVEN
Please read this owner’s manual thoroughly before operating.
ENGLISH
ภาษาไทย
(optional, please check model specification)
MS253
****
www.lg.com
MFL69673104_0

Copyright © 2018 LG Electronics Inc. All Rights Reserved.
CONTENTS
How the Microwave Function Works
Microwaves are a form of energy similar to radio,
television waves, and ordinary daylight. Normally,
microwaves spread outwards as they travel through the
This oven, however, has a magnetron that is designed
to make use of the energy in microwaves. Electricity,
supplied to the magnetron tube, is used to create
microwave energy.
These microwaves enter the cooking area through
openings inside the oven. A tray is located inside the
oven. Microwaves cannot pass through metal walls
of the oven, but they can penetrate such materials as
glass, porcelain and paper, the materials out of which
microwave-safe cooking dishes are constructed.
Microwaves do not heat cookware, though cooking
vessels will eventually get hot from the heat generated
by the food.
Your Microwave oven, is one of the safest
of all home appliances. When the door
is opened, the oven automatically stops
producing microwaves. Microwave energy
is converted completely to heat when it
enters food, leaving no “left over” energy
to harm you when you eat your food.
A very safe appliance
CONTENTS
3
IMPORTANT SAFETY INSTRUCTIONS
8
BEFORE USE
8
Unpacking & Installing
10
Control Panel
10
Display Picto
11
Setting Clock
11
Quick Start
11
More/Less
11
Energy Saving
12
HOW TO USE
12
Timed Cooking
12
Microwave Power Levels
13
Child Lock
13
Reheat
13
Reheat Menu Instructions
14
Popular Menu
14
Popular Menu Instructions
17
Soften
17
Soften Menu Instructions
18
Melt
18
Melt Menu Instructions
18
Yogurt
19
Yogurt Menu Instructions
19
Keep Warm
20
Inverter Defrost
20
Inverter Defrost Menu Instructions
21
MICROWAVE-SAFE UTENSILS
22
FOOD CHARACTERISTICS &
MICROWAVE COOKING
24
TO CLEAN YOUR OVEN
25
QUESTIONS & ANSWERS
26
TECHNICAL SPECIFICATIONS
24
USING THE SMART DIAGNOSIS™
FUNCTION
CONTENTS
How the Microwave Function Works
Microwaves are a form of energy similar to radio,
television waves, and ordinary daylight. Normally,
microwaves spread outwards as they travel through the
This oven, however, has a magnetron that is designed
to make use of the energy in microwaves. Electricity,
supplied to the magnetron tube, is used to create
microwave energy.
These microwaves enter the cooking area through
openings inside the oven. A tray is located inside the
oven. Microwaves cannot pass through metal walls
of the oven, but they can penetrate such materials as
glass, porcelain and paper, the materials out of which
microwave-safe cooking dishes are constructed.
Microwaves do not heat cookware, though cooking
vessels will eventually get hot from the heat generated
by the food.
Your Microwave oven, is one of the safest
of all home appliances. When the door
is opened, the oven automatically stops
producing microwaves. Microwave energy
is converted completely to heat when it
enters food, leaving no “left over” energy
to harm you when you eat your food.
A very safe appliance
CONTENTS
3
IMPORTANT SAFETY INSTRUCTIONS
8
BEFORE USE
8
Unpacking & Installing
10
Control Panel
10
Display Picto
11
Setting Clock
11
Quick Start
11
More/Less
11
Energy Saving
12
HOW TO USE
12
Timed Cooking
12
Microwave Power Levels
13
Child Lock
13
Reheat
13
Reheat Menu Instructions
14
Popular Menu
14
Popular Menu Instructions
17
Soften
17
Soften Menu Instructions
18
Melt
18
Melt Menu Instructions
18
Yogurt
19
Yogurt Menu Instructions
19
Keep Warm
20
Inverter Defrost
20
Inverter Defrost Menu Instructions
21
MICROWAVE-SAFE UTENSILS
22
FOOD CHARACTERISTICS &
MICROWAVE COOKING
24
TO CLEAN YOUR OVEN
25
QUESTIONS & ANSWERS
26
TECHNICAL SPECIFICATIONS
24
USING THE SMART DIAGNOSIS™
FUNCTION
3
IMPORTANT SAFETY INSTRUCTIONS
READ CAREFULLY AND KEEP FOR FUTURE REFERENCE
ENGLISH
CONTENTS
How the Microwave Function Works
Microwaves are a form of energy similar to radio,
television waves, and ordinary daylight. Normally,
microwaves spread outwards as they travel through the
This oven, however, has a magnetron that is designed
to make use of the energy in microwaves. Electricity,
supplied to the magnetron tube, is used to create
microwave energy.
These microwaves enter the cooking area through
openings inside the oven. A tray is located inside the
oven. Microwaves cannot pass through metal walls
of the oven, but they can penetrate such materials as
glass, porcelain and paper, the materials out of which
microwave-safe cooking dishes are constructed.
Microwaves do not heat cookware, though cooking
vessels will eventually get hot from the heat generated
by the food.
Your Microwave oven, is one of the safest
of all home appliances. When the door
is opened, the oven automatically stops
producing microwaves. Microwave energy
is converted completely to heat when it
enters food, leaving no “left over” energy
to harm you when you eat your food.
A very safe appliance
CONTENTS
3
IMPORTANT SAFETY INSTRUCTIONS
8
BEFORE USE
8
Unpacking & Installing
10
Control Panel
10
Display Picto
11
Setting Clock
11
Quick Start
11
More/Less
11
Energy Saving
12
HOW TO USE
12
Timed Cooking
12
Microwave Power Levels
13
Child Lock
13
Reheat
13
Reheat Menu Instructions
14
Popular Menu
14
Popular Menu Instructions
17
Soften
17
Soften Menu Instructions
18
Melt
18
Melt Menu Instructions
18
Yogurt
19
Yogurt Menu Instructions
19
Keep Warm
20
Inverter Defrost
20
Inverter Defrost Menu Instructions
21
MICROWAVE-SAFE UTENSILS
22
FOOD CHARACTERISTICS &
MICROWAVE COOKING
24
TO CLEAN YOUR OVEN
25
QUESTIONS & ANSWERS
26
TECHNICAL SPECIFICATIONS
24
USING THE SMART DIAGNOSIS™
FUNCTION
4
-
5
ENGLISH
6
his model doesn't provide a temperature probe.
S
Farm houses;
By clients in hotels, motels and other residential environments;
Bed and breakfast type environments.
T
36
When the symbol is used, It means that the surfaces are liable to get hot during use.
37
Do not place an object(a book, a box, etc.) on the product. The product may overheat or catch fire or the
object may fall, causing injury to persons.
Caution, hot surface
7
ENGLISH
UNPACKING & INSTALLING
BEFORE USE
By following the basic steps on these two pages you will be able to quickly check that your oven is operating correctly.
Please pay particular attention to the guidelines on where to install your oven. When unpacking your oven make sure
you remove all accessories and packing materials. Check to make sure that your oven has not been damaged during
shipping.
1
2 Place the oven on the level location of your choice with more
than 85cm height but make sure there is at least 20 cm of space
on the top and 20 cm at the rear & left & right for proper
ventilation. The front of the oven should be at least 8 cm from
the edge of the surface to prevent tipping.
An exhaust outlet is located on bottom or side of the oven.
Blocking the outlet can damage the oven.
If you use the microwave oven in an enclosed space or cupboard,
lower performance and reduced service life. If possible, please use the
microwave oven in the counter top condition.
NOTE
THIS OVEN SHOULD NOT BE USED FOR COMMERCIAL CATERING PURPOSES.
3 Plug your oven into a standard household socket. Make sure your oven is the only appliance connected to the socket.
If your oven does not operate properly, unplug it from the electrical socket and then plug it back in.
4
Fill a microwave safe container with 300 ml (1/2 pint) of water.
Place on the glass tray and close the oven door.
If you have any doubts about what type of container to use
please refer to Microwave-safe utensils.
Open your oven door by pulling the door handle. Place the rotating
ring inside the oven and place the glass tray on top.
5
GLASS TRAY
ROTATING RING
TURNTABLE SHAFT
8
BEFORE USE
NOTE
Do not remove the cavity Mica Sheet (silver plate) inside of oven.
The Mica plate is there to protect the microwave components from food spatters.
Mica Sheet
*Do Not Remove
Mica Sheet
0 cm
 cm
 cm
0 cm
6 Press the STOP/CANCEL button, and press the START/ENTER button
one time to set 30 seconds of cooking time.
7 The DISPLAY will count down from 30 seconds.
When it reaches 0 it will sound BEEPS. Open the oven door
and test the temperature of the water.
If your oven is operating the water should be warm.
Be careful when removing the container it may be hot.
YOUR OVEN IS NOW INSTALLED
8
The contents of feeding bottles and baby food jars shall be stirred or shaken and the temperature checked before
consumption in order to avoid burns.
9
Button recognition may be hampered in the following circumstances:
Only the outside area of the button is pressed.
10
NOTE
Do not use rubber gloves or disposable gloves.
The setting of the cooking time should be shorter than common microwave ovens (700 W, 800 W) due to
the relatively high output power of the product. Excessive heating with the product may cause moisture on the door.
BEFORE USE
9
ENGLISH
CONTROL PANEL
DISPLAY PICTO
When operate Microwave, Show up the icon on the display.
When operate Inverter Cook / Steam Cook, Show up the icon on the dispaly.
When operate Inverter Defrost, Show up the icon on the display.
When you can set More/Less, Show up the icon on the display.
When you can Cook Start, Show up the icon on the display.
When you can set Output Power, Show up the icon on the display.
When you can set Weight, Show up the icon on the display.
Icon
10
BEFORE USE
Part
POWER
See page 12“Timed Cooking”
INVERTER DEFROST
See page 20 “Inverter Defrost”
YOGURT / KEEP WARM
See page 18 "Yogurt"
See page 19 “ Keep Warm”
INVERTER COOK
Inverter Cook allows you to cook most of your
favorite food by selecting the food type and the
weight of the food.
See page 13 "Reheat"
See page 14 "Popular Menu"
See page 17 "Soften"
See page 18 "Melt"
MORE / LESS
Choose the cooking menu.
Set cooking time and weight.
While cooking with auto and manual function,
you can increase or decrease the cooking time
at any point by pressing the - or + keys (except
defrost mode).
STOP/CANCEL
Clears all functions and set entries except time of day.
START
Press this button to start cooking or resume cooking
if the door was opened or the STOP button was
pressed once.
• The quick start feature allows you to set
30 second intervals of HIGH power cooking with each
press of the START button.
SMART DIAGNOSIS
Hold the mouthpiece of a phone up to this icon
when directed to by service centre personnel, to
help diagnose problems with the microwave oven
when calling for service.
8
1. Press STOP/CANCEL .
4. Press START .
MICROWAVE POWER LEVELS
Your microwave oven is equipped with five power
levels to give you maximum flexibility and control
over cooking. The adjacent table will give you
some idea of which foods are prepared at each of
the various power levels.
The adjacent chart shows the power level settings
for your oven.
MICROWAVE POWER LEVEL CHART
When cooking is complete, Tip will sound. The word
End shows in the display window. 'End' remains in
the display and Tip will sound every minute until the
door is opened, or any button is pressed.
If you do not select the power level, the oven
will operate at power HIGH. To set HI-POWER
cooking, skip step 2 above.
NOTE
2. Press POWER until display
shows ‘800 W’.
(1st time 1000 W appears
in the display. This is to
tell you that the oven is set
on HI unless a different
power setting is chosen.)
HOW TO USE
TIMED COOKING
(MANUAL COOKING)
This function allows you to cook food for a
desired time. There are 5 power levels available.
The example below shows how to set 800 W
power level for the desired time.
Example: To cook food on 800 W for 5
minutes 30 seconds
3. Enter 5 minutes 30 seconds
by pressing '+' until display
shows '5:30'.
Boiling water.
Browning ground beef.
Making candy.
Cooking poultry pieces,
fish & vegetables.
Cooking tender cuts of meat.
Reheating rice, pasta & vegetables.
Reheating prepared foods quickly.
Reheating sandwiches.
Cooking egg, milk and cheese dishes.
Cooking cakes and breads.
Melting chocolate.
Cooking veal.
Cooking whole fish.
Cooking puddings and custard.
Thawing meat, poultry and seafood.
Cooking less tender cuts of meat.
Cooking pork chops
and roast.
Taking chill out of fruit.
Softening butter.
Keeping casseroles and main
dishes warm.
Softening butter and cream cheese.
Power
Level
Use
High
1000 W
800 W
600 W
400 W
200 W
HOW TO USE
12
MORE/LESS
By using the ( - ) or ( + ) key, TIMED COOK program
can be adjusted to cook food for a longer or shorter
time. Pressing ( + ) will increase10 seconds to the
cooking time each time you press it. Pressing ( - )
will decrens 10 seconds of cooking time each time
you press it. The max time possible will be 99 min
59 seconds.
1. Close the Door.
3. Press START.
until display shows ‘1-1’.
SETTING CLOCK
When your oven is plugged in for the first time or
when power resumes after a power interruption,
the numbers in the display reset to
'
12H
'.
ENERGY SAVING
Energy saving means save energy by turning off
the display. This feature only operates when the
Microwave Oven standby and the display will go out.
Example: To adjust the Auto Cook
(ex. Dinner Plate 1 Serve) cooking time for
a longer time, or for a shorter time
11
BEFORE USE
1. Press START to confirm
the 12H clock display.
(You can press +
to select
for 24Hour mode)
You can also set the time by using the slide
Touch Key after closing the door.
The QUICK START feature allows you to set 30
seconds intervals of HIGH power cooking with
a touch of the START.
Example: Set 2 minutes of cooking on high
power
Press the START button four times
The oven will start before you have finished
the fourth press.
During QUICK START cooking, you can extend
the cooking time up to 99 minutes 59 seconds by
repeatedly pressing the START button.
QUICK START
1. Press STOP/CANCEL.
2. Press INVERTER COOK .
until display shows ‘1’ .
6
.
Slide ( + ) or ( - ) Remaining
time will increase or decrease
by 10 seconds.
Example: To set 11:11
NOTE
When using clock mode, the display will remain on.
2. Press + until display
shows ‘11:’
4. Press + until display
shows ‘11:11’
3. Press START.
5. Press START.
Press STOP/CANCEL.
2. Select 2 minutes on high
power.
NOTE
If you want to set the clock again or change options,
you will need to unplug the power cord and reconnect.
4. Press + until display
shows ‘1-3’.
5. Press START.
ENGLISH
1. Press STOP/CANCEL .
4. Press START .
MICROWAVE POWER LEVELS
Your microwave oven is equipped with five power
levels to give you maximum flexibility and control
over cooking. The adjacent table will give you
some idea of which foods are prepared at each of
the various power levels.
The adjacent chart shows the power level settings
for your oven.
MICROWAVE POWER LEVEL CHART
When cooking is complete, Tip will sound. The word
End shows in the display window. 'End' remains in
the display and Tip will sound every minute until the
door is opened, or any button is pressed.
If you do not select the power level, the oven
will operate at power HIGH. To set HI-POWER
cooking, skip step 2 above.
NOTE
2. Press POWER until display
shows ‘800 W’.
(1st time 1000 W appears
in the display. This is to
tell you that the oven is set
on HI unless a different
power setting is chosen.)
HOW TO USE
TIMED COOKING
(MANUAL COOKING)
This function allows you to cook food for a
desired time. There are 5 power levels available.
The example below shows how to set 800 W
power level for the desired time.
Example: To cook food on 800 W for 5
minutes 30 seconds
3. Enter 5 minutes 30 seconds
by pressing '+' until display
shows '5:30'.
Boiling water.
Browning ground beef.
Making candy.
Cooking poultry pieces,
fish & vegetables.
Cooking tender cuts of meat.
Reheating rice, pasta & vegetables.
Reheating prepared foods quickly.
Reheating sandwiches.
Cooking egg, milk and cheese dishes.
Cooking cakes and breads.
Melting chocolate.
Cooking veal.
Cooking whole fish.
Cooking puddings and custard.
Thawing meat, poultry and seafood.
Cooking less tender cuts of meat.
Cooking pork chops
and roast.
Taking chill out of fruit.
Softening butter.
Keeping casseroles and main
dishes warm.
Softening butter and cream cheese.
Power
Level
Use
High
1000 W
800 W
600 W
400 W
200 W
HOW TO USE
12
REHEAT
Your oven’s menu has been preprogrammed to automatically roast food. Tell the oven what you want
and how many items there are. Then let your microwave oven roast your selections.
CHILD LOCK
This is a unique safety feature that prevents
If the CHILD LOCK was already set and you
unwanted oven operations. Once the CHILD
touch another pad, the word Loc shows in
LOCK is set, no cooking can take place.
the display. You can cancel the CHILD LOCK
according to below procedure.
To set the child lock
To cancel the child lock
Press and hold STOP/CANCEL
2. Press and hold
STOP/CANCEL until 'Loc'
until 'Loc' disappears in the
display.
appears in the display
and tip are heard.
If the time of day was already set, the time of
day will appear on the display window after
1
seconds.
After the CHILD LOCK is turned off, the oven
will operate normally.
Example : To reheat 0.3 kg pizza
REHEAT MENU INSTRUCTIONS
Weight
Cod
e
Menu
Instructions
Ute
nsil
Limit
1-1
Beverage 1 - 2 cups
Room
1. Place food on a microwave-safe cup.
Microwave-
(1 cup /
200 ml)
2. Place food in the oven. Choose the menu and
safe cup
weight, press START.
1-2
Casserole 0.25 - 1.0 kg
Refrigerated
1
1. Place food on a microwave-safe bowl.
Microwave-
(250 g /
1 serving)
Cover with plastic wrap and vent.
safe bowl
2. Place food in the oven. Choose the menu and
weight, press START.
3. After cooking, stand covered for 3 minutes.
1. Place food (0.4 - 0.5 kg of meat, chicken,
1-3
Dinner Plate
Refrigerated
Microwave-
mashed potato, vegetable etc.) on a
safe dish
microwave-safe dish. Cover with plastic wrap
and vent.
2. Place food in the oven. Choose the menu,
press START.
3. After cooking, stand covered for 3 minutes.
1-4
Muffin 1 - 4
Frozen 1. Place food on a microwave-safe dish.
Microwave-
(75 - 80 g /
1 muffin)
2. Place food in the oven. Choose the menu and
safe dish
weight, press START.
Initial
Temperature
3. Press + until display
shows ‘1-6’.
1.
Press
STOP/CANCEL.
5. Press + until
display shows ‘0.
kg’.
6.
Press
START.
2. Press
INVERTER COOK
until diplay shows ‘1’ .
4.
Press START.
Example: To set the CHILD LOCK
Example: To cancel the CHILD LOCK
1. Close the Door.
Press STOP/CANCEL.
13
HOW TO USE
ENGLISH
1-5
Pie
0.2 - 0.6 kg
Refrigerated
1. Cut leftover pie into pieces.
2.
Place food on a microwave-safe dish.
Microwave-
(150 - 200 g
/ piece)
safe dish
3
. Place food in the oven. Choose the menu and
weight, press START.
1-6
Pizza
0.2 - 0.5 kg
Refrigerated
1. Place food on a microwave-safe dish.
Microwave-
2. Place food in the oven. Choose the menu and
safe dish
weight, press START.
1-7
Rice 0.1 - 0.3 kg
Refrigerated
1. Place food on a microwave-safe bowl.
Microwave-
Cover with plastic wrap and vent.
safe bowl
2. Place food in the oven. Choose the menu and
weight, press START.
3. After cooking, stand covered for 3 minutes.
1-8
Soup 0.25 - 1.0 kg
Room
1. Place food on a microwave-safe bowl.
Microwave-
(250 g
Cover with plastic wrap and vent.
safe bowl
1 serving)
2. Place food in the oven. Choose the menu and
weight, press START.
3. After cooking, stand covered for 3 minutes.
POPULAR MENU
Your oven’s menu has been preprogrammed to automatically cook food. Tell the oven what you want
and how many items there are. Then let your microwave oven cook your selections.
POPULAR MENU INSTRUCTIONS
Weight Initial
Code
Instructions Utensil
Limit Temperature
2-1
Chicken
Clear Soup
1.0 kg
Refrigerated
Ingredients
Microwave-
300 g chicken legs
½ carrot, peeled and large cut
1 potato, peeled and large cut
½ onion, large cut
2 celeries, cut 1 inch
3 cups chicken stock
½ teaspoon salt
¼ teaspoon pepper powder
safe bowl
1. Clean a chicken legs, cut to large pieces and drain.
2. In a microwave-safe bowl, put the all ingredients.
3. Place food in the oven. Choose the menu, press start.
/
Weight
Code
Menu
Instructions
Ute
nsil
Limit
Initial
Temperature
3. Press + until display
shows ‘2-4’.
4.
Press START .
5. Press + until
display shows ‘0.3 kg’.
6.
Press START.
1.
Press STOP/CANCEL.
2. Press INVERTER COOK
until display shows ‘2’.
Example: To cook 0.3 kg Dum Aloo
HOW TO USE
14
Menu
Ingredients
4 chicken breasts, cut into cubes
1 cup natural yogurt
1 tablespoon ground cumin
1 tablespoon garam masala powder
1 teaspoon ground coriander
1 lemon juice
8 cloves garlic, finely chopped
1 inch grated ginger, finely chopped
¼ teaspoon red food color
1 lemon
Salt and pepper to taste
Micreowave-
safe bowl
2-2
Curry Chicken
1.5 kg
Room
CONTROL PANEL
DISPLAY PICTO
When operate Microwave, Show up the icon on the display.
When operate Inverter Cook / Steam Cook, Show up the icon on the dispaly.
When operate Inverter Defrost, Show up the icon on the display.
When you can set More/Less, Show up the icon on the display.
When you can Cook Start, Show up the icon on the display.
When you can set Output Power, Show up the icon on the display.
When you can set Weight, Show up the icon on the display.
Icon
10
BEFORE USE
Part
POWER
See page 12“Timed Cooking”
INVERTER DEFROST
See page 20 “Inverter Defrost”
YOGURT / KEEP WARM
See page 18 "Yogurt"
See page 19 “ Keep Warm”
INVERTER COOK
Inverter Cook allows you to cook most of your
favorite food by selecting the food type and the
weight of the food.
See page 13 "Reheat"
See page 14 "Popular Menu"
See page 17 "Soften"
See page 18 "Melt"
MORE / LESS
Choose the cooking menu.
Set cooking time and weight.
While cooking with auto and manual function,
you can increase or decrease the cooking time
at any point by pressing the - or + keys (except
defrost mode).
STOP/CANCEL
Clears all functions and set entries except time of day.
START
Press this button to start cooking or resume cooking
if the door was opened or the STOP button was
pressed once.
• The quick start feature allows you to set
30 second intervals of HIGH power cooking with each
press of the START button.
SMART DIAGNOSIS
Hold the mouthpiece of a phone up to this icon
when directed to by service centre personnel, to
help diagnose problems with the microwave oven
when calling for service.
8
Weight
Initial
Code
Menu
Instructions Utensil
Limit
Temperature
Micreowave-
safe bowl
15
HOW TO USE
2-2
Curry Chicken
1.5 kg
Room
1. Add all ingredients in a deep and large microwave
-safe bowl and mix well. Cover with plastic wrap
and vent.
2. Place food in the oven. Choose the menu, press
start.
3. Stir at least twice during cooking.
2-3
Room
Dolma
1.0 kg
Micreowave-
safe bowl
1. Add cooked rice, ground beef, onion, salt and pepper
in a bowl and mix well.
2. Place grape leaf on a flat surface and place 1 1/2
spoonfuls of the rice mixture in the center of the
leaf. Wrap rice mixture with leaf.
3. Put all wrapped leaves in rows into a deep and
large microwave-safe bowl and add water. Cover
with plastic wrap and vent.
4. Place food in the oven. Choose the menu, press
start.
5. After cooking, serve with sour cream or as desired.
Ingredients
1 pot of grapes leaves
200 g cooked rice
500 g ground beef
1 onion, chopped
Salt and pepper to taste
½ cup water
2-4
Room
Dum Aloo
0.1~0.3 kg
Ingredients
0.1 kg 0.2 kg 0.3 kg
Aloo (small & pricked) 100 g 200 g 300 g
Oil 2 tbsps 3 tbsps 3 tbsps
Cumin, pepper, cloves As required
Onion paste 1 tbsp
1 ½
tbsps
1 ½ tbsps
Ginger garlic paste 1 tsp 1 ½ tsps 1 ½ tsps
Tomato puree 1 tbsp 2 tbsps 3 tbsps
Curd ½ cup 1 cup 1 cup
Turmeric powder,
red chilli powder, salt,
To taste
Coriander leaves To garnish
1.In a microwave-safe bowl, put small pricked potatoes
with oil (1/2 the amount mentioned per weight) and
cover.
2.Choose the menu and weight, press start.
3.When BEEP, add
oil(remaining half amount) cumin,
pepper, cloves, onion paste, ginger garlic paste,
tomato puree. And then press start to continue
cooking.
4.When BEEP, add a curd, turmeric powder, red chilli
powder, salt and coriander leaves. And then press
start to continue cooking.
5.After cooking, stand for 3 minutes. Garnish with
coriander leave.
Micreowave-
safe bowl
Ingredients
200 g featherback fish, minced
2 tablespoons curry paste
4 Thai eggplant, quarter
1 each red and yellow chili spur pepper, sliced
2 bunches fresh pepper corn
¼ cup krachai, thin sliced
5 kaffir lime leaves, teared
¼ cup holy basil
2 teaspoons fish sauce
1 teaspoon coconut sugar
3 cups water
2-5
Fish ball and
Thai Herbs
Spicy Soup
1.0 kg
Room
Micreowave-
safe bowl
ENGLISH
CONTROL PANEL
DISPLAY PICTO
When operate Microwave, Show up the icon on the display.
When operate Inverter Cook / Steam Cook, Show up the icon on the dispaly.
When operate Inverter Defrost, Show up the icon on the display.
When you can set More/Less, Show up the icon on the display.
When you can Cook Start, Show up the icon on the display.
When you can set Output Power, Show up the icon on the display.
When you can set Weight, Show up the icon on the display.
Icon
10
BEFORE USE
Part
POWER
See page 12“Timed Cooking”
INVERTER DEFROST
See page 20 “Inverter Defrost”
YOGURT / KEEP WARM
See page 18 "Yogurt"
See page 19 “ Keep Warm”
INVERTER COOK
Inverter Cook allows you to cook most of your
favorite food by selecting the food type and the
weight of the food.
See page 13 "Reheat"
See page 14 "Popular Menu"
See page 17 "Soften"
See page 18 "Melt"
MORE / LESS
Choose the cooking menu.
Set cooking time and weight.
While cooking with auto and manual function,
you can increase or decrease the cooking time
at any point by pressing the - or + keys (except
defrost mode).
STOP/CANCEL
Clears all functions and set entries except time of day.
START
Press this button to start cooking or resume cooking
if the door was opened or the STOP button was
pressed once.
• The quick start feature allows you to set
30 second intervals of HIGH power cooking with each
press of the START button.
SMART DIAGNOSIS
Hold the mouthpiece of a phone up to this icon
when directed to by service centre personnel, to
help diagnose problems with the microwave oven
when calling for service.
8
Weight
Initial
Code
Menu
Instructions
Utensil
Limit
Temperature
2-5
2-6
2-7
Fish ball and
Thai Herbs
Spicy Soup
1.0 kg
Room
Refrigerated
Room
Stewed Pork
belly
1.2 kg
Stir-fried
Squid with
Curry Powder
0.6 kg
Micreowave-
safe bowl
Micreowave-
safe bowl
Ingredients
300 g squids
½ onion, sliced
2 red spur peppers, sliced
2 Chinese celeries, cut 2 inches
2 spring onions, cut 2 inches
2 tablespoons curry powder
1 egg
3 tablespoons unsweetened condensed milk
2 tablespoons oyster sauce
2 teaspoons sugar
2 tablespoons chili paste
2 tablespoons cooking oil
1. Remove the head, tentacles and ink-sac from the
squid. Pull off and discard the mottled skin. Slice flesh
to stripe and cut into cubes, drain.
2. Mix all the ingredients except vegetables and oil.
3. In a microwave-safe bowl, put the mixture, vegetables,
oil and squids.
4. Place food in the oven. Choose the menu, press start.
Stir at least twice during cooking.
1. Squeeze the featherback fish with a touch of salt
and water, until it becomes sticky. Set aside.
2. In a large microwave-safe bowl, put the fish ball
and all ingredients.
3. Place food in the oven. Choose the menu, press
start.
300 g pork belly(less fat)
4 star anises
3 cinnamon sticks, cut 1 inch
5 garlics, crushed
2 teaspoons pepper corn
2 coriander roots, crushed
4 cups pork stock
2 tablespoons coconut sugar
2 tablespoons soy sauce
2 tablespoons dark soy sauce
2 tablespoons seasoning sauce
Cheesecloth for wrap the spices
1. Clean pork belly, cut into the pieces about 3 cm
pieces.
2. In a large microwave-safe bowl, put the pork belly
and all ingredients.
3. Place food in the oven. Choose the menu, press
start.
Ingredients
HOW TO USE
16
Micreowave-
safe bowl
Ingredients
1 ½ cups Basmati rice
400 g water
2 cups chopped onions
1 tomato, chopped
1 cup vegetables(carrot, beans, peas, potato),
chopped
2 green chilly, chopped
1 teaspoon ginger garlic paste
1 ½ teaspoon red chilly powder
1 teaspoon coriander powder
1 teaspoon cumin powder
Micreowave-
safe bowl
2-8
1.0 kg
Room
Veg. Biryani
SOFTEN
The oven uses low power to soften foods (butter, cream
cheese and ice cream) S
ee the following table.
SOFTEN MENU INSTRUCTIONS
3-1
3-2
3-3
Cream
0.1 - 0.3 kg
Refrigerated
Cheese
Microwave-
safe dish
Microwave-
safe dish
1. Unwrap and place on a microwave-safe dish.
2. Place food in the oven. Choose the menu and weight,
press START.
3. Butter will be at room temperature and ready for use
in a recipe.
Ice
Cream
2 / 4 cups
Frozen
1. Unwrap and place on a microwave-safe dish.
2. Place food in the oven. Choose the menu and weight,
press START.
3.Cream cheese will be at room temperature and ready
for use in a recipe.
1. Remove lid and cover.
2. Place food in the oven. Choose the menu and weight,
press START.
3. Ice cream will be soft enough to make scooping easier.
Example : To Soften 0.2 kg cream cheese
Weight
Code
Menu
Instructions
Ute
nsil
Limit
Initial
Temperature
3.
Press
+
until display
shows ‘3-2’.
1.
Press STOP/CANCEL.
2. Press
INVERTER COOK
until display shows ‘3’.
6.
Press
START.
4.
Press START.
5. Press + until
display shows ‘0.2 kg ’.
Butter
1 - 3 ea
(100 - 150 g
/ each)
Refrigerated
,
17
HOW TO USE
Weight
Initial
Code
Menu
Instructions Utensil
Limit
Temperature
Micreowave-
safe bowl
2-8
Veg. Biryani
1.0 kg
Room
1. Cook all vegetables and spices in a lightly oiled frying
pan until lightly browned.
2. Place the cooked vegetable mixture into a deep and
large microwave-safe bowl and add rice and water.
Cover with plastic wrap and vent.
3. Place food in the oven. Choose the menu, press start.
Stir at least twice during cooking.
Ingredients
1 tablespoon Biryani masala
1 cinnamon
2 cardamoms
2 cloves
2 small bay leaves
1 teaspoon fennel seeds
A bunch of finely chopped coriander leaves
(cilantro) and mint leaves
1 tablespoon oil
2 tablespoons ghee or clarified butter
Salt to taste
ENGLISH
HOW TO USE
18
Weight
Code
Menu
Instructions
Ute
nsil
Limit
Initial
Temperature
MELT MENU INSTRUCTIONS
Butter
1 - 3 ea
(100 - 150 g
/ each)
Refrigerated 1. Place on a microwave-safe bowl.
1. Place on a microwave-safe bowl.
2. Place food in the oven. Choose the menu and weight,
press START.
3. After cooking, stir to complete melting.
Cheese
0.2 - 0.4 kg
Refrigerated
1. Use processed cheese food only. Unwrap and cut into
Microwave-
cubes.
safe bowl
3. Place food in the oven. Choose the menu and weight,
press START.
4. After cooking, stir to complete melting.
Chocolate
0.1 - 0.3 kg
Room
1. Chocolate chips or squares of baking chocolate
Microwave-
may be used.
safe bowl
2. Unwrap and place on a microwave-safe bowl.
3. Place food in the oven. Choose the menu and weight,
press START.
4. After cooking, stir to complete melting.
4-1
4-2
4-3
Microwave-
safe bowl
YOGURT
This feature allows you to cook yogurt by pressing yogurt button.
‘5h00 will show in the display.
Example : To Cook 0.6 kg yogurt
Example : To Melt 0.2 kg chocolate
MELT
The oven uses low power to melt foods (butter, cheese and chocolate). See the following table.
3. Press START.
2. Press
YOGURT/KEEP WARM
until display shows ‘1’.
1. Press STOP/CANCEL.
3.
Press
+
until display
shows ‘4-3’.
1.
Press STOP/CANCEL.
2. Press
Inverter Cook
until display shows ‘4’.
6.
Press
START.
4.
Press START.
5. Press + until
display shows ‘0.2 kg ’.
.
Weight
Code
Menu
Instructions
Ute
nsil
Limit
Initial
Temperature
YOGURT MENU INSTRUCTIONS
Lukewarm
1
Microwave-
safe bowl
Yogurt
1.
Thoroughly wash the proper sized microwave-safe
bowl with hot water.
2. Pour 500 ml milk into the bowl.
3. Heat it about 1 minutes 30 seconds - 2 minutes 30
seconds on high microwave power until 40 - 50 °C
temperature.
4. Add 100 ml yogurt into the bowl and stir well.
5. Cover with plastic wrap or lid and place food in the
oven. Choose the menu, press START.
6. After proofing, stand in the refrigerator for about 5
hours.
7. Taste nice with jam, sugar or fruits.
Note :
The following types of milk and yogurt may be used :
Thoroughly wash all utensils with hot water and dry
before proofing yogurt.
Make sure that the milk is lukewarm(40 - 50 °C)
before proofing.
Don’t shake or mix yogurt during proofingas this will
affect the firmness of the yogurt.
If the amount of ingredients are greater than
suggested, increase the proofing time.
500 ml pasteurized whole milk
100 g natural plain yogurt
0.6 kg
Ingredients
Do not use
Milk
2 %, 1 % or
fat-free milk
High calcium milk
Soy milk
Leftover milk
Expired milk
Do use
Milk
Pasteurized
whole milk
Yogurt
Natural
plain
yogurt
Yogurt
Leftover
yogurt
Expired
yogurt
KEEP WARM
The Keep Warm function will keep hot, cooked food at serving temperature. Always start with hot food.
Use microwave-safe utensils.
Example: Keep warm manually
To warm food at high level in 90 minutes.
Notes :
Crisp foods (pastry, pies, turnovers, etc)
should be uncovered during keep warm.
Moist foods should be covered with plastic
wrap or microwave-safe lid.
The amount of keep warm food is suitable
for 1-3 servings.
‘1h30 ’ will show in the display.
3. Press START.
2. Press
YOGURT/KEEP WARM
until display shows ‘2’.
1. Press STOP/CANCEL.
19
HOW TO USE
ENGLISH
1. Press STOP/CANCEL .
4. Press START .
MICROWAVE POWER LEVELS
Your microwave oven is equipped with five power
levels to give you maximum flexibility and control
over cooking. The adjacent table will give you
some idea of which foods are prepared at each of
the various power levels.
The adjacent chart shows the power level settings
for your oven.
MICROWAVE POWER LEVEL CHART
When cooking is complete, Tip will sound. The word
End shows in the display window. 'End' remains in
the display and Tip will sound every minute until the
door is opened, or any button is pressed.
If you do not select the power level, the oven
will operate at power HIGH. To set HI-POWER
cooking, skip step 2 above.
NOTE
2. Press POWER until display
shows ‘800 W’.
(1st time 1000 W appears
in the display. This is to
tell you that the oven is set
on HI unless a different
power setting is chosen.)
HOW TO USE
TIMED COOKING
(MANUAL COOKING)
This function allows you to cook food for a
desired time. There are 5 power levels available.
The example below shows how to set 800 W
power level for the desired time.
Example: To cook food on 800 W for 5
minutes 30 seconds
3. Enter 5 minutes 30 seconds
by pressing '+' until display
shows '5:30'.
Boiling water.
Browning ground beef.
Making candy.
Cooking poultry pieces,
fish & vegetables.
Cooking tender cuts of meat.
Reheating rice, pasta & vegetables.
Reheating prepared foods quickly.
Reheating sandwiches.
Cooking egg, milk and cheese dishes.
Cooking cakes and breads.
Melting chocolate.
Cooking veal.
Cooking whole fish.
Cooking puddings and custard.
Thawing meat, poultry and seafood.
Cooking less tender cuts of meat.
Cooking pork chops
and roast.
Taking chill out of fruit.
Softening butter.
Keeping casseroles and main
dishes warm.
Softening butter and cream cheese.
Power
Level
Use
High
1000 W
800 W
600 W
400 W
200 W
HOW TO USE
12
INVERTER
DEFROST
Four defrost sequences are preset in the oven.
The INVERTER DEFROST feature provides you
with the best defrosting method for frozen foods.
The cooking guide will show you which defrost
sequence is recommended for the food you are
defrosting.
For added convenience, the INVERTER DEFROST
includes a built-in beep mechanism that reminds
you to check, turn over, separate, or rearrange
to getthe best defrost results. Four different
defrosting leve is are provided.
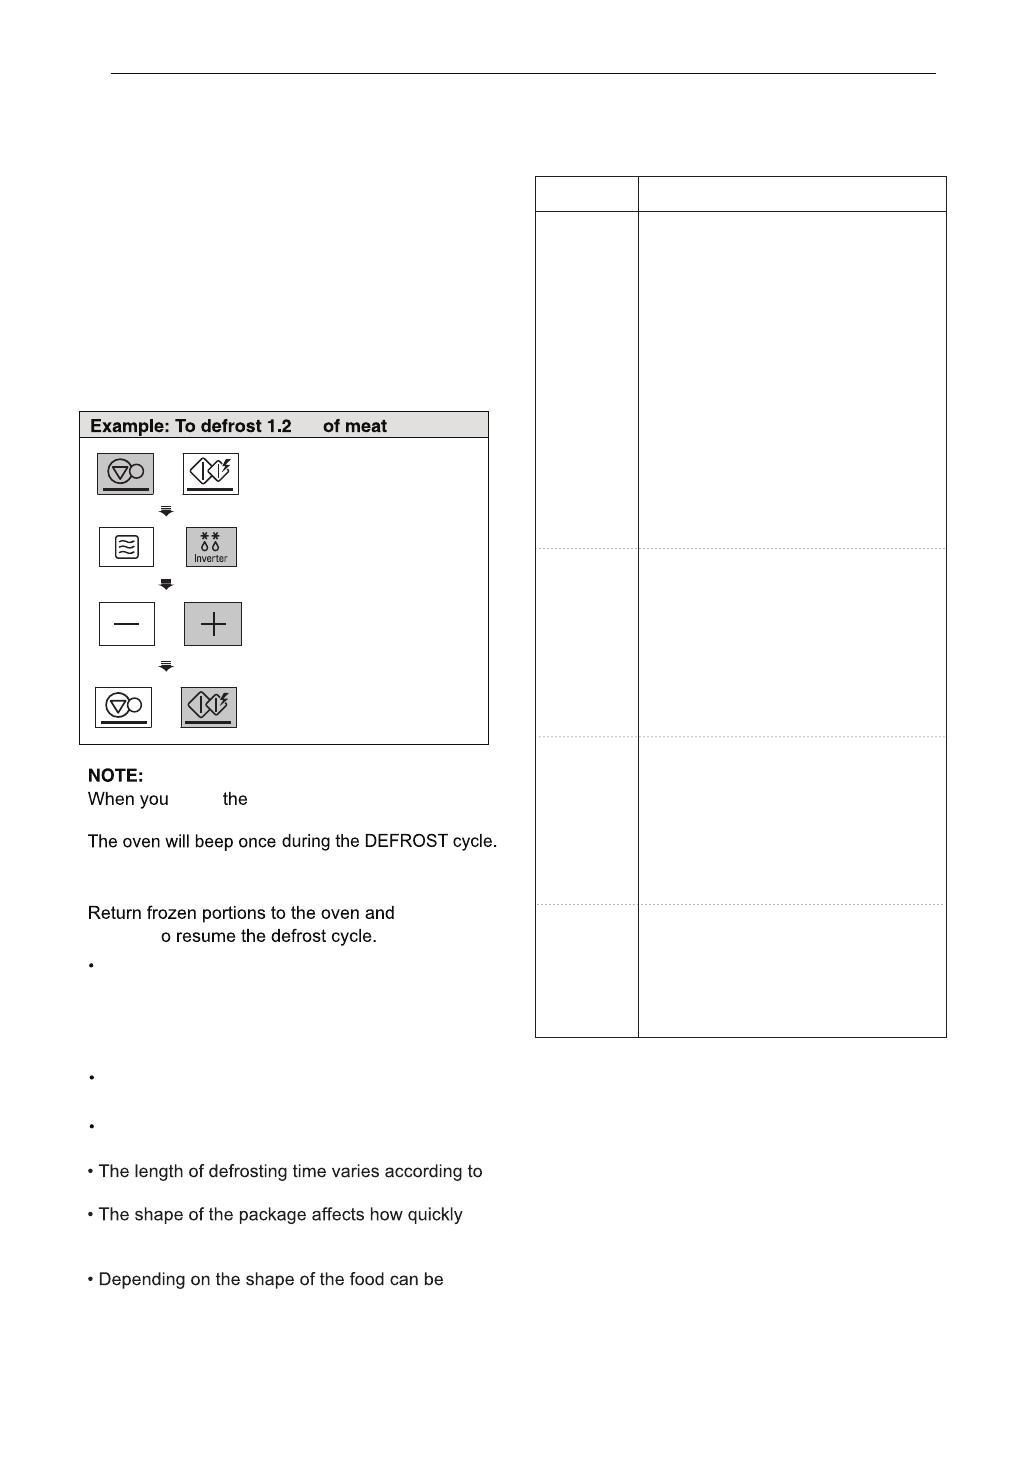
(MEAT /POULTRY / FISH / BREAD)
kg
2.
Press INVERTER DEFROST
until display shows ‘dEF1’.
INVERTER DEFROST
MENU INSTRUCTIONS
Category
Food to be Defrosted
Beef
Ground beef, Round steak,
Cubes for stew, Tenderloin steak,
Pot roast, Rib roast, Rump roast,
Chuck roast, Hamburger patty
MEAT
Lamb
( 1FEd )
Chops, Rolled roast
Pork
0.1-4.0 kg
Chops
, Hot dogs,
Spareribs, Country-style ribs.
Rolled roast, Sausage
Veal
Cutlets (0.5 kg, 20 mm thick)
Turn food over at beep.
After defrosting, let stand for 5 - 15
minutes.
POULTRY
( FEd 2)
0.1-4.0 kg
FISH
( FEd 3)
0.1-4.0 kg
BREAD
( FEd 4)
0.1-0.5 kg
Sliced bread, Buns, Baguette, etc.
Separate slices and place between
paper towel or flat plate.
Turn food over at beep.
After defrosting, let stand for
1 - 2 minutes.
Fish
Fillets, Whole Steaks
Shellfish
Crab meat, Lobster tails, Shrimp,
Scallops
Turn food over at beep.
After defrosting, let stand for 5 - 10
minutes.
Poultry
Whole, Cut-up, Breast (boneless)
Cornish Hens
Whole
Turkey
Breast
Turn food over at beep.
After defrosting, let stand for 30 - 60
minutes.
1. Press STOP/CANCEL.
4. Press START.
3.
Press
+
until display
shows ‘1.2 kg’.
HOW TO USE
20
Place foods in a shallow container or on a
microwave roasting rack to catch drippings.
Food should still be somewhat icy in the center
when removed from the oven.
START button,
START
t
Remove fish, shellfish, meat,
how solidly the food is frozen.
food will defrost. Shallow packages will defrost
more quickly than a deep block.
defrosted more or less.
and poultry from
its original wrapping paper or plastic package.
Otherwise, the wrap will hold steam and juice
close to the foods, which can cause the outer
surface of the foods to cook.
press
At beep, open the door and remove any portions
that have thawed and turn.
press
the display changes to the defrost time count down.
  • Page 1 1
  • Page 2 2
  • Page 3 3
  • Page 4 4
  • Page 5 5
  • Page 6 6
  • Page 7 7
  • Page 8 8
  • Page 9 9
  • Page 10 10
  • Page 11 11
  • Page 12 12
  • Page 13 13
  • Page 14 14
  • Page 15 15
  • Page 16 16
  • Page 17 17
  • Page 18 18
  • Page 19 19
  • Page 20 20
  • Page 21 21
  • Page 22 22
  • Page 23 23
  • Page 24 24
  • Page 25 25
  • Page 26 26
  • Page 27 27
  • Page 28 28
  • Page 29 29
  • Page 30 30
  • Page 31 31
  • Page 32 32
  • Page 33 33
  • Page 34 34
  • Page 35 35
  • Page 36 36
  • Page 37 37
  • Page 38 38
  • Page 39 39
  • Page 40 40
  • Page 41 41
  • Page 42 42
  • Page 43 43
  • Page 44 44
  • Page 45 45
  • Page 46 46
  • Page 47 47
  • Page 48 48
  • Page 49 49
  • Page 50 50
  • Page 51 51
  • Page 52 52

LG MS2535GIS Owner's manual

Category
Microwaves
Type
Owner's manual

Ask a question and I''ll find the answer in the document

Finding information in a document is now easier with AI