Magene G611 Owner's manual
- Type
- Owner's manual
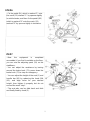
Magene G611 is a versatile indoor cycling equipment designed to provide an immersive and personalized fitness experience. Its sturdy construction ensures stability during intense workouts, while its adjustable resistance levels cater to users of varying fitness levels. Track your progress and cycling data by connecting the G611 to the Onelap and Onelapfit apps via Bluetooth. Enjoy a comfortable ride with its ergonomic handlebars and adjustable seat, allowing you to focus on achieving your fitness goals.
Magene G611 is a versatile indoor cycling equipment designed to provide an immersive and personalized fitness experience. Its sturdy construction ensures stability during intense workouts, while its adjustable resistance levels cater to users of varying fitness levels. Track your progress and cycling data by connecting the G611 to the Onelap and Onelapfit apps via Bluetooth. Enjoy a comfortable ride with its ergonomic handlebars and adjustable seat, allowing you to focus on achieving your fitness goals.


-
 1
1
-
 2
2
-
 3
3
-
 4
4
-
 5
5
-
 6
6
-
 7
7
-
 8
8
-
 9
9
-
 10
10
-
 11
11
-
 12
12
-
 13
13


Magene G611 Owner's manual
- Type
- Owner's manual
Magene G611 is a versatile indoor cycling equipment designed to provide an immersive and personalized fitness experience. Its sturdy construction ensures stability during intense workouts, while its adjustable resistance levels cater to users of varying fitness levels. Track your progress and cycling data by connecting the G611 to the Onelap and Onelapfit apps via Bluetooth. Enjoy a comfortable ride with its ergonomic handlebars and adjustable seat, allowing you to focus on achieving your fitness goals.
Ask a question and I''ll find the answer in the document
Finding information in a document is now easier with AI
Other documents
-
BodyCraft SPR-CT Owner's manual
-
-
Matrix ES Owner's manual
-
-
Sunny SF-B1423 User manual
-
Ironman Fitness 6150 Owner's manual
-
-
Spirit Johnny G Owner's manual
-
-
Spirit CU800 ENT Owner's manual