Hatari AC Turbo1 User manual

Type
User manual

The Hatari AC Turbo1 air cooler features a 5-speed fan, adjustable swing, and a remote control for convenient operation. Its cooling system, powered by ice packs, provides a refreshing breeze, while the built-in water tank adds humidity to the air. The AC Turbo1 also includes a night mode for quieter operation and a built-in timer for automatic shutoff.

The Hatari AC Turbo1 air cooler features a 5-speed fan, adjustable swing, and a remote control for convenient operation. Its cooling system, powered by ice packs, provides a refreshing breeze, while the built-in water tank adds humidity to the air. The AC Turbo1 also includes a night mode for quieter operation and a built-in timer for automatic shutoff.




คูมือการใชงาน / User Manual
พัดลมไอเย็น-พรอมรีโมท / Air Cooler - with remote control
ขอมูลจำเพาะ / Product Specification





F









สารบัญ
2
6
6



































































สวนประกอบพัดลม / FAN COMPONENTS
CORD WINDER
CONTROL AND DISPLAY PANEL
WIND DIRECTION SHUTTERS
FRONT COVER
WATER TANK
WATER LEVEL WINDOW
WHEELS (2 back wheels with brakes)
PRE-FILTER
SIDE 2 PIECES
BACK 1 PIECE
SIDE GRILLES
SIDE 2 PIECES
WATER DIFFUSING PLATE
SIDE 2 PIECES
BACK 1 PIECE
WATER TANK LID
GEL PACK COMPARTMENT
POWER SUPPLY CORD WITH PLUG
WATER DRAIN LID
REMOTE CONTROL
GEL PACK 2 PIECES















































¤Óàµ×͹







วิธีการใชงาน

2

ระบบสัมผัสรีโมทคอนโทรล











A
B
B

A

µÐá¡Ã§¢ŒÒ§
Ἃ¹¡Ãͧ
ÊÇÁŧ : ãÊ‹¡ÅѺ
¡¢Öé¹ : ¶Í´ÍÍ¡
แผนกรองชั้นแรก (ดานหลัง)






แผนกรองชั้นแรก (ดานขาง)




















การเปลี่ยนแบตเตอรี่รีโมทคอนโทรล




วิธีทำความสะอาดและการบำรุงรักษา





วิธีถอดแผนกรองชั้นแรกเพื1อทำความสะอาด



1
ปด
เปด
32








ขอแนะนำการใชงาน





ขอควรระวังการใชงาน


 




This fan is operated by touch screen system and remote control. Touch screen system can be activated using fingers to touch the
control and display panel. Remote control, point the remote signal transmitter in the direction of the signal receiver on the control
and display panel. Avoid having obstructions between the remote signal transmitter and the receiver.
Plug the power supply cord into a 220V, 50Hz power socket.
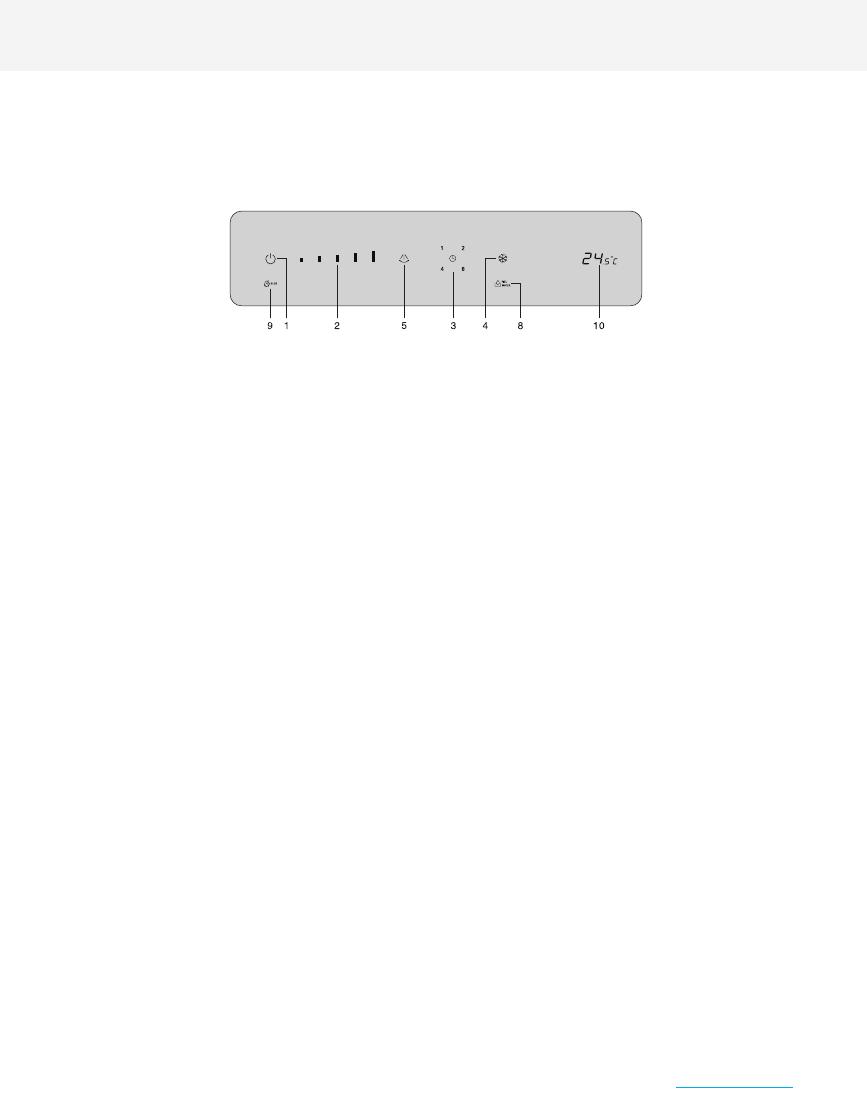
Touch the switch on the control and display panel to turn on the fan. The light will show the resumed settings
of the fan’s latest operation before having been switched off. To turn the fan off, touch the switch again for
about 1.5 seconds (When the air cooler is switched off while the COOL function is activated, the fan will
continue to operate for 1 minute to remove moisture. The fan will stop working immediately afterwards).
5 adjustable fan speed settings 0: off,1: lowest speed, 2: low speed, 3: medium speed, 4: high speed, 5: highest
speed, respectively.
Switch for timing the fan’s operation: 1, 2, 4, 8 hours or to cancel timing altogether, respective to the number of
time the sensor is touched. Once set, the timer will indicate the remaining time left of the duration.
Set the timer while the fan is switched on to set the time when the fan is to automatically turn off.
Set the timer while the fan is turned off (but it must be plugged in) to set the time when the fan is to automatically
turn on. When the time comes, the fan will resume settings of the latest operation before having been switched off.
Switch for activating the water cooling system. Touch the switch to activate the function. Touch the switch again
to deactivate the function.
Switch for adjusting left to right swinging motions. Touch the switch to activate the function. Touch the switch
again to deactivate the function.
Dimmer switch for the control and display panel. Touch the switch (while the operating lights are on) to reduce
the brightness of the control and display panel. Press the switch again or any other control function to resume
the standard broghtness level. (This function is controlled by remote control only)
On/off button, light on the control and display panel. Press the button on the remote control. to turn off the
light on the control and display panel. Press the switch again or any oter control function to resume the
standard broghtness level. (This function is controlled by remote control only)
A warning will light up when the water level in the tank is too low for the water distribution system to function
(unable to activate COOL function). Turn off and unplug the machine to fill the water tank with clean water (do
not exceed MAX level). The warning light will go off when the machine is turned on and the COOL function is
activated.
A warning with a warning sound will appear when there is electricity leakage. The circuit breaker system will
immediately be activated.
Temperature display for surrounding area of the fan, While the fan is turned off or on (but it must be plugged in).
ON/OFF
SPEED
TIMER
TIMER OFF
TIMER ON
COOL
SWING
DIMMER
NIGHT
FILL WATER
ELCB
TEMPERATUER












DIRECTION OF USE




A
B
B

A

SIDE GRILLES

Replace
Remove
Pre-filter (BACK)



Pre-filter (SIDE)
Use a screwdriver to loosen the screws holding the grille in place. Use your hands to press
the locks located at the top of the grille to unlock it. Lift the grille upwards to free it from the
latches in the middle and remove the pre-filter for cleaning.
To replace the pre-filter within the side grilles, flip the side grille upward and place the pre-filter
in place within the frame boundary (A) ensuring that the side with the arrow is at the top.
Insert the grille from the top, ensuring that the latches in the middle fit with those of the grille
on bothsides. Use your hands to press the locks located at the top of the grille and carefully
push to lock it. Use a screwdriver to tighten the screws holding the grille in place.


Use a screwdriver to loosen the screws holding the pre-filter in place. Use your hands to press
the locks located at the top to remove the pre-filter for cleaning.
To insert the pre-filter, use your hands to press the locks located at the top of the pre-filter and carefully
push to lock it in place. Use a screwdriver to tighten the screws holding the pre-filter in place.
CAUTION



Unplug the supply cord before filling water, cleaning or changing the components, and when not in use for a long period of time.
This appliance is not intended for use by persons (including children) with reduced physical, sensory or mental
capabilities, or lack of experiences and knowledge, unless they have been given supervision or instruction concerning
use of the appliance.
Children should be supervised to ensure they do not play with the appliance.









HOW TO REPLACE THE REMOTE CONTROL BATTERY
Open the battery cover by using your fingernail to push the catch downwards as shown
by the arrow and remove the battery cover. Replace the used batteries with new “AAA”
batteries, ensuring that the positive (+) and negative (-) poles are correctly inserted
and correspond with the symbols on the remote control. Place the battery cover back
in its original position.
*Batteries should be removed from the remote control when not in use for a long
period of time.
HOW TO REMOVE THE PRE-FILTER FOR CLEANING
6






USAGE RECOMMENDATIONS
The fan should not be placed or installed in areas that are of extreme temperatures or near stoves, or in areas that are wet
with high humidity, or has hydrocarbon vapors such as petroleum.
Do not spray all types of spray into the fan; for example, hairspray or cleaning spray.
Do not insert fingers, pencils or other objects into the grille while the blades are spinning as it may result in possible injury or
physical damage.
If an electrical component such as supply cord, motor, or switch is damaged, it must be replaced by the manufacturer, its service
agent or similarly qualified persons in order to avoid a hazard. It is not advisable to fix the fan at home.
The fan must always be placed vertically; it must never be lying horizontally or placed upside down. If the fan falls down, unplug it
immediately and lift the fan up to a vertical standing position. Use a cloth to wipe the fan and leave it to dry in order to
prevent electrocution.
USAGE PRECAUTIONS
Use only clean water to fill the water tank. Do not use any other liquid. The water tank should be cleaned regularly to reduce
bacteria buildup.




Use a damp cloth to wipe stains, and then dry the area by wiping.
When cleaning, be careful not to let the supply cord, switch, motor, and other electrical components get wet.
Do not use chemical products, thinner solvents, alcohol, kerosene or petrol to clean the fan.
The water tank, pre-filter, grilles, and water tank can be cleaned with water or soapy water. It should be cleaned at least every
1-2 months.
CARE AND CLEANING INSTRUCTIONS

2
Constantly check the water level in the tank,
making sure that it is not below the MIN level
and not above the MAX level.
CLOSE
OPEN
3
If the fan is not in use for a long period of time,
drain out all the water by twisting open the
water drain lid. Securely close the lid back after
to prevent dust and insects from entering the
water tank.
Pull open the water tank lid to ll water
before inserting the gel pack (frozen).
1
  • Page 1 1
  • Page 2 2
  • Page 3 3
  • Page 4 4
  • Page 5 5
  • Page 6 6
  • Page 7 7
  • Page 8 8
  • Page 9 9

Hatari AC Turbo1 User manual

Type
User manual

The Hatari AC Turbo1 air cooler features a 5-speed fan, adjustable swing, and a remote control for convenient operation. Its cooling system, powered by ice packs, provides a refreshing breeze, while the built-in water tank adds humidity to the air. The AC Turbo1 also includes a night mode for quieter operation and a built-in timer for automatic shutoff.

Ask a question and I''ll find the answer in the document

Finding information in a document is now easier with AI