Page is loading ...

ELEMENT
ELEMENT
™
™
PPHHAARRMMAACCIIEE PPOORRTTEE SSIIMMPPLLEE // SSIINNGGLLEE DDOOOORR CCAABBIINNEETT
Manuel du propriétaire
Owner’s Manual
10049036_2021-04-26
Veuillez lire les instructions avant de commencer
Please read instructions before proceeding
15
3
5
18
1
9
8
11
18
2
10
9
22
4
5
20
21
23
16
14
12
7
17
13
24
6
7
Illustration du cabinet SV2024, #124902 installé en surface
Picture of the SV2024, #124902 cabinet surface mounted

2
Drawings not to scale
Dessins non à l’échelle
85
9
18
13 14
25
ILLUSTRATION DES PIÈCES
ILLUSTRATION OF COMPONENTS
SAC DE QUINCAILLERIE (10049319)
HARDWARE BAG (10049319)
3
1
2
15
11
10
Des changements peuvent être apportés aux produits sans préavis. Veuillez utiliser
le manuel fourni avec le produit.
Des pièces supplémentaires ont été ajoutées au besoin.
Product specifications are subject to change without notice. Use owner’s manual
instructions supplied with product. Spare parts included for your convenience.
12
23
7
19
20
16
SAC DE QUINCAILLERIE (10049317)
HARDWARE BAG (10049317)
4
21
22
26

3
Bottom bracket
Top bracket
Side mirror
Side mirror (hinge side)
Side mirror bracket
Door
#10-32 x 1/4” button head screw
#6 x 3/8” screw
#10 x 1 1/4” screw
Clear plastic washer
Snap cap
Shelf bracket
Shelf stop
Shelf screw
Mirror tape pads (4 per pack)
Door bumpers (if required)
Glass shelves
Wall anchor
Allen key 1/8”
Magnetic catch
Door support
Recess spacer kit
#5 x 1/2” long screw
Cabinet box
Screwdriver
Level
PARTS DESCRIPTION
1
2
3
4
5
6
7
8
9
10
11
12
13
14
15
16
17
18
19
20
21
22
23
24
25
26
ITEM
1
2
1
1
4
1
14
4
5
4
4
4
4
4
1
1
2
5
1
1
1
1
2
1
1
1
QUANT.
Support du bas
Support du haut
Miroir latéral
Miroir latéral (côté charnière)
Support du miroir latéral
Porte
Vis #10-32 x 1 1/4” hexagonale
Vis #6 x 3/8”
Vis #10 x 1 1/4”
Rondelle de plastique
Capuchon
Support à tablette
Butoir du support à tablette
Vis pour support à tablette
Ruban de mousse adhésive (4 per paquet)
Amortisseurs (si nécessaire)
Tablette
Cheville
Clé Allen
Receveur magnétique
Support pour porte
Espaceur pour installation encastrée
Vis #5 x 1/2”
Boîtier
Tournevis
Niveau
DESCRIPTION DES PIÈCES
DESCRIPTION DES PIÈCES
DESCRIPTION OF COMPONENTS
AVANT DE DÉBUTER
BEFORE STARTING
Carefully remove your cabinet from its pack-
aging and ensure that all the components are in good
condition and are not missing. If you have a problem,
please contact your distributor immediatly. Place the
door in a safe location to avoid any possible damages.
Before installation, you must determine
which side of the cabinet box the door is going to open.
To reverse the opening side, turn the cabinet box upside
down.
Required equipment:
Safety glasses
Measuring tape
Level
Robertson or Phillips head screwdriver #1 and #2
Electric Drill (Surface Mounting)
Drill Bit, 3/16” (Surface Mounting)
Note: Safety Glasses should be worn at all times.
Before you start, close the sink drain. This will
avoid small dropped parts from falling into the
drain.
Lors de la réception, vérifiez si votre cabinet
et ses pièces sont en bonne condition et si toutes les
pièces sont incluses dans le sac de quincaillerie. Si il y
a un problème, signalez-le immédiatement à votre dis-
tributeur. Placez vos portes en lieu sûr afin d’éviter tous
bris du miroir.
Avant l’installation, vous devez déterminer si la
porte s’ouvrira à gauche ou à droite. Pour inverser le côté
d’ouverture, retourner la pharmacie.
Équipement requis:
Lunettes de sécurité
Ruban à mesurer
Niveau
Tournevis carré ou étoile #1 et #2
Perceuse (Installation en surface)
Mèche, 3/16” (Installation en surface)
Note: Portez vos lunettes de sécurité en tout temps.
Avant de commencer, boucher le drain de votre évier.
Ceci empêchera les petits pièces de tomber dans le
drain.
Les commandes pour les pièces de remplacement doivent inclure leurs numéros,
description, dimensions et couleur.
When ordering replacement parts, please refer to part number, description, dimen-
sions and color.

4
20 X 24 X4.5
508mm X 609,6mm X 114,3mm
24 X 36 X 4.5
609,6mm X 914,4mm X 114,3mm
20 X 30 X 4.5
508mm X 762mm X 114,3mm
OVERALL DIMENSIONS (W X H X D)
DIMENSIONS GÉNÉRALES (L X H X P)
13.5 X 17.5 X 3
342,9mm X 444,5mm X 76,2mm
14.25 X 25.25 X 3
362mm X 641,4mm X 76,2mm
13.5 X 17.5 X 3
342,9mm X 444,5mm X 76,2mm
WALL OPENING (W X H X D)
OUVERTURE MURALE (L X H X P)
DESCRIPTION DES PRODUITS
PRODUCTS DESCRIPTION
124902
126549
126548
# PRODUCT #
# PRODUIT #
SV2024
SV2436
SV2030
PRODUCT NAME
NOM DU PRODUIT

ÉTAPE 1
- Installation du support pour la porte
STEP 1 -
Door’s support installation
Guide d’installation
Installation Instruction
I. Fixez le support pour la porte (21) au cabi-
net (24) à l’aide des vis hexagonales (7) et
de la clé Allen (19) fournie.
I. Secure the door support (21) to the cabinet box
(24) using eight (7) button head screws. Screw
with provided Allen wrench (19).
STEP 2 -
Installation du receveur magnétique
STEP 2 -
Magnetic catch installation
I. Attachez le receveur magnétique (20) au
boîtier du cabinet (24) en utilisant les vis
fournies (23).
I. Attach the magnetic catch (20) to the cabinet
box (24) using two (23) screws.
5

6
ÉTAPE 3 - Installation encastrée
STEP 3 -
Recess mount installation
Deux montants de bois dans le mur sont néces-
saires, un de chaque côté du boîtier.
**IMPORTANT** Pour l’installation encastrée, il faut
au préalable avoir assemblé et fixé l’espaceur (22)
sur le boîtier (24) de la pharmacie.
Arrange the wall opening with wall studs on
both sides of the cabinet.
**IMPORTANT** For the recess mount installation,
you have to asemble and fix the recess spacer (22)
to the cabinet (24).
ÉTAPE 3A - Assemblage de l’espaceur
STEP 3A -
Recess spacer assembly
Open side upright (long)
Top and bottom (short)
Hinge side upright
#6 X 3/4” flat head screw
PARTS DESCRIPTION
A
B
C
D
ITEM
1
2
1
4
QUANT.
Côté
Extrémité
Côté charnière
Vis #6 X 3/4” à tête plate
DESCRIPTION DES PIÈCES
DESCRIPTION DES PIÈCES (ESPACEUR)
DESCRIPTION OF COMPONENTS (RECESS SPACER)
I. Visser les côtés (A,C) aux extrémités (B) en uti-
lisant les vis fournies (D).
Veuillez noter que lorsque le côté charnière (C) est
fixez aux extrémités (B), il reste un jeu de
3/16” (4,8mm). Voir détail A ci-dessous.
I. Screw sides (A,C) to top and bottom (B) using pro-
vided screws (D).
Please note that when hinge side (C) and top and
bottom (B) are assemble, there is a remaining gap of
3/16” (4,8mm). See detail A below.
3/16”
4,8mm
A
Détail A
Vue d’un assemblage
Detail A
Assembly view

ÉTAPE 3B - Installation de l’espaceur
STEP 3B -
Recess spacer installation
I. Appliquez le ruban de mousse adhésive (15)
fournie dans le sac de quincaillerie du cabi-
net sur le rebord du boîtier (24).Veuillez
noter que les rubans appliqués aux
extrémités doivent être collés de manière
à ce qu’ils soient à 1 1/4” (31,8mm) du
côté charnière et à 1/8” (3,2mm) du haut
et du bas. Voir illustration ci-dessou
s.
II. **IMPORTANT** Le ruban autocollant (15)
fournie avec la cabinet (24) est très
adhésif. Accordez une attention partic-
ulière pour le positionnement de l’es-
paceur (22). Enlevez la partie protégeant le
ruban de mousse adhésive (15) et appliquez
l’espaceur (22) de manière à ce que le jeu
de 3/16” (4,8mm) soit positionné vers le sup-
port pour la porte (21).
I. Using the miroir tape pads (15) from the cab-
inet hardware bag, apply the pads onto the
cabinet box (24) flanges.Please note that
tape pads have to be positionned in a way
that it is at 1 1/4” (31,8mm) of hinge side
and at 1/8” (3,2mm) from top and bottom.
See illustration below.
II. **IMPORTANT** The provided self adhe-
sive tape (15) is highly adhesive. Be care-
ful while positionning recess spacer (22).
Remove the backing protecting the foam
tape (15) and secure the recess spacer (22)
so that the 3/16” (4,8mm) gap is facing the
door support (21).
1 1/4”
31,8mm
1/8”
3,2mm
1 1/4”
31,8mm
1/8”
3,2mm
1 1/4”
31,8mm
1/8”
3,2mm
7
3/16”
4,8mm
Vue de derrière du cabinet
Back of cabinet view
Vue de derrière du cabinet
Back of cabinet view
24
21
15
22
24
21
I.
II.
A
B
C
Détail A
Detail A
Détail B
Detail B
Détail C
Detail C

91011
I.
III.
P/ D
6”
(152,4mm)
II.
6”
(152,4mm)
I.
II.
I. Déterminez l’emplacement du cabinet et
préparez l’ouverture dans le mur aux dimen-
sions requises selon le modèle du boîtier
(24) (voir tableau description des produits en
page 4). La distance entre le plus haut
point de la robinetterie et le bas du boîti-
er (24) doit être de 6” (152,4mm) au mini-
mum.
II. Placez le boîtier (24) dans l’ouverture en
vous assurant que le rebord du boîtier cou-
vre de manière uniforme cette ouverture.
Nivelez le boîtier (24).
III. À l’aide des trous pré-percés sur les côtés
du cabinet, fixez le boîtier (24) sur les mon-
tants du mur de chaque côté du boîtier en
utilisant les vis (9) avec les rondelles de
plastique (10) en faisant bien attention de ne
pas déformer les côtés du boîtier (24).
Insérez les capuchons (11) sur les rondelles
de plastique (10) pour couvrir les têtes de
vis (9).
Pour continuer les étapes du boîtier encas-
tré, poursuivez directement à l’étape 6.
I. Prepare wall opening to the required dimen-
sions according to the cabinet model (24)
(see products description on page 4). The
distance between the higher point of the
faucet and the bottom of the cabinet box
(24) has to be 6” (152,4mm) minimum.
II. Position cabinet (24) in the opening. Make
certain that the flange covers the wall open-
ing uniformly. Level the cabinet (24).
III. Using the pre-drill holes on the cabinet (24)
sides, fix the cabinet (24) to the studs on
each side of the cabinet by using the screws
(9) along with the plastic washers (10).To
not deform the sides of the cabinet do not
overtighten the screws (9). Insert snap caps
(11) on washers (10) to cover the screws
(9).
To continue with the recess mounted instal
lation, go directly to the step 6.
ÉTAPE 3C - Installation du boîtier
STEP 3C -
Cabinet box installation
8

18
1
2
9
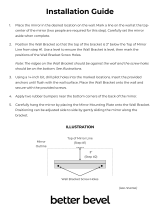
ÉTAPE 4 - Installation en surface
STEP 4 - Surface mount installation
I. Déterminez l’emplacement du cabinet. Nivelez et
marquez le dessous du boîtier (24). La distance
entre le plus haut point de la robinetterie et le
support du bas du cabinet (24) doit être de 6”
(76mm) au minimum.
II. Positionnez le dessus du support du bas (1) sur la
ligne. Marquez l’emplacement des trous de fixation.
S’il n’y a pas de poutre dans le mur, pré-percez
des trous de 3/16” pour insérer les chevilles (18)
fournies dans le mur.
III. Fixez le support du bas (1) au mur à l’aide des vis
(10).
IV. Installez les supports du haut (2) en faisant glisser
leur bout arrondie dans la zone de dégagement
prévue sur le dessus du boîtier (A).
V. Mettre chaque support du haut (2) près des
extrémités du boîtier (24) (de préférence vis à vis
une poutre du mur). S’il n’y a pas de poutre dans le
mur, pré-percez des trous de 3/16” pour insérer
des chevilles (18) dans le mur.
VI. Placez le cabinet (24) au mur en le déposant sur le
support du bas (1). **IMPORTANT** Assurez-
vous que le support du bas (1) est positionné
dans la fente sous le boîtier (24) prévue à cette
effet.
VII. Maintenez le cabinet (24) en place et fixez les sup-
ports du haut (2) à l’aide des vis (10).
I. Position the cabinet at the desired emplacement.
Level and make a mark underneath the cabinet
(24). The distance between the higher point of
the faucet and the bottom bracket of the cabi-
net (24) has to be 6” (76mm) minimum.
II. Position the bottom bracket (1) on the mark made
in the step above. Mark the hole locations. If there
is no solid support (wood stud) behind the wall, drill
3/16” holes and insert the plastic plugs (18).
III. Fix the bottom bracket (1) on the wall with the
screws (10).
IV. Install the top brackets (2) by sliding the ball end of
each top bracket (2) into the clearance area provid-
ed on top slot of the cabinet (24).
V. Put both of top bracket (2) near cabinet ends (24)
preferably facing wood studs. If there is no solid
support (wood stud) behind the wall, drill 3/16”
holesnd insert the plastic plugs (18).
VI. Place the cabinet (24) on the bottom bracket (1).
**IMPORTANT** Ensure the bottom bracket (1)
is positioned in the groove provided under the
cabinet (24).
VII.
Place the cabinet (24) in final position and fix the
top bracket
s (2) with screws (10).
II.
I.
III.
V.
IV.
VI.
VII.
9
6”
152,4mm

ÉTAPE 5 - Installation des miroirs latéraux STEP 5 - Side mirrors installation
Seulement dans le cas d’un installation du
cabinet en surface.
I. Fixez deux supports de miroir (5) de chaque
côté du cabinet à l’aide des vis (8) et des
rondelles de plastiques (10). Utilisez les
capuchons (11) pour couvrir les têtes de vis.
II. Une fois en place appliquez deux rubans de
mousse adhésive (15) sur chacun des sup-
ports de miroir (5).
III. **IMPORTANT** Le ruban autocollant (15)
fournie avec la cabinet (24) est très
adhésif. Accordez une attention partic-
ulière pour l’alignement des miroirs (3,4).
Enlevez la partie protégeant le ruban de
mousse adhésive (15) et appliquez le miroir
latéral (4) sur les supports (5) du côté de la
charnière et la miroir latéral (3) sur les sup-
ports (5) du côté opposé. Assurez-vous de
bien aligner le haut et la bas des miroirs
latéraux avec le haut et le bas du cabinet.
Only in a surface mounting installation.
I. Fix two side mirrors brackets (5) on each
side of the cabinet (8) by using screws (8)
and plastic washers (10). Use the snap cap
(11) to cover the screws.
II. Once in place, apply two pieces of foam
tape (15) on each side of the mirror brackets
(5).
III. **IMPORTANT** The provided self adhe-
sive tape (15) is highly adhesive. Be care-
ful while aligning side mirrors (3,4).
Remove the backing protecting the foam
tape (15) and secure the side mirror (4) on
to the mirror brackets (5) on hinge side and
the other side mirror (3) on the miror brac-
kets (5) on the other side. When installing
the side mirrors, be certain that it is centered
and flush with the top and bottom edge of
the cabinet box.
810
5
15
11
I.
II.
III.
10
3
4

ÉTAPE 6 -
Installation de la porte STEP 6 - Door installation
I. En utilisant la clé Allen fournie (19) Vissez légère-
ment 2 vis hexagonales (7) en prenant soin de laisser
un espace de 1/8” (3,2mm). Ces vis serviront de sou-
tient lors de l’installation de la porte.
II. **IMPORTANT** L’installation de la porte peut
s’avérer difficile pour une personne seule. Il est
donc recommandé qu’une deuxième personne
aide à tenir la porte durant cette étape. Installez
la porte en venant insérer les 2 vis hexagonales (7)
dans les trous de montage se trouvant sur la
charnière intégrée à la porte (6). Glissez la porte (6)
vers l’intérieur du boîtier (24) de manière à venir
placer l’encoche des trous de montage derrière la
tête des vis (7).
III. Fixez la porte (6) sur le boîtier (24) avec quatre vis
(7) en utilisant la clé Allen fournie (19). Serrez fer-
mement ces 4 vis (7). Serrez les deux vis (7) de
soutient. Ne pas serrer de manière excessive.
IV. Fixez les amortisseurs (16) sur la boîte de pharma-
cie (24). Fermez la porte et assurez vous que
l’aimant s’appuie bien sur le reçeveur magnétique
(20). Au besoin, dévissez les vis du receveur mag-
nétique et ajustez la position de celui-ci puis resser-
rer.
I. Install two (7) button head screws with the provide
Allen key (19). Tight slightly and leave a gap of 1/8”
(3,2mm). These screws act as helpers when
installing the door.
II. **IMPORTANT ** Door installation can be diffi-
cult. It is recommended that a second person
help hold the door during this step. Mount the
door (6) on the cabinet box (24). Position the key-
hole slots in the hinge over the helper screws. Slide
the door (6) toward the cabinet box (24) so the slots
of the keyhole slots are behind the heads of the
helper screws (7).
III. Secure the door to the cabinet box (24) using four
(7) button head screws. Use the Allen wrench pro-
vided, Tighten securely, but do not overtighten.
Tighten the two helper screws.
IV. Add bumpers (16) to the cabinet box (24) flange.
Close door to make sure that the raised strike plate
has full contact with the magnetic catch (20). If not,
loosen magnetic catch mounting screws, adjust the
position of the magnetic catch and retighten the
mounting screws.
11
7
21
7
6
21
7
1/8”
7
7
6
Aimant
Raised Strike Plate
II.
III.
I.
IV.
16
20
3,2mm

12
I. Insérez les vis (14) sur les butoirs des sup-
ports (13). Serrez environ un tour complet.
**ATTENTION** Les vis ne doivent pas
dépasser dans la rainure se trouvant sur le
cabinet.
II. Insérez le butoir (13) et le support (12) dans
la rainure. Tournez le butoir et le support de
manière à ce qu’ils puissent glisser aisément
dans la rainure.
III. Glissez le butoir (13) et le support (12) l’un
dans l’autre.
IV. Déterminez la hauteur des tablettes (17)
avant de visser légèrement les butoirs (13)
en place avec le tournevis inclus (23).
V. Insérez les tablettes (17) en place dans les
supports (12) tel qu’illustré.
VI. Nivelez les tablettes avec le niveau (26) et bar-
rer les butoirs avec le tournevis inclus (25).
I. Install screw (14) into shelf stop (13) only one
full turn. **ATTENTION** Screw must not
extend into the cabinet groove.
II. Insert shelf stop (13) and shelf bracket (12)
into groove. Slightly turn shelf stop and shelf
bracket until it can slide inside the groove.
III. Slide shelf stop (13) and shelf bracket (12)
one inside the other.
IV. Determine shelf (17) height before thighting
slightly shelf stops (13) in place with screw-
driver provided.
V. Snap glass shelves (17) in place on shelf
brackets (12) as shown.
VI. Level shelves with level (26) and lock shelf
stopper with screwdriver provided (25).
ÉTAPE 7 - Installation des tablettes STEP 7 - Shelves installation
13
14
13
1415
III.
I.
II.
IV. V.
VI.
13
14
12
25
26
17
13
12
13

13
NETTOYAGE
CLEANING
Les nettoyeurs ménagers liquides doux
sont suffisants pour garder la surface pro-
pre et brillante. Rincez à fond et asséchez
avec un chiffon propre.
Ne jamais utiliser de nettoyants abrasifs,
grattoirs, brosses métalliques, ni autres
objets ou produits pouvant égratigner ou
ternir les surfaces.
Ne jamais utiliser de nettoyant contenant
de l’ammoniac.
Ne jamais mettre une surface en contact
avec des produits contenant de l'acétone
(nettoyant de polis à ongle), des solvants,
des décapants, de l'essence, etc.
Enlevez la poussière grâce à un linge doux
et humide.
Utilisez l'alcool à friction pour enlever les
taches de peinture, d’encre ou de graisse.
Les égratignures et marques sont rarement
visibles sur la surface et si elles devaient
paraître, il serait facile de les enlever grâce
à un polisseur liquide pour automobile.
Mild liquid household cleaners will keep
the metal surface bright and clean. Rinse
well and dry with a clean cloth.
Do not use abrasive cleaners, scrapers,
metal brushes, or any items or products
that could scratch or dull the surface.
Do not use cleaner containing ammonia.
Do not allow the surface to come into con-
tact with products such as acetone (nail
polish remover), dry cleaning solution, lac-
quer thinner, gasoline, etc.
Remove dust with a soft, damp cloth.
Clean grease, oil, paint and ink with rubbing
alcohol.
Accidental scratches or stains will rarely
show, and if they do they can be easily
removed with a liquid automobile polish.

22
LIMITED WARRANTY — UNITED STATES
LIMITED WARRANTY — CANADA
GARANTIE LIMITÉE — CANADA
MAAX Bath Inc. offers express limited warranty on each of its products. This warranty extends only to
the original owner/end-user for personal household use. For commercial uses, additional limitations apply.
For accessing product Limited warranty please visit:
www.maax.com/us-warranty
MAAX Bath Inc. offers express limited warranty on each of its products. This warranty extends only to the
original owner/end-user for personal household use. For commercial uses, additional limitations apply.
For accessing product Limited warranty please visit:
www.maax.com/ca-warranty
MAAX Bath Inc. offre une garantie limitée expresse sur chacun de ses produits. Cette garantie s’adresse
uniquement au propriétaire/
utilisateur original pour un usage personnel domestique. Des restrictions
additionnelles s’appliquent aux utilisations commerciales.
Pour accéder à la garantie limitée de votre produit, veuillez consulter le site :
www.maax.com/garantie

23

#
10049036_2021-04-26
T. 1 877 GET-MAAX (1 877 438-6229)
F. 1 888 361-2045
www.maax.com
Technical Services / Service technique / Servicio técnico
/