Page is loading ...

3
02
Safety Precautions
When using the massage chair, basic precautions should always be followed to
reduce the risk of electric shock, burns, fire or injury to persons. Please read the
following precautions before using the massage chair.
*
Make sure the power plug is securely inserted into a proper electrical outlet to
reduce the risk of short-circuit and fire.
*
Always unplug the massage chair from the electrical outlet immediately after using
and before cleaning.
*
DO NOT use the massage chair in areas where the humidity is high such as a
sauna or steam room.
*
DO NOT use the massage chair outdoors and avoid areas with direct sunlight.
*
If the electricity is off, turn the power switch to the OFF position and unplug the
massage chair from the electrical outlet to prevent any damages to the chair
when the electricity comes back on.
*
Never plug/unplug the power cord plug socket with wet hands.
*
Close and continuous supervision is necessary when the massage chair is used
by, on or near children or disabled persons.
*
No more than one person should use the massage chair at a time.
*
The massage chair is intended for use as described in the Instruction Manual. Do
not use any attachments other than those recommended by the manufacturer.
*
DO NOT attempt to stand or sit on the backrest, armrest or footrest in order to
prevent accident, injury or damage to the chair.
*
Avoid falling asleep while using the massage chair.
*
Always keep the massage chair clean, and never insert any objects into or around
the gaps of the massage chair.
*
DO NOT move the massage chair by pulling on the power supply cord.
*
Make sure there are no children, pets or other obstacles behind or underneath the
massage chair.
*
If you find any rips or tears in the fabric of the massage chair contact the service
department and stop using the chair immediately.

4
*
This massage chair is designed for household use and should not be used in
non-residential settings.
*
Please consult your doctor if you are in doubt as to whether or not you should use
this massage chair.
*
Please consult a doctor before using the massage chair if you are pregnant,
undergoing any medical treatment, using a medical electronic device such as a
pacemaker, or are experiencing any of the following: Malignant tumor, heart
disease,
back pain, abnormal or curved back bone, osteoporosis or acute illness.
*
If you experience pain while using the massage chair, stop using the chair
immediately and consult your doctor.
*
Never use a massage function on swollen or inflamed parts of the body.
*
DO NOT use the massage chair for more than 30 minutes at a time.
*
DO NOT use the massage chair where aerosol (spray) products are being used or
where oxygen is being administered.
*
This massage chair is a non-professional product designed to provide a comfortable
massage and should not be substituted for appropriate medical treatment.
*
Never operate the appliance with the air openings blocked. Keep the air openings
free of lint, hair, and the like.
*
Temperatures sufficiently high to cause burns may occur regardless of the control
setting. Do not use on an invalid or on a sleeping or unconscious person. Check the
skin in contact with the heated area of the appliance frequently to reduce the risk of
blistering.
*
Burns may result from improper use.
*
Do not crush-avoid sharp folds.
*
Keep children away from extended foot support (or other similar parts.)
*
DO NOT WET-DO NOT USE PINS.
*
NEVER REMOVE COVER.

5
03
Chair Components
Footrest
Massage pillow pad
Anti-slip pillow pad
Shoulder massage pads
Backrest
cushion
Backrest
Controller
Armrest
Power switch /
Power jack
Seat cushion
Side panel
Leg rest
Castor wheels

air bags
0 air bags
hammer
air bags
hammer
0 air bags
air bags

7
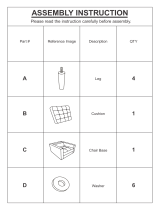
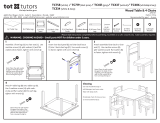
04
Chair installing
When installing the chair, please leave 31.5” of space behind
the back-rest to allow free reclining.
Unplug from outlet when installing parts of the massage chair.
Before installing, please check all the parts in the following list.
12 3
45
78 910
11 12 13 14
15 16 17 18
6
Massage chair part Side panel
Backrest pad
Controller holder Power supply wire
Pillow pad
Backrest
Back massage
strength-control pad
Flat head rivet
φ6*18*2 Gasket×4
Phillips screwdriver
φ6*20*2 Nylon spacer
φ6 Spring washer×4 Allen driver
M4*10 Pan head screws×4
φ4*9*1 Gasket×4
M6*55 Hex screws×4
Split pin

8
Step 1: Remove the chair parts out of the two cartons:
1) Massage chair part
3) Side panel
Note: The parts and the serial number of them in the below installation are corresponding
to the parts list.
Step 2: Connect pipes and terminals between the side panels and seat part as
demonstrated in PIC 1.
Step 3: Install side panels.
1) Insert the side panels along the hook D to the holder C (on the seat) at 90 degrees as
demonstrated in PIC 2.
2) Adjust the side panel to make the holes aligned, lock the hex screws as demonstrated
in PIC 3.
Note: 1) Please be careful to avoid scratching during installation.
2) The hex screws, gaskets and spring washers are packed in a small bag
marked “1”.
3) Please always bear in mind to fix the side panels to the chair without backrest,
meanwhile, lifting up the seat pad for easier to tighten the screws. Once you
fix one of the side panels, please don’t tighten the two screws immediately until
you make sure the two screws are perfectly fitting to each holes.
Air pipe colour
label: white
3
1
LED jack
Valve jack
PIC 1

9
Step 5:
● Use the diagonal pliers to cut off the cable tie which binds the stopper of the backrest
and take off the packing material of the backrest actuator, where both of them are
located underneath the seat pad.
PIC 2
PIC 3
15
16
17
X
X
A
B
C
C
D
D
PIC 4
Step 4: Repeat step 2 and step 3 to install the other side panel.
4) Please fix the back screw prior to the front screw while you assemble one
of the side panels.

10
Step 6: Install the backrest.
Lift the backrest, then lower the backrest into the seat brackets. Securely lock the flat
head bolts (A) into both sides (B) of the seat as demonstrated in PIC 5.
A. Flat Head Bolt(on the backrest)
B. Holder(on the seat)
PIC 5
Before installment
After installment
A
AB
Step 7: Attach the connecting rod (A) and the U stay fork of the reclining actuator (B)
with a flat head rivet (C), and secure with a split pin (D), then connect the air pipe and
the audio wire in both left and right sides as demonstrated in PIC 6.
A. Connecting rod (on the backrest)
B. U stay fork of reclining actuator (on the seat)
C. Flat head rivet (part 10 in the list)
D. Split pin (part 11 in the list)
A
C
D
B
A
C
B
Audio cable
Air pipe colour
label: grey
PIC 6

11
Step 8: Insert the wire plugs into the seat as demonstrated in PIC 7.
Note: Insert black to black and grey to grey, otherwise damage to the chair may happen.
PIC 7
Step 9: Attach the backrest pad and the pillow pad.
1) Attach the backrest pad and the pillow pad using
the magic tape.
2) Attach the backrest pad with the zipper and
magic tapes.
PIC 8
PIC 9
Magic tapes
Zipper
Step 10: Attach the outer coat of the massage
pillow that is easy to take off and could be
cleaned by water.

12
Step 12: Connect the wire plugs.
PIC 12
Step 11: Install the controller.
Adjust the positioning holes of controller to match with the ones in the side panel as
demonstrated in PIC 11. Lock the screws which are with flat pad when holes C’, D’, E’, F’
are corresponding to hole C, D, E, F.
Note: 1. The A and B in PIC 11 are corresponding to PIC 10’s A and B.
2. The screws and the gaskets used in this step are packed in a small bag marked “3”.
PIC 10 PIC 11
A
A
C
C'
DD'
E
E'
F
F'
7
B
B

13
Step 13: Put the instruction manual into the small pocket on the backrest pad. The small
pocket’s position is shown in PIC 13.
Step 14: Music player can be put inside the remote controller’s holder as demonstrated
in PIC 14.
Note: Please use the nylon spacer (put in small bag marked “4”) for proper adjustment
if the gaps between the side panels and the backrest are different.
PIC 13
small pocket
Music player equipment
storage place
PIC 14

14
05
Preparation For Use
● To set up the chair
1. To avoid obstruction to the back and front of the chair, please ensure when the
chair reclines, there will be excess space free from any obstacles.
2. There should be at least 10” for the leg rest and 31.5” for the backrest.
3. To avoid damage to the floor, it is advisable to place a carpet or cushion under
the chair.
● To move the chair
1. Lift up the leg rest.
2. Recline the chair to approximately
45 degrees.
3. Move the chair around the house
with a slight pull and push.
Caution:
• Before moving the chair, adjust the
leg rest back into its original position.
• Do not move the massage chair when
there is someone seated on it.
• Place a mat underneath the massage
chair before moving to protect the floor from scratches.
31.5”
10”
/