Bose MediaMate® computer speakers Owner's manual

Category
Blu-Ray players
Type
Owner's manual
Acoustimass
®
6 series V
Acoustimass
®
10 series V
home theater speaker systems
Owner's Guide | Brugervejledning | Bedienungsanleitung | Gebruiksaanwijzing | Omistajan opas | Guía del usuario
Notice d’utilisation | Manuale di istruzioni | Felhasználói útmutató | Podręcznik użytkownika | Guia dos proprietários | Bruksanvisningen
2 - English
Please read this owner’s guide and save it for future reference.
The lightning ash with arrowhead symbol within an equilateral triangle alerts the user to the presence of uninsulated, dangerous voltage within the system enclosure that may be of
sufcient magnitude to constitute a risk of electric shock.
The exclamation point within an equilateral triangle, as marked on the system, is intended to alert the user to the presence of important operating and maintenance instructions in
this owner’s guide.
WARNINGS:
To reduce the risk of re or electrical shock, do not expose the product to rain or moisture.
Do not expose this apparatus to dripping or splashing, and do not place objects lled with liquids, such as vases, on or near the apparatus. As with any electronic products, use
care not to spill liquids into any part of the system. Liquids can cause a failure and/or a re hazard.
Do not place any naked ame sources, such as lighted candles, on or near the apparatus.
CAUTION:
Do not make unauthorized alterations to the product; doing so may compirmise safety, regulatory compliance, system performance and may void the warranty.
WARNING: This product contains magnetic material. Contact your physician if you have questions on whether this might affect the operation of your implantable medical device.
NOTES:
Where the mains plug or appliance coupler is used as the disconnect device, such disconnect device shall remain readily operable.
This product must be used indoors. It is neither designed nor tested for use outdoors, in recreation vehicles, or on boats.
The speaker wire and interconnect cables included with the system are not approved for in-wall installation. Please check your local buidling codes for the correct type of wire and
cable required for in-wall installation.
This symbol means the product must not be discarded as household waste, and should be delivered to an appropriate collection facility for recycling. Proper disposal and recycling
helps protect natural resources, human health and the environment. For more information on disposal and recylcing of this product, contact your local municipality, disposal service,
or the shop where you bought this product.
Bose Corporation hereby declares that this product is in compliance with the essential requirements and other relevant provisions of Directive 1999/5/EC and all other applicable EU
directive requirements. The complete declaration of conformity can be found at: www.Bose.com/compliance.
Important Safety Instructions
1. Read these instructions.
2. Keep these instructions.
3. Heed all warnings.
4. Follow all instructions.
5. Do not use this apparatus near water.
6. Clean only with a dry cloth.
7. Do not block any ventilation openings. Install in accordance with the manufacturer’s instructions.
8. Do not install near any heat sources such as radiators, heat registers, stoves, or other apparatus (including ampliers) that produce heat.
9. Protect the power cord from being walked on or pinched particularly at plugs, convenience receptacles, and the point where they exit from the apparatus.
10. Only use attachments/accessories specied by the manufacturer.
11. Unplug this apparatus during lightning storms or when unused for long periods of time.
12. Refer all servicing to qualied personnel. Servicing is required when the apparatus has been damaged in a way, such as power-supply cord or plug is damaged, liquid has been spilled
or objects have fallen into the apparatus, the apparatus has been exposed to rain or moisture, does not operate normally, or has been dropped.
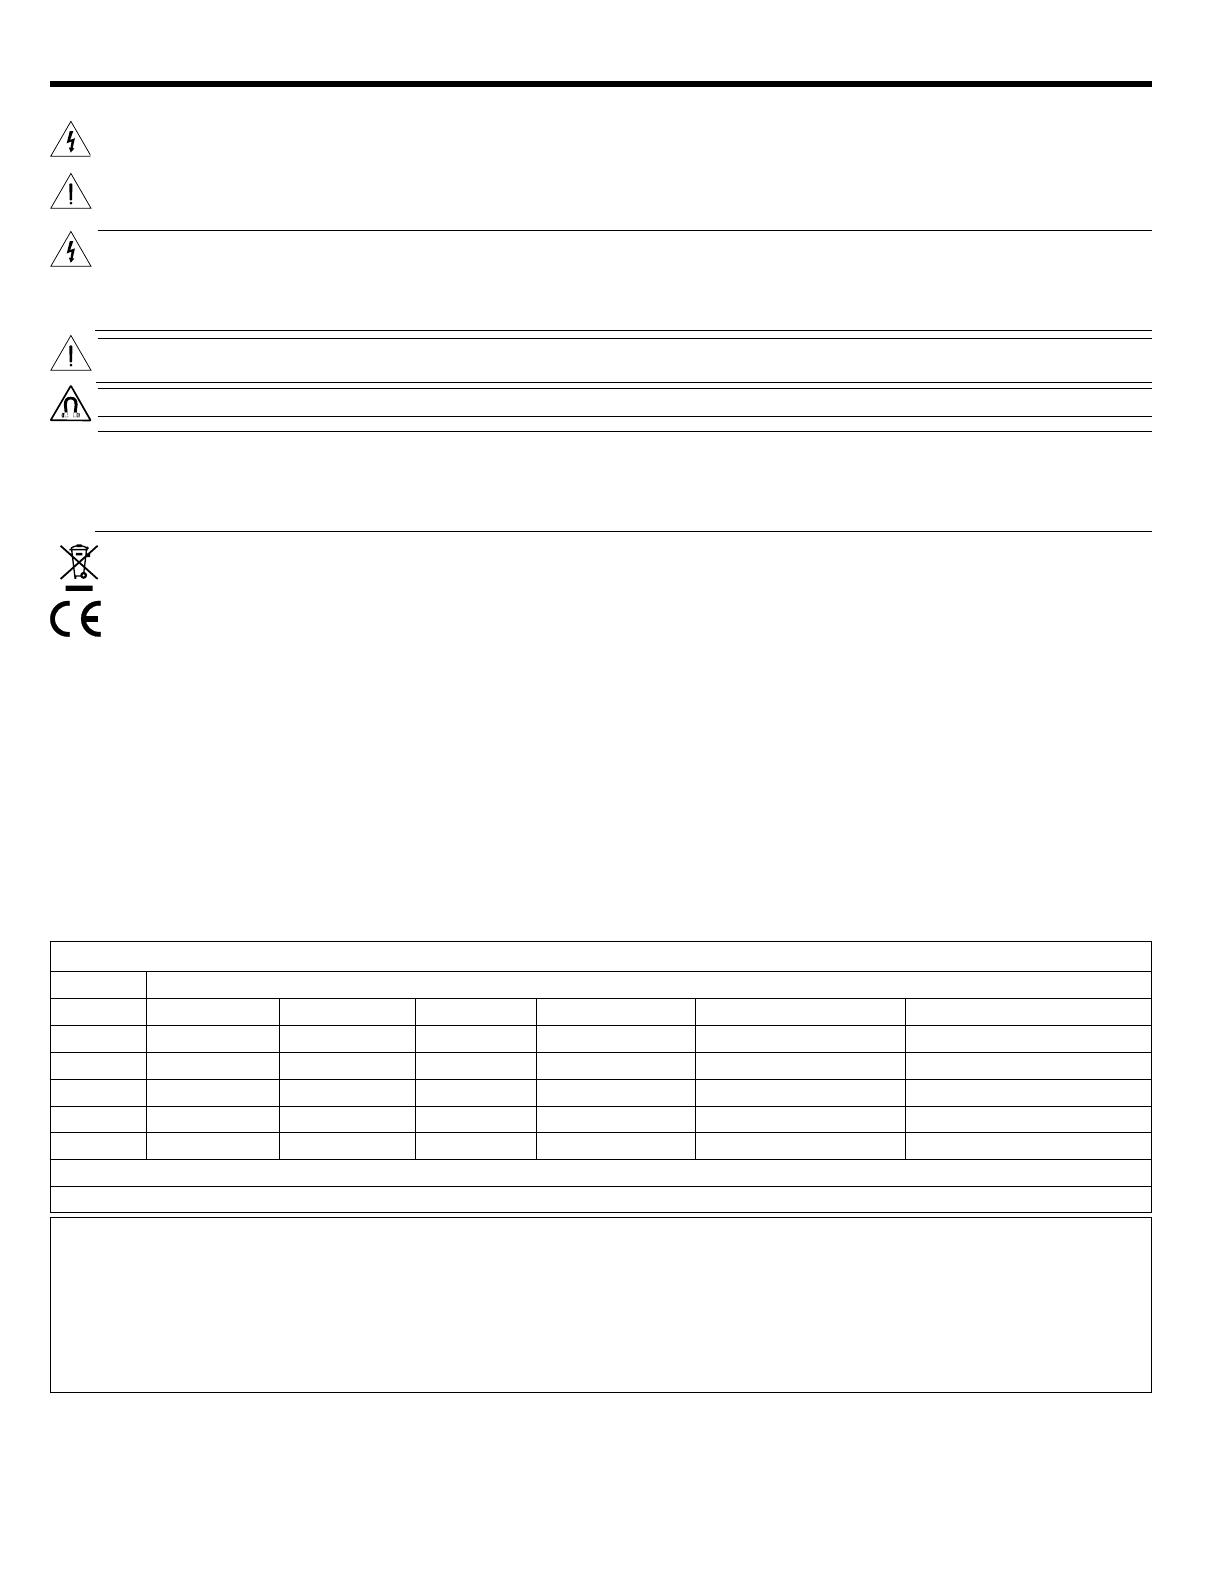
Names and Contents of Toxic or Hazardous Substances or Elements
Part Name
Toxic or Hazardous Substances and Elements
Lead (Pb) Mercury (Hg) Cadmium (Cd) Hexavalent (CR(VI)) Polybrominated Biphenyl (PBB) Polybrominated diphenylether (PBDE)
PCBs
X 0 0 0 0 0
Metal parts
X 0 0 0 0 0
Plastic parts
0 0 0 0 0 0
Speakers
X 0 0 0 0 0
Cables
X 0 0 0 0 0
0: Indicates that this toxic or hazardous substance contained in all of the homogeneous materials for this part is below the limit requirement in SJ/T 11363-2006.
X: Indicates that this toxic or hazardous substance contained in at least one of the homogeneous materials used for this part is above the limit requirement in SJ/T 11363-2006.
Blu-ray Disc™ and “Blu-Ray™” are trademarks of the Blu-Ray Disc Association.
HDMI is a trademark or registered trademark of HDMI Licensing LLC in the United States and other countries.
©2015 Bose Corporation. No part of this work may be reproduced, modified, distributed, or otherwise used without written permission.
Important Safety Information
Please complete and retain for your records.
The serial number and model number are located on the connector panel of the Acoustimass
®
module.
Serial Number: ________________________________________________________________________________________________________________________
Model Number: _______________________________________________________________________________________________________________________
Purchase date: ________________________________________________________________________________________________________________________
Please keep your receipt together with this owner’s guide.
English - 3
Contents
Introduction
ank You ....................................................................................................................................................................................................... 4
Unpacking the carton ................................................................................................................................................................................. 4
Setting Up
Placing your speakers to achieve realistic home theater sound ......................................................................................................... 5
Front left and right speakers ............................................................................................................................................................... 6
Center speakers ..................................................................................................................................................................................... 6
Rear speakers ......................................................................................................................................................................................... 6
Powered Acoustimass
®
module .......................................................................................................................................................... 6
Making the connections ............................................................................................................................................................................. 7
Connecting speakers to the Acoustimass module ......................................................................................................................... 7
Connecting the Acoustimass
®
module to the receiver ................................................................................................................. 8
Checking the connections .......................................................................................................................................................................... 9
Using Your System
Getting the most from your home theater speakers ............................................................................................................................. 10
Adjusting the bass/room compensation .......................................................................................................................................... 10
Adjusting the LFE level ........................................................................................................................................................................ 10
Setting your digital surround sound receiver ......................................................................................................................................... 11
Receiving a digital audio signal .......................................................................................................................................................... 11
Setting your analog surround sound receiver ........................................................................................................................................ 11
Reference
Troubleshooting ........................................................................................................................................................................................... 12
Customer service .......................................................................................................................................................................................... 13
Cleaning .......................................................................................................................................................................................................... 13
Limited warranty information .................................................................................................................................................................... 13
Accessories .................................................................................................................................................................................................... 13
Technical Information .................................................................................................................................................................................. 14
Speaker driver complement ................................................................................................................................................................ 14
System power rating ............................................................................................................................................................................ 14
Connectivity ........................................................................................................................................................................................... 14
4 - English
Introduction
ank You
We appreciate your choice of the Bose
®
Acoustimass
®
6 series V or Acoustimass 10 series V home theater speaker system.
The Acoustimass 6 features five small cube speakers, while the Acoustimass 10 system features four cube speaker arrays and a center
front speaker. These speakers, together with the Acoustimass module, produce a powerful and realistic home theater experience.
Unpacking the carton
Carefully unpack the carton contents:
1. Remove the brown inner carton containing the speakers.
2. Gently roll the carton onto its side and pull out the Acoustimass module.
WARNING: To avoid injury, use care in lifting the module, which weighs roughly 30 lb (14 kg).
Powered acoustimass module 20-ft (6.1 m) system input
cable
Three 20-ft (6.1 m) front speaker cables Two 50 ft (15.2 m) rear
speaker cables
With Acoustimass 6 system With Acoustimass 10 system
Five Virtually Invisible
®
series II speakers Four Direct/Reflecting
®
series II speakers and one horizontal center
channel speaker
Power cord (1)
U.S./Canada Europe U.K./Singapore Australia
Now is a good time to record the serial number for your product on your warranty card. Save all packaging materials for possible
future use.
WARNING: To avoid danger of suffocation, keep the plastic bags that wrap these speakers out of the reach of children.
English - 5
Placing your speakers to achieve realistic home theater sound
Keep these guidelines in mind when choosing a location for each speaker:
The Acoustimass
®
module should be at least 2 feet (.6 m) from your TV set to prevent interference.
Select a stable and level surface for each of the speakers.
In an Acoustimass 10 system, the center channel speaker is for use at the front of the room and near the center of your TV. The other
speakers are identical and can be placed interchangeably around the room.
In the Acoustimass 6 system, all five speakers are identical and can be placed interchangeably around the room.
The shape and size of your room and location of the furniture in it will affect your choice of speaker locations. Use the example below
as a guideline for your home theater setup.
Setting Up
ank You
We appreciate your choice of the Bose
®
Acoustimass
®
6 series V or Acoustimass 10 series V home theater speaker system.
The Acoustimass 6 features five small cube speakers, while the Acoustimass 10 system features four cube speaker arrays and a center
front speaker. These speakers, together with the Acoustimass module, produce a powerful and realistic home theater experience.
Unpacking the carton
Carefully unpack the carton contents:
1. Remove the brown inner carton containing the speakers.
2. Gently roll the carton onto its side and pull out the Acoustimass module.
WARNING: To avoid injury, use care in lifting the module, which weighs roughly 30 lb (14 kg).
Powered acoustimass module 20-ft (6.1 m) system input
cable
Three 20-ft (6.1 m) front speaker cables Two 50 ft (15.2 m) rear
speaker cables
With Acoustimass 6 system With Acoustimass 10 system
Five Virtually Invisible
®
series II speakers Four Direct/Reflecting
®
series II speakers and one horizontal center
channel speaker
Power cord (1)
U.S./Canada Europe U.K./Singapore Australia
Now is a good time to record the serial number for your product on your warranty card. Save all packaging materials for possible
future use.
WARNING: To avoid danger of suffocation, keep the plastic bags that wrap these speakers out of the reach of children.
Acoustimass 10 series V system
6 - English
Setting Up
Front left and right speakers
The goal for these is to create a sound image wider than the screen that seems natural to viewers sitting anywhere in the room.
Place these two front speakers on either side of your TV.
Keep them 6 feet (2 m) to 15 feet (5 m) apart and at least 6 inches (15 cm) away from any CRT (picture tube) TV.
Center speaker
Sound from the center speaker should seem to come from within the picture to give the most realistic performance of on-screen action
and dialogue.
Place the center speaker above, on top of, or below your TV. Do NOT rest the weight of the TV on the speaker.
Keep the speaker in line with the vertical center of the screen, if possible, for the most accurate reproduction of dialogue.
Keep the speaker at least 6 inches (15 cm) away from any CRT (picture tube) TV.
Rear speakers
While the rear (surround) speakers may deliver some dialogue, they serve primarily to deliver discrete sounds and special effects that
expand the visual image. They help bring the viewer into the center of the action.
Choose locations that are practical and convenient, while considering these recommended guidelines:
Position the left and right rear speakers so they can deliver sound on both sides of the viewer, rather than from directly behind.
Place these speakers at the same height as the ears of a seated viewer or higher.
Powered Acoustimass
®
module
Acoustimass speaker technology makes it difficult to locate the source of low-frequency sound from this module. So feel free to hide it
from view. Place the module according to the following guidelines:
At the same end of the room as the TV screen.
At least 2 feet (.6 m) from your TV set to prevent interference.
To increase bass effects, turn the front opening toward a wall; turn it away from the wall to decrease bass effects.
Keep both the front opening and the ventilation grille on the bottom of the module at least 2 inches (5 cm) from any other surface.
Do not block the ventilation grilles located on the bottom of the module. Impeding ventilation can cause a reduction in the
bass-frequency output from the module.
Preferred
Alternate
English - 7
Making the connections
Only the Acoustimass
®
module connects to your receiver. The speakers all connect directly to the Acoustimass module.
WARNING: Do not connect the speakers to a receiver. This can result in damage to your system and possible electric shock.
Connecting speakers to the Acoustimass module
Insert the plug on each speaker cable into the connector on the module. Match the label on the plug to the proper connector.
1. Use the supplied 20-ft (6.1 m) speaker cables for the three front speakers.
• Insert the R plug into the connector labeled Right Front.
• Insert the C plug into the connector labeled Center Front.
• Insert the L plug into the connector labeled Left Front.
2. Use the supplied 50-ft (15.2 m) speaker cables for the speakers at the rear of your room.
• Insert the RR plug into the connector labeled Right Rear.
• Insert the LR plug into the connector labeled Left Rear.
3. Insert the other end of each cable into the connector on each speaker, with the label facing down.
Note: Find the label on each speaker cable that matches it to the proper speaker:
Speaker cable label
L for the speaker at the left front LR for the speaker at the left rear
R for the speaker at the right front RR for the speaker at the right rear
C for the speaker at the center front
Setting Up
Acoustimass 10 series V system
Acoustimass 6 series V system
8 - English
Setting Up
Connecting the Acoustimass
®
module to the receiver
CAUTION: Before making these connections, turn off your receiver to prevent unwanted noises when you plug the Acoustimass
®
module into it.
The system input cable is 20 feet (6.1 m) long and connects to your surround receiver. Unlike the speaker cables, this input cable has a
multi-pin connector that inserts into the Audio Input connector on the module.
At the other end of the system input cable, multiple wire pairs “unzip” for easy reach and insertion into terminals on your receiver. A red
collar marks a wire as positive (+) wire.
CAUTION: Do NOT connect your module to the TV, which lacks the required amplification.
The single RCA plug at that end is for use ONLY with a receiver that handles low-frequency effects and provides an
LFE/SUBWOOFER connector.
Module input
connector
System input
cable connector
Wire pair
RCA plug for
LFE only
English - 9
To make the connections:
1. Insert the multi-pin connector on the system input cable into the input connector on the Acoustimass
®
module. Tighten the two
thumbscrews to secure the connection.
2. Connect each wire pair on the other end of the system input cable to your surround receiver, which should have audio output
terminals labeled:
• Right, Left, and Center for the front audio channels.
• Right Surround and Left Surround for the rear channels. The specific labels on your receiver may differ slightly.
CAUTION: Do not allow exposed wires to brush against each other; this could damage your receiver.
3. Carefully match the polarity of the connections (+ to + and – to –).
Attach each red-collared wire (+) to the appropriate + terminal.
Attach each plain wire (–) to the appropriate – terminal.
4. If applicable to your receiver, insert the RCA plug marked LFE on the system input cable into the LFE/SUBWOOFER OUT connector
on your surround receiver. Remove the cover first.
Checking the connections
Before plugging in the Acoustimass module, check all connections from the receiver to the module and the module to the speakers.
Make sure all speakers are connected to the proper terminals according to their position in your room.
Check to be sure all wires are connected to your surround receiver with the proper polarity (+ to + and – to – wires). Incorrect wiring
can result in a total loss of module output.
Correct any wiring problems before you plug in your receiver and turn it on.
When all the connections check out, plug the power cord from the Acoustimass module into an AC (mains) outlet. Plug in the
receiver also.
Note: Bose recommends using a quality surge suppressor on all electronics equipment. Voltage variations and spikes can damage
electronic components in any system. Using a high-quality suppressor (available at electronics stores) can eliminate the vast
majority of failures caused by a power surge.
Setting Up
LFE connector with
cover removed
Acoustimass
module
Home theater recievers
Thumbscrews
10 - English
Using Your System
Getting the most from your home theater speakers
With system connections completed and the module plugged in, your Acoustimass
®
system is now ready for use.
Familiarize yourself with the controls and built-in protections that adjust the audio of this system. They offer options to suit your particular
style of use and preferences.
CAUTION: This system provides an automatic protection circuit to help guard against damage from electrical stresses and overload of
the system. At high volume levels, the circuit activates to reduce output, which slightly decreases the volume. If you notice
this decrease, be aware that your system is functioning as designed. This volume reduction also indicates that power input
to the system may exceed safe levels. Sustained listening at these levels is not recommended.
Adjusting the bass/room compensation
After placing the Acoustimass module where you want it, you can fine-tune it for that location. Make this adjustment only as necessary.
For example:
If the system performance lacks bass, turn the BASS control (shown above) clockwise to increase the low-frequency output of the
module.
If the audio overemphasizes bass, turn the knob counter-clockwise to reduce the low-frequency output of the module.
The setting made at the factory is meant for use in the most common room arrangements.
Adjusting the LFE level
The LFE level control (shown above) is for use only with receivers that provide an LFE/SUBWOOFER channel.
By turning the knob, you can adjust the relative level of the low-frequency effects from movie soundtracks. Use it to match the volume
level of the LFE channel with volume levels of your other speaker channels.
You can check all levels by using the “test tones” feature on your digital surround sound receiver. For details on using this feature, refer
to the owner’s guide provided with your surround receiver.
English - 11
Using Your System
Setting your digital surround sound receiver
Speakers in your Acoustimass
®
6 series V or Acoustimass 10 series V system are fully compatible with the audio output of digital
surround receivers. The system’s integrated signal processing supports full low-frequency reproduction from all channels.
To gain complete advantage of these system capabilities, you may want to adjust some settings on your receiver. To make changes,
use the digital display menu on the receiver and refer to the list of recommended settings below.
Speaker Receiver setting
Left and right LARGE
Center LARGE
Left and right surround LARGE
LFE/Subwoofer ON
Note: If your receiver provides it, the LFE or Subwoofer option setting should be ON and the crossover value at the lowest number
possible, which is typically 80 Hz.
Receiving a digital audio signal
For the digital audio signal from additonal sources (Blu-ray
or DVD player, CBL/SAT box, gaming system, etc.) to reach your surround
receiver, you need a digital audio connection between the additonal source and receiver.
Use either the HDMI
, Optical or Coaxial input on the receiver to connect to the digital output from the additional source. Do not use
more than one connection.
Be sure to select the digital output in the setup menu of your additional source.
For additional setup and operating information, please refer to the owner’s guide that came with your surround receiver.
HDMI
HDMI
Setting your analog surround sound receiver
For analog (non-digital) surround sound applications, we recommend that you set the surround sound center mode of your receiver to
Wide. For instructions on how to change this setting, refer to the owner’s guide provided with your surround receiver.
12 - English
Reference
Troubleshooting
If you have a problem with your Acoustimass
®
speaker system, turn off your sound source and try the following solutions. If you still have
a problem, contact your Bose
®
dealer to arrange for service. To contact Bose directly, refer to the contact sheet in the carton.
Problem What to do
System does not function at all Make sure the receiver and powered Acoustimass module are plugged into an operating AC outlet and that the
receiver is turned on.
Be sure to select an audio source on the receiver (Blu-ray or DVD player, CBL/SAT box, gaming system, etc.).
No sound Increase the volume.
Disconnect any headphones.
Check the speaker connections at the bass module, reciever, and speakers.
Make sure that both the powered Acoustimass module and the receiver are plugged in.
For digital sound, be sure an HDMI, coaxial or optical cable connects the digital output of the audio source
with the digital input on your receiver.
Be sure the audio source selected is correct. For example, select DVD audio on your receiver to hear the
DVD sound.
No surround sound Make sure the source material contains surround sound.
If you are using the Dolby Pro-Logic mode on your receiver, make sure surround sound is turned on.
Be sure the source material (Blu-ray
or DVD player, CBL/SAT box, gaming system, etc.) is Dolby Digital encoded.
Be sure your receiver is processing a signal from a stereo TV, laserdisc, Blu-ray player or DVD player, or other
surround sound source.
If you are using digital programming, verify that the settings are correct at the receiver.
No bass Be sure the speaker connections from the receiver to the amplifier are in the correct phase, red-collared wire to red
connector (+ to + and – to –).
Verify that the speaker size in the reciever is set to large.
Not enough or too much bass Move your Acoustimass module closer to a wall or corner to increase bass. Move it farther from a wall or corner to
decrease bass.
Adjust the LFE level or Room Compensation control.
Sound is distorted Make sure speaker wire is not damaged.
Reduce the volume of external components connected to the receiver.
English - 13
Reference
Customer service
For additional help in solving problems, contact the Bose
®
Customer Service office appropriate to your area. See the contact sheet in the
carton.
Cleaning
The cabinets of your Acoustimass
®
speaker system may be cleaned only with a soft dry cloth. Do not use any sprays near the system or
allow liquids to spill into any openings. Also, do not use any solvents, chemicals, or cleaning solutions containing alcohol, ammonia,
or abrasives.
The grille assemblies on the speakers may be carefully vacuumed, if necessary. Please note that the drivers are located directly behind
the grille and are easily damaged if reasonable care is not taken.
Limited warranty information
Your Acoustimass
®
speaker system is covered by a limited warranty. Details of the warranty are provided on the warranty card that came
with your system. Please fill out the information section on the card and mail it to Bose. Failure to do so, however, does not affect your
rights.
The warranty information provided with this product does not apply in Australia or New Zealand. See our website at
www.bose.com.au/warranty or www.bose.com.nz/warranty for details of the Australia and New Zealand warranty.
Accessories
You can place system speakers on wall brackets, table stands or floor stands. To purchase these accessories, contact your local Bose
®
dealer or visit www.Bose.com.
For the following accessories:
Input cable adapter for use with in-wall wiring from the Acoustimass module to the receiver
20-ft (6.1 m) extension cable for use between the Acoustimass module and the receiver
Speaker cable adapters for use with in-wall wiring
Contact your authorized Bose dealer. Or to contact Bose directly, refer to the contact sheet in the carton.
14 - English
Reference
Technical Information
Speaker driver complement
Acoustimass
®
10 system:
Cube speaker arrays and center front speaker:
Two 2.5" (6.35 cm) Twiddler
speakers
Powered Acoustimass module:
Two 5.25" (13 cm) woofers
Acoustimass 6 system:
Cube speakers:
One 2.5" (6.35 cm) Twiddler
speaker
Powered Acoustimass module:
One 5.25" (13 cm) woofers
System power rating
Acoustimass 10 system:
U.S./Canada: 100-127V 50/60 Hz 270W
Europe/Australia: 220-240V
50/60 Hz 270W
Acoustimass 6 system:
U.S./Canada: 100-127V 50/60 Hz 135W
Europe/Australia: 220-240V
50/60 Hz 135W
Connectivity
Acoustimass 10 system:
Compatible with A/V receivers and amplifiers rated from 10 to 200 watts per channel, rated from 4 to 8 ohms
Acoustimass 6 system:
Compatible with A/V receivers and amplifiers rated from 10 to150 watts per channel, rated from 4 to 8 ohms
Acoustimass 10 system:
Cube speaker array and center front speaker: 2.2 lb (1kg) each
Cube speaker array: 7.46"H x 3.28"W x 3.34"D (18.95 cm x 8.32 cm x 8.49 cm)
Center front speaker: 3.43"H x 7.35"W x 3.26"D (8.70 cm x 18.68 cm x 8.27 cm)
Module: 35 lb (15.8 kg)
16.3"H x 8.1"W x 25.3"D (41.4 cm x 20.6 cm x 64.3 cm)
Acoustimass 6 system:
Cube speaker: 1.18 lb (0.45 kg) each
3.7"H x 3.2"W x 3.3"D (9.5 cm x 8.3 cm x 8.4 cm)
Module: 27 lb (12.2 kg)
16.3"H x 8.1"W x 22.3"D (41.4 cm x 20.6 cm x 56.6 cm)
English - 15
Reference
4 - Dansk
Indledning
Tak
Det glæder os, at du har valgt Bose
®
Acoustimass
®
6 series V eller Acoustimass 10 series V højttalersystemet til hjemmebiograf.
Acoustimass 6 har fem små kubehøjttalere, mens Acoustimass 10-systemet har fire rækker med kubehøjttalere og en midterste
fronthøjttaler. Disse højttalere leverer sammen med Acoustimass-modulet en effektfuld og realistisk hjemmebiografoplevelse.
Udpakning af kassen
Tag forsigtigt indholdet ud af kassen:
1. Fjern den indvendige brune kasse, der indeholder højttalerne.
2. Vip forsigtigt kassen om på siden, og træk Acoustimass-modulet ud.
ADVARSEL: Vær forsigtig, så du undgår at komme til skade, når du løfter modulet, som vejer ca. 14 kg.
Elektrisk Acoustimass-modul 6,1 m systemindgangskabel Tre 6,1 m fronthøjttalerkabler To 15,2 m
baghøjttalerkabler
Med Acoustimass 6 system Med Acoustimass 10 system
Fem Virtually Invisible
®
series II-højttalere Fire Direct/Reflecting
®
series II-højttalere og en vandret centerhøjttaler
Netkabel (1)
USA/Canada Europa UK/Singapore Australien
Nu er det et godt tidspunkt at skrive produktets serienummer på dit garantikort. Gem al emballage til eventuel senere brug.
ADVARSEL: Opbevar de plastikposer, som højttalerne er pakket ind i, utilgængelige for børn for at undgå risiko for kvælning.
Dansk - 7
Foretagelse af tilslutninger
Kun Acoustimass
®
-modulet tilsluttes direkte til din modtager. Alle højttalere tilsluttes direkte til Acoustimass-modulet.
ADVARSEL: Tilslut ikke højttalerne til en modtager. Dette kan resultere i skader på dit system og elektrisk stød.
Tilslutning af højttalerne til Acoustimass-modulet
Sæt stikket på hvert højttalerkabel ind i stikket på modulet. Sørg for, at mærket på stikket passer til det rigtige stik.
1. Brug de medfølgende 6,1 meter lange højttalerkabler til de tre fronthøjttalere.
• Sæt R stikket i stikket, der er mærket Right Front
• Sæt C stikket i stikket, der er mærket Center Front.
• Sæt L stikket i stikket, der er mærket Left Front.
2. Brug de medfølgende 15,2 meter lange højttalerkabler til højttalerne bagest i rummet.
• Sæt RR stikket i stikket, der er mærket Right Rear.
• Sæt LR stikket i stikket, der er mærket Left Rear.
3. Sæt den anden ende af hvert kabel i stikket på hver højttaler, hvor mærket vender nedad.
Bemærk: Find det mærke på hvert højttalerkabel, der passer til den rigtige højttaler:
Mærke på højttalerkabel
L for højttaleren forrest til venstre LR for højttaleren bagest til venstre
R for højttaleren forrest til højre RR for højttaleren bagest til højre
C for højttaleren forrest i midten
Opstilling
Acoustimass 10 Series V-system
Acoustimass 6 Series V-system
14 - Dansk
Reference
Tekniske oplysninger
Højttalerdriverkomplement
Acoustimass
®
10-system:
Rækker med kubehøjttalere og midterste fronthøjttaler:
To 6,25 cm Twiddler
-højttalere
Elektrisk Acoustimass-modul:
To 13 cm bashøjttalere
Acoustimass 6-system:
Kubehøjttalere:
En 6,35 cm Twiddler
-højttaler
Elektrisk Acoustimass-modul:
En 13 cm bashøjttaler
Systemets nominelle effekt
Acoustimass 10-system:
USA/Canada: 100-127 V 50/270 Hz 60W
Europa/Australien: 220-240 V
50/270 Hz 60W
Acoustimass 6-system:
USA/Canada: 100-127 V 50/135 Hz 60W
Europa/Australien: 220-240 V
50/135 Hz 60W
Forbindelsesmuligheder
Acoustimass 10-system:
Kompatible med A/V-modtagere og -forstærkere med en effekt fra 10 til 200 W pr. kanal, effekt fra 4 til 8 ohm
Acoustimass 6-system:
Kompatible med A/V-modtagere og –forstærkere med en effekt fra 10 til 150 watt pr. kanal, effekt fra 4 til 8 ohm
Acoustimass 10-system:
Række med kubehøjttalere og midterste fronthøjttaler: 1 kg for hver
Række med kubehøjttalere: 18,95 cm H x
8,32 cm B x 8,49 cm D (7,46" x 3,28" x 3,34")
Centerfronthøjttaler: 8,70 cm H x 18,68 cm B x 8,27 cm D (3,43" x 7,35" x 3,26")
Modul: 15,8 kg
41,4 cm H x 20,6 cm B x 64,3 cm D (16,3" x 8,1" x 25,3")
Acoustimass 6-system:
Kubehøjttaler: 0,45 kg pr. stk.
9,5 cm H x 8,3 cm B x 8,4 cm D (3,7" x 3,2" x 3,3")
Modul: 12,2 kg
41,4 cm H x 20,6 cm B x 56,6 cm D (16,3" x 8,1" x 22,3")
Dansk - 15
Reference
4 - Deutsch
Einführung
Vielen Dank
Mit dem Heimkino-Lautsprechersystem Bose
®
Acoustimass
®
6 Serie V oder Acoustimas 10 Serie V haben Sie eine gute Wahl getroffen.
Das Acoustimass 6 umfasst fünf kleine Cube-Lautsprecher, während das System Acoustimass 10 vier Cube Speaker Array und
einen vorderen Center-Lautsprecher beinhaltet. Zusammen mit dem Acoustimass-Modul sorgen diese Lautsprecher für kräftigen und
realistischen Heimkino-Sound.
Auspacken des Kartons
Packen Sie den Inhalt vorsichtig aus:
1. Entnehmen Sie den braunen inneren Karton, der die Lautsprecher enthält.
2. Kippen Sie den Karton vorsichtig auf die Seite und ziehen Sie das Acoustimass-Modul heraus.
WARNUNG: Um Verletzungen zu vermeiden, seien Sie beim Hochheben des Moduls vorsichtig – es wiegt ca. 14 kg.
Aktives Acoustimass-Bassmodul Systemeingangskabel
(6,1 m)
Drei Kabel für die vorderen Lautsprecher (6,1 m) Zwei Kabel für
die hinteren
Lautsprecher (15,2 m)
Beim System Acoustimass 6 Beim System Acoustimass 10
Fünf Virtually Invisible
®
Serie II-Lautsprecher Vier Direct/Reflecting
®
Serie II-Lautsprecher und ein horizontaler Center
Channel-Lautsprecher
Netzkabel (1)
USA/Kanada Europa GB/Singapur Australien
Sie sollten sich nun die Seriennummern des Produkts auf der Garantiekarte notieren. Bewahren Sie das Verpackungsmaterial zur
späteren Verwendung auf.
WARNUNG: Halten Sie die Plastikverpackung der Lautsprecher von Kindern fern, um Erstickungsgefahr zu vermeiden.
  • Page 1 1
  • Page 2 2
  • Page 3 3
  • Page 4 4
  • Page 5 5
  • Page 6 6
  • Page 7 7
  • Page 8 8
  • Page 9 9
  • Page 10 10
  • Page 11 11
  • Page 12 12
  • Page 13 13
  • Page 14 14
  • Page 15 15
  • Page 16 16
  • Page 17 17
  • Page 18 18
  • Page 19 19
  • Page 20 20
  • Page 21 21
  • Page 22 22
  • Page 23 23
  • Page 24 24
  • Page 25 25
  • Page 26 26
  • Page 27 27
  • Page 28 28
  • Page 29 29
  • Page 30 30
  • Page 31 31
  • Page 32 32
  • Page 33 33
  • Page 34 34
  • Page 35 35
  • Page 36 36
  • Page 37 37
  • Page 38 38
  • Page 39 39
  • Page 40 40
  • Page 41 41
  • Page 42 42
  • Page 43 43
  • Page 44 44
  • Page 45 45
  • Page 46 46
  • Page 47 47
  • Page 48 48
  • Page 49 49
  • Page 50 50
  • Page 51 51
  • Page 52 52
  • Page 53 53
  • Page 54 54
  • Page 55 55
  • Page 56 56
  • Page 57 57
  • Page 58 58
  • Page 59 59
  • Page 60 60
  • Page 61 61
  • Page 62 62
  • Page 63 63
  • Page 64 64
  • Page 65 65
  • Page 66 66
  • Page 67 67
  • Page 68 68
  • Page 69 69
  • Page 70 70
  • Page 71 71
  • Page 72 72
  • Page 73 73
  • Page 74 74
  • Page 75 75
  • Page 76 76
  • Page 77 77
  • Page 78 78
  • Page 79 79
  • Page 80 80
  • Page 81 81
  • Page 82 82
  • Page 83 83
  • Page 84 84
  • Page 85 85
  • Page 86 86
  • Page 87 87
  • Page 88 88
  • Page 89 89
  • Page 90 90
  • Page 91 91
  • Page 92 92
  • Page 93 93
  • Page 94 94
  • Page 95 95
  • Page 96 96
  • Page 97 97
  • Page 98 98
  • Page 99 99
  • Page 100 100
  • Page 101 101
  • Page 102 102
  • Page 103 103
  • Page 104 104
  • Page 105 105
  • Page 106 106
  • Page 107 107
  • Page 108 108
  • Page 109 109
  • Page 110 110
  • Page 111 111
  • Page 112 112
  • Page 113 113
  • Page 114 114
  • Page 115 115
  • Page 116 116
  • Page 117 117
  • Page 118 118
  • Page 119 119
  • Page 120 120
  • Page 121 121
  • Page 122 122
  • Page 123 123
  • Page 124 124
  • Page 125 125
  • Page 126 126
  • Page 127 127
  • Page 128 128
  • Page 129 129
  • Page 130 130
  • Page 131 131
  • Page 132 132
  • Page 133 133
  • Page 134 134
  • Page 135 135
  • Page 136 136
  • Page 137 137
  • Page 138 138
  • Page 139 139
  • Page 140 140
  • Page 141 141
  • Page 142 142
  • Page 143 143
  • Page 144 144
  • Page 145 145
  • Page 146 146
  • Page 147 147
  • Page 148 148
  • Page 149 149
  • Page 150 150
  • Page 151 151
  • Page 152 152
  • Page 153 153
  • Page 154 154
  • Page 155 155
  • Page 156 156
  • Page 157 157
  • Page 158 158
  • Page 159 159
  • Page 160 160
  • Page 161 161
  • Page 162 162
  • Page 163 163
  • Page 164 164
  • Page 165 165
  • Page 166 166
  • Page 167 167
  • Page 168 168
  • Page 169 169
  • Page 170 170
  • Page 171 171
  • Page 172 172

Bose MediaMate® computer speakers Owner's manual

Category
Blu-Ray players
Type
Owner's manual

Ask a question and I''ll find the answer in the document

Finding information in a document is now easier with AI