Page is loading ...

UBZ-LJ8
FM TRANSCEIVER
INSTRUCTION MANUAL
EMETTEUR-RECEPTEUR FM
MODE D’EMPLOI
TRANSCEPTOR DE FM
MANUAL DE INSTRUCCIONES
RICETRASMETTITORE FM
MANUALE DI ISTRUZIONI
FM-HANDFUNKSPRECHGERÄT
BEDIENUNGSANLEITUNG
FM ZENDONTVANGER
GEBRUIKSAANWIJZING
© B62-1669-10 (E)
09 08 07 06 05 04 03 02 01
UBZ-LJ8 E 00 Cover 02.11.20, 9:41 AM1

CONTENTS
INTRODUCTION ....................................................................... 1
SUPPLIED ACCESSORIES.......................................................... 1
PRECAUTIONS ........................................................................ 2
ORIENTATION.......................................................................... 3
CONTROL FUNCTIONS ............................................................. 3
DISPLAY ................................................................................ 4
PREPARATION ........................................................................ 5
INSTALLING/ REMOVING BATTERIES ............................................ 5
SETTING THE ANTENNA ........................................................... 6
INSTALLING/ REMOVING THE BELT CLIP ...................................... 7
INSTALLING/ REMOVING OPTIONAL ACCESSORIES ........................ 8
GETTING STARTED................................................................ 9
GROUP MODE ...................................................................... 10
SECRET MODE ..................................................................... 11
MENU SETTINGS.................................................................. 12
BEEP TONES ....................................................................... 12
BATTERY INDICATOR/ BATTERY TYPE ........................................ 13
AUTO POWER OFF (APO) .................................................... 14
AUTO CHANNEL SELECT........................................................ 14
VOICE ACTIVATED CONTROL (VOX)........................................ 16
CALLING ALERT TONES ......................................................... 18
SQUELCH ............................................................................ 19
OPERATING FEATURES....................................................... 20
KEY LOCK ........................................................................... 20
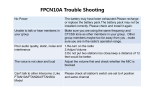
LAMP .................................................................................. 20
TRANSMIT POWER SAVER ...................................................... 21
BATTERY SAVER ................................................................... 21
LOUDNESS ........................................................................... 22
RESETTING THE TRANCEIVER .......................................... 23
OPTIONAL ACCESSORIES.................................................. 24
SMC-34 SPEAKER-MICROPHONE...................................... 25
MONITOR ............................................................................ 25
ADDITIONAL FUNCTIONS ........................................................ 25
SPECIFICATIONS.................................................................. 26
TRANSCEIVER SPECIFICATIONS ............................................... 26
CHANNEL FREQUENCY CHART ................................................ 26
GROUP MODE NUMBERS ....................................................... 27
TK-3101 / UBZ-LJ8 COMPATIBILITIES .................................. 27
TROUBLESHOOTING GUIDE............................................... 28
UBZ-LJ8 E 000 02.11.20, 9:42 AM1

1
INTRODUCTION
Thank you for purchasing this KENWOOD Private Mobile
Radio 446 (PMR446). This KENWOOD product is a precision
device. Treat it with care, and you will enjoy years of reliable
operation.
PMR446 refers to personal short range Private Mobile Radios
for family and friends to keep in touch without the need for a
licence, radio knowledge, or monthly charges. Your
KENWOOD PMR446 is called a “transceiver”, meaning
transmitter and receiver.
You can choose from eight preset channels to communicate
with others. For your convenience, Automatic Squelch quiets
your transceiver when you are not receiving calls and Group
Mode keeps your transceiver quiet except for calls you want to
hear. For your privacy, Secret Mode encrypts your messages
so you can talk with your group members without having
others listen in on your conversation.
Your transceiver provides safety and convenience almost
anywhere. The talk range depends on your location; you’ll get
maximum distance of up to approximately 3.2 km (2 miles) in
open areas, less in buildings and vehicles.
Information KENWOOD is on the web: http://www.kenwood.com/
SUPPLIED ACCESSORIES
Carefully unpack the transceiver. Make sure the following
items are included in your kit before discarding the packing
material:
• Transceiver
• Belt clip
• Instruction manual
• Warranty card
UBZ-LJ8 E 01-28 02.11.20, 9:44 AM1

2
PRECAUTIONS
• Refer service to qualified technicians only. Do not modify or
attempt to adjust the transceiver for any reason.
• Do not expose the transceiver to long periods of direct
sunlight, nor place it close to heating appliances.
• Do not place the transceiver in excessively dusty, humid, and/
or wet areas, nor on unstable surfaces.
• Avoid extremes in exposure to weather, heat, and cold. This
transceiver can be used in mild weather conditions, but it is not
waterproof.
• Turn OFF your transceiver while taking on fuel or while parked
in gasoline service stations.
• Do not operate your transceiver or charge your battery pack in
an explosive atmosphere (gases, dust, fumes, etc.).
• If an abnormal odor or smoke is detected coming from the
transceiver, immediately switch OFF the power and remove
the batteries. Contact your KENWOOD dealer.
UBZ-LJ8 E 01-28 02.11.20, 9:44 AM2

3
ORIENTATION
key
VOL control
SP/MIC jacks
Microphone
Power switch
Antenna
Display
PTT switch
▲ key
▼ key
Speaker
CONTROL FUNCTIONS
PTT (Push-to Talk) switch: Press this switch then speak into
the microphone to make a call. Release the switch to receive.
▲ key: Press to increase the channel or group mode
number, and to turn selected functions ON or OFF.
▼ key: Press to decrease the channel or group mode
number, and to turn selected functions ON or OFF.
VOL control: Rotate to adjust the volume level.
Power switch: Press and hold to turn the transceiver power
ON or OFF. With the power ON, press momentarily to enter
the Loud Function setting.
key: Press momentarily to enter the Group Mode setting.
Press momentarily again to enter the Secret Mode setting.
Press a third time to return to normal. Press and hold to lock
the transceiver controls.
UBZ-LJ8 E 01-28 02.11.20, 9:44 AM3

4
DISPLAY
dekcolneebevahslortnocreviecsnartehtnehwsraeppA
.)02egap(
.)31egap(rewopyrettabgniniamerehtsyalpsiD
detavitcaneebsahedoMterceSehtnehwsraeppA
.)11egap(
denrutebnacedoMterceSnehwsknilbdnasraeppa
.)11egap(FFOroNO
neebsahnoitcnufffOrewoPotuAehtnehwsraeppA
.)41egap(detavitca
.)41egap(gninnacselihwsraeppA
.)61egap(esunisinoitcnufXOVehtelihwsraeppA
.gnittimsnartelihwsraeppA
sihcleuqsehtelihwrolangisagniviecerelihwsraeppA
.)91egap(detavitcaed
neebsahreifilpmaoidualanretniehtnehwsraeppA
.)22egap(detavitca
FFOroNOnoitcnufpeebehtgnitteselihwsraeppA
.)21egap(
.)8ot1(rebmunlennahctnerrucehtsyalpsiD
ro)83ot1(rebmunedoMpuorGtnerrucehtsyalpsiD
.)01egap()”FO“(FFO
nacrebmunedoMpuorGehtnehwsknilbdnasraeppa
.)01egap(detceleseb
UBZ-LJ8 E 01-28 02.11.20, 9:44 AM4

5
INSTALLING/ REMOVING BATTERIES
This transceiver requires 3 LR6 (AA) batteries. Use high
quality alkaline batteries to enjoy longer periods of battery life.
You can also use an optional UPB-1 NiCd battery pack. When
using an optional battery pack, be sure to set the battery
indicator type to battery pack, from its default setting of
alkaline batteries. Refer to page 13 for details on how to set
the indicator type.
Average alkaline battery life: 24 hours
Average battery pack life: 12 hours
Average times are calculated using 10% transmit time, 10%
receive time, and 80% standby time
Note: Before installing/ removing batteries, you must rotate the
antenna out of the way (page 6).
1 Release the battery cover lock, then slide the cover away
from the transceiver.
2 Insert (or remove) 3 LR6 (AA) batteries or the optional
UPB-1 NiCd battery pack.
• Mate the battery polarities with those marked on the
battery compartment.
• When removing the battery pack, pull on the ribbon that is
attached to the pack to dislodge the pack from the battery
compartment.
PREPARATION
Battery cover
Lock
UBZ-LJ8 E 01-28 02.11.20, 9:44 AM5

6
3 Align the battery cover tabs with the slots on the
transceiver, hold the cover in place, then latch it with the
battery cover lock.
Note:
◆ Do not mix old and new batteries or batteries of different types.
◆ When you do not use the transceiver for an extended period of
time, remove the batteries from the transceiver.
SETTING THE ANTENNA
Before using the transceiver, be sure to raise the antenna.
Ribbon
Label
Contacts
Battery pack installationBattery installation
UBZ-LJ8 E 01-28 02.11.20, 9:44 AM6

7
INSTALLING/ REMOVING THE BELT CLIP
1 To install the belt clip, align the clip with the guides on the
rear of the transceiver, then slide the belt clip up until it
latches in place.
2 To remove the belt clip, press the locking latch in then
slide the belt clip down before pulling it away from the
transceiver.
Locking latch
UBZ-LJ8 E 01-28 02.11.20, 9:44 AM7

8
INSTALLING/ REMOVING OPTIONAL ACCESSORIES
Note: Always switch OFF the transceiver power when installing or
removing the optional accessories.
The following accessories can be used with this transceiver:
• EMC-3 Clip Microphone and Earphone
• HMC-3 VOX/PTT Headset
• KHS-21 Headset
• SMC-32 Speaker-Microphone
• SMC-33 Speaker-Microphone
• SMC-34 Speaker-Microphone
To install these accessories:
1 Open the SP/MIC tabs on the side of the transceiver.
2 Insert the accessory’s plugs into the SP/MIC jacks.
3 When you remove the accessory from the transceiver, be
sure to cover the SP/MIC jacks with the attached tabs in
order to keep dust and dirt away from the contacts.
Note:
◆ Refer to the accessory instruction manuals for detailed
instructions on each of the accessories.
◆ The transceiver is not water resistant while using accessories.
UBZ-LJ8 E 01-28 02.11.20, 9:44 AM8

9
GETTING STARTED
qq
qq
q Switch the Power ON by pressing and
holding the switch for approximately
1 second.
• A confirmation tone sounds.
To switch the transceiver power OFF,
press and hold the
switch again for
1 second.
ww
ww
w Adjust the Volume by rotating the VOL
control.
• Clockwise increases the volume and
counterclockwise decreases the volume.
ee
ee
e Select a Channel from 1 to 8 by pressing
the ▲ and ▼ keys.
• A confirmation tone sounds each time you
press a key.
• When you receive a call on your selected
channel, you will hear audio from the
speaker and the busy icon will appear.
• To use a Group Mode number, refer to
“GROUP MODE” on page 10.
rr
rr
r Make a Call:
1 Press and hold the PTT switch, then
speak into the microphone to transmit.
• The transmit icon will appear.
• For best sound quality, speak into the
microphone in your normal speaking
voice while holding the microphone
approximately 3 to 4 cm (1.5 inches)
from your lips.
2 Release the PTT switch when you
have finished speaking.
UBZ-LJ8 E 01-28 02.11.20, 9:44 AM9

10
GROUP MODE
Group Mode is a function which allows you to reject signals
from undesired parties that are using the same channel as
you. You will hear audio from the speaker only when you
receive a signal that matches your Group Mode number.
Likewise, when you transmit on a channel set up with a Group
Mode number, the receiving station must have a matching
Group Mode number in order to hear your call.
You can select a Group Mode number from 1 to 38 (or OFF).
After changing your Group Mode number, confirm that the
other members in your group have selected the same number.
1 Press the
key.
• The current setting appears with a
flashing arrow.
2 Press the ▲ or ▼ key to select your
desired value.
• The values range from 1 to 38. “OF”
means you have selected no Group Mode
number. Refer to page 27 for the actual
Group Mode numbers.
3 Press the key two times to confirm the
setting.
UBZ-LJ8 E 01-28 02.11.20, 9:44 AM10

11
SECRET MODE
Whereas the Group Mode function (page 10) allows you to
ignore unwanted calls, Secret Mode allows you to hold a
conversation in complete privacy. When activated, any other
party listening in on your channel will be unable to understand
your conversation. The transceiver scrambles your voice so
that anybody listening in on your conversation will not be able
to understand what you are saying.
In order for members of your own group to understand your
call while you are using Secret Mode, all other members must
also activate Secret Mode on their transceivers. This
scrambles everybody’s voice while transmitting and
unscrambles the voice message on your own transceiver
when you receive the message.
Note: In order to enter Secret Mode, you must also select a Group
Mode number. If you have not selected a Group Mode number, do so
before following the instructions given below.
1 Press the key two times.
• The privacy icon appears with a flashing
arrow.
2 Press the ▲ or ▼ key to turn Secret Mode
ON or OFF.
• An image appears in the privacy box
when Secret Mode is ON.
3 Press the key again to confirm the
setting.
UBZ-LJ8 E 01-28 02.11.20, 9:44 AM11

12
MENU SETTINGS
Your transceiver has a hidden setting menu which allows you
to adjust a variety of features to your desired settings. To
enter Menu Setting:
1 Press and hold the ▲ key while turning the transceiver
power ON.
2 To view the various settings, press the ▲ or ▼ key.
Following are a list of the settings available:
• Beep: ON/ OFF
• Battery Type: Alkaline Batteries/ UPB-1 Battery Pack
• APO (Auto Power Off): ON/ OFF
• Auto Channel Select: Remove/ Add
• VOX (Voice Activated Control) Gain Level: OFF/ 1/ 2/ 3
• VOX Delay Time (Only available when VOX Gain Level is
not OFF. Refer to page 17.): 0.5/ 1.0/ 2.0/ 3.0 seconds
• Calling Alert Tone: 1 ~ 10
• Squelch: ON/ OFF
3 Refer to the appropriate sections below for details of
adjusting each setting.
BEEP TONES
You can turn the transceiver beep tones ON or OFF, as
desired.
1 Enter the Menu Settings (above) and
press the ▲ or ▼ key until you reach the
“BEEP” display.
2 Press the
key to turn the beep tones
ON (
) or OFF ( ).
UBZ-LJ8 E 01-28 02.11.20, 9:44 AM12

13
3 Press the PTT switch or turn the
transceiver power OFF to confirm your
setting.
BATTERY INDICATOR/ BATTERY TYPE
The battery indicator on the display lets you know approxi-
mately how much battery life is remaining. When the battery
voltage becomes too low while transmitting, the transceiver
stops transmitting and a tone sounds until you release the
PTT switch. Recharge or replace the battery pack at this time.
High battery power
Medium battery power
Low battery power
Time to replace the batteries or recharge the battery pack
Depending on the type of batteries you are using in the
transceiver, adjust the battery type to match. The battery
indicator can only accurately read out the remaining battery
power if this value is set correctly. An incorrect setting will
result in an inaccurate battery power readout on the display.
1 Enter the Menu Settings (page 12) and
press the ▲ or ▼ key until you reach the
“
” display.
2 Press the
key to set the value to
alkaline batteries (
) or to the optional
UPB-1 battery pack ( ).
• You must set this menu each time the
battery type is changed.
3 Press the PTT switch or turn the
transceiver power OFF to confirm your
setting.
UBZ-LJ8 E 01-28 02.11.20, 9:44 AM13

14
AUTO POWER OFF (APO)
Auto Power Off is useful when you unintentionally leave the
transceiver power ON. This function saves battery consump-
tion. After two hours elapse with no controls adjusted or
activated and no calls received, APO turns the transceiver
power OFF. One minute before power is turned OFF, a
warning tone sounds (even if the beep tone has been turned
OFF).
1 Enter the Menu Settings (page 12) and
press the ▲ or ▼ key until you reach the
“APO” display.
2 Press the
key to turn the Auto Power
Off function ON (
) or OFF ( ).
3 Press the PTT switch or turn the
transceiver power OFF to confirm your
setting.
• If you have turned the APO function ON,
the APO icon appears on the display.
AUTO CHANNEL SELECT
Auto Channel Select allows you to scan the transceiver
channels to search for a signal. When the transceiver verifies
a signal on a channel, it proceeds to check whether or not its
Group Mode number matches that which is set up on your
transceiver. (Auto Channel Select will not operate if no Group
Mode number is selected.) If the Group Mode number
matches, the transceiver stops at the channel and opens the
squelch so you can listen to the call. If the Group Mode
number does not match, the call is ignored and scanning
continues.
UBZ-LJ8 E 01-28 02.11.20, 9:44 AM14

15
Before you can use the Auto Channel Select function, ensure
that it is activated. You can add or remove this function to/
from your transceiver using the Menu Settings:
1 Enter the Menu Settings (page 12) and
press the ▲ or ▼ key until you reach the
“SCAN” display.
2 Press the
key to remove Auto Channel
Select from your transceiver ( ) or add it
to your transceiver (
).
3 Press the PTT switch or turn the
transceiver power OFF to confirm your
setting.
1 Press and hold the ▲ key for
approximately 1 second.
• The SCAN icon appears on the display.
2 When a signal is detected and the Group
Mode number matches, the channel
number blinks.
3 When the signal is no longer present, the
transceiver waits for 10 seconds before
scanning continues.
• If a new signal appears before the
10 seconds elapse, the transceiver will
remain on the channel until the new
signal is no longer present.
When you have added Auto Channel Select to your
transceiver, you can then operate scan while using the
transceiver. To begin scanning:
UBZ-LJ8 E 01-28 02.11.20, 9:44 AM15

16
4 To end the scan at any time, press the ▲,
▼, or
key.
VOICE ACTIVATED CONTROL (VOX)
Using the VOX feature, you can operate the transceiver
hands-free. For best operating conditions, we recommend
you use an optional headset with both an ear piece and a
microphone on a boom that rests in front of your mouth.
With VOX activated, your voice level will determine when the
transceiver transmits. Because of this, you must take care
that the ambient noise around you is not so loud that it causes
the transceiver to transmit. Due to the automatic switching
between transmission and reception, we recommend you set
the VOX gain such that it will not activate transmission when
in an area with excessive ambient noise.
Before VOX will operate, you must set a VOX Gain Level:
1 Enter the Menu Settings (page 12) and
press the ▲ or ▼ key until you reach the
“VOX” display.
2 Press the
key to set the VOX Gain
Level (
) from 1 to 3, where 3 is the most
sensitive setting, or OFF (
).
3 Press the PTT switch or turn the
transceiver power OFF to confirm your
setting.
• If you have turned the VOX function ON
by selecting a VOX Gain Level other than
OFF (
), the VOX icon appears on the
display.
UBZ-LJ8 E 01-28 02.11.20, 9:44 AM16

17
When operating VOX, if you find that the transceiver returns
to receive mode too quickly after you stop speaking, the end
of your message may not be transmitted. To avoid this, select
an appropriate delay time to allow your entire message to be
transmitted. However, do not make the delay overly long.
1 Enter the Menu Settings (page 12) and
press the ▲ or ▼ key until you reach the
“VOX
” display.
• This menu is only available if the VOX
Gain Level has been set to any value
other than OFF (
).
2 Press the key to set the VOX Delay
Time ( ) from 0.5 to 3.0 seconds.
3 Press the PTT switch or turn the
transceiver power OFF to confirm your
setting.
When you have activated the VOX function and selected an
appropriate Gain Level and Delay Time, you can then operate
the transceiver hands-free. To use VOX:
1 To transmit, simply speak into the headset microphone.
• You do not need to press the PTT switch; the transceiver
automatically detects your voice and begins transmitting.
2 To stop transmitting, stop speaking.
• Transmission will continue momentarily after you stop
speaking. You can select the delay time as described
above.
3 To exit VOX operation, set the VOX gain level (page 16) to
OFF (
).
UBZ-LJ8 E 01-28 02.11.20, 9:44 AM17

18
CALLING ALERT TONES
Calling Alert Tones are used to identify yourself to your party
members. You can set up a Calling Alert Tone to one of ten
types. If each party member uses a different tone, it is easy to
know who is making the call. To select your Calling Alert
Tone:
1 Enter the Menu Settings (page 12) and
press the ▲ or ▼ key until you reach the
“
” (Calling Tone) display.
2 Press the key.
• The current Calling Alert Tone number
blinks and the Calling Alert Tone sounds.
3 Press the ▲ or ▼ key to select your
desired Calling Alert Tone, from 1 to 10.
• The selected Calling Alert Tone sounds
each time you press the ▲ or ▼ key.
4 Press the PTT switch or turn the
transceiver power OFF to confirm your
setting.
To use the Calling Alert Tone:
1 Press the PTT switch to transmit, as normal.
2 Before speaking into the microphone, momentarily press
the ▲ key.
• Your Calling Alert Tone is transmitted to your party members.
3 Continue your call as normal.
UBZ-LJ8 E 01-28 02.11.20, 9:44 AM18
/