Page is loading ...

“Keeping North America Warm Since 1869”
OPTIONAL B36TK THERMODISC FOR B36 BLOWER
Installation:
1.
2.
3.
4.
5.
6.
7.
8.
9
10.
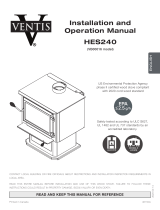
Fix the thermodisc in its case with two (2) screws. For APS 1600, fix the thermodisc and its case at the same time with two screws (figure 3).
Fix the connector on the thermodisc case (figure 3)
At 18” (45cm) from the motor, take off 3” (8cm) of the rubber wrapping of the power cord (figure 1).
Cut the black wire in the center and strip both ends by 3/8” (1cm) (figure 1).
Bend the wires and insert into the case through the connector (figure 3).
Fix the two(2) Slip on terminals on both ends of the black wires (figure 2).
Connect the terminals to the thermodisc (figure 3).
Tighten the screw of the box connector (figure 3).
Fix the case to the support on the back of the stove, just over the holes (figure 4).
Fix the cover on the thermodisc (figure 4).
FIGURE 4.FIGURE 3.
FIGURE 1. FIGURE 2.
THE BLOWER ASSEMBLY MUST BE DICONNECTED FROM
THE SOURCE OF ELECTRICAL SUPPLY BEFORE ATTEMPT-
ING THE INSTALLATION.
Characteristics of the
thermodisc:
• Starts the blower when the
stove’s temperature reaches
120°F (49°C).
• Cuts the electrical contact when
the temperature reaches 90°F
(32°C).
Warning: The blower position on
your stove can change depending
which you have. For the right po-
sition, consult you manual.
851716
/