Page is loading ...

Installation Guide of Telescope Drive Master
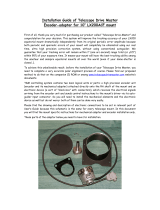
Encoder-adapter for Losmandy G11 mount
First of all, thank you very much for purchasing our product called “Telescope Drive Master” and
congratulation for your decision. This system will improve the tracking accuracy of your G11
equatorial mount dramatically independently from its original periodic error amplitude because
both periodic and aperiodic errors of your mount will completely be eliminated using our real
time, ultra high precision correction system, without using conventional autoguider. We
guarantee that your tracking error will remain within 1” (one arc-second) range total (or ±0.5”)
within 95% of your exposure time. It means your mount will have the best tracking ability among
the amateur and semipro equatorial mounts all over the world (even if your dome-shutter is
closed…).
To achieve this unbelievable result, before the installation of your Telescope Drive Master, you
need to complete a very accurate polar alignment process of course. Please find our proposed
method to do that on the companion CD ROM or among www.telescopedrivemaster.com website’s
documents.
TDM controlling system contains two main logical units or parts: a high precision encoder unit
(encoder and its mechanical adapter) attached directly onto the RA shaft of the mount and an
electronic device (a sort of “black-box” with connectors), which receives the electrical signals
arriving from the encoder unit and sends control instructions to the mount’s driver via its auto-
guider input connector. So you will need to install the mechanical elements and the electronic
device as well but do not worry: both of them can be done very easily.
Please find the drawing and description of electronic connections to be set in relevant part of
User’s Guide because this schematic is the same for every telescope mount. In this document
you will find the mount specific instructions for mechanical adapter and encoder installation only.
Before starting it is highly important to emphasize that both encoder unit and its adapter
elements are sensitive mechanical parts!!! Do not drop any of them; do not stress them during
installation!!! Handle with care! Any damages of these parts can destroy product’s accuracy.
Just two Allen-wrenches (in size 2mm and 3mm), a Torch screwdriver (size#8), some metal glue
(e.g. Loctite) and a small hammer will be needed for installation.
You need to find a small plastic bag within encoder box with small particles as seen below.

Mechanical parts of the adapter have been assembled in one unit before delivery. The risk of
any mechanical damage during transportation is much lower in this way but, it means, you need to
disassemble them before installation. You just need to remove those screws (4 pcs; use 2mm
Allen-wrench) which fix the cover of the encoder unit onto the adapter stator as you can see
below. Do NOT remove those 6 (2x3) pcs screws which keep all the three parts of the stator in
one unit!!!
Before assembling parts during installation, please always check and clean all of the threads and
surfaces of the lower end of the RA shaft and encoder adaptor elements if necessary. Use clean
clothes (not nylon!) for smooth surfaces and a dry toothbrush to clean the internal and/or
external thread(s) of the RA hollow shaft if it is necessary. Only the clean and tight mechanical
contact between surfaces will provide correct mechanical coupling and positions.

Step 1:
At first, please rotate RA shaft in neutral position where your mount can be stabile without
fixing. Remove the brake-ring from the RA-shaft.
Step 2:
Using a small hand-hammer if it is necessary (but applying just small knocks), put the attached
tiny locating pin into the hole (see picture below). The length of the pin remained out of the
stator ring has to be between 12 and 14 mm roughly. Do not enlarge the diameter of the hole!!!
Thanks to the tight fit, the pin has to be fixed without any slackness!!! To ensure correct and
the most rigid position of locating pin or if you removed it from the hole (which is not
recommended), and want to put it back again but the hole is not tight enough, please use some
metal glue (e.g. Loctite) for fixing locating pin. If this pin can move just an extremely little bit
than TDM will not work properly!!!
*: Tassilo: if you know which encoder will be sent with this adapter, it is better to install locating
pin into the adapter in your shop before delivery (this is no longer than 10 minutes). In this case,
you need to modify this list according to the real installation procedure of course.

Step 7:
Now, put the stator onto the house of the RA shaft and fix its position tightening six set-
screws (2x3 pcs on both sides, with 2mm Allen-wrench) pre-installed into their holes. If you
have new type of G11 mount you need to change the large diameter spacer ring to the small one
(which has the same diameter as the old version has) provided in adapter package during this
action (it can be seen above, in the 2
nd
picture of this document). Also, you need to screw the
original RA brake-ring back to the RA shaft in this step. Draw the fixing screws of the stator on
very well please. Do not worry: a pre-installed plastic ring will save the surface of your mount
but, at the same time, the stator has to be fixed rigidly enough.
Step 8:
Next step is attaching encoder shaft into the hollow shaft of RA axis. Do NOT touch the long
cylindrical surface of the encoder shaft with any metal tool (e.g. pliers)!!! Just push this part
into the (internally cleaned) hollow shaft completely and fix it using a 3mm Allen wrench on
coaxial expansion screw as you see below in the picture. Tighten it well enough, please. This part
cannot have any position offset or slip compared to the RA axis movement; it has to become an
integral part of the RA shaft!

Step 9:
Please install black plastic bucket into the encoder slot. It has to glide to its place firmly. Please
find possible versions of encoder installation in the file called “Heidenhain.jpg”: version 3 has to
be applied for this type of adapter.
Step 10:
Now, please check the released clamps on both the front and back side of the encoder and push
the encoder firmly onto the previously installed and cleaned steel shaft. The position of the
locating pin has to fit to the plastic bucket. The diameter of the locating pin is a bit larger than
the slot in the plastic bucket so you need to push it a bit harder. Avoiding stator deformation

during this action, it is useful to keep against this force from the backside of the stator by hand
(see picture below). But be careful: roughly 1mm gap has to remain between the surface of the
stator back side and the encoder front side.
Step 11
Using Torch screw (size #8) tighten two screws well in the clamping ring on both ends of the
encoder. You can reach the screw on the front side via slots created especially for this purpose
onto the encoder body.
Step 12
The main parts of the encoder adapter have been installed so far. Now, please put the cover of
the encoder to its place and fix it in proper position (cable slot is down) using the same screws
dismounted as the very first step of this installation process. (A small difference in the position
of the encoder and cover is not a problem; just push the cable into the empty space between the
encoder and its cover.)

Step 13
Finally, please put the cover-cap to the RA shaft for saving encoder against environmental
influences.
Congratulation, you successfully installed the encoder onto your equatorial mount and you have
finished the most difficult part of the installation process!!!
You just need to create cable connections among telescope electric units according to the
relevant part of the User’s Guide.
Additionally, please find several useful tips and tricks in the User’s Guide of TDM and other
documents found on companion CD ROM or visiting www.telescopedrivemaster.com website.
/