Page is loading ...
SWAINS
OWNERS
MANUAL
MODEL NO.
315.796621
CAUTION:
Read Rules for
Safe Operation
and Instructions
Carefully
SAVE THIS
MANUAL FOR
FUTURE REFERENCE
6 I;_547-51 t
CRRFTSMRN
16 INCH HEDGE TRIMMER
DOUBLE INSULATED
Introduction
Assembly
Operation
Maintenance
Repair Parts
Designed exclusively for and sold only by
SEARS, ROEBUCK AND CO., Dept. 731A!671, Sears Tower, Chicago, IL 60684
PRINT£O IN U _ A
=l
FULL ONE YE.AR WARRANTY ON CRAFTSMAN HEDGE TRIMMER
If this Craftsman Hedge Trimmer fails to perform properly due to adefect in material or workmanship
within one year from the date of purchase, Sears will repair it free of charge,
if this Craftsman Hedge Trimmer is used for commercial or rental purposes, this warranty coverage
applies for only 90 days from the date of purchase,
WARRANTY SERVICE IS AVAILABLE BY CONTACTING THE NEAREST SEARS STORE OR SERVICE
CENTER IN THE UNITED STATES. This warranty applies only while product is in use in the United
States.
This warranty gwes you specific legal rights and you may also, have other rights which vary from
state to state.
SEARS, ROEBUCK AN[3 CO.
DEPT, 731A/671
SEARS TOWER
CHICAGO, IL 60684
INTRODUCTION
DOUBLE INSULATION -- is a concept in safety, in
electric power tools, which eliminates the need for
the usual three wire grounded power cord and
grounded supply system. Wherever there is electric
current in the tool there are two complete sets of in.
sulatlon to protect the user. AH exposed metal parts
are isolated from the internal metal motor com-
ponents with protecting Insulation.
IMPORTANT _ Servicing of a tool with double in.
sulation requires extreme care and knowledge of the
system and should be performed only by a qualified
service technician. For service we suggest you
return the tool to your nearest Sears Store for repair.
Always use original factory replacement parts when
servicing.
RULES FOR SAFE OPERATION
1, KNOW YOUR HEDGE TRIMMER -- READ AND FOLLOW ALL INSTRUCTIONS -- Read
owner's manual carefully. Learn its applications and limitations as well as the specific
potential hazards related to this tool.
2, DRESS PROPERLY -- Donotwearlooseclothingorjewelry. They can be caught tn mov-
ing parts. Use of sturdy gloves, non-skid footwear and safety goggles or safety glasses
with side shields is recommended.
3. STAY ALERT -- Watch what you are doing -- use common sense, Do not operate trim-
mer when fatigued,
. CUT HAZARD -- KEEP HANDS AWAY FROM BLADES -- Keep
both hands on handles when power is on, Do not attempt to remove cut material or hold
material to be cut When blades are moving, Make sure your trimmer is unplugged and
the switch is off when clearing jammed material from blades. Do not grasp the exposed
cutting blades or cutting edges of trimmer.
5. I_i]]_-- Blades will coast after trimmer is turned off.
,

7. WHEN OPERATING YOUR TRIMMER --Keep extension cord behind trimmer. Never
drape it over hedge being trimmed.
8. KEEP CHILDREN AWAY-- Do not permit children to contact trimmer or extension cord.
Keep children a safe distance from work area.
9. USE TRIMMER PROPERLY -- Use only for trimming the type of shrub, growth, etc.,
described in the operating instructions, Do not abuse trimmer.
10. DON'T OVERREACH OR STAND ON UNSTABLE SUPPORT -- Keep goodfooting and
balance at all times. Do not use on ladder.
11, AVOID UNINTENTIONAL STARTING OF TRIMMER -- Before plugging in trimmer, be
sure trimmer switch is off. Don't carry trimmer with finger on switch.
12. DISCONNECT (UNPLUG) TRIMMER FROM POWER SUPPLY -- When not in use, before
servicing, cleaning, etc.
13. MAINTAIN TRIMMER WITH CARE -- Keep blades sharp at all times, and clean for best
and safest performance. Follow maintenance instructions. Always use a clean cloth
when cleaning. Never use brake fluid, gasoline, petroleum-based products, or any
strong solvents to clean your tool.
14. STORE TRIMMER INDOORS -- When net in use store trimmer indoors in a dry place
where not accessible to children.
15. DO NOT ATTEMPT TO REPAIR TRIMMER -- For service or repair return the trimmer to
your nearest Sears store. See that only identical replacement parts are used.
16. KEEP WORK AREA CLEAN -- Cluttered areas and benches invite accidents.
17.
i8: AVOID LOCKING TRIMMER SWITCH ON -- Do not use switch lock unless necessary.
Do not leave switch locked on.
19. WEAR HEARING PROTECTION DURING EXTENDED PERIODS OF OPERATION.
20. EXTENSION CORDS. -- The use of any extension cord will cause some loss of power.
To keep the loss to a minimum and to prevent tool overheating, be sure to use an exten-
sion cord heavy enough to carry the current your product will draw, For lengths less than
100 feet, No. 16 A.W.G. extension cords should be used. Follow the recommended cord
sizes on the chart below when using extension cords. If in doubt, use the next heavier
gage. The smaller the gage number the heavier the cord, For tools rated 6 amps or less:
Extension Cord Length Wire Size A.W.G.
25 Feel 18
50 Feet 16
100 Feet 16
150 Feet 14
21. TO PREVENT DISCONNECT of extension cord during operation, make knot as shown in
Fig. 8.
22. SAVE THESE INSTRUCTIONS. Review them frequently for continuing safe operation
and instructing third-party users. If you loan someone this tool, loan them these
instructions also.
Page 3
ASSEMBLY
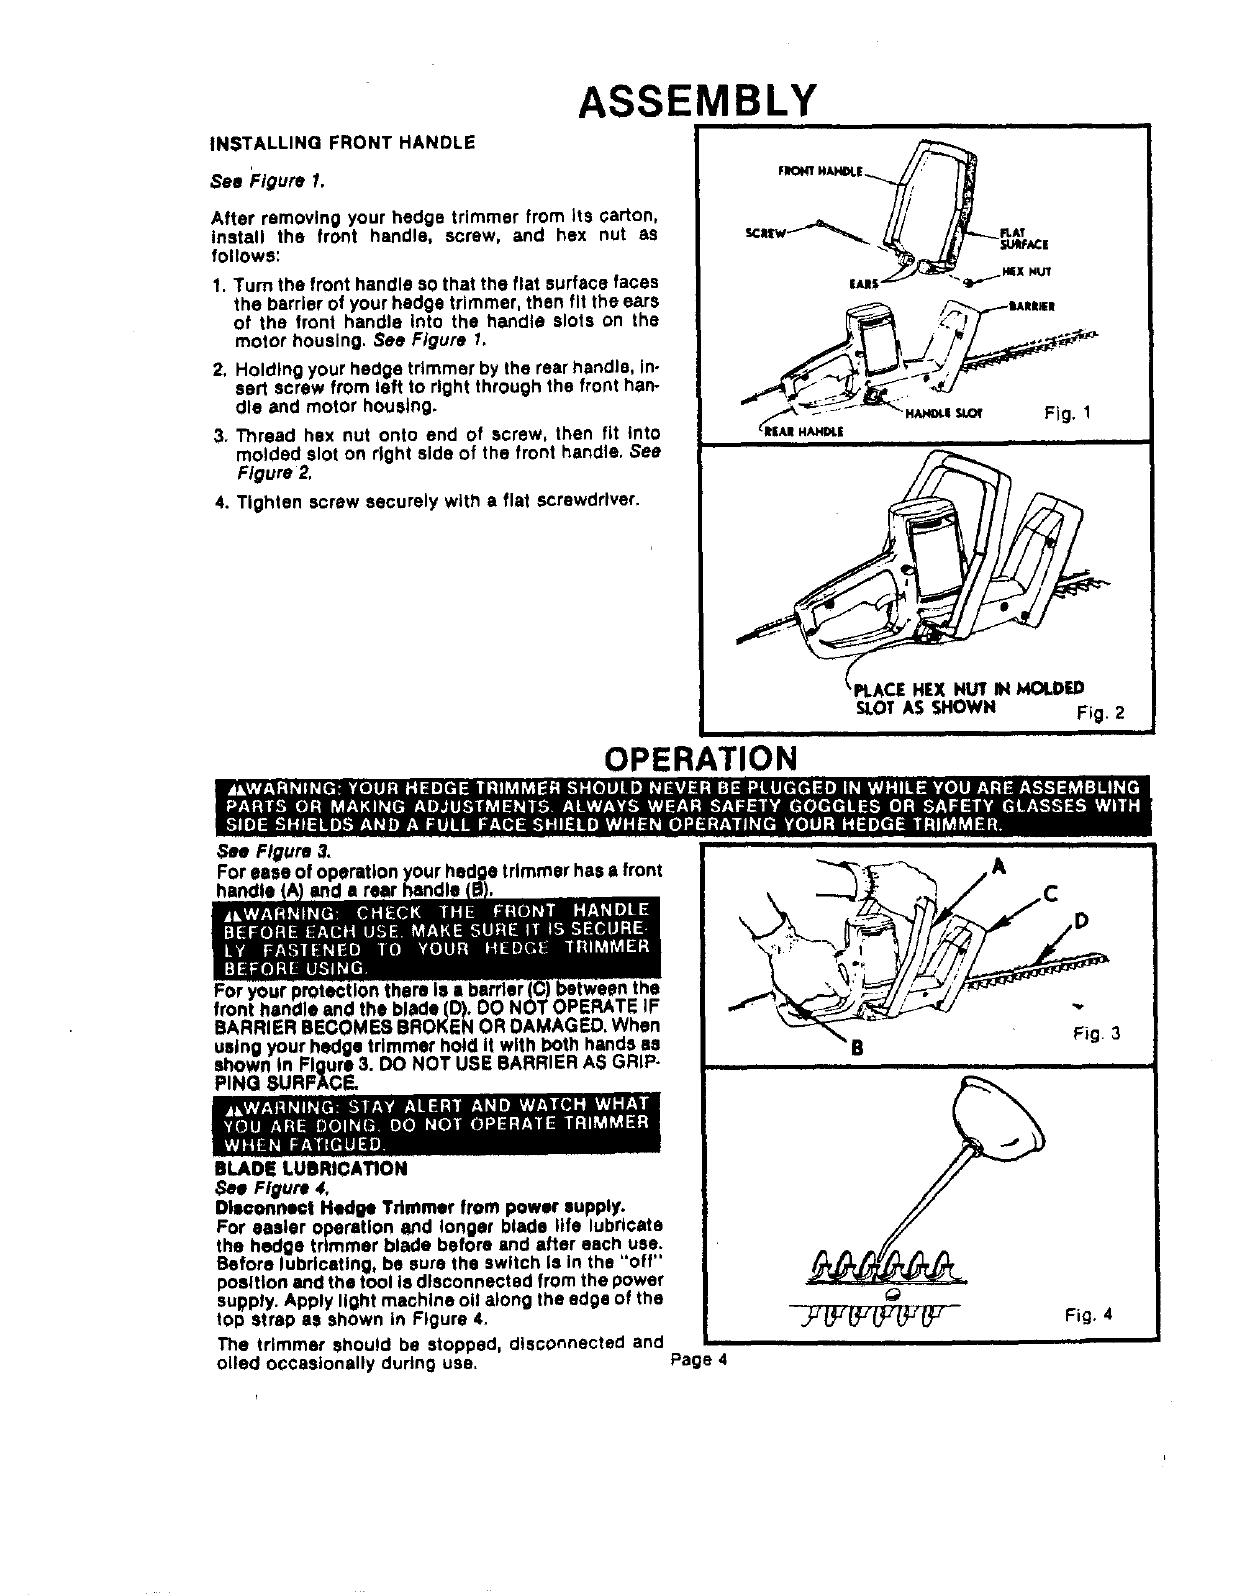
INSTALLING FRONT HANDLE
See 'Figure I,
After removing your hedge trimmer from its carton,
install the front handle, screw, and hex nut as
follows:
1. Turn the front handle sothat the flat surface faces
the barrier ofyour hedge trimmer, then fit theears
of the front handle Into the handle slots on the
motor housing. See Figure I,
2. Holding yourhedge trimmerby the rear handle, in-
sert screw from left to right through the front han-
dle and motor housing.
3. Thread hsx nut onto end of screw, then fit into
molded slot on right side of the front handle, See
Figure 2.
4. Tighten screw securely with a flat screwdriver.
HAN_.t
_F_|
SLOTAS SHOWN Fig. 2
OPERATION
_'_='E, II?I PI |'J aPSes=we: ,'r,l ,I;11 _ ell svl=l:l +'lq "JII dt ]I11 l_,I:l=l:_,.$1:l,V,l:lilP[l
I+NII]:II, ,f_,1_l_ (ell_,|l]lll_l,,Imh, Sl=111.,TS _MI _.,|.I_ r_+q:=I_ [I] II]: II'II_IO_'_'_=I..I,/J|I;
Ill =I_'1;I| m=ei]+1=,I_I11,.,I all S II =V_,_el_l+_l"-II_ e ll,,_; 11 _II] _ I: _,.II I_[11 rail PIe 11
,e Figure 3.
,rease of operation yourhedge trimmer has a front
ndte _A! lind a rear handle _B_.
front handle and the blade [D).DO NOT OPERATEIF
+RRIERBECOMES BROKEN OR DAMAGED, When
using your hedgetrimmer hold It with both handsas
own In Figure 3, DO NOT USE BARRIERAS GRIP-
_G SURFACE,
iliBil
ADE LUBRICATION
See Figure 4.
Dlaconnae| Hedge Tdmmar from power supply,
For easier operation lind longer blade life lubricate
Dhedge trimmer blade before end after each use.
=fore lubricating, be sure the switch Is in the "off"
p ,sltlon and the tool is disconnected from the power
supply. Apply light machine oll along the edge of the
strap as shown in Figure 4.
Fig. 4
The trimmer should be stopped, dlscc ...... "_ ""_
oiled occasionally during use. Page 4
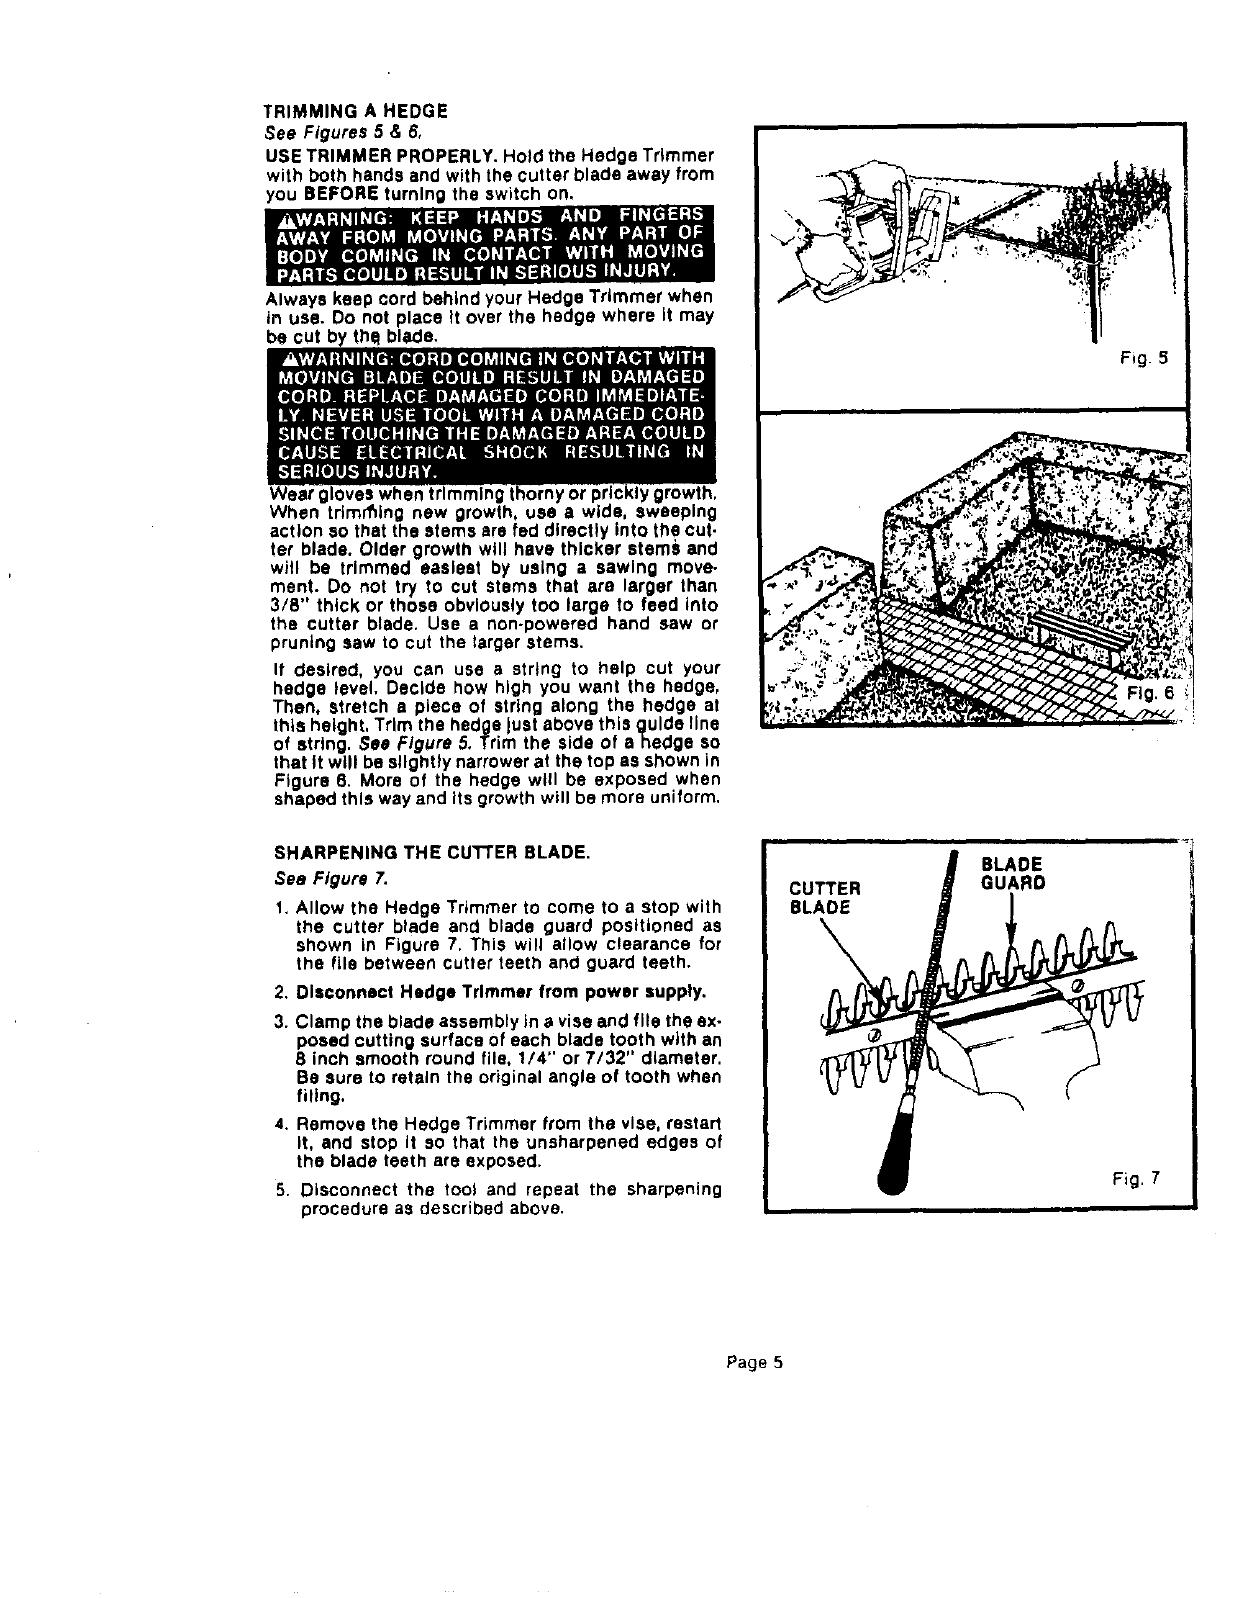
TRIMMINGAHEDGE
See Figures 5 & 6,
USE TRIMMER PROPERLY. Hold the Hedge Trimmer
with both hands and with the cutter blade away from
you BEFORE turning the switch on.
Always keep cord behind your Hedge Trimmer when
in use. Do not place It over the hedge where it may
be cut by thE!blade.
trimming thorny or prickly growth,
When trimming new growth, use a wide, sweeping
action so that the stems are fed directly into the cut-
ter blade. Older growth will have thicker stems and
will be trimmed easiest by using a sawing move.
ment. Do not try to cut stems that are larger than
3/8" thick or those obviously too large to feed into
the cutter blade. Use a non-powered hand saw or
pruning saw to cut the larger stems.
If desired, you can use a string to help cut your
hedge level. Decide how high you want the hedge,
Then stretch a piece of string along the hedge at
this height, Trim the hedge lust above this guide line
of string. Sea Figure 5. Trim the side of ahedge so
that It will be slightly narrower at the top as shown in
Figure 8. More of the hedge will be exposed when
shaped this way and its growth will be more uniform.
SHARPENING THE cUTTER BLADE.
See Figure 7.
1. Allow the Hedge Trimmer to come to a stop with
the cutter blade and blade guard positioned as
shown in Figure 7. This will allow clearance for
the file between cutter teeth and guard teeth.
2. Disconnect Hedge Trimmer from power supply.
3. Clamp the blade assembly in a vise and file the ex-
posed cutting surface of each blade tooth with an
8 inch smooth round file, 1/4" or 7/32" diameter.
Be sure to retain the original angle of tooth when
filing.
4. Remove the Hedge Trimmer from the vise, restart
it, and stop it so that the unsharpened edges of
the blade teeth are exposed.
5. Disconnect the tool and repeat the sharpening
procedure as described above.
CUTTER
BLADE
BLADE
GUARD
Fig. 7
Page 5
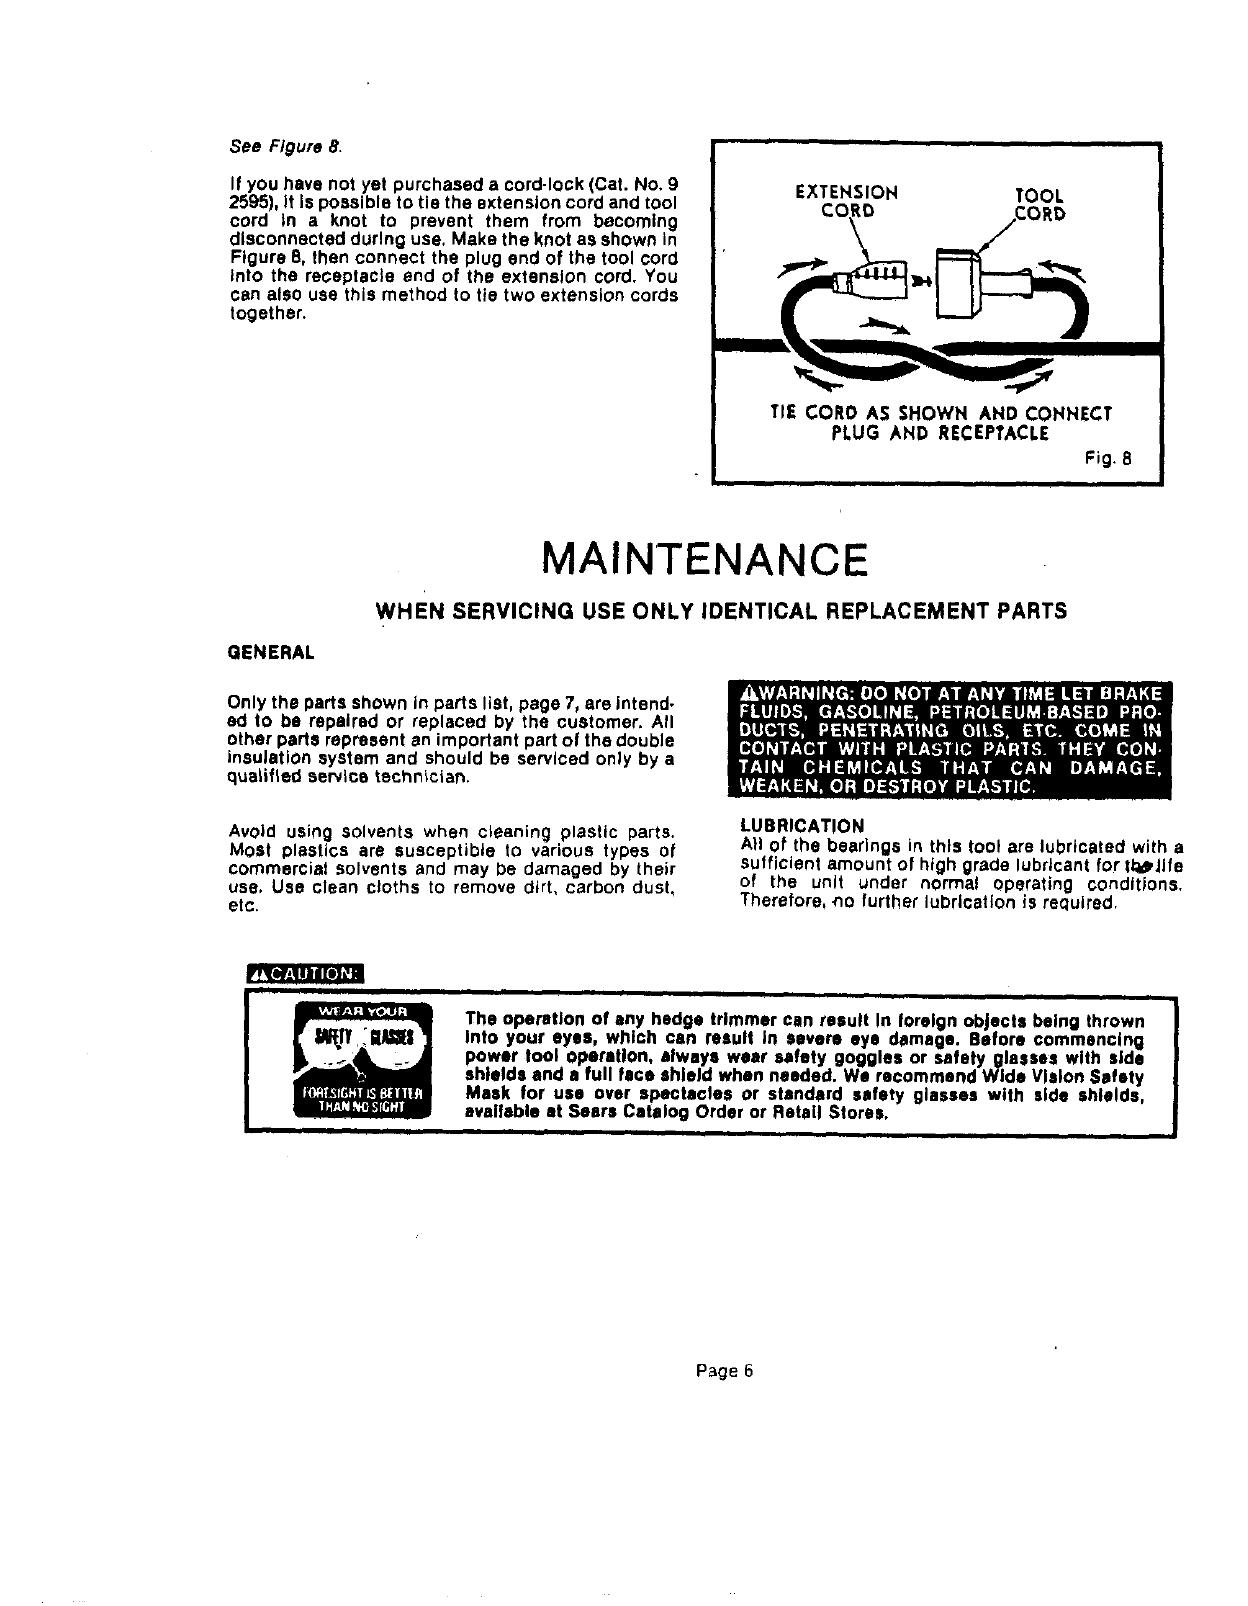
See Figure 8.
If you have not yet purchased a cord-lock (Cat. No. 9
2595), it I$ possible to tie the extension cord and tool
cord tn a knot to prevent them from becoming
disconnected during use, Make the knot as shown in
Figure 8, then connect the plug end of the tool cord
into the receptacle and of the extension cord. You
can also use this method to tie two extension cords
together.
EXTEHSION TOOL
CO ',D
TIE CORD AS SHOWN AND CONNECT
PLUG AND RECEPTACLE
Fig, 8
GENERAL
MAINTENANCE
WHEN SERVICING USE ONLY IDENTICAL REPLACEMENT PARTS
Only the parts shown in parts list, page 7, are intend-
ed to be repaired or replaced by the customer. All
other parts represent an important part of the double
insulation system and should be serviced only by a
qualified service technician.
Avoid using solvents when cleaning plastic parts.
Most plastics are susceptible to various types of
commerciat solvents and may be damaged by their
usa. Use clean cloths to remove dirt, carbon dust,
etc.
LUBRICATION
All of the bearings in this tool are lubricated with a
sufficient amount of high grade lubricant for tl;_Jlfe
of the unit under normal operating conditions.
Therefore, .no further lubrication is required,
The operation of any hedge trimmer can result In foreign objects being thrown
Into your eyes, which can result in severe eye damage. Before commencing
power loci operation, always wear safety goggles or safety glasses with side
shields and a full face shield when needed, We recommend Wide Vision Safety
Mask for use over spectacles or standard safety glasses with side shields,
available at Sears Catalog Order or Retail Stores,
Pa_ge6

--_'---CRAFTSMAN 16 INCH HEDGE TRIMMER -- MODEL NUMBER 315.796621-_--.-
I
I
The Model Number will be found on a plate attached Io the Motor Housing. I
Always mention the Model Number in all correspondence regarding your
I
H_DGE TRIMMER or when ordering repair parts.
SEE BACK PAGE FOR PARTS ORDERING INSTRUCTIONS
4
SEE NOTE "A"
Kay
No. Part Number
1 998557.002
2 930517,073
3 612695-001
4 929058-005
5 998553,002
612547-511
i
PARTS LIST
Description Quan.
Logo Plate ............................... 1
Screw (1/4-20 x 4.1/4 Rd. Hd,) ............... 1
Front Handle ............................. 1
"Hex Nut (1/4-20)" "STD541025 ............... 1
Data Plate ................................ I
Owner's Manual
i i
NOTE: "A" -- The assembly shown represents an important part of the Double Insulated System. To
avoid the possibility of alteration or damage to the System, service should be performed by your
nearest Sears Repair Center. Contact your nearest sears Catalog Order or Retail Store.
"Standard Hardware Item _ May Be Purchased Locally
"'Available From DIv. 98 _ Source 980,00
Page 7
SWAINS
OWNERS
MANUAL
SERVICE
MODEL NO.
315.796621
HOW TO ORDER
REPAIR PARTS
CRAFTSMRN
16 INCH HEDGE
TRIMMER
DOUBLE INSULATED
Now that you have purchased your Hedge Trimmer,
should a need ever exist for repair parts or service,
simply contact any Sears Service Center and most
Sears, Roebuck and Co. stores. Be sure to provide
all pertinent facts when you call or visit,
The model number of your Hedge Trimmer will be
found on a plate attached to the motor housing.
WHEN ORDERING REPAIR PARTS, ALWAYS GIVE
THE FOLLOWING INFORMATION:
• PART NUMBER • PART DESCRIPTION
• MODEL NUMBER
315.796621
• NAME OF ITEM
Hedge Trimmer
All parts listed may be ordered from any Sears Ser-
vice Center and most Sears stores.
If the parts you need are not stocked locally, your
order will be electron_ally transmitted to a Sears
Repair Parts Distribution Center for handling.
SEARS, ROEBUCK ANO CO,, Dept. 731A/671, Sears Tower, Chicago, IL 60684
/