Page is loading ...

2
“Every baby deserves a safe place to sleep.”
SAFE SLEEP TIPS
Visit DeltaChildren.com/Safety for more safety information.
The safest place for your baby to sleep is in a
JPMA Certified crib.
Adult beds are not safe for babies: NEVER
co-sleep
Read all warnings and follow all instructions.
Missing or broken parts, any questions?
CALL Delta Children Consumer Care
NEVER place the crib near a window or any
wall hangings.
Your baby should sleep on a firm mattress.
DO NOT place any items in the crib.
AAP Recommends: Always lay your baby on its
back to sleep. Consult your doctor.
Pillows and Blankets have caused infants to
suffocate, NEVER use in a crib.

5
FURNITURE SAFETY TIPS
Visit DeltaChildren.com/Safety for more safety information.
Serious or fatal crushing injuries can occur from
furniture tip-over.
DO NOT set TV’s or other heavy objects on the
top of bedroom or nursery furniture.
ALWAYS use provided tipover restraints.
NEVER allow children to climb or hang on
drawers, doors,or shelves.
Place heaviest items in the lowest drawers.
NEVER open more than one drawer at a time.
DO NOT leave drawers open when not in use.
Read all warnings and follow all instructions.
Missing or broken parts, any questions?
CALL Delta Children Consumer Care

8
Serious or fatal crushing injuries can occur from furniture tip-over. To help prevent tip-over:
.
Install tipover restraint provided.
.
Place heaviest items in the lowest drawers.
.
Unless specifically designed to accommodate, do not set TV’s or other heavy objects on the top of this product.
.
Never allow children to climb or hang on drawers, doors,or shelves.
.
Never open more than one drawer at a time.
Use of tip-over restraints may only reduce, but not eliminate, the risk of tip-over.
.
Always monitor your child’s activity when in the nursery.
.
Do not allow standing in drawers.
.
Do not allow standing on top of this product.
.
Accessory Items must be securely fastened to this product according to the instructions provided with those
items.
.
To avoid head injury, do not allow children to play underneath open drawers.
.
Do not leave drawers open when not in use.
WARNING
ADVERTENCIA
Pueden producirse lesiones graves o mortales por aplastamiento al volcarse muebles. Para evitar
vuelcos:
.
Instale las herramientas de contención de vuelcos suministrada.
.
Coloque los artículos de mayor peso en los cajones inferiores.
.
No coloque televisiones ni ningún otro objeto pesado en la parte superior de este producto, a no ser que esté
específicamente diseñado para acomodarlo.
.
Nunca permita que los niños trepen sobre cajones, puertas o baldas de estantería ni que se cuelguen de ellos.
.
Nunca abra más de un cajón al mismo tiempo.
.
El uso de herramientas de contención de vuelcos tan solo puede reducir, pero no eliminar, el riesgo de
vuelco.
.
Vigile siempre la actividad de su hijo cuando se encuentre en su cuarto.
.
No permita que nadie se ponga de pie en los cajones.
.
No permita que nadie se ponga de pie encima de este producto.
.
Los artículos accesorios deben ser fijados a este producto de forma segura según las instrucciones que
acompañan a dichos artículos.
.
Para evitar lesiones en la cabeza, no permita que los niños jueguen debajo de cajones abiertos.
.
No deje cajones abiertos si no los está utilizando.
AVERTISSEMENT
Le renversement du meuble peut entraîner des blessures graves ou mortelles. Pour aider à prévenir
tout renversement :
.
Installez le système anti-basculement fournie.
.
Placez les objets les plus lourds dans les tiroirs du bas.
.
Ne déposez pas de postes de télévision ou d’autres objets lourds sur ce meuble, à moins qu’il ne soit conçu
spécifiquement à cet effet.
.
Ne laissez jamais les enfants monter sur ou se suspendre aux tiroirs, portes et ou tablettes.
.
N’ouvrez jamais plus d’un tiroir en même temps.
.
L’utilisation de dispositif anti-renversement peut uniquement réduire les risques de renversement,
mais ne les élimine pas totalement.
.
Surveillez toujours les activités de votre enfant lorsqu’il se trouve dans la chambre d’enfants.
.
Ne lui permettez pas de se tenir debout dans les tiroirs.
.
Ne lui permettez pas de se tenir debout sur ce meuble.
.
Les accessoires doivent être solidement fixés sur ce produit conformément aux instructions fournies avec
lesdits éléments.
.
Afin de prévenir toute blessure à la tête, ne laissez pas les enfants jouer sous les tiroirs ouverts.
.
Ne laissez pas les tiroirs ouverts lorsque vous ne les utilisez pas.

HH. Back Panel Screw x33
Vis pour Panneau Arrière
Tornillo de Panel Trasero
JJ. Φ8x30mm Dowel x48
Cheville Φ8x30mm
Pasador Φ8x30mm
DD. Φ6x30mm Dowel x12
Cheville Φ6x30mm
Pasador Φ6x30mm
PP. Knob / Bouton / Perilla x12
#27328
PP1. Knob
Bouton
Perilla
PP2. Knob Screw
Vis de Bouton
Tornillo para Perilla
Parts:
Pièces:
Piezas:
Hardware kits Part# 27351
L'ensemble de quincaillerie - pièce n°27351
El kit de herramientas - Pieza #27351
BB. 50mm Bolt x18
Boulon 50mm
Perno 50mm
LL. 70mm Bolt x1
Boulon 70mm
Perno 70mm
CC. 30mm Bolt x4
Boulon 30mm
Perno 30mm
AA. 40mm Bolt x1
Boulon 40mm
Perno 40mm
KK. Crescent Washer x8
Rondelle en croissant
Arandela de media luna
EE. Plastic Barrel Nut x30
Écrou à portée cylindrique
en plastique
Tuercacilíndricaplástica
GG. 25mm Screw x24
Vis 25mm
Tornillo 25mm
NN.12mm Screw x36
Vis 12mm
Tornillo 12mm
FF. 40mm Screw x30
Vis 40mm
Tornillo 40mm
Phillips Screwdriver – Not included
Tournevis Phillips - non inclus
Destornillidor Phillips – no incluido
M4 Ballend Screwdriver
tournevis M4 à tête sphérique
destornillador M4 con cabeza de bola
CAUTION: Do Not use a power screwdriver
they can cause screws to break or strip.
ATTENTION: Ne Pas utiliser un tournevis
électrique car les vis peuvent casser ou
perdre leurs filets.
ATENCIÓN: No use un destornillador
eléctrico ya que puede causar que los
tornillos se rompan o rueden.
11
Ball End M4 Allen Wrench
Clé Allen M4 à bout arrondi
Llave Allen de cabeza redonda
Note: Fasteners are shown full size
Remarque: Les dispositifs de fixation sont montrés en taille réelle
Nota: Los pernos se muestran en tamaño real

JJ. Φ8x30mm Dowel x4
Cheville Φ8x30mm
Pasador Φ8x30mm
M4 Allen Wrench
Clé Allen M4
Llave Allen M4
14
STEP #1
ÉTAPE N°1
PASO #1
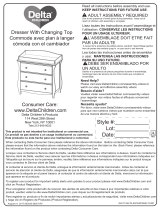
Attach Bottom Front Rail (Part G), Bottom Back Rail (Part H), Top Front Rail (Part E) and Top
Back Rail (Part F) to Center Panel (Part S) using (1) 70mm bolt (Part LL),(2) 50mm bolts (Part
BB),(1) 40mm bolt (Part AA) (and (4) Φ8x30mm Dowels (Part JJ). Tighten the Bolts with the M4
Allen wrench.
Fije la Barra frontal inferior (Pieza G), Barra trasero inferior (Pieza H), Barra Frontal Superior
(Pieza E) y Barra Posterior Superior (Pieza F) al panel central (Pieza S) utilizando (1) Perno
70mm (Pieza LL),(2) Pernos 50mm (Pieza BB), (1) Pernos 40mm (Pieza AA) y (4) Pasadors Φ
8x30mm (Pieza JJ) utilizando el llave Allen M4.
Fixer le Barre avant inférieur (Pièce G), Barre arrière inférieur (Pièce H), Barre Supérieur avant
(Pièce E) et Barre Supérieur Arrière (Pièce F) aux panneau central (Pièce S) à l’aide de (1)
boulon de 70 mm (Pièce LL),(2) boulons de 50 mm (Pièce BB), (1) boulon de 40 mm (Pièce AA)
et (4) Chevilles Φ8x30mm (Pièce JJ) à l’aide de clé Allen M4 .
LL. 70mm Bolt x1
Boulon 70mm
Perno 70mm
BB. 50mm Bolt x2
Boulon 50mm
Perno 50mm
AA. 40mm Bolt x1
Boulon 40mm
Perno 40mm

JJ. Φ8x30mm Dowel x6
Cheville Φ8x30mm
Pasador Φ8x30mm
16
STEP #2
ÉTAPE N°2
PASO #2
Attach (2) Drawer Rails (Part J) and (1) Back Weight ( Part W) to the assembly from Step 1 using
(6) Φ8x30mm Dowels (Part JJ).
Fije (2) Barra de la gaveta (Pieza J) y (1) Peso trasero (Pieza W) al ensamblaje del Paso 1
utilizando (6) Pasadors Φ8x30mm (Pieza JJ) .
Fixez (2) Barre de tiroir (pièce J) et (1) Poids arrière (pièce W) au montage réalisé à l’étape 1 à
l’aide de (6) Chevilles Φ8x30mm (Pièce JJ).

A. Left Side x1
Côté gauche
Lado izquierdo
# 27332
18
STEP #3
ÉTAPE N°3
PASO #3
KK. Crescent Washer x4
Rondelle en croissant
Arandela de media luna
JJ. Φ8x30mm Dowel x14
Cheville Φ8x30mm
Pasador Φ8x30mm
M4 Ballend Screwdriver
tournevis M4 à tête sphérique
destornillador M4 con cabeza de bola
M4 Allen Wrench
Clé Allen M4
Llave Allen M4
Attach the Left Side (Part A) to the assembly from Step 2 using (4) 50mm bolts (Part BB), (4)
Crescent Washer (Part KK) and (14) Φ8x30mm Dowels (Part JJ). Tighten the Bolts with the M4
Ballend Screwdriver and M4 Allen wrench, following the instructions on pages 12 and 13.
Fije el Lado izquierdo (Pieza A) al ensamblaje del Paso 2 utilizando (4) Pernos 50mm (Pieza
BB), (4) Arandela de media luna (Pieza KK) y (14) Pasadors Φ8x30mm (Pieza JJ)utilizando el
destornillador M4 con cabeza de bola y la llave Allen M4 siguiendo las instrucciones de
laspáginas 12 y 13.
Fixez le Côté gauche (pièce A) au montage réalisé à l’étape 2 à l’aide de (4) boulons de 50 mm
(Pièce BB), (4) Rondelle en croissant (Pièce KK) et (14) Chevilles Φ8x30mm (Pièce JJ) à l’aide
de dutournevis M4 à tête sphériqueet la clé Allen M4 ensuivant les instructions pages 12 et 13.
BB. 50mm Bolt x4
Boulon 50mm
Perno 50mm

20
STEP #4
ÉTAPE N°4
PASO #4
JJ. Φ8x30mm Dowel x6
Cheville Φ8x30mm
Pasador Φ8x30mm
Attach (2) Drawer Rails (Part J) and (1) Back Weight ( Part W) to the assembly from Step 3 using
(6) Φ8x30mm Dowels (Part JJ).
Fije (2) Barra de la gaveta (Pieza J) y (1) Peso trasero (Pieza W) al ensamblaje del Paso 3
utilizando (6) Pasadors Φ8x30mm (Pieza JJ) .
Fixez (2) Barre de tiroir (pièce J) et (1) Poids arrière (pièce W) au montage réalisé à l’étape 3 à
l’aide de (6) Chevilles Φ8x30mm (Pièce JJ).

22
STEP #5
ÉTAPE N°5
PASO #5
KK. Crescent Washer x4
Rondelle en croissant
Arandela de media luna
JJ. Φ8x30mm Dowel x14
Cheville Φ8x30mm
Pasador Φ8x30mm
M4 Ballend Screwdriver
tournevis M4 à tête sphérique
destornillador M4 con cabeza de bola
M4 Allen Wrench
Clé Allen M4
Llave Allen M4
Attach the Right Side (Part B) to the assembly from Step 4 using (4) 50mm bolts (Part BB), (4)
Crescent Washer (Part KK) and (14) Φ8x30mm Dowels (Part JJ). Tighten the Bolts with the M4
Ballend Screwdriver and M4 Allen wrench, following the instructions on pages 12 and 13.
Fije el Lado derecho (Pieza B) al ensamblaje del Paso 4 utilizando (4) Pernos 50mm (Pieza BB),
(4) Arandela de media luna (Pieza KK) y (14) Pasadors Φ8x30mm (Pieza JJ)utilizando el
destornillador M4 con cabeza de bola y la llave Allen M4 siguiendo las instrucciones de
laspáginas 12 y 13.
Fixez le Côté droit (pièce B) au montage réalisé à l’étape 4 à l’aide de (4) boulons de 50 mm
(Pièce BB), (4) Rondelle en croissant (Pièce KK) et (14) Chevilles Φ8x30mm (Pièce JJ) à l’aide
de dutournevis M4 à tête sphériqueet la clé Allen M4 ensuivant les instructions pages 12 et 13.
BB. 50mm Bolt x4
Boulon 50mm
Perno 50mm

JJ. Φ8x30mm Dowel x4
Cheville Φ8x30mm
Pasador Φ8x30mm
CC. 30mm Bolt x4
Boulon 30mm
Perno 30mm
M4 Ballend Screwdriver
tournevis M4 à tête sphérique
destornillador M4 con cabeza de bola
M4 Allen Wrench
Clé Allen M4
Llave Allen M4
STEP #6
ÉTAPE N°6
PASO #6
24
Attach the Top Panel (Part C) to the assembly from Step 5 using (4)Φ8x30mm Dowels (Part
JJ), (4) 30mm Bolts (Part CC) and (8) 50mm Bolts (Part BB). Tighten the Bolts with the M4
Ballend Screwdriver and M4 Allen wrench.
Fixer le Panneau Avant (Pièce C) au montage assemblé à l’étape 5 à l’aide de (4) Chevilles Φ
8x30mm (Pièce JJ), (4) Boulons 30 mm (Pièce CC) et (8) Boulons 50 mm (Pièce BB) à l’aide de
du tournevis M4 à tête sphériqueet la cléAllen M4.
Fije el Panel Superior(Pieza C) al ensamblaje del Paso 5 utilizando (4) Pasadores Φ8x30mm
(Pieza JJ), (4) Pernos 30 mm (Pieza CC) y (8) Pernos 50 mm (Pieza BB) utilizando el
destornillador M4 con cabeza de bola y la llave Allen M4.
BB. 50mm Bolt x8
Boulon 50mm
Perno 50mm

HH. Back Panel Screw x33
Vis pour Panneau Arrière
Tornillo de Panel Trasero
Phillips Screwdriver – Not included
Tournevis Phillips - non inclus
Destornillidor Phillips – no incluido
STEP #7
ÉTAPE N°7
PASO #7
26
Attach the Back Panel-Upper (Part D) and the Back Panel-Lower (Part P) using (33) 15mm
Screws (Part HH), tighten with a Phillips screwdriver.
Fixez le Panneau arrière - Supérieur (Pièce D) et Panneau arrière - Inférieur (Pièce P) à l’aide
de (33) vis de 15 mm (Pièce HH), serrez à l’aide d’un tournevis cruciforme.
Una el Panel Trasero Superior (Pieza D) y Panel Inferior Trasero (Pieza P) utilizando (33) tornillos
de 15 mm (Pieza HH), apriete utilizando un destornillador Philips.

CAUTION: Do Not use a power screwdriver they can cause screws to break or strip.
ATTENTION: Ne Pas utiliser un tournevis électrique car les vis peuvent casser ou perdre leurs filets.
ATENCIÓN: No use un destornillador eléctrico ya que puede causar que los tornillos se rompan o rueden.
28
STEP #8
ÉTAPE N°8
PASO #8
GG. 25mm SCREW x24
Vis 25mm
Tornillo 25mm
Attach the Drawer Sides (Parts M) to the Drawer Front (Part K, T) with (4) 25mm Screws (Part GG).
Note: Grooves in Bottom must align. Tighten With Phillips Screwdriver. Repeat this step until 6
drawers are complete.
Fixer les côtés des tiroirs (Pièces M) à l’avant du tiroir (Pièce K,T) à l’aide de (4) vis 25mm (Pièce
GG). Remarque: Les rainures inférieures doivent être alignées. Serrer avec un tournevis Phillips.
Répéter cette étape jusqu’à ce que les 6 tiroirs soient montés.
Fije los lados de la gaveta (Pieza M) a la parte frontal de la gaveta (Pieza K,T) utilizando (4) tornil-
los 25mm (Pieza GG). Nota: Las ranuras al inferior deben alinearse. Apriete utilizando un destornil-
lador Phillips. Repitaestepaso hasta haber completadolas 6 gavetas .
Phillips Screwdriver – Not included
Tournevis Phillips - non inclus
Destornillidor Phillips – no incluido

35
EE. Plastic Barrel Nut x30
Écrou à portée cylindrique
en plastique
Tuercacilíndricaplástica
Phillips Screwdriver – Not included
Tournevis Phillips - non inclus
Destornillidor Phillips – no incluido
CAUTION: Do Not use a power screwdriver they can cause screws to break or strip.
ATTENTION: Ne Pas utiliser un tournevis électrique car les vis peuvent casser ou
perdre leurs filets.
ATENCIÓN: No use un destornillador eléctrico ya que puede causar que los tornillos se
rompan o rueden.
STEP #9
ÉTAPE N°9
PASO #9
FF. 40mm SCREW x30
Vis 40mm
Tornillo 40mm
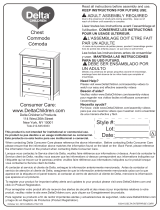
Slide Drawer Bottom (Part R) into the grooves. Install the Drawer Support (Part N) and Drawer
Back (Part L), using (2) Φ6x30mm Dowels (Pièce DD), (5) 40mm Screws (Part FF) and (5)
Plastic Barrel Nuts (Part EE). Note: Grooves In Bottom Must Align. Repeat this step until 6
drawers are complete.
Glisser le fond du tiroir (Pièce R) dans les rainures. Installer le support du tiroir (Pièce N) et
l’arrière du tiroir (Pièce L), à l’aide de (2) Chevilles Φ6x30mm (Pièce DD) (5) vis 40mm (Pièce
FF) et de (5) Écrous à portée cylindriques en plastique (Pièce EE). Remarque: Les rainures
inférieures doiventêtre alignées. Serrer avec un tournevis Phillips. Répéter cette étape jusqu’à
ce que les 6 tiroirs soientmontés.
Deslice la Fondo de la gaveta (Pieza R) hacia las ranuras. Instale el soporte de gaveta (Pieza
N) y Trasera de la gaveta (Pieza L) utilizando (2) Pasador Φ6x30mm (Pieza DD), (5) tornillos de
40 mm (Pieza FF) y (5) tuercas cilíndricas plásticas (Pieza EE). Nota: Las ranuras al inferior
deben alinearse. Apriete utilizando un destornillador Phillips. Repita este paso hasta haber
completado las 6 gavetas.
30
DD. Φ6x30mm Dowel x12
Cheville Φ6x30mm
Pasador Φ6x30mm

32
Attach (2) Knobs (Part PP1) to Drawer Assembly using (2) Knob Screws (Part PP2). Repeat this step until 6 drawers are
complete.
Fixer le (2) boutons (Pièce PP1) au montage assemblé du tiroir à l’aide d’(2) vis de Bouton (Pièce PP2). Répéter
cette étape jusqu’à ce que les 6 tiroirs soient montés.
Fije la(2) perillas (Pieza PP1) al ensamblaje de la gaveta utilizando (2) tornillos para Perilla (Pieza PP2). Repita este
paso hasta haber completado las 6 gavetas.
CAUTION: Do Not use a power screwdriver they can cause screws to break or strip.
ATTENTION: Ne Pas utiliser un tournevis électrique car les vis peuvent casser ou perdre leurs filets.
ATENCIÓN: No use un destornillador eléctrico ya que puede causar que los tornillos se rompan o rueden.
STEP #10
ÉTAPE N°10
PASO #10
PP. Knob / Bouton / Perilla x12
PP1. Knob
Bouton
Perilla
PP2. Knob Screw
Vis de Bouton
Tornillo para Perilla

NN.12mm Screw x36
Vis 12mm
Tornillo 12mm
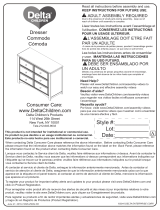
Attach (2) Drawer Guide outer pieces to each assembled drawer. There are pre-drilled holes in each
drawer side.
i)Place the end of the Drawer Guide with the tab against the Drawer Front, then align the holes in the
Guide to the holes in the Side, tab should remain very close to the Drawer Front.
ii)Attach the Drawer Guide with (3) 12mm screws (Part NN). Install the screws from the back to the
front (1st,2nd,3rd in the illustration). Tighten with a Phillips Screwdriver.
iii)Repeat with the other Drawer Side.
iv)Repeat until all (6) Drawers are complete.
Fixez (2) parties extérieures de glissière de tiroir sur chaque tiroir monté. Des trous prépercés se
trouvent sur le côté de chaque tiroir.
i)Placez l’extrémité de la glissière de tiroir avec la patte contre l’avant du tiroir, puis alignez les trous
de la glissière aux trous sur le côté. La patte doit rester très proche de l’avant du tiroir.
ii)Fixez la glissière du tiroir à l’aide de (3) vis de 12 mm (Pièce NN) Montez les vis de l’arrière vers
l’avant (1st,2nd,3rd sur l’illustration). Serrez à l’aide d’un tournevis cruciforme.
iii)répétez cette étape avec le côté de l’autre tiroir.
iv)Répétez jusqu’à ce que les (6) tiroirs soient montés.
Fije (2) piezas externas de guía de gaveta en cada gaveta ensamblada. Hay agujeros pre
taladrados en cada lado de la gaveta.
i)Coloque el extremo de la guía de gaveta, con la lengüeta contra la parte frontal de la gaveta, luego
alinee la guía con los agujeros del lado; la lengüeta debe quedar muy cerca de la parte frontal de la
gaveta.
ii)Fije la guía de gaveta con (3) tornillos de 12 mm (Pieza NN). Instale los tornillos desde la parte
posterior hacia el frente (1st,2nd,3rd en la ilustración). Apriete con un destornillador Philips.
iii)Repita con el otro lado de la gaveta.
iv)Repita hasta completar las (6) gavetas.
36
STEP #12
ÉTAPE N°12
PASO #12

Consumer Care:
www.DeltaChildren.com
Delta Children’s Products
114 West 26th Street
New York, NY 10001
Tele.212-645-9033
To register your product for important safety alerts and updates to
your product please visit www.deltachildren.com
Pour enregistrer votre produit pour avoir les alertes de sécurité et
les mises a jour de votre produit veuillez visiter
www.DeltaChildren.com
Para registrar su producto para alertas importantes de seguridad y
estar al tanto sobre novedades de su producto por favor visite
www.DeltaChildren.com y seleccione Product Registration.
Warranty:
This Delta product is warranted to be free from defects for a period of 90
days from the date of purchase under normal use. This warranty extends only to the
original retail purchaser and is valid only when supplied with proof of purchase, or if
received as a gift, when the registration is on file with Delta.
Garantie: Ce produit Delta est garanti sans défauts pour une période de 90 jours a
partir de la date d’achat et sous condition d’une utilisation normale. Cette garantie
concerne seulement l’acheteur d’origine et est valide uniquement sur présentation de la
preuve d’achat, ou si reçu en cadeau, lorsque l’enregistrement en a été fait chez Delta.
Garantía: Esta producto Delta tienen una garantía por defectos de 90 dias desde la
fecha de su compra bajo uso normal. Esta garantía se ofrece solamente al
compradororiginal y es vålida solo si provee la prueba de su compra, o si fue recibido
como regalo cuando elregistro se encuentra en el archivo de Delta.
Date of Purchase: _____________ (you should also keep your receipt)
Date d’Achat: ____________(vous devriez aussi garder votre facture d’achat)
Fecha de Compra: _____________ (debe además mantener su recibo)
To report a problem, please log on to www.deltachildren.com and
click the Consumer Care Tab, or contact us by phone at
(212) 645-9033.
Pour signaler un problème, veuillez vous connecter a
www.DeltaChildren.com et cliquez sur la touche Consumer Care,
ou contactez nous par téléphone au (212) 645-9033
Para reportarcualquier problema, por favor entre a
www.DeltaChildren.com y de clicen Servicio al cliente o
contáctenos por telefono al (212) 645-9033.
/