
Installation and Operation Manual
01.09.2015
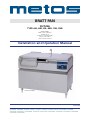
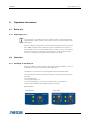
BRATT PAN
FUTURA
TYPE: 60L, 60D, 85L, 85D, 110L,110D
Accessories
HEIGHT ADJUSTMENT H
WATER TAP W
STAINLESS STEEL BOTTOM S
MANUAL TILTING M
WALL INSTALLATION P
Futura 110 HW
MG codes: 3755409, 3755408, 3755404, 3755404N, 3755407, 3755407N, 3755406, 3755406N,
3755409N, 3755408N, 3755410, 3755411, 3755412, 3755413, 3755416, 3755417, 3754429M, 3754419M,
3754432M, 3754422M, 3754432MO, 3754431M, 3754421M, 3754431MO, 3754434M, 3754424M, 3754434MO,
3754433M, 37544323M,

01.09.2015 METOS Bratt pan Futura
2
Table of Contents
1. General .......................................................................................................................................................3
1.1. Symbols used in the manual .......................................................................................................................3
1.2. Symbols used on the appliance ...................................................................................................................3
1.3. Checking the relationship of the appliance and the manual ........................................................................3
2. Safety .........................................................................................................................................................4
2.1. Safe use of the appliance ............................................................................................................................4
2.2. Safety instructions in case of malfunction ...................................................................................................4
2.3. Disposal of the appliance ............................................................................................................................4
3. Functional description ..............................................................................................................................5
3.1. Intended use of the appliance .....................................................................................................................5
3.2. Use for other purposes ...............................................................................................................................5
3.3. Operating principle ......................................................................................................................................5
4. Operation instructions ..............................................................................................................................6
4.1. Before use ...................................................................................................................................................6
4.1.1. Preparing the use ........................................................................................................................................6
4.2. Operation .....................................................................................................................................................6
4.2.1. Switching on the bratt pan ...........................................................................................................................6
4.2.2. Setting of the frying temperature ................................................................................................................7
4.2.3. Frying temperature ......................................................................................................................................8
4.2.4. Tilting ........................................................................................................................................................... 8
4.2.5. Adjustment the working height ...................................................................................................................9
4.2.6. Filling the water ...........................................................................................................................................9
4.3. After use ...................................................................................................................................................... 9
4.3.1. Cleaning .......................................................................................................................................................9
4.3.2. Service ...................................................................................................................................................... 10
5. Installation ............................................................................................................................................... 11
5.1. Transporting and unpacking the bratt pan .................................................................................................. 11
5.2. Positioning the bratt pan ............................................................................................................................ 11
5.3. Electrical connections ................................................................................................................................ 11
5.4. Water connection ......................................................................................................................................12
5.5. Test-run ......................................................................................................................................................12
6. Troubleshooting ....................................................................................................................................... 13
7. Technical specifications ..........................................................................................................................15

01.09.2015
METOS Bratt pan Futura
3
1. General
Carefully read the instructions in this manual as they contain important information regarding
proper, efficient and safe installation, use and maintenance of the appliance.
Keep this manual in a safe place for eventual use by other operators of the appliance.
The installation of this appliance must be carried out in accordance with the manufacturer’s
instructions and following local regulations. The connection of the appliance to the
electric and water supply must be carried out by qualified persons only.
Persons using this appliance should be specifically trained in its operation.
Switch off the appliance in case of failure or malfunction. The periodical function checks
requested in the manual must be carried out according to the instructions. Have the appliance
serviced by a technically qualified person authorized by the manufacturer and using
original spare parts.
Not complying with the above may put the safety of the appliance in danger.
1.1. Symbols used in the manual
This symbol informs about a situation where a safety risk might be at hand. Given instructions
are mandatory in order to prevent injury.
This symbol informs about the right way to perform in order to prevent bad results, appliance
damage or hazardous situations.
This symbol informs about recommendations and hints that help to get the best performance
out of the appliance.
1.2. Symbols used on the appliance
This symbol on a part informs about electrical terminals behind the part. The removal of
the part must be carried out by qualified persons only.
1.3. Checking the relationship of the appliance and the manual
The rating plate of the appliance indicates the serial number of the appliance. If the manuals
are missing, it is possible to order new ones from the manufacturer or the local representative.
When ordering new manuals it is essential to quote the serial number shown
on the rating plate.
STOP

01.09.2015 METOS Bratt pan Futura
4
2. Safety
2.1. Safe use of the appliance
Because the bratt pan is a heated appliance that has hot surfaces during normal use, the
following warnings and instructions must be followed to avoid burns:
• During long-time operation even the sides of the frying surfaces, the pouring nose
and the lid get hot.
• For safe frying, always use heat protective gloves and appropriate accessories.
• Look out for discharging steam when opening the lid, especially when simmering
or stewing.
• Do not leave the bratt pan on for long periods totally without supervision.
It is strictly forbidden to use bratt pan as a deep fat fryer.
2.2. Safety instructions in case of malfunction
Switch off the appliance if it is damaged or malfunctioning. Contact authorised service
personnel using original spare parts for service of the appliance.
2.3. Disposal of the appliance
The destroying of the appliance when the end of its economical lifetime has been reached
must be carried out in accordance with local rules and regulations. Taking care of substances
that might be harmful to the environment, if not properly handled, and utilizaton
of reusable materials is best done by using professional personnel specializing in recycling.
STOP

01.09.2015
METOS Bratt pan Futura
5
3. Functional description
3.1. Intended use of the appliance
Futura bratt pan is intended for heating, frying and stewing of food.
3.2. Use for other purposes
Use of the appliance for other purposes than stated above is prohibited.
The manufacturer of the appliance takes no responsibility for situations that may occur if
warnings and instructions in this manual are neglected.
3.3. Operating principle
The frying surface of the bratt pan is heated by specially designed heating elements that
are controlled by a thermostat. The yellow pilot light goes off when the preset frying temperature
is reached.
In the largest bratt pan Futura 110, the frying surface is divided into two frying zones. The
temperatures of both zones can be controlled individually.
The tilting of the bratt pan is electrical and is controlled by push buttons in the control panel.
The bratt pan models with letter M in the type marking refers to manual tilting.
Tilting is self blocking and is done by the means of a hand wheel.
The bratt pan models with letter H in the type marking are equipped with the possibility to adjust the
working height of the bratt pan.
The bratt pan models with letter W in the type marking are equipped with the possibility to fill bowl of
the bratt pan by cold water.
The bratt pan models with letter S in the type marking have the bottom of the bowl made from clad steel.
External (frying) surface of this bottom is stainless, internal surface is made from construction steel.
The bratt pan models marked with letter P are for wall installation.
STOP

01.09.2015 METOS Bratt pan Futura
6
4. Operation instructions
4.1. Before use
4.1.1. Preparing the use
The frying surface of the bratt pan is protected with a thin layer of grease during storage
and transportation. Before first-time use the grease must be removed by using hot water
and detergent.
After the cleaning, the frying surface must be burned in with salt-free grease. Heat up the
pan to 200°C keeping the lid closed. Burn the grease for 5-10 minutes, let the pan cool
down and wipe off excessive grease. Repeat when necessary. Do not use oil for burning.
Heated oil would create a tough surface, which is difficult to clean. A well greased pan
reduces fat consumption in frying and minimizes burning of foodstuffs.
4.2. Operation
4.2.1. Switching on the bratt pan
During the installation, a mains switch may have been fitted near the bratt pan, often on a
wall nearby. Check that the mains switch is in the ON position.
The bratt pan is controlled from the operating panel and with the hand wheel (M).
The pan is switched on by turning the thermostat knob to the desired frying temperature,
whereafter
• the heating-up starts
• the green pilot light goes on
• the yellow pilot light goes on, and it goes off when the preset temperature is
reached (only Futura 110 models are fitted with two thermostats).
Operating panels
Futura 60, 85 M Futura 110 M

01.09.2015
METOS Bratt pan Futura
7
Operating panel
1. Green pilot light PAN SWITCHED ON
2. Yellow pilot light TEMPERATURE
3. Temperature adjustment (Futura 60, 85, 110)
4. Temperature adjustment (Futura 110)
5. Pan bowl tilting
6. Return pan bowl to working (horizontal) position
7. Decrement of bratt pan height (optional)
8. Increment of bratt pan height (optional)
9. Water filling (optional)
Heating up to the frying temperature takes about 5-6 minutes. When the preset frying temperature
is reached, the yellow pilot light goes off.
If there are longer interruptions in the electricity distribution, the thermostat (both thermostats
on the Futura 110 models) should be set to the 0 position. This should be done in
order to prevent unexpected start-up of the pan when the electricity distribution is restored.
Due to the very short preheating time of the bratt pan, energy can be saved by not switching
the pan on until the frying is started. If there is a longer pause during the frying, the
bratt pan can be switched off or the temperature can be set to a lower value. Energy can
also be saved by keeping the lid closed always when possible, for instance when simmering
or stewing.
4.2.2. Setting of the frying temperature
The frying temperature can be changed by turning the thermostat knob to the desired temperature.
When lowering the temperature, some time will be needed for the frying surface
to cool down. Increasing of the temperature turns on the yellow pilot light. When the new temperature
is reached the light goes off.
5 6 7 8 9
1
2
3
4
Futura 110EHW

01.09.2015 METOS Bratt pan Futura
8
On the Futura 110 model, the frying surface has been divided into two frying zones that can
be controlled separately. This makes it possible to fry two product types requiring different
frying temperatures at the same time. By turning the thermostat to the 0 position, the
other zone can be switched off when lower frying capacity is needed.
During long-time use, heat is transferred from one zone to the other. Although one zone
would be switched off, it gets gradually warm, reaching a temperature that is about half
of the temperature of the heated zone. If so desired, the temperature of this zone can be
checked by turning the thermostat knob to a position where the yellow pilot light goes on.
Max. possible working temperature for this model of bratt is limited up to 250°C. It is not possible
to set working temperature over 250°C. The rotating knob of the thermostat will not go over mark
“250°C”. Do not try to apply force to override this mark.
4.2.3. Frying temperature
Guiding temperatures for various products:
Fried eggs 150°C
Omelette 160°C
Fish 170°C
Bacon 150°C
Meat cubes 170°C
Meat balls, depending on size 130°C…170°C
Hamburgers, Depending on size 130°C…170°C
Veal fillet 170°C
Wiennasteak 170°C
Thin steak of veal 220°C
Broiler, big pieces 150°C
Floured slices of liver 170°C
Chops 170°C
Sausage cubes 130°C…150°C
Frankfurters 150°C
Fried potatoes 150°C…170°C
Mushrooms 130°C…150°C
Onion 140°C
Small pancakes 170°C
4.2.4. Tilting
Before tilting or returning the bratt pan bowl to the working position, check that nothing is in
the movement area or leaning against the moving part of the bratt pan.
The tilting of the pan bowl is operated with a push button (Figure “Operating panel” in Section
“Switching on the bratt pan”).
To tilt pan bowl at desired angle push and hold “tilting” button. To return pan bowl to working (horizontal)
position push and hold “return” button until pan bowl stop.
The pan cannot be tilted while the lid is closed.
When tilting the pan bowl, the heating is switched off and will be switched on again when the
pan is in the horizontal position.

01.09.2015
METOS Bratt pan Futura
9
4.2.5. Adjustment the working height
Before adjusting the working height of the bratt pan, check that nothing is in
the movement area or leaning against the moving part of the bratt pan.
Adjustment of working height is possible in bratt pan models with additional letter H included in model
marking. These models have two additional push buttons on the operating panel for the option (Figure
“Operating panel” in Section“Switching on the bratt pan”).
Adjustment is not possible if pan bowl is in tilted position.
4.2.6. Filling the water
Filling the cold water is possible in bratt pan models with additional letter W included in model marking.
These models have additional push button on the operating panel for the option (Figure “Operating
panel” in Section“Switching on the bratt pan”). To fill the water push and hold button until required
amount of water collected.
Filling the water is possible when lid of the bratt pan opened.
4.3. After use
4.3.1. Cleaning
Burned deposits on the frying surface of the pan form an isolating layer which slows up
the frying and creates poor frying results. A clean frying surface is a must for good-quality
results.
180°C about 135°C
The effect of burned deposits on the surface temperature: 2 mm of deposits lower the surface
temperature with 24 %.
180°C about 135°C
Cleaning equipment: scraper, hard brush, scouring plate, towel, kitchen paper
Cleaning detergent: slightly alkaline detergent (pH 8-10)
Cleaning method: scraping, dry, wet, damp
Precleaning:
Scrape out frying remains and wipe out grease and loose remains with paper. When necessary,
pour hot water into the pan and let soak.

01.09.2015 METOS Bratt pan Futura
10
Cleaning:
The inside of the pan is cleaned with a brush and hot water. Spots are removed with a
scouring plate. Cleaning detergent should be used only for frying surfaces extremely covered
with burned deposits, because it removes grease from the frying surface.
Inner and outer surfaces of the lid are cleaned with a brush and cleaning detergent solution.
The base and outer surfaces of the pan are cleaned with a brush and cleaning detergent solution and
rinsed with water.
The frying surface of the pan is rinsed with hot water, dried by heating up and greased
with salt-free grease. All other surfaces are rinsed and wiped dry.
Water usage on the control panel and the electric box must be avoided.
Use of a water hose or pressure cleaning jet is strictly forbidden.
In order to remain in good condition, the frying surface must be burned with salt-free
grease when the pan is taken into use for the first time, and after that at intervals during
use. This is especially necessary in connection with thorough cleaning.
4.3.2. Service
Switch the appliance off if it is damaged or is malfunctioning. Contact authorized service
personnel using original spare parts for service of the appliance.
The appliance does not include any user serviceable parts inside. Service must be left to
authorized service personnel.
STOP
STOP

01.09.2015
METOS Bratt pan Futura
11
5. Installation
5.1. Transporting and unpacking the bratt pan
The best way to move the bratt pan is to keep it in its own package as long as possible
while it also protects the pan from outer damage. If it is necessary to unpack the pan, possible
lifting must thereafter be done from the bottom frame of the base by using suitable
spacers of wood. In order to avoid damage, it is not allowed to use the lid as a workbench
during installation.
5.2. Positioning the bratt pan
The installation is started by moving the pan exactly to the right installation spot considering
a possible floor drain. The distances needed are shown in the installation drawing.
For service, most pans can be accessed from the front.
Thereafter the pan is adjusted into a horizontal position by turning the adjustable legs. The
correct position is checked from the frying surface, not from the outer edges of the pan.
When the bratt pan is on the correct location and in a horizontal position, it must be bolted
to the floor, the land models by the flanges in the rear adjusting legs and the marine models
by all four leg flanges.
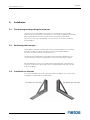
5.3. Installation on the wall
As on option Futura Bratt can also be ordered with cantilever installation on the wall, model P.
The bratt pan is supplied with special wall brackets
Cantilever installation on the wall
For cantilever installation on the wall special version of bratt pan must be ordered.
This version of bratt pan is supplied with special wall brackets code 3755515,
3755516.
Bratt pan is delivered with wall brackets already attached to the base of bratt pan.
Brackets must be detached before installation and fastened to the installation wall by
screw connections. Screw connections must be of following thread size:
- diam 12mm for screws with strength class (ISO property class) 8.8 and higher
- diam 20mm for screws with strength class (ISO property class) below 8.8
Brackets are delivered with mounting holes diam 14 mm (suitable for thread diam
12mm). Mounting holes must be drilled out up to diam 22mm, if screws diam 20mm
will be applied.
Brackets can be detached after lifting bratt pan above floor level and unscrewing two
fixing screws on each bracket. It is recommended to use suitable wooden spacers
between base of bratt pan and fork lift while lifting.
After fastening to the wall support surface of left and right bracket should be in
horizontal position and collinear to each other.
When wall brackets properly fastened to the wall place bratt pan on it and fix by
fixing screws.
The installation wall should be of sufficient strength to carry weight of bratt pan with
product, wall brackets and all additional accessories. Total weight of bratt pan with
all accessories and wall bracket without product is as follows:
- Futura 110PDEHW 225kg
- Futura 85PDEHW 200kg
Other requirements, given in installation drawings T03677D3, T03693C3 and
Installation and Operation Manual should also be followed.

01.09.2015 METOS Bratt pan Futura
12
The bratt pan is delivered with wall brackets factory installed into the pan base. Brackets must always be
detached before installation and fastened to the installation wall by screw connections. Screw connec-
tions must be of following thread size:
- diam 12mm for screws with strength class (ISO property class) 8.8 and higher
- diam 20mm for screws with strength class (ISO property class) below 8.8
Brackets are delivered with mounting holes diam 14 mm (suitable for thread diam 12mm).
If In case 20 mm screws are used, the holes must by drilled up to dia. 22mm.
Brackets can be detached after lifting bratt pan above floor level and unscrewing two fixing screws on
each bracket. It is recommended to use suitable wooden spacers between base of bratt pan and fork lift
while lifting.
After fastening to the wall support surface of left and right bracket should be in horizontal position and
collinear to each other.
When wall brackets properly fastened to the wall place bratt pan on it and fix by fixing screws.
The installation wall should be of sufficient strength to carry weight of bratt pan with product, wall
brackets and all additional accessories. Total weight of bratt pan with all accessories and wall bracket
without product is as follows:
- Futura 110PDEHW 225kg
- Futura 85PDEHW 200kg
Other requirements, given in installation drawings T03677D3, T03693C3 and Installation and Operation
Manual should also be followed.
5.4. Electrical connections
In order to make eventual future service easier and to increase safety, a mains switch must
be installed near the appliance. This switch must disconnect the appliance completely
from the electrical supply network.
The feedthrough grommet for the connection cable is located on the bottom plate of the
base, just under the connection terminal as shown in the installation drawing. In order to
make the connection, the lower front panel must be removed. To remove panel loose six screws
that are located on the lower (3pcs.) and upper (3pcs.) edge of the panel and than move the panel
towards yourself.
5.5. Water connection
Connection to cold water supply must be made by pressure resistant hose ( not included in delivery)
fitted with G ¾ connector. The water connection must be fitted with shut-off valve and non-return valve
(not included in delivery).
The length of water hose must be sufficient to compensate movement of connection point in up- and
downward direction for bratt pan models with adjustment of working height.
Rinse the water hose before making the water connection.

01.09.2015
METOS Bratt pan Futura
13
5.6. Test-run
Besides the live electrical parts also look out for possible moving mechanisms in the lower
part of the appliance, if there is a need for testing the appliance during installation while
the guards or cover plates are detached.
Make sure that the protective grease has been removed from the frying surface before taking
the pan into use. See “Preparing the use”.
After connecting the cable check the function of the bratt pan.
Check that
• when turning the thermostat knob, both the green and yellow pilot light goes on
(two zones in the P 110 models)
The bratt pan model Futura 60, Futura 85 are equipped with safety thermostat. Bratt pan model Futura
110 is equipped with two safety thermostats. Safety thermostat prevents bratt pan from overheating if
main thermostat does not switch off heating elements.
After installation of the bratt pan during test-run check the condition of safety thermostat. If after turning
the main thermostat knob at desired temperature green pilot lamp goes on but yellow pilot lamp remains
off than safety thermostat need to be reset. Contact an authorized service person to reset safety ther-
mostat.
• the yellow pilot light goes off after a few minutes when the frying surface has
reached the set temperature
• the limit switches of the heating work properly: when tilting the heating is
switched off, the return movement stops when the pan reaches the base and the
heating is switched on. If necessary, adjust the limit switches.
• before refitting the front panel, check that no wires in the base interfere with moving
parts.
Refit the lower front panel.

01.09.2015 METOS Bratt pan Futura
14
6. Troubleshooting
If the appliance does not function, check the following:
• Has the appliance been used according to the instructions?
• Are all possibly removable parts refitted?
• Are the mains switch on the appliance or nearby - often on the wall - in the ON
position?
If even this does not help, figure out in advance how to briefly describe the break-down
and contact an authorized service person.
The appliance does not include any user serviceable parts inside. Service must be left to
authorized service personnel.
STOP


01.09.2015 METOS Bratt pan Futura
16
7. Technical specifications
Voltage codes
Product codes
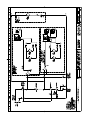
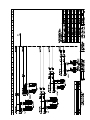
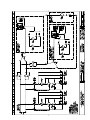
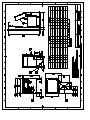
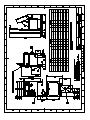
Main and control circuit diagram T02737C3
Main and control circuit diagram T02739C3
Main and control circuit diagram T03144C3
Main and control circuit diagram T03151B3
Heating element connection T02746A3
Heating element connection T02748A3
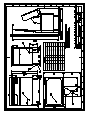
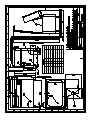
Installation drawing T03210C3
Installation drawing T03059E3
Installation drawing T03408B3
Installation drawing T03409B3
Installation drawing T03410B3
Installation drawing T03411B3
Installation drawing T03175C3
Installation drawing T03183E3
Installation drawing T03677D3
Installation drawing T03693C3
Installation drawing T03418B3
Technical specification table

01.09.2015
METOS Bratt pan Futura
17
Voltage codes
Voltage code Voltage
A 3/N/PE~400/230V 50Hz
B ~250V 16A 50Hz
C 3/N/PE~380/220V 50Hz
D 3/PE~200V 50-60Hz
F 2/PE 220−240V 50Hz
G 3/N/PE~415/240V 50Hz
H 3/PE~230V 50Hz
I 3/PE~220V 60Hz
J 3/PE~380 50Hz
K 3/PE~400V 50Hz
L 3/PE~415V 50Hz
M 3/PE~440V 60Hz
N 3/PE~460V 60Hz
O 3/PE~480V 60Hz
P 1/N/PE~220-240V 50Hz
R 2/PE~220-230V 60Hz
Product codes
Type codes Full name Description
60
85
110
Model codes
DC Futura DC Pan depth 180mm with bottom made from construction steel
LC Futura LC Pan depth 90mm with bottom made from construction steel
Accessory codes
H Height adjustment
S Bottom of the bowl made from stainless (clad) steel
W Water tap
M Manual tilting
P Wall installation


Page is loading ...
Page is loading ...
Page is loading ...
Page is loading ...
Page is loading ...
Page is loading ...
Page is loading ...
Page is loading ...
Page is loading ...
Page is loading ...
Page is loading ...
Page is loading ...
Page is loading ...
Page is loading ...
Page is loading ...
Page is loading ...
Page is loading ...
Page is loading ...
Page is loading ...
Page is loading ...
-
 1
1
-
 2
2
-
 3
3
-
 4
4
-
 5
5
-
 6
6
-
 7
7
-
 8
8
-
 9
9
-
 10
10
-
 11
11
-
 12
12
-
 13
13
-
 14
14
-
 15
15
-
 16
16
-
 17
17
-
 18
18
-
 19
19
-
 20
20
-
 21
21
-
 22
22
-
 23
23
-
 24
24
-
 25
25
-
 26
26
-
 27
27
-
 28
28
-
 29
29
-
 30
30
-
 31
31
-
 32
32
-
 33
33
-
 34
34
-
 35
35
-
 36
36
-
 37
37
-
 38
38
-
 39
39
-
 40
40


Metos Prince W Owner's manual
- Type
- Owner's manual
- This manual is also suitable for
Ask a question and I''ll find the answer in the document
Finding information in a document is now easier with AI
Related papers
-
Metos GL6RT45 Owner's manual
-
-
-
-
-
-
-
-
-
Other documents
-
Haier HMS1000 Operating instructions
-
Draper KM203-W Datasheet
-
Steba 62.04.00 Datasheet
-
Lang cl130ff Operating instructions
-
Falcon G2994 User Instructions
-
GGM Gastro TWK1760TD Owner's manual
-
Bartscher 115245 Operating instructions
-
Electrolux FT76TH Datasheet
-
Asko HIG1944MF Installation guide
-
 Hantek DDS-3X25 User manual
