
g_
0
Z
SONY
3-285-369-11 (1)
C
Digital Video Camera Recorder
_r'J___
Operating Guide
DCR-DVD910
Getting Started
Editing
Utilizing Media
Customizing Your
Camcorder
Performing with Your /
Computer
Troubleshooting
Additional
Information
Quick
Reference
Spanish Quick Guide/
Gufa r_.pida en espafiol
Addilienal inR)rm ifien en this preducl and answers
le frequently asked quesliens can be lk)und at our
Customer Supperl Website.
http://www.sony.net/
Printed on 70% or more recycled paper
using VOC (Volatile Organic Compound)
-free vegetable oil based ink.
Printed in Japan
IIIIIIIIIII
3285369110
R/RW
I_ i ---_'-
_vo ÷_Wr_tabl_
DVD+_ DL
© 2008 Sony Corporation
_1_InfoLITHIUM 0
s_lEs

To reduce fire or shock hazard, do
not expose the unit to rain or
moisture.
This symbol is intended to alert
the user to tile presence of
uninsulated "dangerous
w)ltage _' within the product's
enclosure thal may be of
sufficienl magnitude to
constitute a risk of electric
shock to persons.
This synlbol is intended to alert
tile user 1o file presence of
important operating and
maintenance (servicing)
insn uctions in tile lileramre
acconlpanying tile appliance.
IMPORTANT
SAFEGUARDS
For yottr protection, please read these safety
instructions completely bel\_re operating
the appliance, and keep this manual for
future reference.
Carefully observe :ill warnings, precautions
and instructions on the appliance, or the one
described in the operating inslructions attd
adhere to them.
PowerSources
This sel sllould be operatcd only from tile lype of
power source indicated on the marking label. If
you are not sure of file type of electrical power
supplied to your honle, consult your dealer or
local power company. For tllose sets designed to
operate liom battel 3, power, or other sourc:cs, rel_:r
to file operating instructions,
Polarization
This set may be equipped with a polarized ac
power cord phlg (a phlg having one blade wider
than tile oilier),
This plug will fil into the power out]el only one
way. This is a salcly lbamre. If you are unable to
insert the phlg hilly into the outlel, try reversing
file plug. II the plug should still l_til to fit, colltact
your electrician to have a suitable outlet installed.
Do not del_at the salEly purpo_ ol the polarized
phlg by forcing it in.
Overloading
Do not overload wall otltlets, extension cords or
convenience receplacles beyond lheir capacity,
since Ibis can resuh in lire or eleclric silo&.
ObjectandLiquidEntry
Never push objects ol any kind inlo the set
lhrougl/openings as they may touch dangerous
voltage points or sllorl otlt parts that could l'estlh
in a fire or electric shock. Never spill lk]ukl ol ally
kind on ll/e set.
Attachments
Do not rise attachlnenls llOt leCOl/ll/lellded by the
l/lantlfacturer, as they may cause hazards.

Cleaning
Unplug the set lroln the wall omlet belore
cleaning or polishing it. Do not use liquid clemlers
or aerosol cleaners. U_ a cloth lightly dampened
with water lbr cleaning the exterior ol tile set.
Water andMoisture
Do nol use power-line opcraled _ls near waler
lbr example, near a bathlub, washbowl, kitchen
sink. or laundry tub. in a wet basement, or near a
swimming pool. elc.
Power-CordProtection
Route tile power cord so thai it is not likely to be
walked on or pinched by items placed upon or
against them, paying particular attention to tile
plugs, receptacles, and the point where the cord
exits lioln tile appliance.
Accessories
Do not place tile set on an unstable cart. stand.
tripod, bracket, or table. Tile set may ball, causing
serious injury to a child or an adult, and serious
damage to tile set. Use only a carl. stand, tripod.
bracket, or table recommended by the
illanul_lcturcr.
Ventilation
Tile slots and openings in tile cabinet arc provided
lbr necessary venlilatkm. To ensure reliable
operalion of tile set, and lo protect il fl'oln
overheating, these slots and openings must never
be blocked or covered.
Never cover the slots and openings with a cloth
or olhcr inalerials,
Never block the slots and openings by placing
tile set on a bed, sol_. rug, or other similar
surlace.
Never place the set in a confined space, such as
a bookcase, or bulb-in cabinet, unless proper
vcntilatkm is provided.
Do not place tile set near or over a radiator or
heal register, or whm'c it is exposed to direct
sunlight.
Lightning
For added protection lor this set during a lightning
storm, or when it is lell unattended and unused h)r
long periods of lime. unplug it l)'onl tile wall
outlet and disconnect tile antenna or cable system.
This will prevent damage to file set due to
lighming and power-line surges.
DamageRequiringService
Unplug the set b'oln tile wall outlet and relcr
servicing to qu_dilied service personnel under tile
lbllowing conditions:
When the power cord or plug is damaged or
fi'ayed.
If liquid llas been spilled or objects bye IMlen
into tile set.
If the set has been exposed to rain or water.
If the _t has been subject to excessive shock by
being dropped, or the cabinet has been
damaged.
If the set does not operate normally when
lollowing the operating instructions. Adjust
only those controls that aw specified in the
operating instructions, hnproper adjustment of
other controls may rcsulI in damage and will
often require extensive work by a qualified
techniciml to restore tile set 1onormal operation.
When tile sel exhibits a dislinct cllange in
per%rmancc this indicates a need %r service.
Servicing
Do not idtenlpt to service tile set yourself as
opening or removing covers may expose you to
dangerous voltage or other lla/ilrds.
Rel_:r all sel_qcing to qualilied service personnel.
Replacementparts
Wllen replacement parts m'e required, be sure tile
service technician has used rcplacelnent pm'ts
specified by tile nlmmlacmrcr that have tile same
chm'aCtcl'istics as tile original part,,.
Unauthorized substitutions may rcsuh in fire,
electric shock, or other hazards.
SafetyCheck
Upon COlnplelion of any ser_ ice or repairs to tile
set. ask tile selvice techniciml to l_erlolm routine
safi:ty checks (as specified by tile manuh,cmrcr)
to detcmline that file set is ill sale operating
condilkm.

Readthis beforeoperatingyourcamcorder
Be%re operating the unit, please read this
manual thoroughly, and retain it for future
reference.
Do not expose the batteries to
excessive heat such as sunshine,
fire or the like.
CAUTION
Tile use of optical instrunlcnts with this product
will increase eye haznrd. U_ of controls or
adjustmcnts or perlornlancc of procedures othm+
than those specified hm+einmay resuh in
hazardous radiation exposurc.
Replace the battery with the
specified type only. Otherwise, fire
or injury may result.
Owner's Record
Tile model and serial nunlhers are located on tile
bottom. Record tile serial number ill tile space
provided below. Relcr to tllese numbers whenever
you call your Sony dealer regarding lhis producl.
Model No. DCR-DVD910
Serial No.
Model No+ AC-
Serial No.
RECYCLINGLITHIUM-IONBATTERIES
Liddunl-lon baueries are rccyclable.
You can help pre_rve our
ellvirolllnent by, relllrnhlg your
used rechargeable batteries to tile
collection and recycling location
llearesI you+
For more inR_rmation regarding
recycling of rechargeable batteries+ call toll lre_ 1-
800-822- 8837, or visil hltp://www.rbrc.org/
Caution: Do not handle danlaged or leaking
Lithium-Ion batteries.
If you have any questions about this product, you
nlay call:
Sony Custonler lnh)rmation Center
1-800-222-SONY (7669).
Tile nunlber below is lbr tile FCC rclaled nlalters
only.
RegulatoryInformation
Declaration of Conformity
Trade Name: SONY
Model No.: DCR-DVD910
Responsible Party: Sony Electronics Inc.
Address: 16530 Via Esprillo, San Diego, CA
92127 U.S.A.
Telephone No.: 858-942-2230
This device conlplies with Pal_ 15 of the FCC
Rules. Operation is sut_iect to tile lollowing two
conditions: / 1) This device may not cause
harmfid interlcrcnce, and (2) this device nlusl
accept any interlcrence received, including
intert_:rcnce thai nlay cause undesired operation.
CAUTION
YoII arc catltioned lhat ally challges or
modilications not expressly approved in this
nlanual could void your authority to opelale this
equipnlenL
Note
This equipment has been tested and timnd to
conlply with the limits lor a Class B digital
device, pursuant to Part 15 of the FCC Rules.
These limits armdesigned to provide reasonable
protection against harmfifl interlcrence ill a
residential installation. This equipnlent generates,
uses, and can radiate radio flcqucncy energy and,
if not installed and used in accordance with the
instructions, may cause harmful interli:rence to
radio COllllntlnicalions+
Howcver, therc is no guarant_ thai interlcrcncc
will not occur in a particular installation. If tllis
equipnlent does cause harnfful interfi:rence to
radio or television reccption, which can be
dctermined by turning the equipment off and on.
tile Ilser is encouraged t_ try t_lcorrect tile
interlcrence by one or morc of tile li_llowing
nleasllrcs:

Rcorienl or rclocat_ tile receiving antenna.
lncrcase tile separation between tile equipmenl
auld receiver.
Connect tile equiplncnt into gln outlet on a
circuit dill;xrcnl Ironl thai to which the receiver
is connected.
Consuh the dealer or an experienced radio/TV
technician litr hdp.
Tile supplied interlace cable must be used with tile
equipment in ordcr tit comply with tile limits lbr a
digilal device pursuanl tit Subparl B of Parl 15 of
FCC Rules.
For the State of California, USA only
Pcrchlol'ateM_Jlerial- special handling may
apply, See
www.dtsc.ca,gov/hazardouswastc/perchlorate
Pcrchloratc Matcrial: Lithium battery contains
perchlorate.
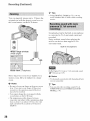
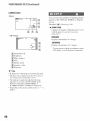
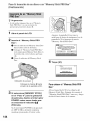
Your camcorder is supplied with two
kinds of operations guides.
"Operating Guide" (This manual)
"PMB Guide" for using your camcorder
with a computer connected (stored on the
supplied CD-ROM) (p. 921
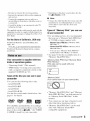
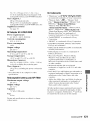
Types of the disc you can use in your
camcorder
You can use the following discs only.
8cm DVD-RW
8cm DVD+RW
8cm DVD-R
8cm DVD+R DL
Use the discs with marks listed below. See
page I I for details.
For reliability and durability of recording/
playback, we recommend that you use Sony
discs or discs with a _g;_g_. */for VIDEO
CAMERA) mark for your camcorder.
* Depending on tile place you purchase, tile disc
has _;;,,_,_ecsA_g_, mark.
0 Note
• Using a discotllerlhan the above maycruisetile
unsatislactoryrecording/playbackor youmay
notbeabletor_movethedischomyour
camcorder,
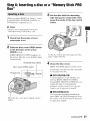
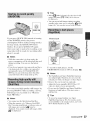
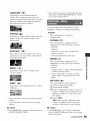
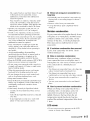
Types of "Memory Stick" you can use
in your camcorder
• For recording movies, it is recommended
that you use a "Memory Stick PRO Duo"
of 512 MB or larger marked with:
MEMORY5TI[KPRI]i]UO("Memory Stick
PRO Duo")*
JVIEFAORY5TIEI(PRO-H5Duo("Memory Stick
PRO-HGDuo")
* Youcan u_ a "Memory Stick PRO Duo"
markedeither with 'Mz_rkT' orwilhoul.
• See page 30 for the recordable time of a
"Memory Stick PRO Duo."
"Memory Stick PRO Duo"/"Memory Stick
PRO-HG Duo"
(This size can be used with your
camcorder.)
"Memory Stick"
(You cannot use it in your camcorder.)
• "Memory Stick PRO Duo" and "Memory
Stick PRO_HG Duo" are both referred to
as "Memory Stick PRO Duo" in this
mauuah
• You cannot use any type of memory card
other than those inentioned above.
• "Memory Stick PRO Duo" can be used
only with "Memory Stick PRO"
compatible equipment.
Continued._ 5

Rsad this bsfo_s ops_ati_S yo_[_camcords_(Sostissed}
• Do not attach a label ur the like on a
"Memory Stick PRO Duo" or a Memory
Stick Duo adaptor.
• When using a "Memory Stick PRO Duo"
with "Memory Stick" cumpatible
equipment, be sure to insert the "Memory
Stick PRO Duo" intu the Memury Stick
Duo adaptor.
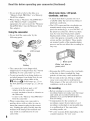
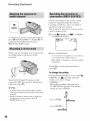
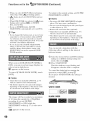
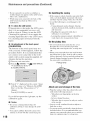
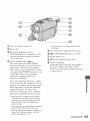
Using the camcorder
• Do not hold the camcorder b5 the
lkdlowing parts.
Viewfinder LCD screen
About menu items, LCD panel,
viewfinder,and lens
• A menu item that is grayed out is not
available under the current recording or
playback conditions.
• The LCD screen and the viewfiuder are
manufactured using extremely high-
precision technulogy, so over 99.9991 of
the pixels are effective. However. there
may be sume tiny black points and/or
bright points (white. red. blue. or green in
color/that appear constantly on the LCD
screen and the viewfinder. These points
are normal results of the manufacturing
process and do not affect the recording in
any way.
Battery
• The camcorder is not dustproofcd.
dripproofcd or waterpruofed. See "About
handling of your camcorder" (p. 116).
• To prevent media from being bruken or
recorded images from being lost. do nut
do the following when either of the
(Movie)/_J (Slill/lamps (p. 23) or
the ACCESS/access lamps (p. 27, 29) are
Oil:
to remove the battery pack or AC
Adaptor from the camcorder
to ap.:_lymechanical shock or vibration to
the camcorder
to remove the "Memory Stick PRO Duo"
fronl the caulcorder
• When connecting yuur camcorder to
another device with a cable, be sure to
insert the connector plug in the correct
way. Pushing the plug forcibly into the
terminal will damage the terminal and
may result in a malfunction of your
camcurder.
White, red, blue or
green point
• Exposing the LCD screen, the viewfiuder.
or the lens tu direct sunlight lk_rlong
periods of time may cause malfunctions.
• Du not aim at the sun. Duing su might
cause your camcorder to nlalfllnction.
Take images of the sun only in low light
cuuditious, such as at dusk.
Onrecording
• Before starting to record, test the
recording function to make sure the image
and sound are recurded without any
problems. Use a DVD-RW/DVD+RW for
trial recording.
• Compensation for the contents of
recordings cannut be provided, even if
recording ur playback is not pussible due
to a malfunction of the camcorder.
recurding media, etc.
• TV color systems differ depending on the
cuuntries/regious. To view your

recordingsonaTV,youneedanNTSC
system-basedTV.
•Televisionprograms,fihns,videotapes,
andothermaterialsmaybecopyrighted.
1Jnauthorizedrecordingofsuchmaterials
maybecontrarytothecopyrightlaws.
•Ifyourepeatrecording/deletingimages
foralongtime,fragmentationofdata
occursona"MemoryStickPRODuo."
huagescmmotbesavedorrecorded.Ill
such a case, save your images O11 another
type of media first (p. 51, 57), and then
format the "Memory Stick PRO Duo"
(p. 671.
About language setting
The on-screen displays ill each local
language are used for illustrating the
operating procedures. Change the screen
language before using your camcorder if
necessary (p. 24).
AbouttheCarlZeisslens
Your camcorder is equipped with a Carl
Zeiss lens. which was developed jointly by
Carl Zeiss. ill Germany, and Sony
Corporation. and produces superior images.
It adopts the MTF measurement system for
video cameras and offers a quality typical
of a Carl Zeiss lens. Also. the lens for your
camcorder is T*-coated to suppress
tmwanted reflections and faithfully
reproduce colors.
MTF = Modulation Transfer Function. The
number value indicates the amotmt of light
from a subject coming into the lens.
Aboutthismanual
• Tile LCD screens :rod tile viewfinder
images and indicators showil ill this
manual were taken with a digital still
camera, and may look different lhom what
you actually see.
• Discs in this manual refers to 8cm DVD
discs.
• In this manual, a disc and a "Memory
Stick PRO Duo" are called the media.
• Design and specifications of media and
other accessories are subject to change
without notice.
Aboutthemarksusedinthismanual
• Tile operations avgfih*bledepend on tile
media used. The following marks are
used to indicate the type of media you
can use for a particular operation.
Disc
"Memory Stick PRO Duo"

TableofContents
Read this before operating your
camcorder .................................... 4
Table of Contents ........................... 8
Subject examples and solutions ... 10
Media for your camcorder ............ 11
Using your camcorder .................. 14
"1_ HOME" and "?_=OPTION"
- Taking advantage of two types of
menus ......................................... 16
Step 1: Checking supplied items .. 19
Step 2: Charging the battery pack 20
Step 3: Turning the power on, and
setting the date and time ............ 23
Changing the language setthg ...24
Step 4: Making adjustments before
recording .................................... 25
Step ,5:Selecting media for movies
.................................................... 26
Step 6: Inserting a disc or a "Memory
Stick PRO Duo" .......................... 27
Recording and playing back with ease
(Easy Handycam operation) ....... 31
Recording ..................................... 34
Zooming ...................................... 36
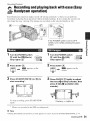
Recording sound with more
presence (5.1ch surround
recording) ................................. 36
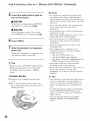
Starting to shoot quickly (QUICK ON)
................................................... 37
Recording high quality still images
during movie recording (Dual Rec)
................................................... 37
Recording in dark places
(NightShot) ................................ 37
Adjusting the exposure for backlit
subjects .................................... 38
Recording in mirror mode ........... 38
Recording the fast action in slow-
motion (SMTH SLW REC) .........38
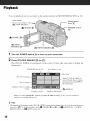
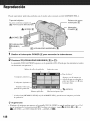
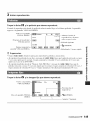
Playback ....................................... 40
Searching for scenes by pinpoint
(Film Roll Index) ........................ 42
Searching for desired scenes by
face (Face Index) ...................... 42
Searching for desired images by
date (Date Index) ...................... 43
Using PB zoom ............................ 43
Playing back a series of still images
(Slide show) .............................. 44
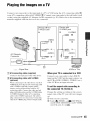
Playing the images on a TV ......... 4,5
4
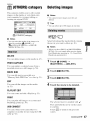
(OTHERS) category ............... 47
Deleting images ............................ 47
Capturing a still image from a movie
..................................................... 50
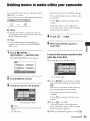
Dubbing movies to the media within
your camcorder ........................... 51
Dividing movies ............................ 52
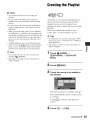
Creating the Playlist ..................... 53
Dubbing movies to VCR or DVD/HDD
recorders .................................... 57
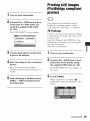
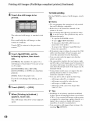
Printing still images (PictBridge
compliant printer) ........................ 59
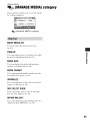
(MANAGE MEDIA) category
..................................................... 61
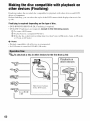
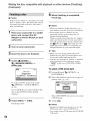
Making the disc compatible with
playback on other devices
(Finalizing) .................................. 62
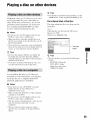
Playing a disc on other devices .... 65
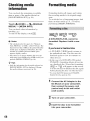
Checking media information ......... 66

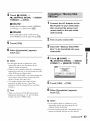
Formattingmedia..........................66
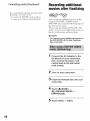
Recordingadditionalmoviesafter
finalizing......................................68
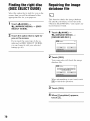
Findingtherightdisc(DISCSELECT
GUIDE).......................................70
Repairingtheimagedatabasefile70
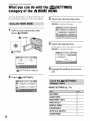
Whatyoucandowiththe
_ (SETTINGS)categoryofthe
1_HOMEMENU........................72
UsingtheHOMEMENU..............72
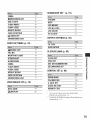
Listofthe_ (SETTINGS)category
items.........................................72
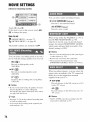
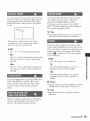
MOVIESETTINGS.......................74
Itemsforrecordingmovies)
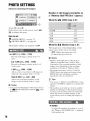
PHOTOSETTINGS......................78
Itemsforrecordingstillimages)
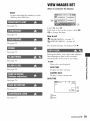
VIEWIMAGESSET.....................79
Itemstocustomizethedisplay)
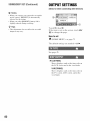
SOUND/DISPSET.......................81
Itemstoadjustsoundandthescreen)
OUTPUTSETTINGS....................82
Itemsforwhenconnectingotherdevices)
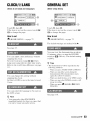
CLOCK/t_]LANG..........................83
Itemstosetclockandlanguage)
GENERALSET............................83
(Othersetupitems)
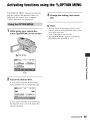
Activatingfunctionsusingthe
o=,_=OPTIONMENU......................85
UsingtheOPTIONMENU...........85
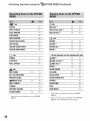
RecordingitemsontheOPTION
MENU.......................................86
ViewingitemsontheOPTION
MENU.......................................86
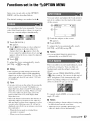
FunctionssetintheO_.._=OPTION
MENU.........................................87
WhatyoucandowithWindows
computer.....................................92
Troubleshooting............................96
Warningindicatorsandmessages
...................................................105
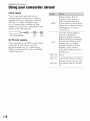
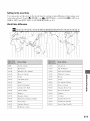
Usingyourcamcorderabroad....110
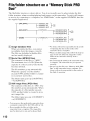
File/folderstructureona"Memory
StickPRODuo".........................112
Maintenanceandprecautions.....113
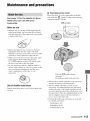
Aboutthedisc...........................113
Aboutthe"MemoryStick".........114
Aboutthe"InfoLITHIUM"battery
pack........................................115
Abouthandlingofyourcamcorder
.................................................116
Specifications..............................120
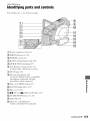
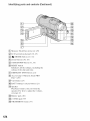
Identifyingpartsandcontrols......123
Indicatorsdisplayedduringrecording/
playback....................................127
Glossary......................................129
Index...........................................130

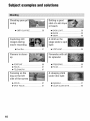
Subjectexamplesandsolutions
_SMTH SLWREC ....................... 38
I movie reeording
_. Dual Rec................................... 37
Flowers in c_ose-
ap
_. PORTRAIT...................................... 89
_.FOCUS............................................ 87
_.TELE MACRO................................. 87
I Focasi_'_go_ the
dog on the left
side ofthe seree_
_"FOCUS............................................ 87
_'SPOT FOCUS.................................. 87
[ etti_lg a good
shot of a ski slope
or beach
_"BACKLIGHT.................................... 38
_"BEACH............................................ 89
_'SNOW ............................................. 89
A child onthe
stage m_dera spot
_'SPOTLIGHT..................................... 89
[
Fireworks with all
_'FIREWORKS.................................... 88
_'FOCUS............................................ 87
10

E_joyiW wi_fl Yo_r gamcor_fer
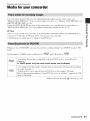
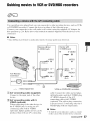
Media for your camcorder
You can select desired media for recording/playback/editing movies from a disc or a
"Memory Stick PRO Duo." You can select either of a disc or a "Memory Stick PRO Duo" on
[MOVIE MEDIA SET] (p. 26).
Using tile [MOVIE DUB] function on tile camcorder, you can club movies recorded on a
"Memory Stick PRO Duo" to a disc without connecting another device/p. 51 ).
"_" Tips
• Discs you can use with your camcorder arc 8cm DVD-RW, DVD+RW, DVD-R and DVD+R DL discs.
• See page 5 ior tile types of 'Memol3_ Slick" you can use in your camcorder.
• Still images are recorded only on a "Memory Stick PRO Duo."
A recording formal Ihal is compatible wilh most DVD devices, especially al]er
finalizing.
In VIDEO mode, only the most recent movie can be deleted.
,&.recording 1_)im al Ihal enables cdiling with your camcorder (dcleling and rearranging
the order of images).
v_ A finalized disc can be played back ill DVD devices Ihat suplx)rt VR mode.
Refer Io Ihe instruclion manual of }our DVD device to see whelher il supporls Ihe VR
mode of DVD-RW.
VIDEO mode and VR mode (_ Glossary/p, 129)
=_
Continued._ 11

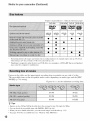
Media fa_yau_aamaa_d÷r{ga_ti_u÷d}
! i!iiiii
iiiii_i_i!_!_!_!:_ii_!_i_¸i_i_i_iii_i_i_i,_ii_ilil¸_i_iiiiiii_ii_!_i_!!!i!_!_ii_i_i_i_!_!i_!_i_i_i_!i_i_!_!_!_!_!_!_!_!_!_!_!_!_i!_i!_i!_!_!_!
* Formauing deleles all imagc _,and retmns ll_e recording media lo its original elnply state (p. 66). Even
when using a new disc, lorn/al il wilh your camcorder (p. 27).
** Finalizing is required to play the disc in a DVD drive on a computcr. A DVD+RW that is not finalized
may cause the computer to maltimction.
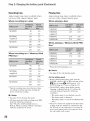
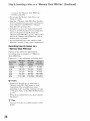
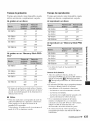
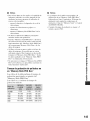
Figures itt the table are the approxitnate recording time itt minutes ott one skle of a disc.
The recordable time on the acceptable media varies depending on media type and the IRE(!
MODEl (p. 74) setting.
Figures in ( ) are the minimutn recording time.
12
20 (18)
30 (18)
P) i_ Y 80 (44)
"_° Tips
• Figures such as 9M and 6M ill tile table show the average bit rate. M stands lot Mbps.
• You can check the rccordable time with [MEDIA INFOI (p. 66).
• When you use a double-sided disc, you can record images on both sides (p. I13).
• See page 30 1or the rccordable tinle on a "Memory Stick PRO Duo."
35 (32)
55 (32)
110 (80)

Your camcorder uses the VBR (Variable Bit Rate) _)rmat to automatically adjust image quality to suit the
recording scene. This technology cauls fluctuations in the recording time of media. Movies containing
quickly moving and comple× images are recorded at a higher bit rate. and this reduces the ovel-all recording
time,
=_
13

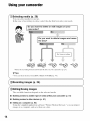
Usingyourcamcorder
f
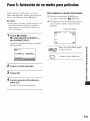
OSelecting media (p. 26)
You can select lnedi:_for mo,,ies.
In file case of recordin_ on a disc. select the disc th:u best suils your needs.
*Selectll_erccordingformal andtk)rmattiledisc on your camcorder (p. 27).
"_°Tips
• Youcan select the disc ti'om [DISCSELECT GUIDE] (p. 70).
@Recording images (p, 34)
@Editing/Saving images
The available fttnctions depend on the selected media.
N Dubbingmoviesto another typeof media within your¢amcorder (p. 51)
I Dubbingmoviesto other devices(p. 57)
I Editingona computer(p. 92)
Using the supplied application software "Picture Motion Browser." you c:m import
images to a computer, attd save them on a disc.
14

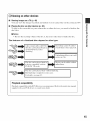
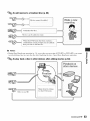
@Viewing on other devices
N Viewing images on aTV (p. 45)
You can view the images recorded and edited on your canworder on the connected TV.
m Playing the disconother devices (p. 65)
To play a disc recorded on your camcorder on other devices, you need to finalize the
disc first.
ONotes
• Tile less the recording volume ol fl_edisc is, fl_e more it takes time to finalize tile disc,
The features of a finalized disc depend on disc type.
4@@
Like commercially sold DVD,
lifts disc can be played back in
most DVD devices al_er
finalizing.
The disc can be played back in I IL. ] Movies can be added without
a device compatible with the _ unfinalizing.
DVD-RW VR mode. l v ]
Recordings cannot be added
even il there is hee space let}. ]
J
Unlinalizing allows you to add ]
movies (p. 68). ]
i
The disc can be played back wifllout finalizing.
Bill finalizing is required in some cases.
For details, see page 62.
r j
Playbackcompatibility
Playback compatibility witll all DVD devices is not guaranteed. Rel_r to theinstruction manual
supplied with your DVD device or consult your dealer.
\
M J
=_
15

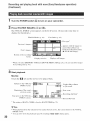
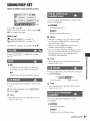
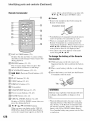
" HOME" and"°_:=OPTION"
- Taking advantage of two types of menus
Category --
[][](HELP)
Displays a description of the item (p. 17)
Nr......................................................................., [- ..........................................................................
D_L_E PHOTO #_TURE
_L ......................................................L ........................................
1/2 ............................................................................, ............................................................................
Mov_ouB [
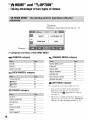
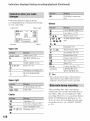
Categoriesand itemsofthe HOMEMENU
_(CAMERA) category
MOVIE* 35
PHOTO* 35
SMTHSLW REC 38
(VIEW IMAGES)category
VISUAL INDEX_ 40
L_INDEX* 42
[_]INDEX* 42
PLAYLIST 53
re(OTHERS) category
DELETE_ 47
PHOTOCAPTURE 50
MOVIEDUB 51
EDIT 52
PLAYLISTEDIT 53
PRINT 59
USBCONNECT 92
(MANAGEMEDIA) category
item Pa_:
MOVIE MEDIASET* 26
FINALIZE* 62
MEDIA INFO 66
MEDIA FORMAT_ 66
UNFINALIZE 68
DISCSELECTGUIDE 70
REPAIR IMG.DB F. 70
(SETTINGS)category*
To customize your camcorder (p. 72).
* You can also scl these items during Easy
Handycam operation (p, 31 l, For items
available in the _ (SETTINGS) catego]y_
see page 72.
** The item is available during Easy Handycam
operation (p. 31 ) when you select [MEMORY
STICKI on [MOVIE MEDlA SETI (p. 26),
16

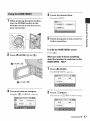
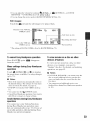
.4
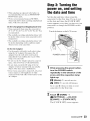
/ While pressing the green button,
turn the POWER switch in the
direction of the arrow to turn on
your camcorder.
2 Press _ (HOME) [] (or []).
(HOME) []
_1_(HOME) []
A
=.1.Touch the desired item.
Example: IEDITI
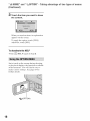
5 Follow the guide on the screen for
further operation.
To hidethe HOMEMENUscreen
Touch [_3.
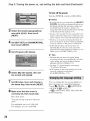
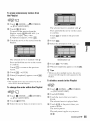
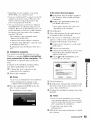
When youwant to knowsomething
aboutthe functionof eachitem onthe
HOMEMENU- HELP
1Press _(HOME).
The HOME MENU appears.
,,<
=0
2
3 Touch the desired category.
Example: _ (OTHERS) cale_ory
2 Touch F_](HELP).
The bottom of [] (HELP) turns orange.
Continued._ 17

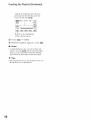
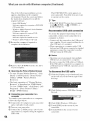
°°_HOME" a_ _Q_O?T_ON°_°Taki_ adva_a_÷ oftwo _yp÷sofmemos
Touch the item you want to know
the content.
When yuu touch an item, its explanation
appears on the screen.
Tu apply the option, touch [YES],
otherwise, touch [NO].
Todeactivatethe HELP
Touch [] (HELP) agaiu in step 2.
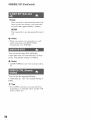
Just a touch on the screen during shooting
or playback displays the functions available
at that moment. You will find it easy tu
make various settings. See page 85 for
further details.
@_,(OPTION)
18

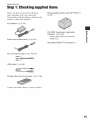
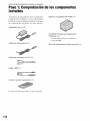
Step1: Checkingsupplieditems
Make sure that you have tile folk)wing
items supplied with yuur camcorder.
The number in the parentheses indicates the
number of that item supplied.
Rechargeable battery pack NP-FH6O (1)
(p. 20)
AC Adaptor (1) (p. 20)
Power cord (mains lead) (1) (p. 20)
AN connecting cable (1) (p. 45, 57)
CD-ROM "Handycam Application
Software" (1) (p. 92)
Pictmc Motion Browser (Software)
PMB Guide
Operating Guide (This manual) (1)
m
USB cable (1) (p. 59)
Wireless Remote Commander (1) (p. 126)
A buuon-type lilhium battery is already installed,
19

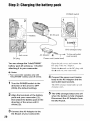
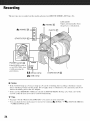
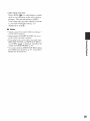
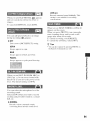
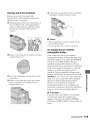
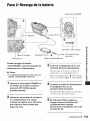
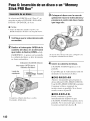
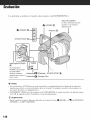
Step2: Chargingthe batterypack
POWER switch
--Battery
Jack cover
DC plug
IN jack
"5 \/ 1
"__ CHG (charge)lamp
AO__Adaptor 4_T=_' _°tlt_sew_l;t_utlet
Power cord (mains lead)
You can charge the "InfoLITHIUM"
battery pack (H series) (p. 115) after
attaching it to your camcorder.
tO Notes
• Your camcorder operates only with
"InfoLITHIUM" battery pack (H series).
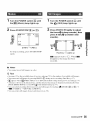
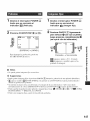
4
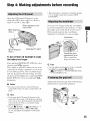
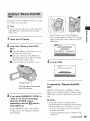
/ Turn the POWER switch in the
direction of the arrow to OFF
(CHG) (the default setting).
4
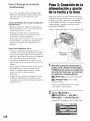
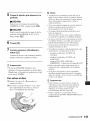
Open tile jack cover, and connect the
DC plug of the AC Adaptor.
Match the • mark on the DC plug with
the • mark on your camcorder.
Connect the power cord (mains
lead) to the AC Adaptor and the
wall outlet (wall socket).
Tile CHG (charge) lamp lights up and
charging starts.
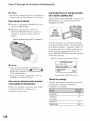
Align the terminals of the battery
pack and your camcorder (O),
then attach the battery pack in the
direction of the arrow until it
clicks (Q).
5
The CHG (charge) lamp turns off
when the battery is fully charged.
Disconnect the AC Adaptor from
the DC IN jack.
3 Connect the AC Adaptor to the
DC IN jack of your camcorder.
2O
Page is loading ...
Page is loading ...
Page is loading ...
Page is loading ...
Page is loading ...
Page is loading ...
Page is loading ...
Page is loading ...
Page is loading ...
Page is loading ...
Page is loading ...
Page is loading ...
Page is loading ...
Page is loading ...
Page is loading ...
Page is loading ...
Page is loading ...
Page is loading ...
Page is loading ...
Page is loading ...
Page is loading ...
Page is loading ...
Page is loading ...
Page is loading ...
Page is loading ...
Page is loading ...
Page is loading ...
Page is loading ...
Page is loading ...
Page is loading ...
Page is loading ...
Page is loading ...
Page is loading ...
Page is loading ...
Page is loading ...
Page is loading ...
Page is loading ...
Page is loading ...
Page is loading ...
Page is loading ...
Page is loading ...
Page is loading ...
Page is loading ...
Page is loading ...
Page is loading ...
Page is loading ...
Page is loading ...
Page is loading ...
Page is loading ...
Page is loading ...
Page is loading ...
Page is loading ...
Page is loading ...
Page is loading ...
Page is loading ...
Page is loading ...
Page is loading ...
Page is loading ...
Page is loading ...
Page is loading ...
Page is loading ...
Page is loading ...
Page is loading ...
Page is loading ...
Page is loading ...
Page is loading ...
Page is loading ...
Page is loading ...
Page is loading ...
Page is loading ...
Page is loading ...
Page is loading ...
Page is loading ...
Page is loading ...
Page is loading ...
Page is loading ...
Page is loading ...
Page is loading ...
Page is loading ...
Page is loading ...
Page is loading ...
Page is loading ...
Page is loading ...
Page is loading ...
Page is loading ...
Page is loading ...
Page is loading ...
Page is loading ...
Page is loading ...
Page is loading ...
Page is loading ...
Page is loading ...
Page is loading ...
Page is loading ...
Page is loading ...
Page is loading ...
Page is loading ...
Page is loading ...
Page is loading ...
Page is loading ...
Page is loading ...
Page is loading ...
Page is loading ...
Page is loading ...
Page is loading ...
Page is loading ...
Page is loading ...
Page is loading ...
Page is loading ...
Page is loading ...
Page is loading ...
Page is loading ...
Page is loading ...
Page is loading ...
Page is loading ...
Page is loading ...
Page is loading ...
Page is loading ...
Page is loading ...
Page is loading ...
Page is loading ...
Page is loading ...
Page is loading ...
Page is loading ...
Page is loading ...
Page is loading ...
Page is loading ...
Page is loading ...
Page is loading ...
Page is loading ...
Page is loading ...
-
 1
1
-
 2
2
-
 3
3
-
 4
4
-
 5
5
-
 6
6
-
 7
7
-
 8
8
-
 9
9
-
 10
10
-
 11
11
-
 12
12
-
 13
13
-
 14
14
-
 15
15
-
 16
16
-
 17
17
-
 18
18
-
 19
19
-
 20
20
-
 21
21
-
 22
22
-
 23
23
-
 24
24
-
 25
25
-
 26
26
-
 27
27
-
 28
28
-
 29
29
-
 30
30
-
 31
31
-
 32
32
-
 33
33
-
 34
34
-
 35
35
-
 36
36
-
 37
37
-
 38
38
-
 39
39
-
 40
40
-
 41
41
-
 42
42
-
 43
43
-
 44
44
-
 45
45
-
 46
46
-
 47
47
-
 48
48
-
 49
49
-
 50
50
-
 51
51
-
 52
52
-
 53
53
-
 54
54
-
 55
55
-
 56
56
-
 57
57
-
 58
58
-
 59
59
-
 60
60
-
 61
61
-
 62
62
-
 63
63
-
 64
64
-
 65
65
-
 66
66
-
 67
67
-
 68
68
-
 69
69
-
 70
70
-
 71
71
-
 72
72
-
 73
73
-
 74
74
-
 75
75
-
 76
76
-
 77
77
-
 78
78
-
 79
79
-
 80
80
-
 81
81
-
 82
82
-
 83
83
-
 84
84
-
 85
85
-
 86
86
-
 87
87
-
 88
88
-
 89
89
-
 90
90
-
 91
91
-
 92
92
-
 93
93
-
 94
94
-
 95
95
-
 96
96
-
 97
97
-
 98
98
-
 99
99
-
 100
100
-
 101
101
-
 102
102
-
 103
103
-
 104
104
-
 105
105
-
 106
106
-
 107
107
-
 108
108
-
 109
109
-
 110
110
-
 111
111
-
 112
112
-
 113
113
-
 114
114
-
 115
115
-
 116
116
-
 117
117
-
 118
118
-
 119
119
-
 120
120
-
 121
121
-
 122
122
-
 123
123
-
 124
124
-
 125
125
-
 126
126
-
 127
127
-
 128
128
-
 129
129
-
 130
130
-
 131
131
-
 132
132
-
 133
133
-
 134
134
-
 135
135
-
 136
136
-
 137
137
-
 138
138
-
 139
139
-
 140
140
-
 141
141
-
 142
142
-
 143
143
-
 144
144
-
 145
145
-
 146
146
-
 147
147
-
 148
148
-
 149
149
-
 150
150
-
 151
151


Ask a question and I''ll find the answer in the document
Finding information in a document is now easier with AI
Related papers
Other documents
-
Qtx 150.298UK User manual
-
Security Labs SLW-164 Datasheet
-
Sylvania 6615LDG Owner's manual
-
RCA CC6372 Owner's manual
-
-
Panasonic AJ-D700P User manual
-
Yamaha DV-C6860 Owner's manual
-
Samsung SC-DC564 Owner's manual
-
-
Sigma APO 70-300mm F4-5.6 DG MACRO Operating instructions