
How to... for Internal S-ATA Drives
Install Guide 3+24
Installationsanleitung 3+25
Guide d'installation 3+26
Guida d'installazione 3+27
Installatiegids 3+28
Guía de instalación 11+29
Guia de Instalação 11+30
Kurulum Kılavuzu 11+31
Instrukcja montażu 11+32
Installationsguide 11+33
17+34
Инструкция по инсталляции 17+36
Installationsvejledning 17+37
17+38
EN
DE
FR
IT
NL
ES
PT
TR
PL
SV
SC
RU
DK
TC
HowTo_Int_RW_Nero7-033.qxd 05-06-2007 15:48 Pagina 1

HowTo_Int_RW_Nero7-033.qxd 05-06-2007 15:48 Pagina 2
Page is loading ...

4
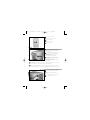
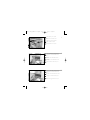
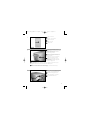
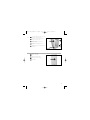
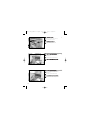
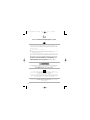
Switch your computer off.
Schalten Sie Ihren Computer aus.
Éteignez l’ordinateur.
Spegnere il computer.
Zet de computer uit.
Disconnect the power cable from the PC.
Ziehen Sie das Netzkabel vom Computer ab.
Débranchez le câble d’alimentation de
l’ordinateur.
Disconnettere il cavo di alimentazione dal PC.
Trek de netstekker uit de PC.
Touch an unpainted metal part (eg. your
heating or an unpainted part of your computer case).
This will avoid any damage to your computer by
electrostatic discharge.
Berühren Sie ein unlackiertes Metallteil
(z.B. Ihre Heizung oder ein unlackiertes Teil Ihres
Computergehäuses).
Das verhindert Schäden an Ihrem Computer
aufgrund von elektrostatischer Entladung.
Touchez une partie métallique non peinte
(p. ex. un radiateur ou une partie non peinte du
boîte de l'ordinateur).
Ce contact permettra d'éviter tout
endommagement de l'ordinateur par décharge
d'électricité statique.
Toccare un elemento di metallo non verniciato (p.es. l’elemento riscaldante o uno non verniciato del
case del computer).
In questo modo si eviteranno danni al computer dovuti a scariche elettrostatiche.
Raak een ongelakt metalen object aan (b.v. de verwarming of een ongelakt deel van de computer-
behuizing).
Op deze manier voorkomt u dat de computer beschadigd raakt als gevolg van elektrostatische ontlading.
4
3
2
EN
DE
FR
IT
NL
EN
DE
FR
IT
NL
EN
DE
IT
NL
FR
HowTo_Int_RW_Nero7-033.qxd 05-06-2007 15:48 Pagina 4

5
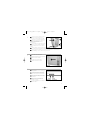
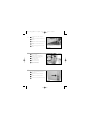
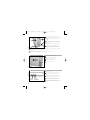
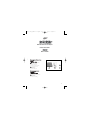
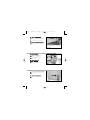
Open your computer. You may have to unleash
screws which are mostly located at the back of your
computer. See your computer manual for more details.
Öffnen Sie Ihren Computer. Eventuell müssen Sie
hierzu Schrauben herausdrehen, die sich meistens an der
Rückseite Ihres Computers befinden.
Weitere Informationen hierzu finden Sie in Ihrem
Computerhandbuch.
Ouvrez l’ordinateur. Pour cela, il peut être nécessaire
de desserrer une ou plusieurs vis à l’arrière de l’ordinateur.
Pour plus de détail, reportez-vous au mode d’emploi de
l’ordinateur.
Aprire il computer. È possibile che si dovranno svitare delle viti che in genere si trovano sul pannello posteriore del
computer. Per ulteriori informazioni fare riferimento al manuale del computer.
Maak uw computer open. Meestal moet u de schroeven aan de achterkant van uw computer losschroeven.
Raadpleeg de handleiding van uw PC voor details over het openen van de PC.
5
6
7
EN
DE
FR
IT
NL
Take off the cover of the computer.
Nehmen Sie die Abdeckung des Computers ab.
Retirez le capot de l’ordinateur.
Togliere il coperchio del computer.
Verwijder de kast van de computer.
EN
DE
FR
IT
NL
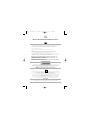
These are the connections (on the back of
your drive) you will have to use for connecting the
drive to the computer.
Das sind die Anschlüsse (an der Rückseite
Ihres Laufwerks), die Sie für den Anschluss Ihres
Laufwerks an den Computer verwenden müssen.
Ce sont les connecteurs (à l’arrière de votre
appareil) que vous devrez utiliser pour raccorder
l’unité à l’ordinateur.
Queste sono le connessioni (sul retro
dell'unità) che dovranno essere utilizzate per
collegare l'unità al computer.
Dit zijn de aansluitingen (op de achterkant van het station) die u gebruikt om het station op de
computer aan te sluiten.
EN
DE
IT
NL
FR
HowTo_Int_RW_Nero7-033.qxd 05-06-2007 15:48 Pagina 5

6
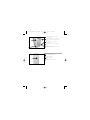
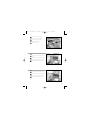
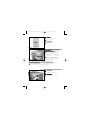
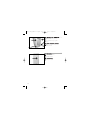
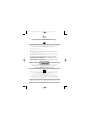
Put the drive into your computer.
Schieben Sie das Laufwerk in Ihren
Computer.
Montez l’appareil dans l’ordinateur.
Mettere l'unità nel computer.
Schuif het station in uw computer.
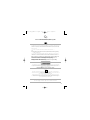
Attach the S-ATA data cable to your drive.
Schließen Sie das S-ATA-Datenkabel an Ihr
Laufwerk an.
Branchez le câble de données S-ATA à votre
lecteur.
Collegare un cavo dati S-ATA alla propria
unità.
Sluit de S-ATA-gegevenskabel aan op uw
station.
Attach a S-ATA Power Cable to your drive.
Schließen Sie ein S-ATA-Stromkabel an Ihr
Laufwerk an.
Branchez un câble d’alimentation S-ATA
à votre lecteur.
Collegare un cavo di alimentazione S-ATA
alla propria unità.
Sluit een S-ATA-stroomkabel aan op uw
station.
10
9
8
EN
EN
DE
FR
IT
NL
EN
DE
IT
NL
FR
DE
IT
NL
FR
HowTo_Int_RW_Nero7-033.qxd 05-06-2007 15:48 Pagina 6

7
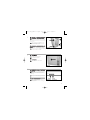
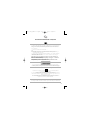
Connect the S-ATA data cable to your
motherboard.
Schließen Sie das S-ATA-Datenkabel an Ihre
Hauptplatine an.
Connectez le câble de données S-ATA sur la
carte mère.
Collegare il cavo dati S-ATA alla propria
scheda madre.
Sluit de S-ATA-gegevenskabel aan op uw
moederbord.
11
12
13
EN
DE
FR
IT
NL
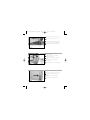
Secure the drive with the screws
(if possible on both sides).
Befestigen Sie das Laufwerk mit den
Schrauben (wenn möglich an beiden Seiten).
Fixez l’appareil à l’aide des vis
(si possible des deux côtés).
Fissare l'unità con le viti
(se possibile su entrambi i lati).
Schroef het station vast
(zo mogelijk aan beide zijden).
EN
DE
FR
IT
NL
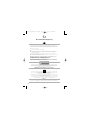
Put the cover you took off in step 5 back on.
Setzen Sie die in Schritt 5 abgenommene
Abdeckung wieder auf.
Replacez le capot que vous avez retiré à
l’étape 5.
Rimettere il coperchio tolto al punto 5.
Plaats de in stap 5 verwijderde kast weer terug.
EN
DE
IT
NL
FR
HowTo_Int_RW_Nero7-033.qxd 05-06-2007 15:48 Pagina 7

8
Put the screws (if there were any) back in
and reconnect the cables.
Schrauben Sie die Schrauben (sofern welche
vorhanden waren) wieder ein und schließen Sie die
Kabel wieder an.
Resserrez la ou les vis, le cas échéant,
et rebranchez les câbles.
Riavvitare le viti (se presenti) e ricollegare
i cavi.
Plaats de schroeven terug (als die er waren)
en sluit de kabels weer aan.
Restart your computer.
Starten Sie Ihren Computer neu.
Allumez l’ordinateur.
Riavviare il computer.
Start uw computer opnieuw op.
15
14
EN
DE
FR
IT
NL
EN
DE
FR
IT
NL
HowTo_Int_RW_Nero7-033.qxd 05-06-2007 15:48 Pagina 8

9
HowTo_Int_RW_Nero7-033.qxd 05-06-2007 15:48 Pagina 9
Page is loading ...
Page is loading ...
Page is loading ...
Page is loading ...
Page is loading ...
Page is loading ...

16
HowTo_Int_RW_Nero7-033.qxd 05-06-2007 15:48 Pagina 16

Это можно найти в окне:
A: Ваш новый дисковод
B: Данное руководство
C: 4 винта в компактный пакет
Dette findes i kassen:
A: Dit nye drev
B: Denne manual
C: 4 skruer i en lille pose
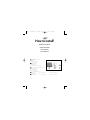
This can be found in the box:
A: Your new drive
B: This manual
C: 4 screws in a small bag
17
1
Как выполнить инсталляцию?
Comment installer?
How to install?
SC
RU
DK
TC
EN
HowTo_Int_RW_Nero7-033.qxd 05-06-2007 15:48 Pagina 17

18
Выключите ваш компьютер.
Sluk for din computer.
Switch your computer off.
Отсоедините кабель питания от вашего PC.
Tag strømkablet fra computeren ud.
Disconnect the power cable from the PC.
Прикоснитесь к любой неокрашенной
металлической части (например: к батарее
отопления или к неокрашенной части корпуса
компьютера).
Таким образом, можно избежать повреждения
компьютера в результате статического разряда.
Rør ved en umalet metalting (fx radiatoren
eller en umalet del af computerens indkapsling).
Dermed undgår du beskadigelse af computeren som
følge af elektrostatiske udladninger.
Touch an unpainted metal part (eg. your heating or an unpainted part of your computer case).
This will avoid any damage to your computer by electrostatic discharge.
4
3
2
SC
RU
DK
TC
EN
SC
RU
DK
TC
EN
SC
RU
TC
EN
DK
HowTo_Int_RW_Nero7-033.qxd 05-06-2007 15:48 Pagina 18

19
Откройте компьютер. Для этого нужно
отпустить винты, расположенные чаще всего на задней
стенке компьютера. Более подробно см. в руководстве
по компьютеру.
Åbn computeren. Du skal muligvis løsne nogle
skruer, der ofte sidder bag på computeren. Find mere
information i manualen til din computer.
Open your computer. You may have to unleash screws which are mostly located at the back of your computer.
See your computer manual for more details.
5
6
7
SC
RU
DK
TC
EN
Снимите крышку компьютера.
Tag dækslet af computeren.
Take off the cover of the computer.
SC
RU
DK
TC
EN
Здесь находятся соединения (на задней
стенке вашего дисковода), которые должны
использоваться для подключения дисковода к
компьютеру.
Dette er de forbindelser (bag på drevet), som
du skal bruge, når drevet skal tilsluttes computeren.
These are the connections (on the back of
your drive) you will have to use for connecting the
drive to the computer.
SC
RU
TC
EN
DK
HowTo_Int_RW_Nero7-033.qxd 05-06-2007 15:48 Pagina 19

20
Вставьте дисковод в ваш компьютер.
Sæt drevet ind i computeren.
Put the drive into your computer.
Присоедините кабель данных S-ATA к
вашему дисководу.
Forbind S-ATA datakablet til drevet.
Attach the S-ATA data cable to your drive.
Присоедините кабель питания S-ATA к
вашему дисководу.
Tilslut et S-ATA strømkabel til drevet.
Attach a S-ATA Power Cable to your drive.
10
9
8
SC
SC
RU
DK
TC
EN
SC
RU
TC
EN
DK
RU
TC
EN
DK
HowTo_Int_RW_Nero7-033.qxd 05-06-2007 15:48 Pagina 20

21
Присоедините кабель данных S-ATA к
материнской плате вашего компьютера.
Forbind S-ATA datakablet til bundkortet.
Connect the S-ATA data cable to your
motherboard.
11
12
13
SC
RU
DK
TC
EN
Закрепите дисковод винтами
(по возможности с обеих сторон).
Fastgør drevet med skruerne
(om muligt på begge sider).
Secure the drive with the screws
(if possible on both sides).
SC
RU
DK
TC
EN
Установите крышку, снятую вами на шаге 5.
Sæt det dækslet på igen (det du tog af under
pkt. 5).
Put the cover you took off in step 5 back on.
SC
RU
TC
EN
DK
HowTo_Int_RW_Nero7-033.qxd 05-06-2007 15:48 Pagina 21

22
Вставьте винты (если требуется) и
присоедините кабели.
Skru eventuelle skruer i igen og tilslut
kablerne igen.
Put the screws (if there were any) back in
and reconnect the cables.
Запустите ваш компьютер.
Genstart computeren.
Restart your computer.
15
14
SC
RU
DK
TC
EN
SC
RU
DK
TC
EN
HowTo_Int_RW_Nero7-033.qxd 05-06-2007 15:48 Pagina 22

HowTo_Int_RW_Nero7-033.qxd 05-06-2007 15:48 Pagina 23

24
More info or help needed
Visit www.philips.com/storageupdates
Troubleshooting
Philips optical disc drives are manufactured with utmost care. In case of problems, it often
appears that the drive itself is not defective. You can simply solve most of these problems by
using the support tools offered by Philips.
When you’re experiencing problems:
1
Please check the information in the "How to…" manual.
2
Check the Philips support websites www.philips.com/storageupdates and
www.philips.com/support for interactive support, troubleshooting, and the newest
software updates.
3
Should you encounter any more difficulties during installation or use, please contact
Philips Customer Care via the e-mail address or telephone numbers that can be found at
www.philips.com/contact.
Prior to claiming a drive for warranty, you must request a return reference
number at www.philips.com/support or contact Philips Customer Care.
➤ Additional warranty information is available in the "Philips Warranty"
folder on the Nero software disc.
"The making of unauthorised copies of copy-protected material, including computer
programmes, files, broadcasts and sound recordings, may be an infringement of copyrights and
constitute a criminal offence. This equipment should not be used for such purposes."
WEEE mark: Disposal of your old product
Your product is designed and manufactured with high quality materials and components, which
can be recycled and reused. Please inform yourself about the local separate collection system for
electrical and electronic products, including those marked by following symbol.
Please act according to your local rules and do not dispose of your old products with your
normal household waste.
WARNING
Plastic bags can be dangerous.
To avoid danger of suffocation, keep this bag away from babies and small children.
www.philips.com/storageupdates
EN
HowTo_Int_RW_Nero7-033.qxd 05-06-2007 15:48 Pagina 24
Page is loading ...
Page is loading ...
Page is loading ...
Page is loading ...
Page is loading ...
Page is loading ...
Page is loading ...
Page is loading ...
Page is loading ...

34
SC
HowTo_Int_RW_Nero7-033.qxd 05-06-2007 15:48 Pagina 34

35
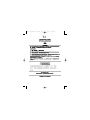
Ქኂ‛
䋼
ᚗర⚛
Hazardous/toxic Substance
ㇱઙฬ⒓
Name of the Parts
䪙
(Pb,
lead)
ᳮ
(Hg,
mercury)
䬝
(Cd,
cadmium)
ચ
䫀
(Cr 6+,
chromium 6+)
ᄙ
⒈ 㘨
⧶
(PBB)
ᄙ
⒈
ੑ⧶
䝮
(PBDE
䯵
Housing
ᄖᄂ
O O O O O O
DVD loader
DVD
శ⋎
X O O O O O
PWBs
〝᧼ ઙ⬉㒘
X O O O O O
O㧦␜
䆹
Ქኂ‛
䋼
䆹
ㇱઙᚲဋ
䋼
᧚ᢱਛ⊛㊂ဋSJ/T11363 - 2006
ᷛ
ಎ
㾘
ቯ⊛㒢㊂ⷐ᳞એਅޕ
O: Indicates that this toxic or hazardous substance contained in all of the homogeneous
materials for this part is below the limit requirement in SJ/T11363 – 2006.
X㧦␜
䆹
Ქኂ‛
䋼
⥋ዋ
䆹
ㇱઙ⊛ᨱ৻ဋ
䋼
᧚ᢱਛ⊛㊂SJ/T11363 – 2006
ᷛ
ಎ
㾘
ቯ⊛㒢㊂ⷐ᳞ޕ
X: Indicates that this toxic or hazardous substance contained in at least one of the
homogeneous materials used for this part is above the limit requirement in SJ/T11363 -
2006.
⦃ֱՓ⫼ᳳ䰤
Environmental Protection Use Period
This logo refers to the period ( 10 years )
⬉
ሶାᕷ
ѻ
ຠਛ⊛Ქኂ‛
䋼
ᚗర⚛ᱜᏱ↪⊛᧦ઙਅਇળ
থ
↢ᄖᴭᚗ⓭
ব
㧘
⬉
ሶାᕷ
ѻ
ຠ↪
᠋
↪
䆹⬉
ሶାᕷ
ѻ
ຠਇળ
ᇍ⦃
Ⴚㅧᚑ
Ϲ
㊀
∵
ᨴᚗ
ᇍ
ੱりޔ
䋶ѻ
ㅧᚑ
Ϲ
㊀
ᤳ
ኂ⊛ᦼ㒢ޕ
This logo refers to the period ( 10 years ) during which the toxic or hazardous substances
or elements contained in electronic information products will not leak or mutate so that the
use of these substances or elements will not result in any severe environmental pollution,
any bodily injury or damage to any assets.
HowTo_Int_RW_Nero7-033.qxd 05-06-2007 15:48 Pagina 35
Page is loading ...
Page is loading ...

38
TC
HowTo_Int_RW_Nero7-033.qxd 05-06-2007 15:48 Pagina 38
Page is loading ...
Page is loading ...
Page is loading ...
Page is loading ...
Page is loading ...
Page is loading ...
-
 1
1
-
 2
2
-
 3
3
-
 4
4
-
 5
5
-
 6
6
-
 7
7
-
 8
8
-
 9
9
-
 10
10
-
 11
11
-
 12
12
-
 13
13
-
 14
14
-
 15
15
-
 16
16
-
 17
17
-
 18
18
-
 19
19
-
 20
20
-
 21
21
-
 22
22
-
 23
23
-
 24
24
-
 25
25
-
 26
26
-
 27
27
-
 28
28
-
 29
29
-
 30
30
-
 31
31
-
 32
32
-
 33
33
-
 34
34
-
 35
35
-
 36
36
-
 37
37
-
 38
38
-
 39
39
-
 40
40
-
 41
41
-
 42
42
-
 43
43
-
 44
44


Ask a question and I''ll find the answer in the document
Finding information in a document is now easier with AI
in other languages
- italiano: Philips SPD2520BM/00 Manuale utente
- français: Philips SPD2520BM/00 Manuel utilisateur
- español: Philips SPD2520BM/00 Manual de usuario
- Deutsch: Philips SPD2520BM/00 Benutzerhandbuch
- русский: Philips SPD2520BM/00 Руководство пользователя
- Nederlands: Philips SPD2520BM/00 Handleiding
- português: Philips SPD2520BM/00 Manual do usuário
- dansk: Philips SPD2520BM/00 Brugermanual
- polski: Philips SPD2520BM/00 Instrukcja obsługi
- Türkçe: Philips SPD2520BM/00 Kullanım kılavuzu
- svenska: Philips SPD2520BM/00 Användarmanual
Related papers
-
Philips SPD2213BD/97 User manual
-
Philips SPD2519BD/97 User manual
-
Philips SPD6105BD User manual
-
Philips SPD6107BD/97 User manual
-
-
-
-
-
Philips SPD6007BM/00 User manual
-
Philips SPD7000BM User manual
Other documents
-
Iomega UltraMax Plus Quick start guide
-
Iomega REV 35 User manual
-
-
Iomega ULTRAMAX PLUS FIREWIRE 400 Owner's manual
-
-
LaCie Big Disk Extreme Dual Quick setup guide
-
-
-
-