Eizo FLEXSCAN SX3031W Owner's manual

Type
Owner's manual

This manual is also suitable for

English Deutsch Français Español Italiano Svenska Greece Russia
中文
Setup Manual
Important: Please read PRECAUTIONS, this Setup Manual and the User’s Manual
stored on the CD-ROM carefully to familiarize yourself with safe and effective
usage. Please retain this manual for future reference.
Installationshandbuch
Wichtig: Lesen Sie die VORSICHTSMASSNAHMEN, dieses Handbuch zur
Einrichtung und das Benutzerhandbuch (auf der CD-ROM) aufmerksam
durch, um sich mit der sicheren und effizienten Bedienung vertraut zu
machen. Bewahren Sie dieses Handbuch zum späteren Nachschlagen auf.
Manuel d’installation
Important : Veuillez lire attentivement les PRECAUTIONS, ce Manuel d’installation ainsi
que le Manuel d’utilisation inclus sur le CD-ROM, afin de vous familiariser
avec ce produit et de l’utiliser efficacement et en toute sécurité. Veuillez
conserver ce manuel pour référence ultérieure.
Manual de instalación
Importante: Lea detenidamente el apartado PRECAUCIONES, el Manual de instalación y
el Manual del usuario que encontrará en el CD-ROM para familiarizarse con
las normas de seguridad y los procedimientos de uso. Conserve este manual
para consultas posteriores.
Manuale di installazione
Importante:
leggere attentamente la sezione PRECAUZIONI, il presente Manuale di
installazione e il Manuale dell’utente memorizzati sul CD-ROM per utilizzare il
prodotto in modo efficace e sicuro. Conservare il manuale per consultazioni future.
Installationshandboken
Viktigt:
Läs försiktighetsåtgärderna, den här installationshandboken och
användarhandboken som finns på CD-skivan noggrant så att du känner dig säker
och får ett effektivt användande av produkten. Behåll manualen för framtida behov.
Εγχειρίδιο εγκατάστασης
Σημαντικό: Διαβάστε προσεκτικά τις ΠΡΟΦΥΛΑΞΕΙΣ, το Εγχειρίδιο εγκατάστασης και το
Εγχειρίδιο χρήστη που θα βρείτε στο CD-ROM προκειμένου να εξοικειωθείτε
με την ασφαλή και αποτελεσματική χρήση της συσκευής. Διατηρήστε αυτό το
εγχειρίδιο για μελλοντική χρήση.
Руководство по установке
Важно! Внимательно прочитайте МЕРЫ ПРЕДОСТОРОЖНОСТИ, настоящее
Руководство по установке и Руководство пользователя на CD-ROM для
получения сведений о безопасной и эффективной эксплуатации.
Сохраните это руководство для справки.
设定手册
重要事项: 请仔细阅读储存在光盘上的用户手册、本设定手册和预防措施、掌握如何安
全、有效地使用本产品。请保留本手册、以便今后参考。
Compatible Resolutions/Freguencies Kompatibla upplösningar/frekvenser
Kompatible Auflösungen/Bildwiederholfrequenzen
Συμβατές αναλύσεις/Συχνότητες
Résolutions/Fréquences compatibles
Поддерживаемые разрешения/частоты
Frecuencias y resoluciones compatibles
兼容的分辨率/频率
Risoluzioni/Frequenze compatibili:
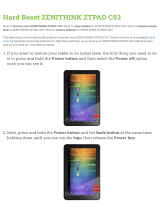
The monitor supports the following resolutions. Skärmen stöder följande upplösningar.
Der Monitor unterstützt die nachfolgend aufgeführten Auflösungen
.
Η οθόνη υποστηρίζει τις παρακάτω αναλύσεις.
Le moniteur est compatible avec les résolutions suivantes. Монитор поддерживает следующие разрешения.
El monitor admite las siguientes resoluciones.
本显示器支持下列分辨率。
Il monitor supporta le seguenti risoluzioni.
Resolution
Dot clock
Frequency Display Setup
Horizontal (kHz)/
Vertical (Hz)
Single Display Dual Display
SIGNAL1 SIGNAL2
SIGNAL1 SIGNAL2
VGA 640 × 480@60Hz 25.2 MHz
31.47
59.94
VGA TEXT
720 × 400@70Hz
28.3 MHz
31.47
70.09
VGA 800 × 600@60Hz
40.0 MHz
37.88
60.32
VESA 1024 × 768@60Hz
65.0 MHz
48.36
60.00
VESA 1280 × 960@60Hz
108.0 MHz
60.00
60.00
VESA
1280 × 1024@60Hz
108.0 MHz
63.98
60.02
VESA
1600 × 1200@60Hz
162.0 MHz
75.00
60.00
1200 × 1600@60Hz
*
1
162.3MHz
99.42
59.96
VESA CVT
1680 × 1050@60Hz
*
5
146.3MHz
65.29
59.95
VESA CVT RB
1680 × 1050@60Hz
*
5
119.0MHz
64.67
59.88
VESA CVT RB
1920 × 1200@60Hz
*
2
*
5
154.0MHz
74.04
59.95
DUAL LINK
1920 × 1200@60Hz
*
3
*
5
193.3MHz
74.56
59.89
DUAL LINK
2048 × 1536@60Hz
*
3
209.3MHz
94.77
59.98
DUAL LINK
2560 × 1600@60Hz
*
3
*
4
*
5
268.5MHz
98.71
59.97
*
1
For Dual display *
2
SIGNAL 2 *
3
For Single display (SIGNAL 1) *
4
Recommended resolution (Set this resolution)
*
1
Für Dualanzeige *
2
SIGNAL 2 *
3
Für einfache Anzeige (SIGNAL 1) *
4
Empfohlene Auflösung (diese Auflösung festlegen)
*
1
Pour l’affichage double *
2
SIGNAL 2 *
3
Pour l’affichage simple (SIGNAL 1) *
4
Résolution recommandée (Réglez votre appareil sur cette résolution)
*
1
Para visualización dual *
2
SIGNAL 2 *
3
Para visualización simple (SIGNAL 1) *
4
Resolución recomendada (ajuste esta resolución)
*
1
Per visualizzazione doppia *
2
SIGNAL 2 *
3
Per visualizzazione singola (SIGNAL 1) *
4
Risoluzione consigliata (impostare questo valore di risoluzione)
*
1
För dubbel visning *
2
SIGNAL 2 *
3
För enkel visning (SIGNAL 1) *
4
Rekommenderad upplösning (Ställ in den här upplösningen)
*
1
Για διπλή οθόνη *
2
SIGNAL 2 *
3
Για μονή οθόνη (SIGNAL 1) *
4
Προτεινόμενη ανάλυση (Επιλέξτε αυτή την ανάλυση)
*
1
Для двойного дисплея *
2
SIGNAL 2 *
3
Для одного дисплея (SIGNAL 1) *
4
Рекомендованное разрешение (Установите данное разрешение)
*
1
用于双画面显示 *
2
SIGNAL 2 *
3
用于单画面显示 (SIGNAL 1) *
4
推荐的分辨率 (设定此分辨率)
*
5
When displaying the wide format input signal, a graphics board in conformance with VESA CVT standard is required.
*
5
Zur Anzeige des Eingangssignals für das Breitbild ist eine Grafikkarte erforderlich, die die Anforderungen des Standards VESA CVT erfüllt.
*
5
Lors de l’affichage du signal d’entrée format large, une carte vidéo conforme à la norme VESA CVT est requise.
*
5
Se necesita una tarjeta gráfica compatible con el estándar VESA CVT para visualizar la señal de entrada con formato panorámico.
*
5
Per visualizzare il segnale di ingresso in formato ampio, è necessaria una scheda grafica conforme allo standard VESA CVT.
*
5
Vid visning med ingångssignalen för bredbildsformat, krävs ett grafikkort som uppfyller VESA CVT-standard.
*
5
Όταν εμφανίζεται το σήμα εισόδου οθόνης μεγάλου μεγέθους, απαιτείται κάρτα γραφικών συμβατή με το πρότυπο VESA CVT.
*
5
Для отображения широкоформатного входного сигнала графическая карта должна соответствовать стандарту VESA CVT.
*
5
当显示宽荧幕格式输入信号时,需要符合VESA CVT标准的显卡。
1
English
Color LCD Monitor
TroubleshootingSetting/AdjustmentInstallationPrior to use
About Setup Manual and Users Manual
Setup Manual
(this manual)
Describes basic information ranging from connection of the monitor to a
PC to using the monitor.
Users Manual
(PDF file on the CD-ROM*)
Describes application information such as screen adjustments, settings,
and specifications.
PRECAUTIONS
Describes how to use the monitor safely.
* Installation of Adobe Reader is required.
Product specifications vary with sales areas. Confirm that the manual is written in the language of the area of purchase.
[Location of Caution Statement]
Copyright© 2007 EIZO NANAO CORPORATION All rights reserved.
No part of this manual may be reproduced, stored in a retrieval system, or transmitted, in any form or by any means,
electronic, mechanical, or otherwise, without the prior written permission of EIZO NANAO CORPORATION.
EIZO NANAO CORPORATION is under no obligation to hold any submitted material or information confidential
unless prior arrangements are made pursuant to EIZO NANAO CORPORATION’s receipt of said information.
Although every effort has been made to ensure that this manual provides up-to-date information, please note that EIZO
monitor specifications are subject to change without notice.
ENERGY STAR is a U.S. registered mark.
Apple and Macintosh are registered trademarks of Apple Inc.
VGA is a registered trademark of International Business Machines Corporation.
DPMS is a trademark and VESA is a registered trademark of Video Electronics Standards Association.
Windows is a registered trademark of Microsoft Corporation.
PowerManager is a trademark of EIZO NANAO CORPORATION.
FlexScan, ScreenManager, i•Sound
and EIZO are registered trademarks of EIZO NANAO CORPORATION in Japan and other countries.
2
English
TroubleshootingSetting/AdjustmentInstallationPrior to use
Package Contents
Check that all the following items are included in the packaging box. If any items are missing or damaged, contact your local
dealer.
NOTE
Please keep the packaging box and materials for future movement or transport of the monitor.
Monitor
Power Cord
Signal Cable (Dual Link): DD200DL-BK
Signal Cable: FD-C39
EIZO USB Cable: MD-C93
EIZO LCD Utility Disk (CD-ROM)
• User’s Manual
Setup Manual (this manual)
PRECAUTIONS
Limited Warranty
Recycling Information
Mounting Screws (M4 x 12, 4 pcs.)
Controls and Functions
1 Input Signal Selection button Switches input signals for display images.
2 Mode button Displays the FineContrast menu (page 5).
3 Enter button Displays the Adjustment menu, determines an item on the menu screen, and
saves values adjusted.
4 Control buttons (Left, Down,
Up, Right)
or button: Displays the brightness adjustment window (page 5).
• Chooses an adjustment item or increases/decreases adjusted values for
advanced adjustments using the Adjustment menu (page 5).
5 Power button Turns the power on or off.
6 Power indicator Indicates monitor’s operation status.
Blue : Operating
Off : Power off
Orange : Power saving
7 Tilt adjustable stand Used to adjust the angle of the monitor screen.
8 Security lock slot Complies with Kensington’s MicroSaver security system.
9 Input signal connectors Left: DVI-D connector (SIGNAL1 DUAL LINK)/Right: DVI-D connector
(SIGNAL2)
10 USB port (Up) Connects the USB cable to use the ScreenManager Pro for LCD software
(for Windows).
For how to use it, refer to the User’s Manual on the CD-ROM.
11
USB port (Down) Connects a peripheral USB device.
12
Option speaker (i·Sound L3)
mounting holes
Used to attach the option speaker (i·Sound L3).
* ScreenManager
®
is an EIZO’s nickname of the Adjustment menu. (For how to use ScreenManager, refer to the Users Manual on
the CD-ROM.)
1 2 3 4 5 6
7
10 9
11
12
8
Adjustment menu
(*ScreenManager
®
)
Power connector
Push the cable into the cable holder.
3
English
TroubleshootingSetting/AdjustmentPrior to use Installation
Connecting Cables
Attention
When replacing the current monitor with a SX3031W-H monitor, be sure to change the PC settings for
resolution and vertical frequency to those which are available for the SX3031W-H monitor referring to the
resolution table (back of cover page) before connecting the PC.
1
Check that the monitor and the PC are powered off.
2
Connect the monitor to the PC with a signal cable that matches the connectors.
After connecting the cable connectors, tighten the screws of the connectors to secure the coupling.
• When the resolution of the graphics board on your PC is applicable to 2560 × 1600 (Single display);
Connectors on the
PC
DVI connector
Connectors on the
monitor
SIGNAL1
Signal cable DD200DL-BK (supplied)
• When the resolution of the graphics board on your PC is not applicable to 2560 × 1600 (Dual display);
Dual display (simultaneous left and right sides display) is available by using a dual DVI-D system graphics
board or any two graphics boards.
Dual display with 1200 × 1600 resolution is the maximum display size.
DVI connector SIGNAL1
Signal cable DD200DL-BK (supplied)
Connectors on the
PC
Connectors on the
monitor
DVI connector SIGNAL2
Signal cable FD-C39 (supplied)
3
Plug the power cord into a power outlet and the Power connector on the monitor.
4
English
Prior to use Installation TroubleshootingSetting/Adjustment
Adjusting the Screen Height and Angle
Adjust the screen height, tilt and swivel the screen to the best condition for working.
Setting the Screen Display
1
Check that the monitor and the PC are powered off.
2
Press with holding down to set the display mode.
Single display: Choose <Single Display>.
Dual display: Choose <Dual Display>.
3
Press .
Attention
Initial setting for the display mode is set to <Single Display>.
Displaying the Screen
1
Turn on the PC.
The screen image appears.
Attention
Turn off the monitor and PC after using them. Unplugging the power cord completely shuts off power
supply to the monitor.
When setting the display mode between single display and dual display, be sure to turn off your PC.
5
English
Prior to use Installation TroubleshootingSetting/Adjustment
The basic settings and adjustments are completed. For advanced settings/adjustments,
refer to the User’s Manual on the CD-ROM.
Selecting Display Mode
FineContrast allows you to select the best display mode easily according to monitors application.
For details of FineContrast, refer to the Users Manual on the CD-ROM.
FineContrast Mode
Custom Available for making desired setting.
sRGB Suitable for color matching with sRGB compatible peripherals.
Text
Suitable for displaying texts for word processing or spreadsheets.
Picture Suitable for displaying images such as photos or picture images.
Movie Suitable for playing back animated images.
1
Press

.
The FineContrast menu appears.
2
Press

again while the FineContrast
menu is displayed.
Each time the button is pressed, the mode on the screen
switches. (Refer to the FineContrast Mode table.)
3
Press at the desired mode.
The selected mode is set.
Adjusting Brightness
1
Press or .
The brightness adjustment window appears.
2
Adjust the brightness with or .
Press to increase screen brightness or press to
decrease.
3
Press at the desired brightness.
The specified brightness is saved.
Performing Advanced Settings/Adjustments
Advanced adjustments for the color and various settings are
available using the Adjustment menu.
For details of each adjustment function, refer to the Users Manual on
the CD-ROM.
Displays the
current mode.
FineContrast menu
Brightness menu
Adjustment menu
6
English
Prior to use Installation Setting/Adjustment Troubleshooting
No-Picture Problem
If no picture is displayed on the monitor even after the following remedial action is taken, contact your local dealer.
1. Check the Power indicator.
Symptom Status Possible cause and remedy
No picture Power indicator does not light
up.
• Check whether the power cord is correctly
connected.
• Press .
Power indicator lights blue. Switch the input signal with .
Power indicator lights orange. Press a key on the keyboard or click the mouse.
Turn on the PC.
2. Check the error message that remains on the screen.
These messages appear when the input signal is incorrect even if the monitor is functioning.
Symptom* Status Possible cause and remedy
The input signal is not received. Check whether the PC is turned on.
Check whether the signal cable is properly
connected to the PC.
Switch the input signal with .
The signal frequency is outside
the specification. Incorrect
signal frequency is shown in
red.
Change the mode to an appropriate mode using
the graphics board’s utility software. Refer to the
manual of the graphics board for details.
* When the display is set to dual display mode, or appears on the error message display to show the error display.
  • Page 1 1
  • Page 2 2
  • Page 3 3
  • Page 4 4
  • Page 5 5
  • Page 6 6
  • Page 7 7
  • Page 8 8
  • Page 9 9
  • Page 10 10
  • Page 11 11
  • Page 12 12
  • Page 13 13
  • Page 14 14
  • Page 15 15
  • Page 16 16
  • Page 17 17
  • Page 18 18
  • Page 19 19
  • Page 20 20
  • Page 21 21
  • Page 22 22
  • Page 23 23
  • Page 24 24
  • Page 25 25
  • Page 26 26
  • Page 27 27
  • Page 28 28
  • Page 29 29
  • Page 30 30
  • Page 31 31
  • Page 32 32
  • Page 33 33
  • Page 34 34
  • Page 35 35
  • Page 36 36
  • Page 37 37
  • Page 38 38
  • Page 39 39
  • Page 40 40
  • Page 41 41
  • Page 42 42
  • Page 43 43
  • Page 44 44
  • Page 45 45
  • Page 46 46
  • Page 47 47
  • Page 48 48
  • Page 49 49
  • Page 50 50
  • Page 51 51
  • Page 52 52
  • Page 53 53
  • Page 54 54
  • Page 55 55
  • Page 56 56
  • Page 57 57
  • Page 58 58
  • Page 59 59
  • Page 60 60

Eizo FLEXSCAN SX3031W Owner's manual

Type
Owner's manual
This manual is also suitable for

Ask a question and I''ll find the answer in the document

Finding information in a document is now easier with AI