
CONGELADOR
VERTICAL
UPRIGHT FREEZER
CONGELADOR
VERTICAL
ZVC 190 C
LIBRO DE INSTRUCCIONES INSTRUCTION BOOKLET MANUAL DE INSTRUÇÕES
2222 090-54
This document was created with FrameMaker 4.0.4

10
CONTENTS
Warnings. . . . . . . . . . . . . . . . . . . . . . . . . . . . . . . . .page 11
Installation . . . . . . . . . . . . . . . . . . . . . . . . . . . . . . . .page 12
Location . . . . . . . . . . . . . . . . . . . . . . . . . . . . . . . .page 12
Rear spacers. . . . . . . . . . . . . . . . . . . . . . . . . . . . . . .page 12
Power connection . . . . . . . . . . . . . . . . . . . . . . . . . . . . .page 12
Cleaning the appliance’s interior . . . . . . . . . . . . . . . . . . . . . . . .page 12
Door reversal directions. . . . . . . . . . . . . . . . . . . . . . . . . . .page 13
Fitting the door panel . . . . . . . . . . . . . . . . . . . . . . . . . . .page 13
Use . . . . . . . . . . . . . . . . . . . . . . . . . . . . . . . . . .page 14
Control panel . . . . . . . . . . . . . . . . . . . . . . . . . . . . . .page 14
Starting-up and temperature regulation . . . . . . . . . . . . . . . . . . . . .page 14
Fast freezing. . . . . . . . . . . . . . . . . . . . . . . . . . . . . . .page 14
Temperature warning light. . . . . . . . . . . . . . . . . . . . . . . . . .page 14
Freezing fresh foods . . . . . . . . . . . . . . . . . . . . . . . . . . . .page 15
Rules for freezing fresh food . . . . . . . . . . . . . . . . . . . . . . . . .page 15
Storage of deep frozen foods . . . . . . . . . . . . . . . . . . . . . . . . .page 15
Useful hints . . . . . . . . . . . . . . . . . . . . . . . . . . . . . . .page 16
Thawing . . . . . . . . . . . . . . . . . . . . . . . . . . . . . . . .page 16
Defrosting . . . . . . . . . . . . . . . . . . . . . . . . . . . . . . .page 16
Making ice cubes . . . . . . . . . . . . . . . . . . . . . . . . . . . . .page 16
Maintenance . . . . . . . . . . . . . . . . . . . . . . . . . . . . . . . .page 17
Internal cleaning . . . . . . . . . . . . . . . . . . . . . . . . . . . . .page 17
External cleaning . . . . . . . . . . . . . . . . . . . . . . . . . . . . .page 17
Long idle periods . . . . . . . . . . . . . . . . . . . . . . . . . . . . .page 17
If the appliance is not working properly. . . . . . . . . . . . . . . . . . . . . . . .page 17
Warning!
The appliance which you have just bought is
supplied not only with the instruction manual, but
also with a Warranty Card Certificate, on the back of
which are written the relative conditions.
Please fill in the necessary details on the Card
Certificate and send it to the Zanussi Centre covering
the area in which the appliance is to be installed.
(See list of Zanussi network centres).
We congratulate you on your choice. Read this instruction
manual carefully and follow the recommendations it
provides to benefit from years of excellent service.
The appliance which you have just purchased has
been very accurately controlled throughout the entire
manufacturing process. Nevertheless, should any
problem arise during usage, whether it be during
the warranty period, or when such period has expired,
please contact your nearest Zanussi Service Centre
immediately.
The address and telephone number of this Centre
can be easily found in the enclosed List or by looking
in the telephone directory, under Zanussi.
Our Zanussi Service Network is at your complete
disposal, to serve you with maximum speed and efficiency,
all you have to do is call.
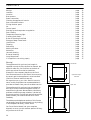
Closed door
Appliance height:
Open door
1240 mm
D266
540
545
550
43
D267
583
1080

11
WARNINGS
It is most important that this instruction book should be
retained with the appliance for future reference. Should the
appliance be sold or transferred to another owner, or should
you move house and leave the appliance, always ensure that the
book is supplied with the appliance in order that the new owner
can be acquainted with the functioning of the appliance and
the relevant warnings.
These warnings are provided in the interest of safety. You must
read them carefully before installing or using the appliance.
ª This appliance is designed to be operated by
adults. Children should not be allowed to tamper
with the controls or play with the product.
ª Any electrical work required to install this
appliance should be carried out by a qualified
electrician or competent person.
ª This product should be serviced by an authorized
Service Centre, and only genuine spare parts
should be used.
ª It is dangerous to alter the specifications or
modify this product in any way.
ª Care must be taken to ensure that the appliance
does not stand on the electrical supply cable.
ª The domestic refrigerators and freezers are
designed to be used specifically for the storage of
edible foodstuffs only.
ª Frozen food must not be re-frozen once it has
been thawed out.
ª Manufacturers’ storage recommendations should
be strictly adhered to. Refer to relevant
instructions.
ª There are working parts in this product which
heat up. Always ensure that there is adequate
ventilation as a failure to do this will result in
component failure and possible food loss. See
installation instructions.
ª Parts which heat up should not be exposed.
Wherever possible the back of the product should
be against a wall.
ª Before any cleaning or maintenance work is
carried out, be sure to switch off and unplug the
appliance.
ª If the appliance has been transported
horizontally, it is possible that the oil contained in
the compressor flows in the refrigerant circuit. It
is advisable to wait at least two hours before
connecting the appliance to allow the oil to flow
back in the compressor.
ª The inner lining of the appliance consists of
channels through which the refrigerant passes. If
these should be punctured this would damage the
appliance beyond repair and cause food loss.
DO NOT USE SHARP INSTRUMENTS to
scrape off frost or ice. Frost may be removed by
using the scraper provided. Under no
circumstances should solid ice be forced off the
liner. Solid ice should be allowed to thaw when
defrosting the appliance. See defrost instructions.
ª Do not place carbonated or fizzy drinks in the
freezer as it creates pressure on the container,
which may cause it to explode, resulting in
damage to the appliance.
ª This appliance is heavy. Care should be taken
when moving it.
ª Ice lollies can cause frost burns if consumed
straight from the appliance.
ª Under no circumstances should you attempt to
repair the appliance yourself.
Repairs carried out by inexperienced persons
may cause injury or more serious malfunctioning.
Refer to your local Service Centre, and always
insist on genuine spare parts.
ª
This appliance does not contain gasses which could damage
the ozone layer, in either its refrigerant circuit or insulation
materials; it must nevertheless be disposed of in a proper
manner, in accordance with regulations for protection of the
environment.

12
INSTALLATION
If this appliance featuring magnetic door seals is to replace an
older appliance having a spring lock on the door or lid, be sure
to make that spring lock unusable before you discard the old
appliance. This will prevent it from becoming a death-trap for a
child.
Location
Place the appliance as far away as possible from
sources of heat, e.g. radiators, heaters, direct
sunlight, etc..
The best results are achieved with a room
temperature ranging from +18°C to +38°C
(class ST) or from +18°C to +43°C (class T). The
class of your appliance is shown on its rating plate.
Make sure that there is nothing at the back, at the
top and at the bottom of the appliance to obstruct
air circulation.
For more efficient operation of the appliance the
minimum distance between the top of the appliance
and other overhanging kitchen furniture, if any,
should be at least 100 mm (Fig. 1/A).
The best solution is shown in Fig. 1/B (without
overhanging kitchen furniture).
The appliance sides may also be in contact with the
kitchen furniture, provided that air can circulate
freely round the back and top.
One or more adjustable feet mounted on the base of
the appliance make it possible to set it perfectly
level.
Fig. 1
Rear spacers
In the plastic envelope containing the Operating
Instructions are also included two wall spacers to be
fitted into the special openings provided on the back
of the appliance (Fig. 2).
Push-fit the spacers into the openings, making sure
that arrow (A) is positioned as per Fig. 2 and then
turn the spacers through 45° until they lock in place
(arrow in vertical position).
A
B
D194
100 mm min.
Fig. 2
Power connection
Before plugging the appliance into the mains
socket, check that the voltage and frequency
indicated on the appliance’s rating plate are the
same as those provided by your home power supply.
A 6% fluctuation above or below rated voltage is
acceptable.
For operation at different voltages, a suitable
transformer should be used.
Make sure the plug and the socket are compatible so
that no adaptors need to be used. If necessary,
replace the socket with a suitable one.
The appliance MUST be connected to an efficient earth or
ground tap.
The supply-lead plug in fact incorporates a special earth
or ground contact for this purpose. If by any chance the
sockets of your domestic wiring system are not earthed,
the appliance must be connected to a separate earth or
ground wire by a qualified electrician, in accordance
with existing safety regulations.
The manufacturer declines to accept any liability if this
accident-prevention procedure is not followed.
This appliance complies with the relevant UNI
standards and with E.E.C. Directive No. 87/308 of
02.06.87 relative to radio interference suppression.
This appliance complies with the following
E.E.C. Directives:
-
73/23 EEC
of 19.2.73 (Low Voltage Directive) and
subsequent modifications;
-
89/336 EEC
of 3.5.89 (Electromagnetic
Compatibility Directive) and subsequent
modifications.
Cleaning the appliance’s interior
Before using the appliance for the first time, wash
all internal parts with lukewarm water and neutral
soap so as to remove the typical «new» smell and
then dry thoroughly.
Do not use detergents or abrasive powders as these
will damage the finish.
D060
A
45°

13
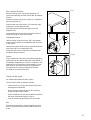
Door reversal directions
Before starting work, unplug the appliance. To
reverse the opening direction of the door proceed as
follows:
Remove the lower hinge (3), the pin (1), the washer
(4) and the screw (2);
slide the door out from the pin (5), remove the pin
and place it on the opposite side;
unscrew the foot front left and place it on the
opposite side;
unscrew the two screws which mask the holes for
fixing the hinge on the front left side;
reassemble the door;
refit the lower hinge (turning it 180
°
), the washer,
the pin and the screw on the opposite side, as shown
in the figure.
remove the handle, after having removed the screw
cover and refit it on the opposite side.
The holes that are not used must be masked with
the plastic plugs removed.
Attention
After completion of the door reversibility operation,
check that the door gasket adheres to the cabinet. If
the ambient temperature is cold (i.e. in Winter), the
gasket may not fit perfectly to the cabinet. In that
case, wait for the natural fitting of the gasket or
accelerate this process by heating up the part
involved with a normal hairdrier.
Fitting the door panel
(for models equipped with door frame)
To fit the door panel, proceed as follows:
– remove the fixing screws and remove the frame
side opposite the handle;
– loosen, without removing them, all remaining
screws fixing the door frame;
– insert the panel from the side on which the frame
has been removed and push it fully in;
– refit the frame side and tighten all the screws.
Note
The panel size should be 1-2 mm smaller than the
door; the maximum permissible panel thickness is
4 mm.
Fig. 3
Fig. 3a
Fig. 3b
5
D548
4
3
1
2
D547
180¡
D162

14
USE
The freezer is suitable for freezing fresh foods, storing deep frozen foods for a maximum of 3 months
and making ice cubes.
Control panel (Fig. 4)
Fig. 4
A - Thermostat knob
B - N/S knob
C - Operating pilot light
D - Fast-freeze light
E - Temperature warning light
A B C
S
D E
1
2
3
4
5
6
N S
Starting-up and temperature regulation
Insert the plug into the nearest wall socket, pilot
light (C) will light up to show that the appliance is
working.
Turn the thermostat knob (A) clockwise to a
medium setting (temperature warning light (E) will
come on).
To safely store frozen and deep-frozen foods, the
inner temperature of the freezer must be –18
°
C or
colder.
Wait until the temperature warning light (E) goes
out, thus showing that the proper temperature has
been reached.
However if the appliance is operating in
unfavourable room conditions such as poor
ventilation, high ambient temperature and frequent
door openings, it might be necessary to select a
more suitable setting.
Freezer operation can be stopped by turning the
thermostat knob to position «
O
».
Fast freezing
For fast freezing, turn the N/S knob (B) (Fig. 4) to
position «S». The fast freeze light (D) will come on.
Temperature warning light (E) (Fig. 4)
This light warns when the temperature inside the
freezer compartment has increased to a point at
which safe storage of food can no longer be
guaranteed.
When the appliance is switched on for the first time
or when food is placed in the compartment for
freezing, this light remains on until the temperature
has reached the level required for correct storage.

15
Freezing fresh foods
To fast-freeze foods when the appliance has not
been in use, switch on the freezer and let it run on
the fast-freeze setting for at least three hours
before putting the food to be frozen in the
compartment.
If however the appliance is already in operation, it
should run on the fast-freeze setting for at least 24
hours before the food is put in the freezer.
During fast freezing the compressor works
continuously, using the maximum cooling power.
Keep the knob on the same setting for 24 hours
after loading the food to be frozen, and then reset
the knob to the position for storage of deep frozen
foods.
It is necessary to consider the freezing capacity of
the appliance, that is the maximum amount of food
that can be frozen in 24 hours; this capacity is 20 kg.
Place packages of deep frozen foods as shown in
Fig. 5.
Fig. 5
Place the food to be frozen in the upper
compartments, so that they do not come in contact
with already frozen foods, as their higher
temperature might increase the temperature of
frozen foods.
At the end of the freezing period, place the frozen
food in other compartments in order to leave room
for freezing more food.
D169
10 Kg
10 Kg
Rules for freezing fresh food
Freeze only good-quality, fresh and well-cleaned
foods.
Split them into small portions to speed up freezing
and avoid having to thaw more food than you
require.
It is in fact important to remember that once food
has thawed out, it deteriorates fast.
Another point to remember is that lean foods keep
better and longer than fatty foods. Salt too reduces
storage time.
Wrap the food in foil or polythene film, ensuring
that the wrapping adheres closely to the food and is
well sealed.
Never put fizzy drinks in the freezer as they might
well burst.
In addition, never put hot foods or liquids in the
freezer compartment and take care not to fill
recipients up to the brim if they are covered with a
lid.
Water ices, if consumed immediately after removal
from the freezing compartment, can cause frost
burns.
It is a good idea to mark packs so that you can keep
a check on storage periods.
Never open the freezer door or introduce new foods
if the freezer is on fast freeze operation.
Important
If accidental thawing occurs – due to a power cut for
example – food must be used up very quickly or else
cooked immediately and refrozen. If, however, the
power failure is relatively brief (from 6 to 8 hours)
and the freezer compartment is packed full, the
frozen food will not suffer any damage.
Note
A special card is located in the holder on the inner
door of the freezer compartment. On the upper part
it shows pictures of different types of food followed
by a figure. These figures indicate the maximum
storage time, in months, for each type of food.
Storage of deep frozen foods
When the freezer is started up for the first time, or
after an idle period, turn the N/S knob to the fast
freeze setting described above, and wait at least
two hours before loading the food to be stored.
Then, turn the knob back to the storage position.
If the freezer is already in operation, there is no
need to wait.

16
Useful hints
Alway check the date shown on deep frozen foods
on sale and eat them before the expiry date.
Do not open the door too often and leave it open
only as long as necessary; the temperature increase
in fact reduces the food storage life.
Make sure all packages are in good condition,
otherwise foods might deteriorate.
If the packages show signs of humidity or have
swollen, the foods may not have been properly
stored, so that the product has lost its original
quality.
When deep frozen foods are bought, always use a
thermal bag; they should always be bought last of
all. Wrap them in newspaper sheets and store them
in the freezer as soon as you get home. Check the
product carefully when you buy it, as unfrozen foods
cannot be frozen again and must be eaten within 24
hours.
Thawing
Before being used, deep-frozen and frozen food can
be thawed out either in the refrigerator or at room
temperature, depending on the time available for
this operation.
Small pieces of food can be cooked straight out of
the freezer, without any intermediate thawing
operation. In this case, cooking time will be longer
than in the case of thawed food.
Defrosting
The freezer compartment, will become
progressively covered with frost. This should be
removed with the special plastic scraper provided,
whenever the thickness of the frost exceeds 4 mm.
During this operation it is not necessary to switch
off the power supply or to remove the foodstuffs.
However, when the ice becomes very thick on the
inner liner, complete defrosting should be carried
out and it is advisable to carry out this operation
when the appliance is empty.
To carry out complete defrosting of the ( )
freezer compartment proceed as follows:
Remove the ice-cube trays and the frozen foods and
wrap them in several sheets of newspaper or, even
better, in thermally insulated containers.
Turn the thermostat knob to the «
O
» position or
unplug the appliance.
Leave the door open.
Insert the plastic scraper in the appropriate seating
at the bottom centre, as shown in Fig. 6, place a
basin underneath to collect the defrost water.
Fig. 6
When defrosting is completed dry the interior
thoroughly.
Keep the scraper for future use.
Turn the thermostat knob (A) to the desired
position or replace the plug in the socket. After
allowing the appliance to run for two hours on the
fast-freeze setting, it is ready for storing frozen
food again.
Important
Never use knives or metal objects to scrape away
the accumulated frost.
Remember that an increase in the surface
temperature of already-frozen foods may
significantly decrease their storage life.
Making ice cubes
The freezer may be fitted with one or more trays for
making ice cubes for the whole family. Fill the trays
with water up to 3/4 of their capacity and place
them in the fast freeze compartment; if the water in
your area contains many mineral salts (especially
lime), use natural mineral water to make ice cubes.
The ice cubes can be detached from the tray by
simply twisting it; never use metal tools to remove
the trays from the freezer.
D068

17
MAINTENANCE
Internal cleaning
During complete defrosting, wash the inside linings
of the freezer with lukewarm water and sodium
bicarbonate; finally, dry thoroughly.
External cleaning
Wash the cabinet surfaces with lukewarm water
and soap; from time to time use a product for
polishing the outside components.
Remove dust from the condenser at the back of the
freezer with a soft brush or a vacuum cleaner;
excessive dust may, in fact, jeopardize the correct
operation of the appliance.
Long idle periods
Whenever the freezer is not used for some time
unplug, empty and clean it. The door should be kept
ajar all the time the freezer is not used.
IF THE APPLIANCE IS NOT WORKING PROPERLY
Before calling the dealer for technical assistance,
and in order to avoid unnecessary calls, check that:
the plug is firmly in the wall socket and the mains
power switch is on;
there is an electricity supply;
the thermostat knob is in the correct position.
If the appliance seems too noisy, check that the
sides are not touching furniture that can transmit or
amplify noise or vibration.
If your appliance is still not working properly after
making the above checks, contact the nearest
service centre.
To obtain fast service, it is essential that when you
apply for it you specify the model & serial number
of your appliance, which can be found on the rating
plate.
-
 1
1
-
 2
2
-
 3
3
-
 4
4
-
 5
5
-
 6
6
-
 7
7
-
 8
8
-
 9
9


Ask a question and I''ll find the answer in the document
Finding information in a document is now easier with AI
Related papers
Other documents
-
AEG Electrolux EU 6322 T User manual
-
Frigidaire RF2802C Owner's manual
-
-
Privileg 785.308 8/4898 User manual
-
 Zanussi - Electrolux CZUF145W User manual
-
Electrolux EU1438T User manual
-
-
-
-
CURT 45794 User manual
