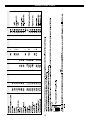
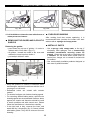
Groupe Brandt KI1250W is a versatile cooker featuring a vitroceramic top with four induction elements, an electric oven, and a storage drawer. The induction elements provide rapid heating and precise temperature control, making them ideal for various cooking techniques, from searing to simmering. The electric oven offers multiple functions, including grilling, baking, and roasting, to accommodate a wide range of culinary creations. Additionally, the storage drawer conveniently stores cookware and other kitchen essentials.
Groupe Brandt KI1250W is a versatile cooker featuring a vitroceramic top with four induction elements, an electric oven, and a storage drawer. The induction elements provide rapid heating and precise temperature control, making them ideal for various cooking techniques, from searing to simmering. The electric oven offers multiple functions, including grilling, baking, and roasting, to accommodate a wide range of culinary creations. Additionally, the storage drawer conveniently stores cookware and other kitchen essentials.


-
 1
1
-
 2
2
-
 3
3
-
 4
4
-
 5
5
-
 6
6
-
 7
7
-
 8
8
-
 9
9
-
 10
10
-
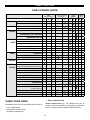 11
11
-
 12
12
-
 13
13
-
 14
14
-
 15
15
-
 16
16
-
 17
17
-
 18
18
-
 19
19
-
 20
20
-
 21
21
-
 22
22
-
 23
23
-
 24
24


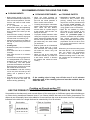
Groupe Brandt KI1250W is a versatile cooker featuring a vitroceramic top with four induction elements, an electric oven, and a storage drawer. The induction elements provide rapid heating and precise temperature control, making them ideal for various cooking techniques, from searing to simmering. The electric oven offers multiple functions, including grilling, baking, and roasting, to accommodate a wide range of culinary creations. Additionally, the storage drawer conveniently stores cookware and other kitchen essentials.
Ask a question and I''ll find the answer in the document
Finding information in a document is now easier with AI
Related papers
-
Brandt FE1022XS User manual
-
Groupe Brandt IF-643S Owner's manual
-
Groupe Brandt FP1030XT User manual
-
-
-
Groupe Brandt FC642XF1 Owner's manual
-
-
-
-
Other documents
-
Gorenje EC647A21XV User manual
-
 De Dietrich DCI799XU1 Owner's manual
-
 De Dietrich DCI900XU Owner's manual
-
 De Dietrich DCI499XU1 Owner's manual
-
-
Bosch HLS79R350A/03 Operating instructions
-
-
Bosch Serie | 6 Operating instructions
-
-


