Page is loading ...

www.canadianSpacompany.com
Instruction Manual
220-240V 50Hz 13A
Read this manual before operation
canadianspacompany.com
Muskoka
Portable Foam Wall Spa
Muskoka
Spa
PORTABLE

READ AND FOLLOW ALL SAFETY INSTRUCTIONS:
Basic safety precautions should always be followed when installing and using this electrical
equipment.
WARNING: The spa has been supplied with a residual operating current not exceeding 30 mA.
The RCD must be tested before each use.
WARNING: No part of the appliance is to be located above the spa during use.
WARNING: This appliance is not intended for use by persons (including children) with reduced
physical, sensory, or mental capability.
WARNING: TO AVOID ELECTRIC SHOCK, DO NOT USE THE SPA WHEN IT IS RAINING.
WARNING: Children should be supervised at all times around the appliance.
WARNING: If the supply cord is damaged, it must be replaced by the manufacturer, its service
agent, or similarly qualified persons in order to avoid a hazard.
WARNING: To reduce the risk of electric shock, do not use an extension cord to connect unit to
the electrical supply; use a properly located outlet.
WARNING: Make sure the home fixed connection box is more than 3.5m away from the spa.
WARNING: RISK OF ELECTRIC SHOCK. DO NOT BURY CORD. Ensure the electrical cord is
located away from lawn mowers, hedge trimmers, and other equipment. Reduce the risk of
electric shock by replacing damaged cords immediately.
WARNING: Electric installations should fulfil the requirements of local standards.
Appliance live parts, except parts supplied with safety-low voltage not exceeding 12 V, must be
inaccessible to a person in the spa.
WARNING: Parts incorporating electrical components, except remote control devices, must be
placed a safe distance away or fixed in position so that they cannot fall into the spa.
WARNING: Do not switch on if there is any possibility that the water in the spa is frozen.
IMPORTANT SAFETY INSTRUCTIONS:
CONTENTS:
IMPORTANT SAFETY INSTRUCTIONS ..................
IMPORTANT SAFETY INSTRUCTIONS ..................
PART 1: PACKAGE LIST .........................................
PART 2: SPECIFICATIONS ......................................
PART 3: CONTROL UNIT FUNCTIONS ......................
PART 4: INSTALLATION .........................................
PART 5: USAGE ..................................................
PART 6: WATER MAINTENANCE ..........................
PART 7: DRAIN & STORE .....................................
PART 8: OPERATION CHECK LIST .........................
PART 9: CONTROL UNIT MESSAGES......................
PART 10: TROUBLESHOOTING.............................
SPA ACCESSORIES ............................................
(2)

IMPORTANT SAFETY INSTRUCTIONS:
DANGER: Risk of Electric Shock. Install at least 5 feet (1.5 m) from all metal surfaces.
DANGER: Risk of Electric Shock. Do not permit any electrical appliances, such as a light,
telephone, radio, or television, within 5 feet (1.5 m) of a spa.
DANGER: Risk of Accidental Drowning. Extreme caution must be exercised to prevent
unauthorized access by children. To avoid accidents, ensure that children cannot use this
spa unless they are supervised at all times.
DANGER: Never operate spa if the suction fittings are broken or missing. Never replace a suction
fitting.
CAUTION: Always consult your doctor before:
a) The use of alcohol, drugs, or medication, before or during spa use may lead to
unconsciousness with the possibility of drowning.
b) Obese persons and people with a history of heart disease, low or high blood pressure,
circulatory system problems, or diabetes, should consult a physician before using a spa.
c) Persons using medication should consult a physician before using a spa since some
medication may induce drowsiness, while other medication may affect heart rate, blood
pressure, and circulation.
d) Pregnant or possibly pregnant women should consult a doctor before using spa.
CAUTION: Wet areas around the spa can be slippery; always enter and exit the spa slowly and
cautiously.
CAUTION: In order to avoid a heater cut out and loss of operation, this appliance must NOT be
supplied through an external switching device, such as a timer, or connected to a circuit that is
regularly switched on and off by the utility.
CAUTION: Do not use the spa immediately following strenuous exercise.
CAUTION: Maintain water chemistry in accordance with the manufacturer’s instructions.
Vinyl Warranty: Canadian Spa Co. warrants the vinyl finish
against defects in material and workmanship and specifically
against blistering, cracking, or de-lamination, for the period
of one (1) year from the original purchase date to the original
purchaser. If Canadian Spa Co. determines the vinyl to be
defective during this period, Canadian Spa Co. will repair or,
at its option, replace the defective spa liner/bladder without
charge to the customer.
Plumbing Warranty: Canadian Spa Co. warrants the
plumbing of the spa will remain free from leaks for the period
of one (1) year from the date of purchase to the original
purchaser.
Equipment Warranty: Canadian Spa Co. warrants the
equipment pack (pump, blower, heater, and control system)
against malfunction and defects of the materials and work-
manship for one (1) year from the date of the purchase to the
original purchaser.
Extent of Warranty: This Limited Warranty applies to
portable spas manufactured after January 1 2017 and sold
by authorized Canadian Spa Co. dealers to residential retail
customers. This Limited Warranty is given only to the first
retail purchaser and terminates upon transfer of ownership.
No warranty is provided on filters or any dealer
installed accessories.
Cost of installation, removal, and/or shipping of the spa, is not
covered by this Limited Warranty. In the event that Canadian
Spa Co. deems the removal of the spa to a place of repair
necessary or that the spa must be replaced, any and all costs
of the spa removal and replacement (landscaping, decking,
fencing and/or structure removal, alteration and/or
replacement; or other costs of providing access to the spa)
will be billed to the purchaser.
This Warranty applies only to spas in single family, residential
installations.
This Limited Warranty becomes void if the spa is placed in
commercial or hire application.
Canadian Spa Co. Manufacturing extends the following
warranties to the original purchasers of its portable Spas:
(3)

PART 1: PACKAGE LIST
Muskoka Spa:
Take all the spa components out of the box and check your instruction manual that all the
following key components are present:
(4)
(E) Inner liner
(H) Filter cartridges x 2
(C) Portable Control Unit
(B) Foam Connectors x 16
(F) Inflatable Lid
(K) Inflation Hose
(D) Bottom Liner
(G) Inlet/Outlet Caps x 2
(J) Drain Hose
(I) Connectors x 3 (fitted to
top liner) plus 1 x spare
(L) Ground sheet
(A) Foam Walls x 8
x7
x1

Quick assembly:
PART 2: SPECIFICATIONS
Item:
Seating Capacity
Spa Dimension (inner)
Spa Dimension (outer)
Water Capacity
Voltage
Heater
Massage Jet Pump
Filter Pump
Max. Heat Temperature
Spa Lid Material
Liner
Net Weight
Gross Weight
Package Dimensions
Test Certificate (Pump only)
Heating Efficiency (Ambient temperature is 68°F /20°C)
KP-10012 (CA17534GB) - Muskoka
6 Persons
160 x 73cm (63’’ x 29”)
184cm x 73cm (73” x 29”)
1230L
220-240V 50Hz
2040W
L1: 400W, L2: 650W, L3: 850W
40W
40°C (104°F)
Polyester Laminated PVC, Synthetic Leather
Polyester Laminated PVC
47.6kg / 104.7lbs
53.9kg / 118.6lbs
#1: 75 x 55 x 62cm / 30” x 22” x 25”
#2: 110 x 79 x 76cm / 43” x 31” x 30”
CE
1.5-2 (°F) /hr
(5)

PART 3: CONTROL UNIT FUNCTIONS
Heater Port
Jet Port
Air Valve
Filter Housing
Filter Port
Digital Spa
Control Centre
The Portable Control Unit
(PCU):
Functions of the Spa Portable Control Unit
• LED Display: Once powered-up, the LED display will show the current water temperature
automatically.
• ‘Temperature Adjustment’ Buttons: Raise or lower set temperature. Pressing one of
the temperature adjustment buttons will cause the LED display to flash. When it is flashing,
you can set the desired temperature. The value will increase or decrease by 1°F/ 1°C for
each press.
• Temperature Adjustment Ranges: 86°F - 104°F/ 30°C - 39°C NOTE: There may be a 3-4
degree variance between the temperature shown on the PCU and the temperature of the
spa water.
• ‘Temperature Mode’ Button: Press this button to change from Celsius to Fahrenheit.
• ‘JETS’ Button: Press the ‘JETS’ button to activate the Jet Massage System on the spa.
Pressing once will start the lowest speed of the jets (L-1 will display on the screen).
Press again to increase the speed of the jets to L-2, and press again to reach the highest jet
speed, L-3. Hold down the ‘JETS’ button for 5 seconds to turn jets off. When jets turn off,
“FIL” will display on the screen to indicate the filtration and heat is back on.
• Lock Button: Hold down for 5 seconds to lock all button functions. Repeat to remove lock.
NOTE: It is highly recommended that PCU buttons are locked when PCU is left unattended.
• ‘HEAT’ Button: Once desired temperature is set press ‘HEAT’ to begin heating.
Heat Button
Temperature
Decrease Button
Temperature
Mode Button
LED Display
Temperature
Increase Button
Lock Button
PCU Controls Digital Spa Control Centre:
Jets Button
(6)

NOTE:
• The massage system will stop automatically after 30 minutes of operation. You can
re-activate the jet function by pressing the ‘JETS’.
NOTE: Heater will automatically turn on when jets turn off.
• Heating and jet function can not be activated at same time. When heating system
is working, pressing ‘JETS’ will change heating mode into jet mode: heating
and filtering are shut down, jet system is activated. When jets are turned off, heating and
filtering automatically resumes.
NOTE: Keeping jets on for a long period of time may cause spa water to lose heat.
• Pressing ‘HEAT’ activates the heating and filtering system at the same time.
The ‘HEAT’ button will display a solid red light as spa water heats up. Once desired
temperature is reached, the heater will go into standby mode, which will be indicated
with a flashing red light.
NOTE: Heater will not resume until spa water drops 4-5 degrees below set temperature
for maximum efficiency. You can also manually restart the heater by pressing ‘HEAT’
when heater is turned off.
• This spa is equipped with automatic moisture protection which will activate the blower
of the PCU once a day for up to 60 seconds. This helps to prevent condensation build up
and increase the lifespan of the PCU.
PART 4: INSTALLATION
1. Site Selection
IMPORTANT: Before you position, construct, and fill with water follow these instructions:
1. Place in an area more than 8.2 sq ft (2.5 sq mtrs.).
2. Place spa on a surface that supports more than 661lb/ft
2
(300 kg/
2
).
3. The spa must be on a clean level ground. If placed on uneven ground the weight of the spa
water may cause the spa to become distorted; this is not covered by the manufacturer’s
warranty. NOTE: Uneven exposure to the sun may cause ballooning in the inflatable lid.
Clean surface
Level ground
Fill the tub up to the water
lines on both interior sides of
the spa to ensure the
spa is level.
(7)

3. Spa Assembly
1) Take the Thermal Ground Sheet and
position it where the footprint of the
spa will be. Take the body’s Vinyl Liner
and position it on top of the ground sheet.
2. Test RCD & Inflate Lid
a) Perform RCD Test
WARNING: RISK OF ELECTRIC SHOCK. The RCD plug must be
tested before each use. Do not use if RCD test fails.
1. Insert the plug into the power outlet.
2. Press the “RESET“ button, the indicator light will illuminate.
3. Press the “TEST” button, the indicator light turns off.
4. Press the “RESET” button, the indicator light will illuminate; the pump is ready to use.
(1) (2) (3)
(4)
(8)
3) Assemble the remaining blank
Foam Panels until spa is
complete. As you assemble
the walls install the top and
bottom wall connectors
between the foam walls as
shown.
TIP: Gripping the Foam Panel
on both sides and giving it a
small wiggle can help guide it
in if it gets stuck.
Ensure to insert the top and bottom
wall connectors as you assemble the
foam wall
2) Position Foam Panel 1 (with
holes - see fig.a), aligning it
exactly with the
corresponding holes in the
Vinyl Liner.
(fig.a)
b) Inflate the Lid
Connect the Inflation Hose to the Inflation Port on the PCU and then connect the other end
to the Inflation Port on the lid and press ‘JETS’ to inflate the lid. Once inflated close the Valve
Cap and press the ‘TEST’ button on the RCD to turn PCU off. When inflating, only top cap
on the Check Valve needs to be opened, when deflating lid, the entire valve should be un-
screwed. NOTE: Please disconnect the power after you inflate the top lip. The heater will
automatically turn on after 20 minutes of the Spa being plugged in. If there’s no water in the
Spa ,”E6” will appear after a few minutes and you will hear the noise of the filter pump dry
run. In this case, please switch off the power then ”E6” will automatically clear.

5) Insert the body of the liner into the centre
of the Spa, ensure the holes of the
Portable Control Unit foam fit into the
holes of the liner and the Drain Hose goes
through the hole in the bottom of the Liner.
6) Pull the Spa Top Liner down and align
with Spa Base Liner. Zip the two liners
together. TIP: Ensure top and bottom
zippers are aligned before pulling the Top
Liner down.
7) Insert the three pipes into the three holes.
These will attach to the Portable Control
Unit. The Drain Hose will come through
the bottom of the liner as well (see figure c).
Smooth out wrinkles in the liner to the
best of your ability and pat out any pockets
of air.
4) Ensure you put the cut out of the drain
(fig.b) inside to the left of the three
holes.
(fig.b)
(fig. c)
(9)
4. Connect the Portable Control Unit to the Spa
Position the PCU next to the spa, remove the Inflation Hose and align the Connection Hoses to
the spa. Use slight force to evenly push the end of the connector hose into the PCU’s
connector port. Screw to tighten and seal the connector. Attach the Aromatherapy canister
to the blower port of the PCU. Attach the remaining connector to the aromatherapy port, and
attach the other end to the corresponding connection on the spa.
NOTE: Ensure
connectors have
‘o’-ring gaskets in
proper postion
X
NOTE: connectors must be held straight when attaching.
Attaching at an angle can result in damage to the connector.
Aromatherapy feature
To use aromatherapy, simply unscrew cap on
Aromatherapy Port and insert canister of
scented Aromatherapy Beads. Replace Cap
on Aromatherapy Port. The aromatherapy
scents will activate once the ‘JETS’ button
has been pressed.

5. Install the Filter Cartridge
Open the Filter Housing lid. Put the new filter cartridge into the cartridge chamber.
Replace Filter Housing Cap and seal by screwing Cap Fitting on. NOTE: Ensure orange ‘o’-ring
is placed correctly inside housing.
PART 5: USAGE
Press the ‘Up’ and ‘Down’ arrows to set desired temperature, and press heat to start the heater.
Place lid on the spa while heating. It can take 24-48 hours for your spa to reach its set tempera-
ture. See Part 3 for complete list of Control Functions. Press the Jet Massage Button to activate
massage system. We suggest a temperature range between (37-39℃) 98.6°F-102°Fduring
the winter. The massage system will stop automatically after 30 minutes of operation to reduce
energy consumption.
6. Pre-Fill Check
Ensure the drain outlet is extended for future draining/access. Check the stopper on the bottom
of the spa and the Drain Cap, ensure both are closed tight. Fill the spa with water using a
garden hose until reaching the water level printed on both interior sides of the spa wall. These
lines are also used as an indication of the levelness of the spa.
NOTE: PCU must be connected to the spa prior to filling. NOTE: Do not use hot water to fill Spa.
7. Purge Air From Portable Control Unit
Unscrew the Air Valve counter-clockwise and release the air until a small amount of water is
coming out, then screw the Air Valve clockwise tightly. Use a towel to dry off the PCU.
IMPORTANT: Make sure PCU is turned off, and all connector caps are removed before
performing this step.
8. Thermal Blanket
Place Thermal Blanket on water
surface with the bubbles facing down
for more efficient heating and
improved heat retention.
(10)
Lock the Cover
Buckle
Push the square
pad upwards to
lock and
downwards to
unlock.

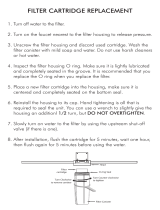
Cleaning / Replacing Filter Cartridge
WARNING: RISK OF ELECTRIC SHOCK. Unplug the PCU
before beginning spa maintenance.
NOTE: A dirty filter cartridge may contaminate the spa water and
cause damage to the heating function.
1. Carefully thread the three plastic caps onto the inlet/outlet ports on inner spa wall.
(Ensure the rubber gaskets are in place within the plastic caps)
2. Remove filter housing lid by turning it anti-clockwise, then remove the filter cartridge.
3. Rinse off filter cartridge with water and reuse if possible. Replace filter
if the cartridge remains dirty after rinsing or is badly discoloured.
4. Put the cleaned filter back into the cartridge housing and close the lid by turning it
clockwise.
5. Remove caps from inlet/outlet ports on inner spa wall and allow water to flow into
pump. Tub is now ready for use.
PART 6: WATER MAINTENANCE
The filter cartridge should be cleaned weekly and replaced on a monthly basis, or depending
on use. A reminder will appear to change the filter after 25 days (‘CHG FIL’). Hold down ‘HEAT’
for 5 seconds to clear the message. Change water once a month or depending on use and use
appropriate spa chemicals. Please pay attention to the chemicals used and dosage. Spa
damage resulting from misuse of chemicals is not covered by the warranty.
Water Balance: We recommend you maintain your water balance: PH value: 7.2 - 7.6; Free
Chlorine: 2ppm - 3ppm; Alkalinity: 120-150ppm. Use a test kit to test your spa water before
each use of the spa, or at least once per week.
Water Sanitation: We suggest using chlorine or bromine granules to disinfect the spa’s water.
NOTE: Chlorine/Bromine tablets are not recommended.
Cleaning the Spa: Clean the spa with soap and water, then rinse. Leave it outside (away from
direct sunlight) to dry.
Repairs: Small holes or punctures can be repaired with the repair kit that comes with the spa
(glue not included)
Maintenance & Troubleshooting
:
PROBLEM
Cloudy water
Odour
Eye skin/
irritation
POSSIBLE CAUSE
High pH (test to verify)
Poor filtration
High dissolved solids
High level of organic
contaminants
Low pH and/or alkalinity
combined Chlorine due to
organic contamination
SOLUTION
Add pH down
Clean filter w/Filter Free
Empty spa and re-fill
Increase the amount of
Chlorine
Add Alkalinity Booster
Increase the amount of
Chlorine Granules
(11)

PART 7: DRAIN & STORE
Drain System
Locate and remove the external threaded Drain Cap. Attach Drain Hose to Drain Outlet.
Locate and remove the stopper on the spa floor to allow water to drain.
Dry the Spa and Portable Control Unit
After a RCD test, press ‘JETS’ to blow out the water inside the jet holes. Turn PCU off and
disconnect all connectors from connection ports on the PCU. Turn PCU back on and run
blower for 30 seconds to allow excess water to clear from blower port. Unplug RCD and hold
PCU at an angle, allowing water to drain from connection ports. Once water flow stops, remove
Filter Housing Lid and hold PCU upside down. Give the PCU a slight shake, allowing all excess
water to be removed. Close Filter Housing Lid when complete. NOTE: PCU must be stored
upright. Leaving PCU at an angle or upside down may result in damage.
Storage
Use a towel to wipe off the spa and dry for 24 hours. Unscrew the Air Valve on the lid. Once
the lid has been deflated and the Foam Panels have been disassembled, gently fold them for
storage. It is recommended that you store the spa in its original package in a warm dry place.
PART 8:
SPA OPERATION CHECK LIST
CHECK 1: Water Level
Ensure water level meets fill lines on
both interior sides of the spa. Check
if this resolves the PCU’s
malfunctioning.
CHECK 2: Inside
Connection Caps
Make sure the clear plastic Inlet/Outlet
caps have been removed before turning
on the PCU.
CHECK 3: Bleed Air out
of Portable Control Unit
If PCU makes a grinding noise, no
water is going to the pump. Bleed
the air out of the pump by
unscrewing the Air Valve. Check if
this resolves the pump’s
malfunctioning.
CHECK 4: Back Flush PCU
Back flushing the PCU is a good practice
to carry out every few months to aid in
PCU performance and longevity. Simply
remove the PCU from the tub connections
(cap ports inside tub first if you do not want
to drain spa) remove the filter and run water
from a garden hose into the ‘Heater Port’.
Flush for 30 seconds and hold PCU
upside down to drain remaining water.
(12)

CODE
Causes
Solutions
E1/ E2
Temperature control
sensor short circuit
or open circuit
1. Unplug RCD from outlet
2. Please contact for service
E3
High Heat:
The water is
over 113F(45°C)
1. Unplug the RCD cable from the outlet
2. See Part 8: Spa Operation Check List for possible solutions
3. Power on spa again to see if error is resolved, if not please contact for
service Note: filling with hot tap water upon initial fill may cause this error.
Drain and refill with cold water
E4
Freezing Conditions
Detected: The water is
lower than 36F(2°C)
1. Unplug the RCD cable from the outlet
2. See Part 8: Spa Operation Check List for possible solutions
3. Power on spa again to see if error is resolved, if not please contact
for service
E5
Overheat:
The water is
over 122F(50℃)
1. Unplug the RCD cable from the outlet
2. See Part 8: Spa Operation Check List for possible solutions
3. Power on spa again to see if error is resolved, if not please contact for
service. Note: filling with hot tap water upon initial fill may cause this error.
Drain and refill with cold water
E6
Inlet or outlet on inner
wall are blocked
Filter cartridge is too
dirty
Spa water does not
reach minimum water
level
Air-lock in pump
See Part 8: Spa Operation Check List for possible solutions,
otherwise contact for service
E7
Heater Dry
See Part 8: Spa Operation Check List for possible solutions,
otherwise contact for service
CH6 FIL
Automatic timed reminder
to check filters
Hold down ‘HEAT’ for 5 seconds
PART 9:
CONTROL UNIT MESSAGES
(13)
NOTE: Daily purge: The pump will bubble 1 minute every 24h for daily purge. Filter alarm system: If you keep using the spa for 150h will activate the filter alarm
system by showing “CHG→FIL→Tem”around to remind to change the filter, you can push the heater button for 3-5s ,the timer will be reset.

PART 10:
TROUBLESHOOTING
Problems Causes Solutions
Spa Pump
Does Not
Operate
• RCD tripped
• RCD broken
• Check power source
• Power failure
• Reset RCD/check if the cable is rated 2kW / 15A
• Call for service if it does not reset
Spa Pump
Does Not
Heat Properly
• Temperature set is too low
• Filter Cartridge is dirty
• Water level is too low
• Heating element failed
• Ensure inlet/outlet ports are not blocked
• Set to a higher temperature
• Clean/replace the filter cartridge
• Fill water to min. water level
• Call for service
Jet Massage
System Does
Not Work
• Pump is too hot
• 30-minute auto shut off
feature is activated
• Something is wrong with
the control panel
• Unplug the RCD cord
• When the pump has cooled, reset the RCD and press
‘JETS’ to reactivate
• Call for service if it does not reset
Water Filtration
Is Not
Working
• Dirty filter cartridge
• Inlet/outlet port blocked
• Air lock
• Something is wrong with
the control panel
• Clean/replace the filter cartridge
• Clean the inlet/outlet ports
• Purge air from the pump as previously outlined
• Call for service if it does not reset
Portable Control
Unit Leaking
• Adaptor seal improperly
located
• Water leakage from pump
body
• Ensure Check Valve below PCU is tightened
• Check the pump body
• Call for service
Spa Leaking
• Spa is torn or
punctured
• Use provided repair patch as previously
outlined
Water Is Not
Clean
• Insufficient filtering time
• Dirty filter cartridge
• Improper chemical
treatment
• Clean/replace the filter cartridge
• Change the spa water completely
• Refer to the chemical manufacturer’s
instructions.
Red Light
Blinking
• Spa has reached set
temperature
•
The PCU does not stop heating until the current water
temperature reaches the set temperature indicated by
the ‘blinking’ red light.
IMPORTANT : PLEASE KEEP ALL ORIGINAL PACKAGING IN CASE OF WARRANTY ISSUES
If you experience any problems, please do not hesitate to contact your local dealer or our after sales service
immediately. Any defect or damage caused by installation, alteration, or repair, by anyone who is not an
employee of Canadian Spa Co., or authorized service technician, is not covered by the Warranty. This Warranty
becomes void if the spa has been subjected to misuse, abuse, alteration, or attempted alteration, repairs or
attempted repairs by anyone other than an authorized Canadian Spa Co. service technician, improper
installation, improper water chemistry, improper maintenance, acts of god, or damage caused beyond the
control of Canadian Spa Co. Misuse and abuse shall include any operation of the spas other than as directed
in the Canadian Spa Co. Manual. Examples of misuse and abuse include, without limitation: damage of the spa
liner caused by leaving the spa uncovered while the spa is empty of water or not in use. Damage to the spa
surface caused by contact with unapproved cleaners or solvents. Damage caused by unapproved sanitizers
such as calcium hypochlorite, tri-chlor type chlorine or any sanitizing chemical that may remain undissolved on
the spa vinyl surface. This Warranty applies only to spas in single family, residential installations. This Limited
Warranty becomes void if the spa is placed in commercial application or hire.
(14)

3 Pack Filter (Buy 3 Get 1 Bonus)
3 x 15 ft² micoban slip replacement filters for Canadian Spa Co. portable spas.
This filter should be changed every 1-2 months (depending on usage).
Portable Chemical Kit:
This chemical kit is an excellent addition to any spa and provides users with all of the essential spa
chemicals needed to keep a spa balanced. The following chemicals are included in the kit:
Chlorinated Granules 800g • Alkalinity Booster 800g • pH Up 1kg • pH Down 1kg • Test Strips
Booster Seat:
Water filled booster seat for added comfort and great for small children.
Cover Cap:
Waterproof, tough and durable • Prevent cover colour bleaching • Resists UV damage • Elastic
sewn into 12” (30.5 cm) hemmed skirt for a snug fit • Fits most spa models and shapes • Made
from durable woven polyethylene
Hard Top Cover
Thick tapered cover for unparalleled heat retention • 5” skirt length • Commercial quality zipper
• Locking straps for added protection • Tough mesh bottom with rugged reinforced stitching.
Step:
Simple to assemble, these spa steps allow for quick and easy entry into a spa while providing a
non-slip surface for safety.
• No tools required to assemble • Made of durable UV protected polypropylene
Spa Surround Rattan Furniture for Muskoka:
All items are customizable to create your own personal spa furniture configuration.
Items Include: • Sofa • Bar Table • Side Table • Planter • Step
Sofa
Bar Table
Side Table
Planter
Step
Cover Lifter
Cover lifter for the portable spas, fits underneath the spa and has a gas shock for easy lifting and
removing of the spa cover. This is the perfect lifter for round and octagonal spas
Aromatherapy Beads
To be placed inside the aromatherapy canister in your spa • Does not effect the chemistry of the
spa water • 6 scents available: Discovery - Eucalyptus, Romantic - Rose, Spring - Green Tea,
Relaxation - Lavender, Vigour - Chamomile, Time - Strawberry Champagne
Headrest & Cup Holder Set
Set of 2 headrests with built-in dual cupholders • Constructed of a durable and comfortable molded
foam • Attaches to the rim of the spa
SPA
ACCESSORIES (OPTIONAL):
(15)

canadianspacompany.com
UK Office:
Canadian Spa Company
Canada House
Salbrook Road
Salfords, Redhill
Surrey, RH1 5GL, UK
T: +44 1293 824094
F: +44 1293 824750
www.canadianspacompany.co.uk
North America Office:
Canadian Spa Company
1283 Cornwall Rd
Oakville, ON L6J 7T5
Canada
T: +1-877-347-7727
F: +1 (905) 825 2513
canadianspacompany.com
canadianspacompany.ca
German Office:
Lützerathstrasse 127
51107 Köln
T:0049-221-94655344
F:0049-221-94655342
www.canadianspacompany.com
Asia Office:
Canadian Spa Company
No.460 Lanxue Road,Huanglou,
Pudong Area Shanghai,P.R.China
Post Code 201205
Tel : +86 21 58942200
Fax: +86 21 58940305
www.canadianspacompany.com
Disclaimer: Canadian Spa Co. or any of its authorized service technicians shall not be held liable for injury, inconvenience, loss of use,
chemical or water damage, transportation costs, continent liabilities or any other incidental or consequential costs, expenses or damage
as result of any deficiency or alleged deficiency of the spa. In no event shall Canadian Spa Co. be liable, for any reason or cause, in excess
of the amount paid for the product. No other warranties, expressed or implied, are valid. No agent, dealer, distributor, service company or
other party is authorized to change, modify, or extend, the terms of this Limited Warranty in any manner whatsoever.
Do not return the product to the store.
Contact your local after sales service centre.
Errors and omissions excepted (E&OE). 02/03/17
INFORMATION
For Product Support Visit:
support.canadianspacompany.com
/