Page is loading ...

COMPRESSOR 9285 1
AIR TANK 9124 1
25 FT. EXTENSION HOSE 9006 1
3/8" -16 x 1" HEX BOLT 4
3/8" -16 FLANGED HEX NUT 4
3/8" FLAT WASHER 4
10 -32 x 1" MACHINE SCREW 4
10 -32 NYLON-INSERT HEX NUT 4
3/16" FLAT WASHER 10
PUSH-TO-CONNECT
1/4 NPT MALE FITTING 1
PRESSURE SWITCH 1
COMPRESSOR T-FITTING 1
TANK VALVE 1
18 FT. AIR LINE TUBING 9038 1
NYLON TIE 6
15 FT. 16 GAGE WIRE WITH 1/4"
SPADE CONNECTOR 1
QUICK-SPLICE CONNECTOR 1
FEMALE SPADE TERMINAL 1
20 AMP BLADE FUSE 1
FUSE HOLDER 1
AIR COMMAND
24-8287 01-06 NAD-33628-2
PARTS LIST
INSTALLATION INSTRUCTIONS
Congratulations on your purchase of a new Ride-Rite
Air Compressor Accessory Kit. This kit will be an asset to
your vehicle, meeting nearly any of your air supply needs.
Please take a few minutes to read through the
instructions, identify the components, and learn how to
properly install your Air Compressor Accessory Kit.
AIR COMPRESSOR ACCESSORY KIT
TOOLS REQUIRED:
• UTILITY KNIFE • 3/8" DRILL BIT
• FLAT SCREW DRIVER • ELECTRIC DRILL
• WIRE CRIMPER/STRIPPER • 1/2" WRENCH
• (2) 9/16" OPEN-END WRENCH • 3/8" WRENCH
2047 / 2232 / 2128
2129 / 2215
NOTE:
If you are planning to install the Ride-Rite Fully
Automatic control or Cab Control Height Adjustment
systems, the Air Compressor Accessory Kit and the Ride-
Rite air helper springs kit designed to fit your vehicle must
first be installed. Contact Firestone for more information.

AIR TANK
BLACK WIRE (TO GROUND)
RED WIRE TO FUSE
BOX OR OTHER
POWER SOURCE
RED WIRE
PRESSURE
SWITCH
BRASS "T"
FITTING
AIR COMPRESSOR
AIR LINE
Air Compressor Accessory Kit
WR1-760-2047
+
INFLATION VALVE
PUSH-TO-CONNECT
MALE CONNECTOR
PUSH-TO-CONNECT
MALE CONNECTOR
Figure A
AIR TANK BRACKET
AIR LINE
AIR LINE
AIR FILTER
MALE AIR FITTING
25' Extension Hose
V
E
H
IC
LE
P
A
N
E
L
3/8-16 X 1-1/2
HEX BOLTS
AIR TANK BRACKET
3/8 FLAT WASHER
3/8 LOCK NUT
Air Tank Attachment
NOTE: Air Filter must be
mounted lower than the
compressor, in a dry area
away from moisture.

NOTE ON CONNECTING AIR LINE TUBING
Cut the air line tubing as squarely as possible. To connect the air
line tubing to the fittings push the tubing into the fittings as far as
possible. If for any reason the tubing must be removed the collar of
the fitting can be pushed toward the body of the fitting and the tubing
can be removed. Make sure the air helper springs are deflated. To
reassemble make sure the tubing is cut squarely and push back into the
fitting.
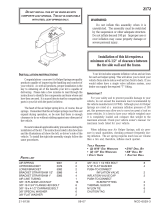
STEP 1
Locate the brass "T" fittings as shown in Figure "A". This fitting
has a preapplied thread sealant on the male threads. No additional
sealant is required.
Install the male threaded end into the compressor head as shown
in Figure "A". Tighten finger tight PLUS 3 1/2 turns. Next get the
pressure switch from your hardware pack. Screw the pressure switch
into the "T" fitting as shown in Figure "A". Then attach the
positive (RED) wire from the compressor to one of the terminals
on the pressure switch. Install the rubber isolators and brass
sleeves to the compressor feet (see Figure "B").
STEP 2
Select a convenient location for mounting the compressor.
This location should provide ample air flow and be protected
from most airborne debris. The surface should be rigid to support
the unit. Some examples might include under the hood on a
fender well, or in a vented storage compartment. Mark and drill
four 3/16" holes. It is recommended that burrs be removed from
the holes so as not to damage the rubber isolator. Mount the
compressor using the #10 pan head machine screws and #10 flat
washers located in your hardware pack. Assembly of the flat
washers, machine screws, and lock nut are shown in Figure "B".
Proper mounting of this compressor will provide maximum isolation. Figure "B" shows the before and after
condition of the rubber isolator. The screw and nut should be tightened only enough to bottom out on the brass
insert. DO NOT OVER TIGHTEN further tightening will crush the insert and isolator and reduce vibration
isolation.
Attach the black wire from the compressor to a convenient ground source on the vehicle. Most any metal
connection point common to the vehicle frame should be suitable.
STEP 3
Get the air tank and mount two 1/4" NPT male connectors into the air tank ports (see Figure "A").
Select a location for mounting the air tank. This location should be protected to prevent damage from flying
rocks or debris. Mark and drill two 7/16" holes 2-1/2" apart. Bolt the tank in place using the 3/8"-16 x 1-1/
2" hex bolts, washers and lock nuts provided. Be sure clear access is provided to the two air ports. (SEE
CAUTION NOTE).
CAUTION:
The air tank supplied with this kit should be protected. Dents or punctures could cause air leaks, personal
injury or property damage. Do not exceed 120 psi in the tank.
STEP 4
Measure a length of air line tubing to go from the compressor to the tank and cut as squarely as possible. A ragged
or angled cut can cause a leak in the system. Do not fold or kink the air line tubing.
Figure "B"
AIR LINE
PUSH-TO-CONNECT
INFLATION VALVE
FLAT WASHER
HEX NUT
VALVE CAP
BODY OF
VEHICLE
Figure "C"
BRASS SLEEVE
COMPRESSOR
FOOT
RUBBER
ISOLATOR
BRASS SLEEVE
COMPRESSOR
FOOT
RUBBER
ISOLATOR
#10 FLAT WASHER
#10 FLAT WASHER
VEHICLE
MOUNTING
SURFACE
#10 -32 LOCK
NUT
#10-32 x 1 PAN HEAD
SCREW

STEP 5
Select a point on your vehicle for the inflation valve. This should be a rigid surface, easily accessible and convenient
(examples might be a wheel well or bumper). Drill a 5/16" hole and install the inflation valve as shown in Figure
"C". Tighten the inflation valve securely and replace the cap.
NOTE: The cap should always be replaced to protect the inflation valve from dirt and debris.
STEP 6
Measure a length of remaining air line tubing to run from the tank to the inflation valve. Cut as squarely as possible
and install according to previous directions.
NOTE: We have provided 18 feet of air line tubing in this kit. Should your installation require more, or your
tubing becomes damaged, you should use 1/4" DOT approved nylon air brake tubing. This is available at most truck
parts dealers.
STEP 7
Get the red wire supplied in your hardware pack. This wire has attached to one end a 1/4" spade connector. Attach
this connector to the remaining stud on the compressor pressure switch. The other end of the wire is to be attached
to a positive 12 Volt D.C. supply capable of handling 20 amps. It is recommended that the connection be made to
an ignition contolled circuit. This method of connection will provide power to the compressor only when the key
is on. Consult your dealer or vehicle owners manual for proper fuse box connection.
Should you desire a circuit which is not ignition switch controlled a switch should be placed in the system. Make
sure the automotive switch you purchase is capable of 20 amps minimum. Turning the switch off when th compressor
is not needed will prevent the compressor from operating periodically and draining the battery. Consult you dealer
or vehicle owners manual for wiring diagrams.
NOTE: Should additional wire be necessary, use 16 gage multistrand wire.
YOU ARE NOW READY TO TEST THE SYSTEM
Turn on the ignition. The air compressor will run for a short time to build up pressure in the tank. Once this air
pressure reaches approximately 120 psi in the air tank, the pressure switch will turn the compressor off. It will not
restart until the pressure in the tank drops below 90 psi.
USING YOUR RIDE-RITE AIR COMPRESSOR ACCESSORY KIT
Your system is now ready to use. With the coiled tubing provided, attach the end with the screw style fitting to
the inflation valve. You can now use the air chuck on the opposite end to inflate Ride-Rite air helper springs, tires,
air shocks and many other items.
FILTER MAINTENANCE PROCEDURE
It is recommended that the air compressor filter be inspected periodically. The frequency that the inspection
should occur depends on how often the compressor is being used. The air compressor filter is located on the head
of the compressor opposite the "Tee" air fitting. If the filter is sufficiently clogged it will require replacement. A
used filter should not be cleaned or reused. A replacement filter is supplied with your kit.
www.riderite.com
/