Page is loading ...

133-0017-NP
Universal
Pull-Out Galley Faucet
with Soap Dispenser
Brushed Nickel
INSTALLATION INSTRUCTIONS
Your new SHURflo Marine Grade Faucet will
give you years of trouble-free performance.
Thank you for choosing SHURflo Marine
Grade Faucets. Please read these instructions
carefully before installing your new faucet. If
you have any additional questions about the
installation of this faucet, please feel free to
contact one of our friendly customer service
representatives at 1-800-854-3218.
(1) Turn off the water supply to your existing faucet (this procedure will vary depending on the specific
plumbing system installed on your boat). Cover the sink drain to prevent any small parts or debris
from falling in. Remove your existing faucet, taking care not to damage your existing water lines.
Clean sink area in preparation for new faucet.
(2) Place the faucet in the center hole of the sink. Pull the flex hose all the way up until the hose stops.
Slide the black rubber washer and then the metal washer onto the mounting shaft. Screw the brass
lock nut on mounting shaft with the two screws pointing up, as illustrated. Hand tighten the brass
lock nut. Position the faucet on the sink and tighten the lock nut screws with a screwdriver.
CAUTION: DO NOT OVER TIGHTEN THE SCREWS.
(3) Very gently bend the copper water inlet tubes slightly out, to allow for larger hose clearance.
CAUTION: USE CARE WHEN BENDING THE TUBES. Grip at point of bend with one hand and
adjust with the other.
(4) Screw the pipe adapter onto the flex hose. Use Teflon tape on threads. Hold the hose tightly while
turning the adapter. Do not allow hose to twist as it my kink. Push the pipe adapter onto the third
copper pipe with the male fitting, until you feel it “snap” into place. You may need to slightly rotate
the adapter side to side while pushing it on. Tighten the pipe adapter screw to secure. The pipe
adapter screw should screw completely in. Pipe adapter may rotate after connection is secure.
Ensure water supply lines do not interfere with flex hose.
(5) Attach metal weight to hose. Adjust position as desired. Weight must be installed to prevent hose
kinking and for easy hose return.
(6) Connect water supply lines (not provided) to the connector hoses. Wrap the brass fittings on the
connector hoses with Teflon (Plumber’s) tape. Follow the appropriate steps depending on your water
supply lines. If you have pre-assembled water supply hoses with threaded connectors, simply screw
on supply hose. If you have plastic water lines with formed ends, water lines will seat partially up into
the brass fittings. Connect by tightening the coupling nuts. We do NOT suggest using sweat fittings
as they are prone to blow-outs.
(7) Unscrew the spout head from the flex hose. Turn the water supplies back on
and allow both hot and cold water to run for at least one full minute. While water
is running, check all connections for leaks. Replace the spout head.
Connections may need re-tightening.
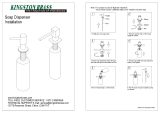
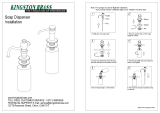
(8) Install soap dispenser. Insert the bottle, with the brass shaft, lock nut, and
washer, up from below. From the top, set the escutcheon onto the brass shaft.
Tighten the housing down onto the shaft. Tighten the lock nut under the sink.
(9) To fill the soap dispenser, lift the pump nozzle and plastic pump out through the
top side. Pour in liquid soap (or hand lotion). Replace pump and pump nozzle.
NOTE: If soap (or hand lotion) is too thick, pump may not function properly,
dilute with water.
1
2
4
5
7
6
9
8

SHURflo reserves the right to update specifications, prices, or make substitutions.
SHURflo*
5900-A Katella Ave.
Cypress, CA 90630
(562) 795-5200 (800) 854-3218
FAX (562) 795-7564
Shipping: 5900-C Katella Ave.
Cypress, CA 90630
SHURflo East
52748 Park Six Court
Elkhart, IN 46514-5427
(574) 262-0478 (800) 762-8094
FAX (574) 264-2169
http://www.shurflo.com
SHURflo Ltd.*
Unit 5 Sterling Park
Gatwick Road, Crawley
West Sussex, RH10 2QT
United Kingdom
+44 1293 424000
FAX +44 1293 421880
LIMITED WARRANTY
SHURflo Marine Grade Faucets & Accessories are guaranteed to be free from material and workmanship defects under normal use and service for a period of
five (5) years from the date of purchase. This limited warranty will not apply to faucets or accessories that were improperly installed, misapplied, or
incompatible with components not manufactured by SHURflo. Faucet failure due to foreign debris is not covered under the terms of this limited warranty.
SHURflo will not warrant any faucet that is physically damaged or altered outside the SHURflo factory. Warranty claims may be resolved by a SHURflo
service center. All returns are to be shipped with charges pre-paid. Package all returns carefully. SHURflo will not be responsible for freight damage
incurred during shipping to a service center. SHURflo's obligation under this warranty policy is limited to the repair or replacement of the faucets &
accessories. Faucets or accessories found not defective (under the terms of this limited warranty) are subject to charges to be paid by the returnee for the
testing and packaging of "tested good" units. Warranty returns will be shipped on a freight allowed basis. SHURflo reserves the right to choose the method
of transportation. SHURflo is not responsible nor will it reimburse for labor necessary to remove and reinstall a faucet or accessory if found defective. This
warranty is only a representation of the complete Marine Products Limited Warranty outlined by Service Bulletin #1050.
PROPER FINISH CARE:
Your new faucet is protected by a clear-coat. To clean it, you only need to wipe it with a damp, soft cloth. NEVER
use any abrasive cleaners, steel wool, or chemicals, as they will harm the finish and void your warranty. If the
faucet will be installed in a salt-air environment (boat exterior), regular cleaning with gentle soap and carnauba wax
will prolong the life of the finish.
3
4
5
6
2
1
26
25
8
13
15
17
18
9
10
12
14
16
7
11
28
27
19
21
22
24
23
20
29
30
31
32
33
34
35
36
37
Parts
1) Blue/Red Cap
2) Handle Screw
3) Handle
4) Cap
5) Retainer Ring
6) Ceramic Disc Cartridge
7) Body Housing
8) Spout Hub
9) Hub Set Screw
10) Valve
11) Internal Vacuum Breaker
12) Packing Ring
13) Base Ring
14) Gasket
15) Rubber Washer
16) Metal Washer
17) Lock Nut
18) Lock Nut Screws
19) Pipe Adaptor O-Ring
20) Pipe Adaptor
21) Pipe Adaptor Screw
22) Pipe Adapter Washer
23) Flex Hose
24) Inlet Tubes
25) Hose Nest
26) Spout Head
27) Weight
28) Weight Screws
29) Soap Disp. Nozzle
30) Soap Disp. Nozzle Collar
31) Soap Disp. Pump
32) Soap Disp. Housing
33) Soap Disp. Escutcheon
34) Soap Disp. Washer
35) Soap Disp. Shaft
36) Soap Disp. Lock Nut
37) Soap Disp. Bottle
© 2004, SHURflo
133-0017-NP
Universal
Pull-Out Galley Faucet
with Soap Dispenser
Brushed Nickel
/