
1
OWNERS MANUAL
CBIR-R
CBIR-L
Before operation, please read and follow all safety and use guidelines stated within this
Owners/Operational Manual.

2
Welcome & Thank You!
Congratulations on your purchase of a new refrigerator! We are very proud of our
product and we are completely committed to providing you with the best service
possible. Your satisfaction is our #1 priority.
Please read this manual carefully to understand all the instructions about how to
install, operate and maintain this product for optimum performance and longevity.
We know you’ll enjoy your new refrigerator and thank you for choosing our product. We
hope you consider us for all of your future outdoor needs.
Please read and save the instructions
This Manual provides specific operating instructions for your refrigerator. Use your
refrigerator only as instructed in this manual. These instructions are not meant to
cover every possible condition and situation that may occur. Common sense and
caution must be practiced when installing, operating and maintaining any appliance.

3
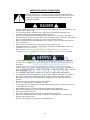
REFRIGERATOR SAFETY
Your safety and the safety of others are very important.
We have provided many important safety messages in this manual for your appliance. Always read
and obey all safety messages.
This is the Safety Alert Symbol. This symbol alerts you to potential hazards that
can kill or injure you and others. All safety messages will follow the Safety
Alert Symbol and either the words ” DANGER”, “WARNING” or “CAUTION”.
Danger means that failure to heed this
safety statement may result in severe
personal injury or death.
Warning means that failure to heed this
safety statement may result in extensive
product damage, serious personal injury, or
death.
Caution means that failure to heed this
safety statement may result in minor or
moderate personal injury, property or
equipment damage.
All safety messages will alert to know what potential hazard is, tell you how to reduce the chance of
injury, and let you know what can happen if the instructions are not followed.

4
IMPORTANT SAFETY PRECAUTIONS
Before the refrigerator is used, it must be properly positioned and installed as
described in this manual, so read the manual carefully. To reduce the risk of fire,
electrical shock or injury when using the refrigerator, follow basic precaution,
including the following:
• Plug into a grounded 3-prong outlet, do not remove grounding prong, do not use an adapter, and
do not use an extension cord.
• It is recommended that a separate circuit, serving only your refrigerator be provided. Use
receptacles that cannot be turned off by a switch or pull chain.
• Never clean refrigerator parts with flammable fluids. These fumes can create a fire hazard or
explosion. And do not store or use gasoline or other flammable vapors and liquids in the vicinity of
this or any other appliance. The fumes can create a fire hazard or explosion.
• Before proceeding with cleaning and maintenance operations, make sure the power line of the
unit is disconnected.
• Do not connect or disconnect the electric plug when your hands are wet.
• Unplug the refrigerator or disconnect power before cleaning or servicing. Failure to do so can
result in electrical shock or death.
• Do not attempt to repair or replace any part of your refrigerator unless it is specifically
recommended in this manual. All other servicing should be referred to a qualified technician.
FOLLOW WARNING CALL OUTS BELOW ONLY WHEN APPLICABLE TO YOUR MODEL
• Use two or more people to move and install refrigerator. Failure to do so can result in back or
other injury.
• To ensure proper ventilation for your refrigerator, the front of the unit must be completely
unobstructed. Choose a well-ventilated area with temperatures above 60°F (16
°
C) and below
90°F (32°C). This unit must be installed in an area protected from the element, such as wind, rain,
water spray or drips.
• The refrigerator should not be located next to ovens, grills or other sources of high heat.
• The refrigerator must be installed with all electrical, water and drain connections in accordance
with state and local codes. A standard electrical supply (115 V AC only, 60 Hz), properly
grounded in accordance with the National Electrical Code and local codes and ordinances is
required.
• Do not kink or pinch the power supply cord of refrigerator.
• The fuse (or circuit breaker) size should be 15 amps.
• It is important for the refrigerator to be leveled in order to work properly. You may need to make
several adjustments to level it.
• All installation must be in accordance with local plumbing code requirements.
• Make certain that the pipes are not pinched or kinked or damaged during installations.
• Check for leaks after connection.
• Never allow children to operate, play with or crawl inside the refrigerator.
• Do not use solvent-based cleaning agents of abrasives on the interior. These cleaners may
damage or discolor the interior.
• Do not use this apparatus for other than its intended purpose.

5
TABLE OF CONTENTS
Welcome and Thank You! ………………………………………………………………………………….2
Refrigerator Safety…………………………………………………………………………………………...3
Important Safety Precautions………………………………………………………………………………4
Table of Contents…………………………………………………………………………………………….5
Important Safety Information………………………………………………………………………………5
Installation Instructions……………………………………………………………………………………..6
Electrical Connections and Operating your Unit Efficiently………………………………………….7
Care and Maintenance……………………………………………………………………………………….8
Troubleshooting Problems with your Refrigerator…………………………………………………….9
Coyote Limited Warranty………………………………………………………………………………….10
Parts and Features 3-D Blowup and Parts Listing……………………………………………………11
IMPORTANT SAFETY INSTRUCTIONS
WARNING
To reduce the risk of fire, electrical shock,
or injury when using your appliance, follow
these basic precautions:
• Read all instructions before using the refrigerator.
• DANGER or WARNING: Risk of child entrapment.
Child entrapment and suffocation are not problems of the past. Junked or
abandoned refrigerators are still dangerous. . . even if they will “just sit in the
garage a few days.”
• Before you throw away your old refrigerator: Take off the doors. Leave the
shelves in place so that children may not easily climb inside.
• Never allow children to operate, play with, or crawl inside the refrigerator.
• Never clean refrigerator parts with flammable fluids. The fumes can create a fire
hazard or explosion.
• Do not store or use gasoline or any other flammable vapors and liquids in the vicinity
of this or any other refrigerator. The fumes can create a fire hazard or explosion.
-Save these instructions-

6
INSTALLATION INSTRUCTIONS
Before Using Your Unit
• Remove the exterior and interior packing.
• Check to be sure you have all of the following parts:
• 2 Shelves
• 1 Glass Lid
• 1 Crisper
• 1 Instruction Manual
• Before connecting the unit to the power source, let it stand upright for approximately 4 hours.
This will reduce the possibility of a malfunction in the cooling system from handling during
transportation.
• Clean the interior surface with lukewarm water using a soft cloth.
I
nstalling the Handle on the Door
• Your CBIR handle is held in place by a set of inner (non-chrome) and outer brackets
(chromed).
• The first set of brackets you will need to mount are the inner brackets, which attach with two
screws to the front of the door.
• Next, attach the bottom outer (chrome) bracket to the inner bracket with one screw.
• Now, place the handle inside the bottom bracket and place the top outer (chrome) bracket on
top of the handle as well and slide it over the already installed, top/inner bracket.
• Finally, put the last set screw in place to keep the handle and brackets together.
Installing Your Unit
• This unit is front vented, so the front bottom vent must remain unobstructed to operate
correctly.
• Place your unit on a floor that is strong enough to support the unit when it is fully loaded. To
level your unit, adjust the leveling legs at the bottom of the unit.
• Locate the unit away from direct sunlight and sources of heat (stove, heater, radiator, etc.).
Direct sunlight may affect the acrylic coating and heat sources may increase electrical
consumption. Extreme cold ambient temperatures may also cause the unit not to perform
properly.
• Avoid locating the unit in moist areas.
• Plug the unit into an exclusive, properly installed-grounded wall outlet. Do not under any
circumstances cut or remove the third (ground) prong from the power cord. Any questions
concerning power and/or grounding should be directed toward a certified electrician or an
authorized Products service center.
• After plugging the appliance into a wall outlet, all
ow the unit to cool down for 2-3 hours before
placing food in the refrigerator compartment.

7
Electrical Connection
This unit should be properly grounded for your safety. The power cord of this unit is equipped with a
three-prong plug which mates with standard three prong wall outlets to minimize the possibility of
electrical shock. Do not under any circumstances cut or remove the third ground prong from the
power cord supplied. For personal safety, this appliance must be properly grounded.
This unit requires a standard 115 Volt AC /60Hz electrical outlet with three-prong ground. Have the
wall outlet and circuit checked by a qualified electrician to make sure the outlet is properly grounded.
When a standard 2-prong wall outlet is encountered, it is your responsibility and obligation to have it
replaced with a properly grounded 3-prong wall outlet. The cord should be secured behind the unit
and not left exposed or dangling to prevent accidental injury.
The unit should always be plugged into its own individual electrical outlet which has a voltage rating
that matches the rating label on the appliance. This provides the best performance and also prevent
overloading house wiring circuits that could cause a fire hazard from overheated. Never unplug the
unit by pulling the power cord. Always grip the plug firmly and pull straight out from the receptacle.
Repair or replace immediately all power cords that have become frayed or otherwise damaged. Do
not use a cord that shows cracks or abrasion damage along its length or at either end. When moving
the unit, be careful not to damage the power cord.
Extension Cord
Because of potential safety hazards under certain conditions, it is strongly recommended that you do
not use an extension cord with this unit. However, if you must use an extension cord it is absolutely
necessary that it be a 3-wire grounding type appliance extension cord having a grounding type plug
and outlet and that the electrical rating of the cord be 220 volts and at least 15 amperes.
OPERATING YOUR UNIT
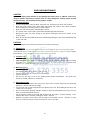
Setting the Temperature Control
• Your unit has only one control for regulating the temperature in the compartment. The temperature
control is located inside on the upper right hand side of the compartment.
• The first time you turn the unit on, set the temperature control to “6”.
• The range of the temperature control is from position "OFF” to “6”. After 24 to 48 hours, adjust the
temperature control to the setting that best suites your needs. The setting of “3” should be
appropriate for home or office use.
• To turn the appliance completely off, turn the temperature control to ”0” and unplug the unit.
• General but not exact temperature ranges for the temperature controls are:
Temperature Control
Setting
Temp
Range
0 Off - 55
1 48 – 55
2 45 – 48
3 42 – 45
4 39 – 42
5 35 – 39
6 33 - 35
Turning the temperature control to “OFF” position stops the cooling cycle but does not shut off the
power to the unit.
If the unit is unplugged, has lost power, or is turned off, you must wait 3 to 5 minutes before
restarting the unit. If you attempt to restart before this time delay, the unit will not start.
Warning
Improper use of the grounded plug can result in the risk of electrical shock. If the power cord is
damaged, have it replaced by an authorized service center.

8
CARE AND MAINTENANCE
CAUTION:
Do not use boiling water because it may damage the plastic parts. In addition, never use a
sharp or metallic instrument to remove frost as it may damage the cooling system and will
void the warranty. We recommend using a plastic scraper.
Cleaning Your Unit
• Turn the temperature control to "OFF", unplug the unit, and remove the food, shelf, and tray.
• Wash the inside surfaces with a warm water and baking soda solution. The solution should be
about 2 tablespoons of baking soda to a quart of water.
• Wash the shelf and tray with a mild detergent solution.
• The outside of the unit should be cleaned with mild detergent and warm water.
• Wring excess water out of the sponge or cloth before cleaning the area of the controls, or any
electrical parts.
• Wash the outside cabinet with warm water and mild liquid detergent. Rinse well and wipe dry with
a clean soft cloth.
CAUTION:
Failure to unplug the unit could result in electrical shock or personal injury.
Power Failure
Most power failures are corrected within a few hours and should not affect the temperature of your
unit if you minimize the number of times the door is opened. If the power is going to be off for a longer
period of time, you need to take the proper steps to protect your food.
Vacation Time
• Short vacations: Leave the unit operating during vacations of less than three weeks.
• Long vacations: If the appliance will not be used for several months, remove all food and unplug
the power cord. Clean and dry the interior thoroughly. To prevent odor and mold growth, leave
the door open slightly: blocking it open if necessary.
M
oving Your Unit
• Remove all the food.
• Securely tape down all loose items inside your unit.
• Turn the leveling legs up to the base to avoid damage.
• Tape the door shut.
• Be sure the unit stays secure in the upright position during transportation. Also protect the
outside of unit with a blanket, or similar item.
Energy Saving Tips
• The unit should be located in the coolest area of the room or island, away from heat producing
appliances, and out of the direct sunlight.
• Let hot foods cool to room temperature before placing in the unit. Overloading the unit forces the
compressor to run longer.
• Be sure to wrap foods properly, and wipe containers dry before placing them in the unit. This cuts
down on frost build-up inside the unit.
• Unit storage bin should not be lined with aluminum foil, wax paper, or paper toweling. Liners
interfere with cold air circulation, making the unit less efficient.
• Organize and label food to reduce door openings and extended searches. Remove as many
items as needed at one time, and close the door as soon as possible.

9
PROBLEMS WITH YOUR REFRIGERATOR?
You can solve many common unit problems easily, saving you the cost of a service call from an
outside company. Try the suggestions below to see if you can solve the problem before calling the
servicer and/or Coyote Customer Service Line (1-855-520-1559)
TROUBLESHOOTING GUIDE
PROBLEM POSSIBLE CAUSE
Unit does not operate.
Not plugged in.
The circuit breaker tripped or a blown fuse.
The unit temperature control is set at “OFF”
position.
Turns on and off frequently. The room temperature is hotter than normal.
A large amount of food has been added to the
unit.
The door is opened too often.
The door is not closed completely.
The temperature control is not set correctly.
The door gasket does not seal properly.
The unit does not have the correct clearances.
Vibrations. Check to assure that the unit is level.
The unit seems to make too much noise.
The rattling noise may come from the flow of the
refrigerant, which is normal.
As each cycle ends, you may hear gurgling
sounds caused by the flow of refrigerant in your
unit.
Contraction and expansion of the inside walls
may cause popping and crackling noises.
The unit is not level.
The door will not close properly.
The unit is not level.
The door was reversed and not properly installed.
The gasket is dirty or bent.
The shelves, bins, or baskets are out of position.
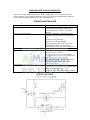
WIRING DIAGRAM

10
COYOTE LIMITED WARRANTY
Coyote will warrant to the original purchaser of this product that it will be free of defects in
material and craftsmanship for the set time frame listed below, when the product is
assembled and used under normal operating conditions set forth in this manual:
All Parts – 1 Year Limited Warranty
Coyote will require a proof of purchase to validate the date of purchase. Therefore, you
should save your receipt in a safe and accessible place, in case it is required as a proof of
purchase.
This Limited Warranty is limited to the replacement of parts at Coyote’s discretion, that
prove to be defective under normal use and service. Furthermore, Coyote may require the
return of the damaged part(s) for examination before issuing replacement parts. If Coyote
would like to have the damaged product returned first, the shipping charges must be paid
by the customer. No returns or shipments back will be accepted without prior Coyote
authorization.
Upon receipt of the damaged parts and to Coyote’s satisfaction, if the original part is
proven defective, Coyote may elect to approve the claim and issue a replacement part,
without charge.
This warranty does not cover any failures or operating difficulties due to abuse, accident,
misuse, alteration, misapplication, vandalism, maintenance, improper installation,
operation or service, as stated in this manual. Furthermore, this warranty does not cover
cosmetic wear from normal use, such as; scratches, dents, corrosion or discoloration
caused by weather, heat, chemicals, paint loss, surface rust, or abuse during installation.
Damage due to severe weather conditions such as hail, hurricanes, earthquakes, tsunami’s,
tornadoes, an Act of God or terrorism, is not covered by this warranty.
Warranty Restrictions:
• This warranty is non-transferable and only applies to the original owner.
• This warranty is void if used for a commercial or rental purpose.
• This warranty gives you specific legal rights and you may have other rights, which
vary from state to state.
• For assistance or more information on this products warranty, please contact:
Coyote Customer Service
855-520-1559
Monday – Friday
8:00am – 4:00pm CST

11
PARTS & FEATURES
CBIR-R and CBIR-L Parts Listing
Reference
No. Part Description
Qty on
Unit Part No.
1 Light Lens Cover 1 CBIR0001
2 Temperature Control Knob 1 CBIR0002
3 Upper Shelf 2 CBIR0003
4 Lower Shelf 1 CBIR0004
5 Leveling Leg 4 CBIR0005
6 Venting Grid 1 CBIR0006
7 Bottom Hinge 1 CBIR0007
8 Door 1 CBIR0008
9 Door Bar 1 CBIR0009
10 Can Dispenser 1 CBIR0010
11 Condiment Bar 1 CBIR0011
12 Top Hinge 1 CBIR0012
13 Door Handle 1 CBIR0013
14 Door Handle Fixings 2 CBIR0014
-
 1
1
-
 2
2
-
 3
3
-
 4
4
-
 5
5
-
 6
6
-
 7
7
-
 8
8
-
 9
9
-
 10
10
-
 11
11


RTA CBIR-R Owner's manual
- Type
- Owner's manual
Ask a question and I''ll find the answer in the document
Finding information in a document is now easier with AI
Related papers
Other documents
-
Lynx 20" Sedona Refrigerator L500REF Care & Use Manual
-
Speakman S-1559 Operating instructions
-
Coyote C1CH36 User guide
-
Coyote C1P36-FS Owner's manual
-
Coyote C2SL30NG User guide
-
Coyote C1HY50CT User guide
-
-
-
Edsal AC300A Installation guide
-