Page is loading ...

Haloplate
HD4415

2

3

4


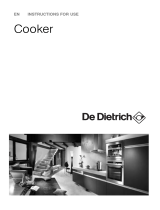
General description
A Cooking plate
B On/off button
C Heating control
D Display
E Mains cord
F Carrying handle
G 'Plate hot' warning light
H Cooking timer
Important
Read these instructions for use carefully before using the appliance and
save them for future reference.
◗ As the appliance largely works by means of heat radiation,
virtually any type of pan can be used, e.g. glass, stainless steel,
aluminium, ceramic, earthenware and non-stick coated pans.
To achieve the best result, use pans with a flat base and a non-
reflective outer surface to ensure highest efficiency in heat
transmission.
◗ Check if the voltage indicated on the appliance corresponds to
the local mains voltage befoe you connect the appliance.
◗ If the mains cord is damaged, it must be replaced by Philips, a
service centre authorised by Philips or similarly qualified persons
in order to avoid a hazard.
◗ Do not allow the mains cord to come into contact with the plate
and the pan standing on the plate when they are hot.
◗ Never immerse the appliance in water or any other liquid.
◗ Leave a free space of about 10cm around the appliance to prevent
damage due to radiated heat.
◗ Place the pan properly in the centre of the plate. Be careful: the
handgrips of small pans may become hot.
◗ Do not put plastic containers or aluminium foil on the plate when
it is hot.
◗ If you detect any cracks or fissures in the plate, stop using the
appliance right away, unplug it and contact the nearest Philips
service centre.
◗ Pans, especially cast-iron and enamel pans, may have ridges or
burrs on the bottom that may cause scratches on the surface of
the plate when the pan is moved.
◗ To prevent permanent marks from developing on the plate, make
sure pans are dry on the outside before placing them on the
plate. If water or anything else splashes onto the plate, wipe it off
the plate immediately.
◗ Do not drop hard objects on the plate, as this may lead to
breakage.
◗ Keep the hot appliance away from meltable and flammable
materials.
ENGLISH6

◗ Keep the appliance out of the reach of children. Do not let the
mains cord hang over the edge of the table or worktop on which
the appliance is standing.
◗ Never let the appliance operate unattended.
◗ Do not cover the ventilation slots in the bottom and at the back
of the appliance.
◗ Do not stare into the light emitted by the plate during operation.
Safety features
Automatic overheat protection
During cooking, the appliance will automatically reduce its heating level
from 8 to 7, 6 or 5 if it becomes too hot.When this happens, the
heating level shown on the display remains unchanged. After having
cooled down sufficiently, the appliance will automatically heat up to the
selected heating level again.
When the appliance has overheated due to a defect or misuse (e.g.
covering of the ventilation slots), the appliance automatically switches
off completely.
Automatic shut-off
The appliance switches off automatically after approximately 180 minutes.
'Plate hot' indication
C
◗ After you have switched the appliance off, the 'plate hot' warning
light will continue to blink to indicate the cooking zone is still hot.
If you unplug the appliance while the warning light is blinking and then
plug it in again, the warning light will not go on again.
Before first use
◗ Clean the appliance with a damp cloth and rub it dry before using
the appliance for the first time.
Using the appliance
1 Put the plug in the wall socket.
The display goes on.
ENGLISH 7

C
2 Press the on/off button once to put the appliance in standby
position.
On the left side of the display a blinking '1' appears.
C
3 Set the required heating level by means of the POWER
and buttons on the left side of the control
panel.
- There are 8 heating levels. Level 1 represents minimum power, level
8 represents maximum power.
- The selected heating level is shown on the left side of the display.
- See section 'Tips' in this chapter for the recommended cooking
settings.
B
If you don't set the heating level within 30 seconds, the appliance will
switch off automatically.
◗ The heating level can also be adjusted during use.
C
4 Press the on/off button after use to switch the appliance off.
5 Keep the appliance plugged in after use for at least 15 minutes
to allow the fan to cool the appliance in a shorter period of
time.
C
◗ Carry the appliance by its handles.
Timer
For extra comfort and safety, you can use the timer to set the desired
cooking time.The appliance will switch off automatically when the set
cooking time has elapsed.
You can set the timer before as well as after setting the heating level.
C
1 Set the timer by means of the TIMER ¢ and £ buttons on the
right side of the control panel.
- The set time is shown on the right side of the display.
- Keep the button pressed to put the minutes forward quickly.
- The timer can be reset by keeping the £ button pressed until the
ENGLISH8

display shows '0' or by pressing the on/off button twice.
- The maximum time that can be set is 180 minutes.
2 Release the button once the required cooking time has been reached.
- The timer starts counting down as soon as you release the button,
also when the heating level has not yet been set.
- During use, the remaining cooking time is shown on the display.
◗ The time can be adjusted during use.
C
3 When the preset time has elapsed, the appliance beeps and
then switches off automatically.You can stop the audible signal
by pressing the on/off button briefly.
During the beeping, the timer can be set again without interrupting the
cooking process. Repeat steps 1 and 2 of this section.
◗ The cooking timer can also be used as a handy kitchen timer. Just
make sure the appliance is plugged in and do not select a heating level.
Tips
◗ As the appliance largely works by means of heat radiation,
virtually any type of pan can be used, e.g. glass, stainless steel,
aluminium, ceramic, earthenware and non-stick coated pans.To
achieve the best result, use pans with a flat base and a non-
reflective outer surface to ensure highest efficiency in heat
transmission.
◗ When using glass pans, avoid thermal shock conditions: do not
place a cold pan on a hot cooker or a hot pan on a cold cooker.
Do not let glass pans boil dry.
ENGLISH 9

◗ Advised cooking settings (for 110V performance)
Cleaning
Regular cleaning will improve the performance of the appliance.
Never immerse the appliance in water.
Do not use any abrasive (liquid) cleaning agents or materials (e.g
scouring pads) to clean the appliance.
1 Unplug the appliance.
C
2 Remove (fat) splashes and spills, encrusted dirt or burned food
when the plate is still warm.
Be careful! Make sure you don't touch the plate with your bare hands.
C
3 If necessary, apply a special cleaner for ceramic glass to the
lukewarm surface of the cooking plate and rub lightly with a
clean cloth or sponge.
4 Let the hot plate cool down completely.
ENGLISH10
Job
Keeping warm
Keeping warm
Stewing
Stewing
Stir frying/Deep frying
Stir frying/Deep frying
Grilling/Quick heating up, bringing to boil in the
shortest time
Grilling/Quick heating up, bringing to boil in the
shortest time
Temperature °C
(approx. value)
105
150
190
245
325
395
520
700
Level
1
2
3
4
5
6
7
8

C
5 Then clean the plastic surfaces with a moist cloth.
◗ Do not spill sugar on the cooking zone. Sugar and sugary
foodstuffs (e.g. fruit syrups and marmalade) must be immediately
removed from the hot plate so as to avoid chemical reactions.
◗ Bright brown stains showing up on the surface of the cooking
plate are an indication of overheated scale.These stains develop
on the plate as a result of spilled water or moist pans.When such
discolourations are observed, the plate should be immediately
cleaned with the cleaners mentioned above.
◗ Thicker layers of scale can only be removed by intensive cleaning,
which may have to be repeated several times to be effective.
◗ Household items made of plastic (spoons, bowls, dishes, etc.) must
on no account be placed on the hot cooking surface.The plastic
will melt and stick to the hot surface. Should this occur, the
surface is to be scraped clean at once while the plate is still hot.
◗ Do not use sponges or cloths which have already been used for
other purposes.
Guarantee & service
If you need information or if you have a problem, please visit the Philips
website at www.philips.com or contact the Philips Customer Care
Centre in your country (you will find its phone number in the
worldwide guarantee leaflet). If there is no Customer Care Centre in
your country, turn to your local Philips dealer or contact the Service
Department of Philips Domestic Appliances and Personal Care BV.
ENGLISH 11

A E
B F
C G
D H
◗
◗
◗
◗
◗
◗
◗
◗
◗
◗
◗
◗
◗
◗
◗
◗
12

C
◗
◗
1
C
2
C
3
B
◗
C
4
5
13

C
◗
C
1
£
2
◗
C
3
◗
14

15
◗
◗
◗

16
1
C
2
C
3
4
C
5
◗
◗
◗
◗
◗

17

18

19

u
4222 002 00031
www.philips.com
/