Bresser Junior 8855100 Owner's manual

Category
Microscopes
Type
Owner's manual

Bresser Junior 8855100 is a versatile microscope that enables users to explore the microscopic world in great detail, suitable for both educational and hobbyist purposes. With its 100X, 200X, and 450X magnification levels, users can observe tiny structures and specimens up close. It features a digital camera that allows users to capture images and videos of their observations, making it easy to share and document findings. The device is compatible with Windows computers and comes with user-friendly software for image editing and capturing.

Bresser Junior 8855100 is a versatile microscope that enables users to explore the microscopic world in great detail, suitable for both educational and hobbyist purposes. With its 100X, 200X, and 450X magnification levels, users can observe tiny structures and specimens up close. It features a digital camera that allows users to capture images and videos of their observations, making it easy to share and document findings. The device is compatible with Windows computers and comes with user-friendly software for image editing and capturing.

INSTRUCTION MANUAL
'LJL0LFURVFRSHLQ
WARNING! Only for use by children over 8 years old. Only for use under
the supervision of adult. This toy contains functional edge.
CAUTION! Read the instructions before use, follow them and keep them
for reference. Keep small children and animals away from
experiments. Store the microscope set out of reach of small
children. Eye protection for supervising adults is not included.
ANL8855100EN0214BRESSER
Parent Quick Start Guide
While the DigiMicroscope 4in1 is easy to install and use, the initial
hardware and software setup must be done
by an adult. Please follow
the instructions below to get started.
It is important to install the software first. This microscope will work on
computers equipped with a USB 1.1 port (USB 2.0 recommended) and
Windows® 2000, Windows® XP SP2 or Windows® Vista. Driver
installation for Windows® 2000 system is mandatory. Driver installation
for XP SP2 and Vista systems is optional and only required if your
computer has issues using this microscope in driverless mode.
1. Insert the installation CD.
2 Wait for the autoplay to start
(If Autoplay does not automatically launch the installer, go to the
desktop and double-click on the icon named My Computer.
Double-click the icon for the CD-ROM/DVD drive that contains the
Microscope software. Sometimes this will cause Autoplay to start. If
it doesn’t, double-click on the autorun.exe, and follow the setup
steps on this page.)
3. This step is optional for Windows XP SP2 and Vista users, you do
not need to install driver. You can jump to step 4. However, you can
install driver if you really want to. For Windows 2000 users, you
must install driver first: Connect the microscope’s USB plug to the
USB port of the computer. Install the microscope driver by clicking
“Install Driver”. Follow the on screen instructions to complete the installation.
4. Install the ArcSoft camera suite by clicking “Install PhotoImpression”
and “Install VideoImpression” on the menu screen. Input the license
key found on the CD sleeve if prompted.
5. Follow the steps by clicking the appropriate buttons.
6. You need the Adobe Acrobat Reader software to open the manual.
Click “Install Adobe Acrobat Reader” if your computer does not have
this software.
7. If you have the Adobe Acrobat Reader software installed, you can
read the manuals for the Digital Microscope and the camera suite by
clicking “Microscope Manual” and “ArcSoft Application Software
Manual” on the menu screen respectively.
8. Insert the microscope’s USB plug to the USB port of the computer.
A new device named “USB 2.0 Camera” will be detected on the first
time the microscope is plugged in. S
tart the PhotoImpression or
VideoImpression application to acquire image with the digital
microscope.
8Qder the environment with electrostatic discharge, the device
may malfunction and require user to reset the device.
- ii -
- i -
Package contents:
1. Microscope
2. Digital camera (with lens, USB cable and stand)
3. 1 Eyepiece adaptor for web camera
4. 4 prepared slides
5. 8 blank slides
6. 12 blank labels
7. 12 slide covers
8. 12 cover glasses
9. 1 pair of metal tweezers
10. 1 preparation needle
11. 1 Software CDROM
12. This manual
Minimum system requirements:
· A computer with USB port
· Intel Pentium 4 Processor or AMD Athlon XP or faster
· 256MB System RAM
· Windows 2000/XP SP2/ Windows Vista
· CD-ROM drive
· 16-bit color display or higher
Software setup guide
For Windows 2000 users, please install the microscope driver software first.
However, for Windows XP SP2 or Vista users, this digital microscope does not
require any driver installation. Driver installation for XP SP2 and Vista systems
is optional and only required if your computer has issues using this
microscope in driverless mode. In any case, you need to use an imaging and/or
a video application software to capture the images from the digital microscope.
You can use your favorite application or the ones provided on the software
CDROM:
1. Insert the software CDROM to your CDROM drive
2. Wait for autoplay to start
3. If the installer screen does not come up automatically, click “Start”, “Run”,
and execute the file “autorun.exe” of the CD to start the installation program.
4. This step is optional for Windows XP SP2 and Vista users, you do not need
to install driver. You can jump to step 5. However, you can install driver if you
really want to. For Windows 2000 users, you must install driver first:
Connect the microscope’s USB plug to the USB port of the computer. Install
the microscope driver by clicking “Install Driver”. Follow the on screen
instructions to complete the installation.
5. Install ArcSoft Camera Suite by clicking “Install PhotoImpression” and
“Install VideoImpression” on the installer screen. Input the license key found
on the CD sleeve if prompted.
Connecting the Digital Microscope:
1. After the Microscope software has been installed, plug the microscope’s
USB cable into your computer’s USB port.
2. Go to the Windows Start menu to launch the imaging software like Arcsoft
PhotoImpression, for example.
Note:
For the location of the USB ports on your computer, please refer to your
computer’s user manual. To ensure that the digital microscope works normally, do
not connect or disconnect the USB cable from the computer while system is
starting up or shutting down. To avoid unstable system software functioning, do not
connect or disconnect the USB cable while application is opening or closing.
If you want to disconnect the digital microscope when the computer is on,
remember to:
1. Close any software application that currently using for the microscope.
2. Disconnect the USB cable.
Never pull on the cable portion to disconnect the USB cable, always grasp the
connector itself while disconnecting.
Note that the computer may not be able to recognize the microscope if it is
disconnected and then reconnected while the computer is in power saving mode.
Using the Microscope in Digital Mode:
- 2 -
- 1 -
1. If you have been using the digital camera module as a web camera,
unscrew the objective lens unit from the camera (figure 2a), then replace
with the eyepiece adaptor (figure 2b).
2. Remove the eyepiece on the microscope (Figure 3a). Snap the digital
camera module in the eyepiece position (Figure 3b), make sure the camera
module sits properly in place.
3. Make sure the microscope is connected to the USB port of the computer.
- 3 -
4. Install two AA size batteries (not included) in the battery compartment near
the arm of the microscope.
5. Place the slide on the stage, fasten it in place with the clip and switch on the
illumination.
6. Start “PhotoImpression” program from the Windows Start menu. The
application will start with the “Get Photo” screen. Here you can select the
device which you get your photo from. If you have correctly connected the
Digital Microscope, you should be able to select the “Video” icon. (On some
systems, the “Video” icon may not be selectable. In such case, get photo
from “Camera/Scanner” and then select “WIA-USB Video Device”.)
- 4 -
Figure 2a Figure 2b
Figure 3b
Figure 3a
7. A window “Capture Image from Video” will pop up, select “USB 2.0 Camera”
from the “Drivers” list.
8. The image window will be blank. To preview the image from the microscope,
click the “Live” button.
9. Set the image size to 640x480 in
the properties window by clicking
the “Format” button, smaller
image size (e.g. 352x288) is
recommended for slower
computers.
10. If there is flickering in the preview
image, click the “Source” button. Try
selecting different “PowerLine
Frequency (Anti Flicker)” setting in
the “Properties” window until
flickering is reduced.
- 5 -
- 6 -
11. Focus:
Adjust the focus knob until the image on the computer screen looks clear.
Focusing may take a little practice. Try making small changes and waiting for the
screen to catch up.
Selecting different magnification:
You can choose different magnification power by rotating the magnification
revolving turret of the microscope. The current level is indicated on the
magnification level label facing you. You will feel a click if the lens is properly
aligned. Levels of 100X, 200X and 450X can be selected.
12. Press the “Capture” button to capture the current image. Press “Done” to
exit the “Capture” window.
13. The captured image will appear in the main working area, select the
“Enhance” or “Create” icon near the top to edit the new image, or select “Get
Photo” again to capture another image. Refer to the manual of
“PhotoImpression” (in the supplied installation disc) for further details.
Using the Microscope in non-Digital Mode:
1. Replace the digital camera module of the microscope with the removable
eyepiece for direct viewing (figure 4).
Figure 4
2. Focusing and magnification level selection are the same as in digital mode.
3. Please refer to the detail instructions of using the microscope starting from
page 12.
- 8 -
- 7 -
Using the digital camera module as a PC camera:
1. Screw the objective lens unit back to the camera module if it has been
removed for microscope viewing. Care should be taken not to make
fingerprints or dust on the lens and the sensor of the camera.
2. Place the camera unit on the stand as shown below.
3. Connect the camera module to the USB port of the computer
4. Start “PhotoImpression” or other Imaging applications from the Windows
Start menu.
5. Adjust the focus by rotating the lens until a clear image is displayed.
6. You can take still pictures and save them in the computer using the same
procedure as described in the section “Using the Microscope in Digital
Mode”.
7. To use the camera module as a web camera for video conference, you need
to install applications like “Netmeeting” or “MSN Messenger”, which can be
downloaded from Microsoft’s web site. Please refer to the corresponding
application manual.
- 9 -
Handling note:
The image sensor of the camera is a delicate integrated circuit and must be
handled carefully. When you remove the lens from the camera, dust may fall on
the sensor. Only use a blower to clean the dust. Never touch the sensor.
Technical Specifications:
Image Sensor: 1/4.5 inch color CMOS (310k effective pixels)
Color: 24 bit RGB
Interface: USB 2.0 (backward compatible with version 1.1)
Video Preview: 30fps @320x240 pixels (QVGA)
30fps @640x480 pixels (VGA)
Video Control: PC software provides control for brightness, contrast,
hue, saturation, sharpness, gamma, 50/60Hz flicker
filtering
Video Capture: 30fps @320x240 pixels (QVGA)
30fps @640x480 pixels (VGA)
Still Capture: 30fps @320x240 pixels (QVGA)
30fps @640x480 pixels (VGA)
Magnification: 100, 200, 450 (for 14” screen)
- 10 -
Welcome to the world of
Micro-Science
®
We take great pleasure in introducing you to the
world of Microscope. Microscope refers to an
instrument with lenses for making very small
near objects to appear larger. Because there
are innumerable living things that cannot be
seen with our naked eyes, microscope enables
these invisible living things to be seen
effortlessly.
The discovery of microscope goes back many
many years, and since the invention it has
exposed to a new field of exploration and study
as more attractive, and exquisite specimens as
you ever imagined can be evidenced.
In our new world of advanced technology, every
science from the most fundamental study of
biology to the highly skilled fields of
astro-physiology will use some form of
microscope. The mission of microscope
allows anyone from all walks of life to better
comprehend the complex forms of living
organisms or stagnant materials that construct
this world which we live in.
This microscope set will be the starting point to
your many hours of fruition as a hobby or
broader your opportunity to a wonderful world of
science.
Happy Experimenting!!!
Attention
The following information should be read carefully
in order to overcome confusions.
This microscope set is appropriate for children over
8 years old. If not applied, supervision of adult is
required as this set comprises of functional sharp
edge.
Before using the microscope, attentively and
carefully read the instructions, follow the guide, and
keep them for future direction in case you need
further helpful hints.
In any situation, be extremely cautious not to allow
chemicals to come into contact with any part of the
body, especially the eyes and mouth. Keep away
young infants and animals from the experiment.
Always, keep the microscope set in a place where
young infant is out of reach.
Eye protection is not provided, it can be obtained
from any science departments, and major shopping
outlets. Remember, in case of accidents please
seek medical advice.
Helpful Hints
The essential component of the microscope is
the lens. Consequently, adequate care must
be exercised when dealing with the lens.
Microscope should be stored in a moisture
free place. Because moisture build up on the
lenses will reduce the light intensity.
After it is utilized, protect the microscope from
dust by covering the microscope or putting it
back into the box.
If the lens gets dusty or dirty, it is suggested to
clear off the lens surface with a soft cotton
cloth or tissue. Do not rub the lens with a
finger or unclean cloth.
If a microscope is not used for a long period of
time, discharge the light source batteries.
Always keep instructions to hand.
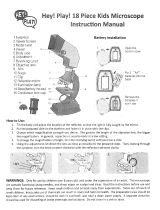
Components of a Microscope
1. Eyepiece
2. Focusing knob
3. Body tube
4. Objective lens
5. Arm
6. Stage
7. Clip
8. Clip adjustors
9. Power switches for the illuminator
10. Base
11. Magnification revolving turret
Procedures
1. Firstly, insert 2 AA penlite dry cells batteries in
the arm of the microscope. You will need to
use a screwdriver to open the battery case
cover. (Batteries are not included)
2. Now put the prepared slide on the stage, and
fasten it in place with the clip adjustors.
3. Next, choose the magnification strength you
desire. In general, it is recommended to begin
with lower magnification for easier focusing.
To change the magnification setting, turn the
magnification revolving turret until you hear a
click.
4. Turn on the illuminator for viewing.
5. Look through the eyepiece and slowly adjust
the focusing knob until the object on the slide
becomes clear. To view different part of the
slide, adjust the clip adjustors until the desired
object appears through the eyepiece.
1
3
11
4
6
7
8
10
2
9
5
How To Make a Prepared Slide
Please note that if the given specimen is not thin
and crystalline, it cannot be inspected by the
microscope. This is due to the fact that light from
the reflector or light source does not advance
through.
Fibres of wool, pollen, or salt will be simple to
see, and will not need a cover glass.
Crystal-clear specimen are stain first with a
drop or two drops of methylene blue. Eosin
or other dyeing solutions are available on the
market.
Also note these are dyeing solutions, and thus
could induce staining of clothing, fabrics, and
carpets. Extreme care should be handled with
when dealing with these solutions.
1. Temporary Mount
Wipe the slide and cover glass clean
Thin the sample with a razor blade. (Be
extremely careful)
Then pick it up with tweezers, and put it on the
centre part of the glass slide.
Next, add one drop of water on the sample
with a dissecting needle. If the sample is
clear, add one drop of methylene blue or eosin
solutions. (Be extremely careful)
Gently put the cover glass on top of it, be sure
not to let any air bubbles go in.
Remove any excess water or dyeing solutions
with blotting paper.
Now, it is ready for observation.
Remember to wash your hands immediately after
doing the preparations and dispose the dyeing
solutions down the drain but not into a sink.
2. Permanent Mount
Wipe the slide and cover glass clean.
Continue as above but before covering the
slide with the cover glass, add few drops of
gum media (or Canada balsam) solution or
transparent adhesive glue with a dissecting
needle to the slide.
Place the cover glass on top with tweezers,
and leave it to dry for about a day.
Safety Recommendations:
Always seek medical attention in case of any
doubts.
In case of:
Eye contact: Wash the eye with plenty of
water, and if necessary hold the eye open.
Inhalation: Remove person to fresh air.
Cut: The wound should be washed in
antiseptic solution, or clean water. Next, put
on a bandage.
Swallowed: Do not encourage vomiting.
Wash mouth with water, and drink fresh water.
In any of the above situations, please contact a
doctor.
IMPORTANT: Keep these
instructions. DO NOT
DISCARD.
1. Requires 2 x “AA” (LR6) batteries. (Not
included)
2. Only adults should install and replace batteries.
3. Alkaline batteries are recommended.
4. Do not use rechargeable batteries.
5. If the toy has not been used for a long time,
remove the batteries.
6. Non-rechargeable batteries are not to be
recharged.
7. Do not mix old and new batteries.
8. Do not mix alkaline, standard (carbon zinc) or
rechargeable (nickel cadmium) batteries.
9. Exhausted batteries are to be removed from
the toy.
10. The supply terminals are not to be
short-circuited.
11. Only batteries of the same or equivalent type
as recommended are to be used.
12. Batteries are to be inserted with the correct
polarity.
Service-Hotline:
+49 (0) 28 72 / 80 74-210
Service-Center:
Bresser GmbH
Gutenbergstr. 2
DE-46414 Rhede
Deutschland
  • Page 1 1
  • Page 2 2
  • Page 3 3
  • Page 4 4
  • Page 5 5
  • Page 6 6
  • Page 7 7
  • Page 8 8
  • Page 9 9

Bresser Junior 8855100 Owner's manual

Category
Microscopes
Type
Owner's manual

Bresser Junior 8855100 is a versatile microscope that enables users to explore the microscopic world in great detail, suitable for both educational and hobbyist purposes. With its 100X, 200X, and 450X magnification levels, users can observe tiny structures and specimens up close. It features a digital camera that allows users to capture images and videos of their observations, making it easy to share and document findings. The device is compatible with Windows computers and comes with user-friendly software for image editing and capturing.

Ask a question and I''ll find the answer in the document

Finding information in a document is now easier with AI