Epson EasyMP.net Network Option Board User manual
- Category
- Projectors
- Type
- User manual
This manual is also suitable for


1
EasyMP.net Operation Guide
Contents
Projector Functions 3
Displaying Motion Pictures and Video Images (EasyPlayer) .4
Selecting a File............................................................................ 4
Playing Motion Pictures.............................................................. 5
Playing Sounds............................................................................ 6
Displaying a Digital Camera Image (Still Image) ...................... 6
Adding a Comment to the Projected Still images....................... 7
Copying/Moving/Deleting/Executing a File (EasyFile)............8
Selecting a File............................................................................ 8
Copying or Moving a File........................................................... 8
Deleting a File............................................................................. 8
Executing a File .......................................................................... 8
Displaying a Web Page (EasyBrowser) .................................9
Operation..................................................................................... 9
Adding a Comment to the Displayed Page............................... 10
Adding Markings and Comments during a Presentation ...... 11
Adding Markings and Comments to the Image (EasyMarker)..11
Using the Tools ..........................................................................11
Using the Projector as a Whiteboard (EasyBoard) ................... 14
Operating a Network PC (Remote Desktop) ........................15
Remote Connection................................................................... 15
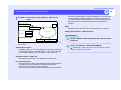
Setting EasyMP.net Options
(EasyConfiguration)..............................................................18
Managing EasyMP.net Users .................................................... 18
Basic System Setup................................................................... 19
Network Setup (LAN Setup) .................................................... 19
Functions Setup (Application Setup) ........................................ 21
Automatic Projection by Schedule (Timer Setup) .................... 22
Operations from the PC (via Network) 23
Projecting PC Images (Network Screen) ............................. 24
Before Starting the Network Screen.......................................... 24
Connecting to the Projector....................................................... 25
Projector Connection by Creating a Projector Group ............... 29
Exporting and Importing a Group ............................................. 31
Using the Toolbar ...................................................................... 33
Disconnecting the Network Connection ...................................35
Projector Setup from the PC (EasyWeb) ............................. 36
Before Operations .....................................................................36
Starting EasyWeb ...................................................................... 36
EasyConfiguration.....................................................................37
EasyMenu..................................................................................38
EasyRemote............................................................................... 38
Integrated Management for Projector Status Check and
Control (EMP Monitor) ......................................................... 39
Registering Projectors to be Monitored .................................... 39
EMP Monitor Main Screen ....................................................... 42

2
Contents
EasyMP.net Operation Guide
Appendices 44
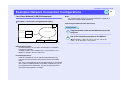
Examples Network Connection Configurations ....................45
Local Area Network (LAN) Environments .............................. 45
If No Local Area Network (LAN) is Available ........................ 49
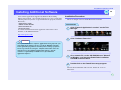
Installing Additional Software ...............................................50
Installation Procedure ............................................................... 50
Executing an Installed Program................................................ 51
When You Receive a Projector Error E-mail ........................52

N
S
O
N
O
N
P
S
O
N
P
S
O
N
E
P
S
O
N
N
O
N
P
S
O
N
S
O
N
E
P
S
O
N
S
O
N
P
S
O
N
E
P
S
O
E
P
S
O
N
O
N
P
S
O
N
N
E
P
S
O
N
E
P
S
O
N
S
O
N
E
P
S
E
P
S
O
N
E
P
S
O
E
P
S
E
P
S
O
E
P
S
E
P
E
E
P
S
O
N
E
P
E
P
S
O
E
P
S
O
N
E
P
S
O
E
P
S
O
E
P
E
P
S
E
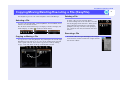
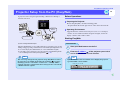
Projector Functions
The EasyMP.net installed in the projector provides the functions required for presentation. The following explains how
to use each of these simple but powerful software functions.
Displaying Motion Pictures and Video Images (EasyPlayer) ........4
• Selecting a File.................................................................................................. 4
• Playlist......................................................................................................................... 5
• Continuous Play of Still Image Files from a Folder ................................................... 5
• Playing Motion Pictures .................................................................................. 5
• Playing Sounds ................................................................................................. 6
• Displaying a Digital Camera Image (Still Image) ......................................... 6
• Adding a Comment to the Projected Still images ......................................... 7
Copying/Moving/Deleting/Executing a File (EasyFile)...................8
• Selecting a File.................................................................................................. 8
• Copying or Moving a File................................................................................ 8
• Deleting a File................................................................................................... 8
• Executing a File................................................................................................ 8
Displaying a Web Page (EasyBrowser)...........................................9
• Operation.......................................................................................................... 9
• Operation Buttons ....................................................................................................... 9
• Displaying Another Window ...................................................................................... 9
• Adding a Comment to the Displayed Page .................................................. 10
Adding Markings and Comments during a Presentation ............ 11
• Adding Markings and Comments to the Image (EasyMarker)................. 11
• Startup ........................................................................................................................11
• Toolbar .......................................................................................................................11
• Using the Tools ............................................................................................... 11
• Property Tool..............................................................................................................11
• Pen Tool .................................................................................................................... 12
• Stamp tool ................................................................................................................. 12
• Text Tool ................................................................................................................... 13
• Eraser and Return to original state Tools ................................................................ 13
• Undo Tool ................................................................................................................. 13
• Save Tool................................................................................................................... 13
• Quit Tool ................................................................................................................... 14
• Using the Projector as a Whiteboard (EasyBoard) .................................... 14
• Using the Drawing Tools .......................................................................................... 14
• Changing the Initial Values of Background and Pen Colours................................... 14
Operating a Network PC (Remote Desktop) .................................15
• Remote Connection ........................................................................................15
• Setup on the PC (Windows XP Professional OS) ..................................................... 15
• Setup on the Projector (EasyMP.net)......................................................................... 15
Setting EasyMP.net Options (EasyConfiguration) .......................18
• Managing EasyMP.net Users.........................................................................18
• Registering/Editing/Deleting a User ......................................................................... 18
• Controlling Access Rights......................................................................................... 18
• Basic System Setup .........................................................................................19
• Setting the Date ......................................................................................................... 19
• Setting the Keyboard Layout..................................................................................... 19
• Maintenance of EasyMP.net...................................................................................... 19
• Network Setup (LAN Setup) .........................................................................19
• Naming the Projector ................................................................................................19
• Network Connection using Network cables.............................................................. 19
• Establishing the Wireless LAN ................................................................................. 20
• Establishing the Mail Notification Function ............................................................. 20
• Establishing Projector Monitoring ............................................................................ 20
• Functions Setup (Application Setup)............................................................21
• Network Screen Setup............................................................................................... 21
• EasyBoard Setup ....................................................................................................... 21
• EasyBrowser Setup ................................................................................................... 21
• EasyPlayer Setup....................................................................................................... 21
• Automatic Projection by Schedule (Timer Setup).......................................22

4
EasyMP.net Operation Guide
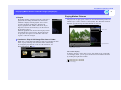
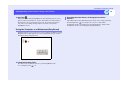
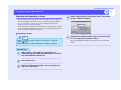
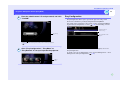
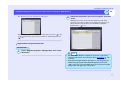
Displaying Motion Pictures and Video Images (EasyPlayer)
Use the EasyPlayer software to play back motion pictures, sounds and still
images. To start EasyPlayer, click "EasyPlayer" on the Main Menu.
EasyPlayer can display or play back the following motion pictures, sounds
and still image files.
Selecting a File
To select and open a file in EasyPlayer, use the File Manager shown at the
right of the screen. Click "EasyMP.net" or "NetWork" to select the file
location, and browse to the folder that contains the desired file.
The file list is switched from large icon display, small icon display and
detailed display each time is clicked (as shown below).
File format/type File extension
Windows media (audio/video file) .asf, .asx, .wma, .wmv, .wmx
Windows audio/video file .avi, .wav
MPEG (Moving Picture Experts
Group)
.mpeg, .mpg
MP3 .mp3
Still image file .bmp, .jpg, .jpeg, .png
TIP
When using your projector system for the first time, you must
initialize EasyPlayer. Set it up by following the on-screen
instructions. Once initialized, you need not repeat the initialization
during the second and subsequent startup.
Click an icon to
select the file lo-
cation.
Properties win-
dow Displays in-
formation about
the current play-
back file
File Manager
Changes the dis-
play format of
the file list.

5
Displaying Motion Pictures and Video Images (EasyPlayer)
EasyMP.net Operation Guide
By double-clicking a motion picture file, audio file or
playlist file, the listing information is stored in the
ASX file is displayed in the playlist. You can also
open the playlist by clicking the "Playlist" tab.
To play a playlist item, double-click its tab. If you
skip item selection and click "Play", the first item in
the playlist is played.
When the playback ends, the next item is played. If no
item remains, the system pauses. The Playlist items
are played in the sequence of ASX files. The item
sequence cannot be changed.
Right-click a folder in the File Manager and select "Plazing the slide
show" to play still image files from the folder continuously.
To change the play interval or effects of the slide show, use
EasyConfiguration.
p.21
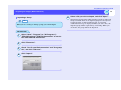
Playing Motion Pictures
The projector can play, pause, rewind, or fast forward motion pictures in a
similar way to a video cassette recorder (VCR). The "Rewind" and "Fast
Forward" operations stop when their buttons are released
Full-screen display
To display an image on the entire screen, click "Full screen". In the full-
screen display mode, you can open a shortcut menu for further functions
by clicking the right mouse button.
Playlist
Continuous Play of Still Image Files from a Folder
Operation buttons
Display Full-screen mode
Selects a file.
Quit full-screen display

6
Displaying Motion Pictures and Video Images (EasyPlayer)
EasyMP.net Operation Guide
Playing Sounds
Similar to motion pictures, MP3 and other sound files can be Paused,
Previous, Rewound or Fast Forwarded. EasyPlayer displays the following
image during sound play.
Full-screen display
To display an image on the entire screen, click "Full screen". In the full-
screen display mode, you can open a shortcut menu for further functions
by clicking the right mouse button.
Displaying a Digital Camera Image (Still Image)
Still image files such as JPEG-format files (.jpg, .jpeg) and Windows
bitmap files (.bmp) can be displayed. To rotate the image, click the "Rotate
to right" or "Rotate to left" buttons, or right-click the image and select
"Rotate to right" or "Rotate to left".
Full-screen display
To display an image on the entire screen, click "Full screen". In full-screen
display mode, you can open a shortcut menu for further functions by
clicking the right mouse button.
Operation buttons
Selects a file.
Selects Full-screen display mode.
Quit full-screen display
Use the "Rotate to
right" or "Rotate to
left" button to ro-
tate the image.
Selects Full-screen display mode.
Quit full-screen display
Rotate to left
Non-display
Rotate to right

7
Displaying Motion Pictures and Video Images (EasyPlayer)
EasyMP.net Operation Guide
Adding a Comment to the Projected Still images
A comment can be added by using the EasyMarker feature.
Right-click the full screen image (
p.6) and select "EasyMarker".
The image with comments can be saved.
"Save Tool" p.11.
Start EasyMarker

8
EasyMP.net Operation Guide
Copying/Moving/Deleting/Executing a File (EasyFile)
Use EasyFile to process a file. Click "EasyFile" on the Task Manager.
Selecting a File
To select a file from EasyFile, click "EasyMP.net", then "NetWork", then a
folder to select the file location.
The file list is switched from large icon display to small icon display and
detailed display, each time is clicked (as shown below).
Copying or Moving a File
To copy or move a file using EasyFile, drag and drop the file from the right
File Manager to the left one or vice versa. A file residing on the network
can be copied or moved. You can also copy or move a file by clicking
"Copy", "Cut" and "Paste" at the top of the EasyFile window.
Deleting a File
To delete a file, select it and click "Delete".
To delete multiple files at the same time, select the
files by dragging and click "Delete". When you are
using both keyboard and mouse, hold down the
[Shift] key (for range selection) or the [Ctrl] key
(for a single file selection) and click the files to be
deleted.
Executing a File
To execute a file or to open and display a file using its
related software, double-click the file or right-click the
file and select "Run".

9
EasyMP.net Operation Guide
Displaying a Web Page (EasyBrowser)
To display a Web page, use EasyBrowser. Click "EasyBrowser" on the
Main Menu. EasyBrowser is a tab browser that can display multiple Web
pages. During a presentation, you can display other Web pages in other
windows and you can switch and project the required page one after the
other.
Operation
Click the toolbar buttons and tabs at the top of the screen to display Web
pages.
Displaying a page using its URL
To display a Web page, enter the URL in the address input field and click
"Move".
If you have already added the required page to “My Favourites”, click
"Favourites".
Full-screen display
To make the window take up the whole screen, click "Fixed Menu".
During the maximum display, the toolbar and tab are redisplayed once the
cursor ( ) is moved to the top of the screen.
To restore the window, right-click anywhere in the window and click
"Fixed Menu" on the shortcut menu.
To open another window, click "Open a Window". When you click a tab,
the window related to the tab appears. You can open up to eight windows
simultaneously and you can switch between them.
Operation Buttons
Button Name Function
Back/
Forward
Moves between the pages (forward or backward).
Stop Stops reading the page.
Refresh Updates the page.
Home Displays the default
"
Home page
"
( Set Home p.21).
Search Displays the default
"
Search page" (Set a Search Page
p.21 ).
Favourites Adds or deletes a page to/from
"
Favourites
"
.
Text size Changes the size of characters on the page. (The default
setting is the intermediate size.)
Encoding Changes the language encoding system (language and
character set) used on the page.
Open New
Window
Opens another window and displays a Web page.
Back
Stop
Refresh
Home
Text size
Open New Window
Favourites
Encoding
Fixed Menu
Page End
Go
Start EasyMarker
Forward
Address input field
SearchForward
Go Moves to the URL page you have entered in the
Address input field.
Start
EasyMarker
Starts EasyMarker to add markings and comments.
("Adding Markings and Comments during a
Presentation" p.11)
Page End Closes the window.
Fixed Menu Make the window take up the whole screen or shrink
the window by displaying or clearing the toolbar and
tab. During maximum display, the toolbar and tab are
redisplayed once the cursor is moved to the top of the
screen.
Displaying Another Window
Button Name Function
Click the appropriate tab to display another window.

10
Displaying a Web Page (EasyBrowser)
EasyMP.net Operation Guide
Adding a Comment to the Displayed Page
Click "Start EasyMarker" on the toolbar to add a marking or a comment to
the currently displayed page. You can save the page with the markings and
comments in an image file and use it later.
See "Adding Markings and Comments during a Presentation" p.11

11
EasyMP.net Operation Guide
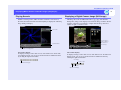
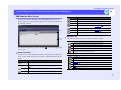
Adding Markings and Comments during a Presentation
Adding Markings and Comments to the Image
(EasyMarker)
When EasyBrowser or EasyPlayer projects an image on the screen, a
marking or comment can be added to the image using EasyMarker. If you
are using EasyMP.net during a presentation, you can add text markings in
any colour, as well as arrows (by using the stamp feature). You can also
highlight characters.
The following table shows how to start the Markings and Comments
function.
Click the required button on the toolbar to draw or erase.
Using the Tools
The properties for pen, stamp, character and eraser tools can be displayed,
cleared or changed.
Startup
EasyBrowser Click on the toolbar.
EasyPlayer Right-click from any position during full-screen display
of a still image, and click . You cannot use this
function when you are playing motion pictures.
When one of the
projector's
applications
application is started
Click the center button of the mouse, or press the [Effect]
button of the remote control.
Toolbar
Button Name Function
Pen Used to draw lines. If semitransparent lines are drawn,
the effect is similar to using a highlighter marker pen.
Stamp There are 14 different stamp symbols which can be
used.
Character Enters text.
Pen
Character
Stamp Eraser Undo
Return to original state
Save
Quit
Close
Property
Eraser Partially erases an entry.
Return to
original state
Clears or erases all markings and comments.
Undo Cancels the last operation.
Property To display the properties of the selected pen, stamp,
Character and Eraser.
Save Saves the projected image as an image file.
Quit Quits EasyMarker. If you click this button without
saving, the image is abandoned.
Close Closes the EasyMarker toolbar. To display the toolbar
again, right-click on the screen.
Property Tool
Button Name Function

12
Adding Markings and Comments during a Presentation
EasyMP.net Operation Guide
A line can be drawn by dragging the pencil pointer. The line thickness and
colour can be selected from the properties.
The initial value for the pen colour can be changed by using
EasyConfiguration (
p.21).
One of 14 different symbols can be stamped in any position by clicking
this tool. Two stamps (horizontal and vertical lines) at the left top position
of the palette draw lines from one end to the other end of the screen. (You
cannot change the colour and thickness.)
Pen Tool
Thickness
Filling Colour
Semitransparent Colour
Click to select
You can use a semitransparent colour to mark the background like
a highlighter pen.
Stamp tool
Click to select
It is drawn here when clicked.

13
Adding Markings and Comments during a Presentation
EasyMP.net Operation Guide
When you drag from a left upper position to a right lower position, a
character input frame appears into which you can enter text.
The size and colour of the text can be selected from the properties.
To end the text input, click outside of the text frame. The text is displayed
as a image. Once characters are displayed as an image, you cannot change
the text.
You can erase an image drawn by EasyMarker by dragging the eraser
pointer. The width of the eraser can be selected from the properties.
To clear the entire image, click the "Return to original state" tool.
When this tool is clicked, your last operation is undone (or cancelled).
When clicked again, the operation is repeated. Only the last operation can
be undone or repeated.
When this tool is clicked, the on-screen image is saved as a bitmap format
file. The file format can be changed to JPEG format by using
EasyConfiguration ( p.21). The file is stored in the folder of the user
who has logged in (the user ID name).
"User Registration and Data Management" in EasyMP.net Setup Guide.
Tex t Tool
Text Size
Character Colour
Click to Select
Drag from the upper left to lower right posi-
tion to set the text frame size
Eraser and Return to original state Tools
Undo Tool
Save Tool
Click to select
Drag the area you wish to
erase

14
Adding Markings and Comments during a Presentation
EasyMP.net Operation Guide
When this tool is clicked, EasyMarker is closed and the previous screen
appears. All of your entries are cleared. Your entries are only stored in a
file when they are saved using the Save tool. (If you have forgotten to
select Save, no warning message will be sent to the screen before
EasyMarker closes.)
Using the Projector as a Whiteboard (EasyBoard)
EasyBoard allows you to use the projector as a whiteboard. When you start
EasyBoard, the toolbar appears on a clear background and you can start
drawing an image using the tools.
The tools can be used in the same way as the EasyMarker tools.
See "Using the Tools" p.11.
The initial values for background and pen colour can be changed by using
EasyConfiguration (
p.21). Images are easy to see if the black
background colour is used when projecting bright images, and the white
background colour is used when projecting dark images.
Quit Tool
Using the Drawing Tools
Changing the Initial Values of Background and Pen
Colours

15
EasyMP.net Operation Guide
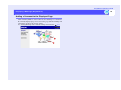
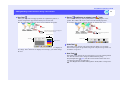
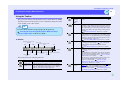
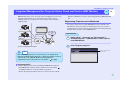
Operating a Network PC (Remote Desktop)
Remote Desktop allows you to operate a network PC from a remote
EasyMP.net location running Windows XP Professional. You can log onto
any network PC from a remote location and start projection using
applications installed on the PC.
Remote Connection
A remote connection can be established when a network PC with Windows
XP Professional is used as a server, which is connected to the EasyMP.net
location (serving as a client). The following setup is required on both the
PC and the EasyMP.net location.
Use the following procedure on the network PC (with Windows XP
Professional) to enable a remote desktop connection.
PROCEDURE
Select "Start" - "Control Panel" and click "System".
Click "Remote" and check the "Allow the user to
connect to the PC from a remote location" box.
The user (administrator), who has been created when Windows
XP Professional OS was first started, has full access rights and
can therefore skip Steps 3 and 4.
Click the "Select a Remote User" and click "Add".
Select the user who wishes to access from a remote
location and click "OK".
A user from the Administrators group already has access rights
even if these have not yet been set. The user password must be
set if this has not been done yet.
Use the following procedure to connect the EasyMP.net location to the
server PC.
PROCEDURE
From the Main Menu or the Task Manager, click
"Remote Desktop".
Setup on the PC (Windows XP Professional OS)
This projector
PC
PC
1
Setup on the Projector (EasyMP.net)
2
3
4
TIP
A password for each user must be set. To set the password, click
"Start" - "Control Panel" and click "User Account". Select the
required user account and set the user password.
1

16
Operating a Network PC (Remote Desktop)
EasyMP.net Operation Guide
Click "New...".
When the connection setup dialogue box appears, set
the following items (see the table below) and click
"OK"
Use the "Settings" and "Performance" tabs for enhanced connection setup
(see the table below).
Double-click the registered icon. The connection
dialogue box will appear. Enter the password and
click "OK" to establish the connection.
Item Explanation
Registration name Enter a name that you can easily understand.
PC Enter the name or an IP address
of the remote
PC (running Windows XP OS).
User name Enter the user name who has been authorised by
Windows XP OS.
Password Enter the user password.
Domain Enter the domain name.
2
3
Item Explanation
Screen color Select a screen colour to be used during remote
connection. The available colours may be limited
depending on the server setup.
Remote PC sound Specify the sound play position.
Keyboard Select the keyboard setup to be used.
Start program. Specify the program to start when connected.
Check the "Start the next program when
connected" box, enter the program path and file
name, and enter the startup folder.
Enable the following setup. The following parameters can be set according to
the connection speed. A LAN running at 10Mbps
or higher is required to select all parameters.
Desktop background Select to display the desktop background.
Show contnts of the
window while
dragging.
Select whether or not the window contents should
be displayed when dragged.
Menu and window
animation
Enable or disable the menu display and window
animation of the server at the client.
Themes Enable or disable the screen background, icons
and sounds of the server at the client.
Bitmap caching Specify to cache the bitmap image at the client.
4

17
Operating a Network PC (Remote Desktop)
EasyMP.net Operation Guide
When the connection is established, the "Windows Logon"
screen is projected and you are ready to operate the Windows
XP desktop PC from EasyMP.net.
To terminate the remote connection, move the mouse pointer
( ) to the top of the screen and click .

18
EasyMP.net Operation Guide
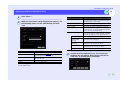
Setting EasyMP.net Options (EasyConfiguration)
Various network parameters and application defaults can be set using
EasyConfiguration. Click the left-hand side menu to start the setup.
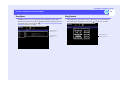
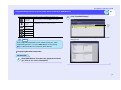
Managing EasyMP.net Users
"System Management" - "User management"
To register a user, click "Create New" and set the parameters in the table
below.
To edit a registered user's data, click the "Edit" button before the user ID
you wish to edit.
Deleting a User
To delete a user, select the user and click "Delete".
"System Management" - "Access Management"
Access rights to allow or limit the access of each user to EasyMP.net can
be set using the PC browser. p.36 Access procedure .
Registering/Editing/Deleting a User
User ID Enter an ID to be used in EasyMP.net.
One to 20 alphanumeric characters can be entered. No
symbols are allowed.
Password Enter a password for system logon. The password can
be 0 to 14 alphanumeric characters.
Reenter password. Reenter the password for confirmation.
Click the required
menu.
EasyMP.net
administrator
Check this box to define the current user as the
EasyMP.net administrator. Then this user can set and
change the EasyConfiguration data without any access
restrictions.
Change the password. This box appears during user editing. Check this box to
change the password.
Controlling Access Rights
Access to the common
folder
Specify the access right to the "EveryOne" common
folder.
Access to EasyMenu Specify the access right to EasyMenu for projector
setup using the PC browser.
Access to EasyRemote Specify the access right to EasyRemote for control of
the projector power and sounds using the PC browser.

19
Setting EasyMP.net Options (EasyConfiguration)
EasyMP.net Operation Guide
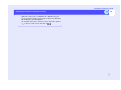
Basic System Setup
"System Management" - "Date and Time"
The projector's built-in clock can be set.
"System Management" - "Keyboard"
The keyboard layout can be set. Select a language from the "Keyboard
layout".
"System Management" - "Maintenance"
The projector setup can be reset to factory defaults.
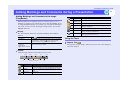
Network Setup (LAN Setup)
"Network" - "Projector Name"
The projector you use can be given a name so that it can be identified on
the network.
"Network" - "LAN"
The following parameters must be set to connect to a network using a
network cable.
Setting the Date
Year Set the current calendar date and clock time. The hours
can be set between 0 and 23 (24-hour system).
Month
Day
Hours
Minutes
Time Zone Select an area.
Daylight Savings
Time
The summer time system of the United States can be set
(you cannot set the summer time of another country).
Setting the Keyboard Layout
Maintenance of EasyMP.net
Initialization The entire system setup will be returned to the factory
default settings.
Naming the Projector
Projector Name The projector name can be up to 15 characters.
A projector name can consist of alphanumeric characters and
hyphens. A projector name consisting of numbers only is not
allowed.
The projector restarts after the name has been set.
Work Group Enter a workgroup name of the Windows network.
Network Connection using Network cables
MAC address Display the MAC address
DHCP
Select "ON" to assign the IP address automatically
using the DHCP. Select "OFF" to set the IP address
manually.
IP address
Enter the fixed IP address to be assigned to the projector.
Subnet mask
Enter the IP address of the subnet mask.
Gateway address
Enter the IP address of the default gateway.
Primary DNS Enter the primary IP address of the DNS.
Secondary DNS Enter the secondary IP address of the DNS.
WINS1 Enter the primary IP address of the WINS server.
WINS2 Enter the secondary IP address of the WINS server.
DNS domain name Enter the DNS domain name.
Page is loading ...
Page is loading ...
Page is loading ...
Page is loading ...
Page is loading ...
Page is loading ...
Page is loading ...
Page is loading ...
Page is loading ...
Page is loading ...
Page is loading ...
Page is loading ...
Page is loading ...
Page is loading ...
Page is loading ...
Page is loading ...
Page is loading ...
Page is loading ...
Page is loading ...
Page is loading ...
Page is loading ...
Page is loading ...
Page is loading ...
Page is loading ...
Page is loading ...
Page is loading ...
Page is loading ...
Page is loading ...
Page is loading ...
Page is loading ...
Page is loading ...
Page is loading ...
Page is loading ...
Page is loading ...
-
 1
1
-
 2
2
-
 3
3
-
 4
4
-
 5
5
-
 6
6
-
 7
7
-
 8
8
-
 9
9
-
 10
10
-
 11
11
-
 12
12
-
 13
13
-
 14
14
-
 15
15
-
 16
16
-
 17
17
-
 18
18
-
 19
19
-
 20
20
-
 21
21
-
 22
22
-
 23
23
-
 24
24
-
 25
25
-
 26
26
-
 27
27
-
 28
28
-
 29
29
-
 30
30
-
 31
31
-
 32
32
-
 33
33
-
 34
34
-
 35
35
-
 36
36
-
 37
37
-
 38
38
-
 39
39
-
 40
40
-
 41
41
-
 42
42
-
 43
43
-
 44
44
-
 45
45
-
 46
46
-
 47
47
-
 48
48
-
 49
49
-
 50
50
-
 51
51
-
 52
52
-
 53
53
-
 54
54


Epson EasyMP.net Network Option Board User manual
- Category
- Projectors
- Type
- User manual
- This manual is also suitable for
Ask a question and I''ll find the answer in the document
Finding information in a document is now easier with AI
Related papers
-
Epson EH-TW6100 User manual
-
Epson EH-TW9100 User manual
-
Epson EMP-X5/S5 User manual
-
Epson EasyMP.net Installation guide
-
-
Epson 825 User manual
-
Epson EMP Monitor User manual
-
-
Epson PowerLite Pro G5350 Operating instructions
-
Other documents
-
NEC UM352W-WK User manual
-
 Blackbox-av Mediascreen 32|43|50|55|65″ Owner's manual
-
Panasonic PT-LB50NTE User manual
-
-
-
Mitsubishi XD550U User manual
-
-
Dell UPS 3750R User guide
-
-
Hitachi CM1711ME User manual
