Page is loading ...

RS 2200/3200 Series
Series 3100
Quick Reference

Quick Reference
© 2002 SYMBOL TECHNOLOGIES, INC. All rights reserved.
Symbol reserves the right to make changes to any product to improve reliability, function,
or design.
Symbol does not assume any product liability arising out of, or in connection with, the
application or use of any product, circuit, or application described herein.
No license is granted, either expressly or by implication, estoppel, or otherwise under any
patent right or patent, covering or relating to any combination, system, apparatus,
machine, material, method, or process in which Symbol products might be used. An
implied license exists only for equipment, circuits, and subsystems contained in Symbol
products.
Symbol and the Symbol logo are registered trademarks of Symbol Technologies, Inc. Other
product names mentioned in this manual may be trademarks or registered trademarks of
their respective companies and are hereby acknowledged.
Symbol Technologies, Inc.
One Symbol Plaza
Holtsville, N.Y. 11742-1300
http://www.symbol.com
Patents
This product is covered by one or more of the following U.S. and foreign Patents:
U.S. Patent No. 4,496,831; 4,593,186; 4,603,262; 4,607,156; 4,652,750; 4,673,805; 4,736,095; 4,758,717;
4,760,248; 4,806,742; 4,816,660; 4,845,350; 4,896,026; 4,897,532; 4,923,281; 4,933,538; 4,992,717; 5,015,833;
5,017,765; 5,021,641; 5,029,183; 5,047,617; 5,103,461; 5,113,445; 5,130,520; 5,140,144; 5,142,550; 5,149,950;
5,157,687; 5,168,148; 5,168,149; 5,180,904; 5,216,232; 5,229,591; 5,230,088; 5,235,167; 5,243,655; 5,247,162;
5,250,791; 5,250,792; 5,260,553; 5,262,627; 5,262,628; 5,266,787; 5,278,398; 5,280,162; 5,280,163; 5,280,164;
5,280,498; 5,304,786; 5,304,788; 5,306,900; 5,321,246; 5,324,924; 5,337,361; 5,367,151; 5,373,148; 5,378,882;
5,396,053; 5,396,055; 5,399,846; 5,408,081; 5,410,139; 5,410,140; 5,412,198; 5,418,812; 5,420,411; 5,436,440;
5,444,231; 5,449,891; 5,449,893; 5,468,949; 5,471,042; 5,478,998; 5,479,000; 5,479,002; 5,479,441; 5,504,322;
5,519,577; 5,528,621; 5,532,469; 5,543,610; 5,545,889; 5,552,592; 5,557,093; 5,578,810; 5,581,070; 5,589,679;
5,589,680; 5,608,202; 5,612,531; 5,619,028; 5,627,359; 5,637,852; 5,664,229; 5,668,803; 5,675,139; 5,693,929;
5,698,835; 5,705,800; 5,714,746; 5,723,851; 5,734,152; 5,734,153; 5,742,043; 5,745,794; 5,754,587; 5,762,516;
5,763,863; 5,767,500; 5,789,728; 5,789,731; 5,808,287; 5,811,785; 5,811,787; 5,815,811; 5,821,519; 5,821,520;
5,823,812; 5,828,050; 5,848,064; 5,850,078; 5,861,615; 5,874,720; 5,875,415; 5,900,617; 5,902,989; 5,907,146;
5,912,450; 5,914,478; 5,917,173; 5,920,059; 5,923,025; 5,929,420; 5,945,658; 5,945,659; 5,946,194; 5,959,285;
6,002,918; 6,021,947; 6,031,830; 6,036,098; 6,047,892; 6,050,491; 6,053,413; 6,056,200; 6,065,678; 6,067,297;
6,068,190; 6,082,621; 6,084,528; 6,088,482; 6,092,725; 6,101,483; 6,102,293; 6,104,620; 6,114,712; 6,115,678;
6,119,944; 6,123,265; 6,131,814; 6,138,180; 6,142,379; 6,172,478; 6,176,428; 6,178,426; 6,186,400; 6,188,681;
6,209,788; 6,216,951; 6,220,514; 6,243,447; 6,244,513; 6,247,647; 6,308,061; 6,250,551; 6,295,031; D305,885;
D341,584; D344,501; D359,483; D362,453; D363,700; D363,918; D370,478; D383,124; D391,250; D405,077;
D406,581; D414,171; D414,172; D418,500; D419,548; D423,468; D424,035; D430,158; D430,159; D431,562;
D436,104.
Invention No. 55,358; 62,539; 69,060; 69,187 (Taiwan); No. 1,601,796; 1,907,875; 1,955,269 (Japan); European
Patent 367,299; 414,281; 367,300; 367,298; UK 2,072,832; France 81/03938; Italy 1,138,713.
rev. 11/01

3
Introduction
The Series 3100 terminals are lightweight, battery powered,
hand-held computer systems. Data can be entered using the
terminal keyboard, the integrated laser scanner, or the tethered
bar code scanners.
The Series 3100 includes both batch and radio terminals. The
PDT 3100 performs direct communications. The PDT 3110
and 3124 perform Spectrum One radio communications. The
PDT 3140 performs Spectrum 24 radio communications. All
Series 3100 terminals can be used as remote terminals for
collecting and storing data that is later uploaded to a host
computer.
About this Guide
This guide presents information on the parts of a Series 3100
terminal and instructions for the following procedures:
• Powering the terminal on and off
• Performing communications
• Charging the batteries
• Replacing the batteries
• Connecting the modems
• Connecting the terminal to a printer
• Configuring the scanner trigger
• Attaching a tethered scanner
• Using the scanners

Quick Reference
4
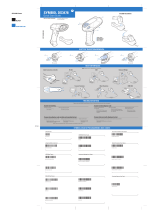
Parts of the Series 3100 Terminal
ALKALINE
BATTERY
PART NO.:
3100-9M0L050
S/N: B029721
SYMBOL TECH, INC.
WARNING
REPLACE BATTERIES QUICKLY TO INSURE
CONTINUOUS OPERATION OF BACKUP
BATTERY SYSTEM.
BEFORE STORING UNIT FOR EXTENDED
PERIODS (OVER 1 MONTH) CONSULT
OPERATING MANUAL OR CALL SYMBOL
FIELD SERVICE.
PDT 3100
DECODE SCAN
1
3
2
4
5
6
6
7
8
14
9
11
12
15
6
9
16
13
10

5
Parts of the Series 3100 terminal include:
1. Integrated Rotatable Laser Scanner
2. Scanner Window
3. Scanner LED
4. LCD Display Screen
5.
PWR Key
6. Alpha/Scanner Triggers
7. Keyboard
8. Serial Port (RJ-41)
9. Hand Strap
10. Hand Strap Hook
11. Battery Compartment Latch
12. Battery Compartment Cover
13. Battery Compartment
14. Alkaline Battery Socket
15. Rechargeable NiCd Battery Socket
16. Battery

Quick Reference
6
Power On and Off
Note: If the terminal is powered by a NiCd battery, charge the
battery fully before using the terminal.
To turn the terminal on or off, press
PWR.
Battery Charging and Communications
To charge the PDT 3100’s batteries or perform communications,
you have the option of using either a 31XX cradle or the 3115
Communications/Charger Adapter.
3115 Communications/Charger Adapter
The Series 3100 has an optional communications/charger
adapter (CCA) that facilitates communication with a host when
no cradle is available, and provides power to the terminal from
a wall-mounted power supply for battery charging during
terminal use and flash EPROM programming.
Battery Charging
To provide power directly to a terminal for charging the
NiCd battery:
1. Plug the 10-pin RJ41 connector into the base of the Series
3100 terminal.
2. Plug the connector from the 15V power supply,
P/N 55915-00-00 (US, 115V) or 60507-00-00 (International,
230V) into the power input jack (J1) on the CCA.

7
3. Plug the power supply into a wall socket.
NiCd batteries require 12 to 16 hours to recharge fully.
The terminals may be used while the battery is being
charged.
Note: Alkaline batteries cannot be charged in the terminal.
To charge the batteries more quickly, use the cradle as
detailed in 31XX Cradles, Battery Charging.
115V
Keyboard
Mouse
COM A
COM B
Parallel
VGA
Wall
Phone
7
8
9
6
3
2
5
4
1
0
ENTER
F7
F8
F9
F6
F5
F4
F1
F2
F3
=
F10
C
LR
F
NC
SHF
CTL
PWR
LIGHT
DARK
LAMP
SPACE
A
B
C
D
E
J
O
T
Y
X
W
V
U
P
K
F
G
H
I
N
S
R
M
L
Q
BSP
Z
RJ-41 Connector
3115 CCA
DB-25 Connector
Power Input Jack

Quick Reference
8
Communications
Note: It is NOT necessary to connect the terminal to a power
source for communications.
To communicate with a PC or printer:
1. Plug the 10-pin RJ41 connector into the base of a Series
3100 terminal.
2. Plug the DB25 connector into the host’s communications
port.
To connect the CCA to a modem:
1. Plug the 10-pin RJ41 connector into the base of a Series
3100 terminal.
2. Insert a female-to-male gender changer on the female
DB25 connector before plugging the connector into the
modem.
Note: The CCA is shipped set for RS-232 communications with
a PC. To use the CCA with a modem or printer may
require changing the internal communications settings.
Refer to the installation instructions (P/N 70-11314-01).

9
31XX Cradles
The single-slot and four-slot cradles are optional devices used
for charging the batteries and performing host communication
with the terminal.
Battery Charging
To recharge the NiCd battery pack in the cradle:
1. Plug the power supply cord round plug in the power
connector on the side of the cradle.
2. Connect the power supply cord AC plug to a standard
electrical outlet.
3. Place the terminal in the cradle.
The battery pack is fully charged in approximately 90
minutes.
7
8
9
6
3
2
5
4
1
0
ENTER
F7
F8
F9
F6
F5
F4
F1
F2
F3
=
F10
CLR
FNC
SHF
CTL
PWR
LIGHT
DARK
LAMP
SPACE
A
B
C
D
E
J
O
T
Y
X
W
V
U
P
K
F
G
H
I
N
S
R
M
L
Q
BSP
Z
PDT 3100
CHARGING
COMM

Quick Reference
10
Communications
To communicate using the cradle:
1. Perform Steps 1 - 2 from the section Battery Charging.
2. Connect the cradle to the host computer using a null
modem cable
3. Insert the terminal in the cradle and perform the
communication steps as detailed in the Series 3100 System
Administration Manual (P/N 62605-00-90) or Series 3000
Application Programmer’s Guide (P/N 59045-00-92).
4. If the cradle is equipped with a modem (single-slot
cradles only), connect it directly to the telephone wall jack
and proceed as directed in the Series 3100 System
Administration Manual.
For more information on the single- and four-slot cradles,
refer to the 3165/3166 Cradle Base Modules Quick Reference
Guide (P/N 70-11313-xx).

11
Replacing the Batteries
To replace the NiCd or NiMH battery:
1. Turn the terminal off.
2. Release the hand strap, unlock the battery compartment
door and remove it.
3. Position the battery adapter in holding plug and press
into place.
4. Fit the NiCd or NiMH battery pack in compartment next
to adapter. Verify that removal strap is accessible (not
tucked under battery), before pressing battery in place.
Note: NiMH batteries cannot be charged in the terminal
through the Communications/Charger Adapter.
PART NO.:
3100-9M0L050
S/N: B029721
SYMBOL TECH, INC.
Nickel Cadmium Battery
SEALED TYPE-RECHARGEABLE
GATES
K•TEC
ELECTRONICS
HOUSTON
PART NO.:
3100-9M0L050
S/N: B029721
SYMBOL TECH, INC.
PART NO.:
3100-9M0L050
S/N: B029721
SYMBOL TECH, INC.
NiCd
Battery
Battery
Compartment
Strap
Battery
Adapter
Hand
Strap
Battery
Compartment
Door

Quick Reference
12
5. Verify that battery and adapter are properly seated.
6. Replace and lock battery compartment door.
7. Replace handstrap.

13
Connecting the Modems
Direct Connect
Some terminals use an optional internal modem that communicates at
rates of up to 14,400 bps (with v.32 bis data compression). There are
specific firmware settings which are used to configure the
modem’s hardware and software for proper operation and
regulatory compliance. The terminal’s application can control
these settings and enable you to view and amend the settings for
country/region, pulse/tone dialing, or repeat dial timing.
Incorrectly defining these settings can lead to illegal use of the
modem and can create unreliable operation. The application
developer should consult the Series 3000 Application
Programmer’s Reference Manual for correct settings.
If your terminal is equipped with a direct connect modem,
connect the modem as follows:
1. Turn the terminal off.
2. Release the hand strap on the back of the terminal.

Quick Reference
14
3. Detach the protective plug covering the modem jack on
the back of the terminal and plug in one of the telephone
cord’s connectors.
4. Plug the cord’s other connector into a telephone jack.
5. Turn the terminal back on.
RJ-41 Jack

15
Acoustic
Some Series 3100 terminals are equipped with a built-in acoustic
modem which allows direct data transmission over a telephone
line.
If your terminal is equipped with an acoustic modem, connect
the modem as follows:
1. Turn the terminal off.
2. Release the hand strap on the back of the terminal.
3. Slide the mouthpiece of the telephone into position on the
muff. Place the hand strap over the telephone handset as
shown below and reattach the strap.
4. Turn the terminal back on.

Quick Reference
16
Connecting the Terminal to a Printer
The Series 3100 has an optional cable (p/n 25-10413-01) which is
used to connect the terminal to a PS-1000 Series printer or a
tethered PS-200 printer (P/N 20-11062-03).
To connect the terminal to one of the printers listed above:
1. Plug the 10-pin RJ41 connector into the base of a Series
3100 terminal.
2. Plug the DB9 connector in the communications port on
the printer.
RJ-41
DB9

17
Using the Integrated Laser Scanner
The integrated scanner has a unique trigger that the operator
can configure. To select the trigger and use the integrated laser
scanner:
1. Power on the system and scanner by pressing
PWR or the
scanner trigger.
2. Lift and turn the scanner to the direction you wish to scan.
The scanner turns toward the back of the terminal.
3. Press the
FUNC key and the trigger you are most
comfortable using (see the figure below). This selects the
scanner trigger. The other trigger defaults to an ALPHA
shift key on the 35-key terminal.

Quick Reference
18
4. Point the scanner at the bar code and press the trigger or
press the soft trigger key (
ENTER). The thin, red laser beam
covers the entire length of the bar code.
The terminal indicates a successful scan by illuminating
the green scanner LED, beeping one or more times, and/
or displaying the decoded bar code on the screen.

19
Connecting and Using a Tethered Scanner
To attach a wand or laser scanner to the Series 3100 terminal:
1. Turn the system off.
2. Remove the plastic cap in the top of the terminal.
3. Plug the scanner into the top of the terminal as shown
below.
4. Aim the scanner at the bar code and press the trigger.
Note: Depending on your application, you may need to turn on
the terminal before using the scanners.
5. If using a wand scanner, lightly touch the scanner tip to
the white space at the left side of the bar code and move it
to the right.

Guide utilisateur
20
IEC825/EN60825 Class 1 Scanner
Series 3100 terminals are equipped with an IEC825/EN60825
scanner operate on an emissions accumulator or “gas tank”
which determines the amount of scan time that you have
available. To meet low power consumption standards, the
scanner cannot scan continuously.
If the gas tank runs out of scan time, the terminal emits a long
low beep. Release the scan trigger and wait until the terminal
emits a long high beep, indicating that it accrued enough scan
time for you to resume scanning.
/