Page is loading ...


AT-9518SP © 04/22 PAGE 2 OF 2
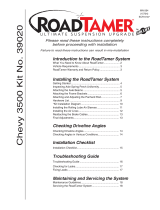
Removal of Stock Exhaust:
1. Remove the muffler cover by removing the four (4) screws securing the cover brackets to
the vehicle. Refer to Figure 1.
2. Remove the 3 nuts securing the muffler inlet to the exhaust pipe. Do not discard them.
Leave the gasket on the vehicle exhaust pipe, it is re-used for the installation.
Refer to Figure 1.
3. Remove the upper and lower springs securing the muffler to the vehicle. Do not discard the
springs.
4. Remove the muffler by sliding the hangers out of the rubber isolators.
5. Remove the stock spark arrestor from the muffler outlet and keep all parts.
Installation of MBRP Exhaust:
1. Slide the hanger rods into the rubber isolators on the vehicle and mate the Muffler
Assembly inlet pipe to the end of the exhaust pipe. Refer to Figure 2.
2. Ensure the lower mount is behind the heat shield and over the round boss on the vehicle
body and secure it with the stock spring.
Refer to Figure 3.
3. Secure the Muffler Assembly by attaching the previously removed spring at the top
location, using the mounting hole in the support bracket. Refer to Figure 4.
4. Secure the inlet using the previously removed stock nuts.
Refer to Figure 5.
5. Install the stock spark arrestor into the Muffler Assembly outlet using the stock hardware.
6. Re-install the muffler cover and brackets if desired.
Refer to Figure 5.
Congratulations! You are ready to begin experiencing the improved performance and driving
excitement of your MBRP Ltd. ATV Exhaust upgrade. We know you will enjoy your
purchase.
Figure 1
Figure 2
Figure 3
Figure 4
Figure 5
/