Razer Ouroboros Owner's manual

Category
Mice
Type
Owner's manual

This manual is also suitable for

0 | For gamers by gamers™
The Razer Ouroboros ambidextrous wireless gaming mouse is a potent weapon packed
with enough lethal features to obliterate the competition.
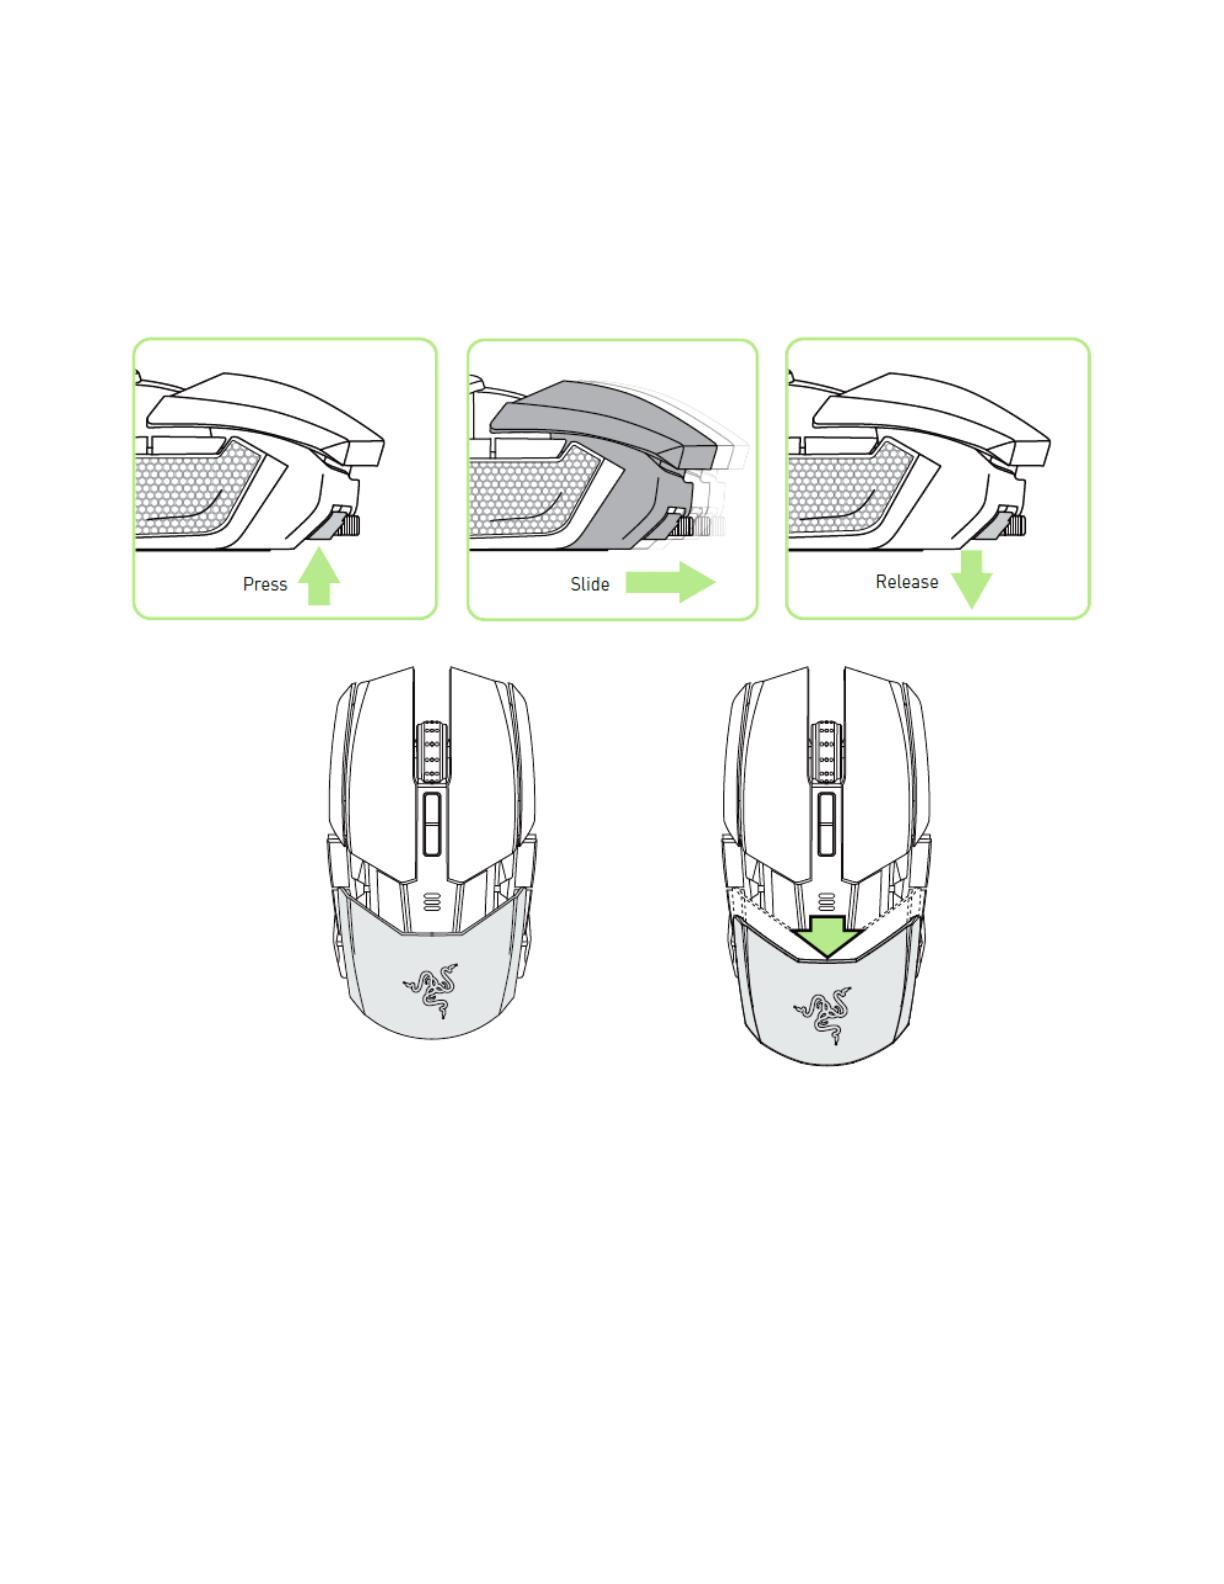
Designed for gamers who prefer an ambidextrous design, it offers fully customizable
ergonomics and fit for every hand size, big or small, by allowing adjustment of the
arched palm rest and back. Two interchangeable side panels ensure you’re using your
preferred grip-style at all times. Game for hours on end while minimizing fatigue and
maximizing comfort, as your enemies rage-quit from exhaustion.
The Razer Ouroboros features a highly advanced 8200dpi 4G laser sensor with a clutch
trigger to temporarily reduce or increase the DPI as you game, letting you go from high
sensitivity assault to low-sense sniper and back as and when you need. Other sensor
customization features include cut-off to Z-axis tracking and surface calibration.
With this all-in-one ultimate gaming mouse, achieving victory is easy.
1 | razer™
TABLE OF CONTENTS
1. PACKAGE CONTENTS / SYSTEM REQUIREMENTS ................................................ 2
2. REGISTRATION / TECHNICAL SUPPORT ............................................................... 2
3. TECHNICAL SPECIFICATIONS ............................................................................... 3
4. DEVICE LAYOUT .................................................................................................. 4
5. SETTING UP YOUR RAZER OUROBOROS ............................................................. 6
6. USING YOUR RAZER OUROBOROS .................................................................... 13
7. INSTALLING YOUR RAZER OUROBOROS ........................................................... 18
8. CONFIGURING YOUR RAZER OUROBOROS ....................................................... 19
9. SAFETY AND MAINTENANCE ............................................................................ 43
10. LEGALESE........................................................................................................ 45
2 | For gamers by gamers™
1. PACKAGE CONTENTS / SYSTEM REQUIREMENTS
PACKAGE CONTENTS
Razer Ouroboros Elite Gaming Mouse
4 Interchangeable Side Panels
Rechargeable NiMH AA Battery
Charging Dock
USB Connector Cable
Quick Start Guide
Master Guide
Screwdriver (US model only)
SYSTEM REQUIREMENTS
PC or Mac with a free USB 2.0 port
Windows® 8 /Windows® 7 / Windows Vista® / Windows® XP (32-bit) / Mac OS X
(10.6-10.8)
Internet connection
100MB of free hard disk space
2. REGISTRATION / TECHNICAL SUPPORT
REGISTRATION
Please visit www.razerzone.com/registration for online product registration.
TECHNICAL SUPPORT
What you’ll get:
2 years limited manufacturer’s warranty.
Free online technical support at www.razersupport.com.
3 | razer™
3. TECHNICAL SPECIFICATIONS
Customizable ergonomics to fit all hand sizes and grip-styles
8200dpi 4G Laser Sensor
Gaming-grade wireless technology with dock
Razer Synapse 2.0 enabled
11 programmable Hyperesponse buttons
1000Hz Ultrapolling
Up to 200 inches per second / 50g acceleration
Approximate size: 122mm - 134mm/ 4.80”- 5.39” (Length) x 71mm / 2.80”
(Width) x 42mm / 1.65” (Height)
Approximate Weight: 147g/0.32lbs
Battery life: (Approx) 12 hrs (continuous gaming)
4 | For gamers by gamers™
4. DEVICE LAYOUT
A. Left Mouse Button
B. Right Mouse Button
C. Scroll Wheel
D. Sensitivity Stage Up
E. Sensitivity Stage Down
F. Adjustable Palm Rest
and Rear Panel
G. Mouse Button 7
H. Mouse Button 6
I. Left Trigger
J. Mouse Button 9
K. Mouse Button 10
L. Right Trigger
5 | razer™
M. Ultraslick Mouse Feet
N. Left Trigger Switch
O. Right Trigger Switch
P. 8200dpi 4G Laser Sensor
Q. Recliner Wheel*
R. Screwdriver (US model only)
S. Rechargeable NiMH AA Battery
*For non-US model, this area is also a Rear Panel adjustment button
T. USB Connector Cable
U. Interchangeable Side Panels
Finger Rest Panel
Finger Grip Panel
V. Charging Dock
W. Pairing Button
6 | For gamers by gamers™
5. SETTING UP YOUR RAZER OUROBOROS
INSERTING THE BATTERY US MODEL ONLY
1. With the mouse flipped over, turn each screw counter-clockwise.
CAUTION: The screws are not removable and over-tightening them can cause damage to the device.
2. Pull the rear panel to remove it.
3. Slide the battery cover up then pull it back to open.
7 | razer™
4. Insert the battery into the compartment then close the battery cover.
5. Reattach the rear panel onto the mouse.
6. Turn each screw clockwise to lock them into position
CAUTION: The screws are not removable and over-tightening them can cause damage to the device.
8 | For gamers by gamers™
INSERTING THE BATTERY NON-US MODEL ONLY
1. Press the Rear Panel adjustment button and detach the rear panel.
2. Slide the battery cover up then pull it back to open.
9 | razer™
3. Insert the battery into the compartment then close the battery cover.
4. Reattach the rear panel onto the mouse.
10 | For gamers by gamers™
CHARGING YOUR RAZER OUROBOROS
For best results, please charge the battery for 8 hours before using the Razer
Ouroboros for the first time. A completely depleted battery can charge up to 90% in
approximately 4 hours and up to 100% in another 4 hours.
The Razer Ouroboros requires a USB connection that is able to supply sufficient power
during battery charging process. The battery charging process of the Razer Ouroboros
may be affected if connected to a non-powered USB hub or non-powered USB ports
found on certain keyboards and other peripherals.
When not using your Razer Ouroboros’ battery for more than 30 days, be sure to
remove and store the battery in a fully charged state. For extended periods of inactivity
we recommend removing the charged battery from the mouse. This will prevent
damage to the battery due to an overly discharged state. If the mouse has not been
used for more than 30 days, the battery might need to be recharged before usage.
11 | razer™
WIRELESS MODE
1. Connect the USB Connector Cable to the Charging Dock and to your computer.
2. Press the pairing button and hold side mouse buttons 6, 7, 9 and 10 simultaneously.
3. The lights on the mouse and Charging Dock will start flashing to indicate the pairing
process. The mouse is ready for use when the lights on the mouse and the Charging
Dock have stopped blinking.
12 | For gamers by gamers™
4. To charge the mouse in wireless mode, simply place the device on the Charging
Dock.
WIRED/CHARGING MODE
Connect the USB Connector Cable to the mouse and to your computer.
The mouse should now be ready for use and the battery will automatically start
recharging.
13 | razer™
6. USING YOUR RAZER OUROBOROS
Press and hold these buttons together for 3 seconds to turn On or 5 seconds to turn
OFF.
ADJUSTING THE PALM REST
Use the Recliner Wheel to tilt the palm rest higher / lower. Rotate the wheel
counterclockwise to lower the palm rest. Rotate the wheel clockwise to raise the palm
rest.
14 | For gamers by gamers™
CHANGING THE SIDE PANELS
Carefully remove and attach the interchangeable side panels using the magnetic holes
as a guide.
DISABLING THE SIDE TRIGGERS
Manually lock the side triggers by moving their corresponding switches downwards.
15 | razer™
EXTENDING THE REAR PANEL US MODEL ONLY
1. With the mouse flipped over, turn each screw counter-clockwise.
CAUTION: The screws are not removable and over-tightening them can cause damage to the device.
2. Set your desired length using the guide underneath the mouse.
3. Turn each screw clockwise to lock them into position.
16 | For gamers by gamers™
EXTENDING THE REAR PANEL NON-US MODEL ONLY
1. Press and hold the Rear Panel adjustment button to unlock.
2. Slide the rear panel horizontally to adjust.
3. Release the Rear Panel adjustment button to lock the panel into position.
17 | razer™
BATTERY LIFE INDICATOR BEHAVIOR
18 | For gamers by gamers™
7. INSTALLING YOUR RAZER OUROBOROS
Note: You may skip Steps 2-4 if you already have Razer Synapse 2.0 installed with an existing account.
Step 1: Plug the Razer Ouroboros into the USB port of your computer.
Step 2: Download the Razer Synapse 2.0 installer from www.razerzone.com/synapse2.
Step 3: Run the installer and follow the onscreen instructions.
Step 4: Register for a Razer Synapse 2.0 account and confirm your new account.
Step 5: Open Razer Synapse 2.0 and log in to your account.
Step 6: Wait until the software automatically downloads and installs.
19 | razer™
8. CONFIGURING YOUR RAZER OUROBOROS
Disclaimer: The features listed here require you to log in to Razer Synapse 2.0. These features are also subject
to change based on the current software version and your Operating System.
MOUSE TAB
The Mouse Tab is your default tab when you first install Razer Synapse 2.0. This tab
allows you to customize your device’s profiles, button assignments, performance and
lighting.
  • Page 1 1
  • Page 2 2
  • Page 3 3
  • Page 4 4
  • Page 5 5
  • Page 6 6
  • Page 7 7
  • Page 8 8
  • Page 9 9
  • Page 10 10
  • Page 11 11
  • Page 12 12
  • Page 13 13
  • Page 14 14
  • Page 15 15
  • Page 16 16
  • Page 17 17
  • Page 18 18
  • Page 19 19
  • Page 20 20
  • Page 21 21
  • Page 22 22
  • Page 23 23
  • Page 24 24
  • Page 25 25
  • Page 26 26
  • Page 27 27
  • Page 28 28
  • Page 29 29
  • Page 30 30
  • Page 31 31
  • Page 32 32
  • Page 33 33
  • Page 34 34
  • Page 35 35
  • Page 36 36
  • Page 37 37
  • Page 38 38
  • Page 39 39
  • Page 40 40
  • Page 41 41
  • Page 42 42
  • Page 43 43
  • Page 44 44
  • Page 45 45
  • Page 46 46
  • Page 47 47

Razer Ouroboros Owner's manual

Category
Mice
Type
Owner's manual
This manual is also suitable for

Ask a question and I''ll find the answer in the document

Finding information in a document is now easier with AI