White Sewing 2380 is a versatile sewing machine that offers a wide range of features to help you with your sewing projects. With its 23 built-in stitches, including utility, stretch, and decorative stitches, you can create a variety of garments and home décor items. The machine also features a one-step buttonhole function, making it easy to create perfectly sized and spaced buttonholes. Other features include an automatic needle threader, a drop-in bobbin system, and a free arm for sewing cuffs and sleeves.
WHITE
t
$11
FashiaflAire
238
Call
Toll
Free
8OO331..3164
Www.
White
sewing.
corn
I
I
I)
11
I
I
COEFG
ji.
(%_
I
I
T
I
‘I
WHiTE
¶JDEL
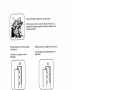
2380
FASHIONAIRE
INSTRUCTION
BOOK
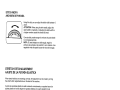
POLARIZED
PLUGS
CAUTION
I/i/s
product
is
equipped
with
a
polarized
alternating
inrent
line
plug
(a
plug
having
one
blade
wider
than
f/i
other).
This
plug
will
fit
into
the
power
outlet
only
nio
way.
This
is
a
safety
feature.
If
you
are
unable
to
inscul
the
plug
fully
into
the
outlet,
try
reversing
the
plug.
If
the
plug
should
still
fail
to
fit,
contact
an
electrician
to
Itp!ace
the
obsolete
outlet.
Do
not
defeat
the
safety
iunpose
of
the
polarized
plug.
WHITE
SEWING
MACHINE
COMPANY
Record
in
space
provided
below
the
Serial
No.
and
Model
No.
of
this
appliance
The
Serial
No.
is
located
on
Bed
plate.
The
Model
No.
is
located
on
Rating
Plate.
numbers
for
future
reference.
I
Serial
No.
No.

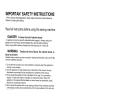
IMPORTANT
SAFETY
INSTRUCTIONS
When
using
an
electrical
appliance,
basic
safety
precautions
should
always
be
followed,
including
the
following:
Read
all
instructions
before
using
this
sewing
machine.
DANGER
To
reduce
the
risk
of
electric
shock:
An
appliance
should
never
be
left
unattended
when
plugged
in.
Always
unplug
this
appliance
from
the
electric
outlet
immediately
after
using
and
before
cleaning.
Always
unplug
before
relamping,
Replace
bulb
with
same
type
of
15
watt
bulb.
WARNING
To
reduce
the
risk
of
burns,
fire,
electric
shock,
or
injury
to
persons:
Operate
sewing
machine
only
when
mounted
in
sewing
machine
table,
case,
and
the
like.
See
the
installation
instructions.
1.
Do
not
allow
to
be
used
as
a
toy.
Close
attention
is
necessary
when
this
appliance
is
used
by
or
near
children.
2.
Use
this
appliance
only
for
its
intended
use
as
described
in
this
manual.
Use
only
attachments
recommended
by
the
manufacturer
as
contained
in
this
manual.
3.
Never
operate
this
appliance
if
it
has
a
damaged
cord
or
plug,
if it
is
not
working
properly,
if
it
has
been
dropped
or
damaged,
or
dropped
into
water,
Return
the
appliance
to
the
nearest
authorized
dealer
or
service
center
for
examination,
repair,
electrical
or
mechanical
adjustment.
4.
Never
operate
the
appliance
with
any
air
openings
blocked.
Keep
ventilation
openings
of
the
sewing
machine
and
foot
controller
free
from
the
accumulation
of
lint,
dust,
and
loose
cloth.
5.
Never
drop
or
insert
any
object
into
any
opening.
6.
Do
not
use
outdoors.
7.
Do
not
operate
where
aerosol
(spray)
products
are
being
used
or
where
oxygen
is
being
administered.
8.
To
disconnect,
turn
all
controls
to
the
off
(“0”)
position,
then
remove
plug
from
outlet.
9.
Do
not
unplug
by
pulling
on
cord.
To
unplug,
grasp
the
plug,
not
the
cord.
10.
Keep
fingers
away
from
all
moving
parts.
Special
care
is
required
around
the
sewing
machine
needle.
11.
Always
use
the
proper
needle
plate.
The
wrong
plate
can
cause
the
needle
to
break.
12.
Do
not
use
bent
needles.
13.
Do
not
pull
or
push
fabric
while
stitching.
It
may
deflect
the
needle
causing
itto
break.
14.
Unplug
the
sewing
machine
when
making
any
adjustments
in
the
needle
area,
such
as
threading
needle,
changing
needle,
threading
bobbin,
or
changing
presser
foot,
etc.
15.
Always
unplug
sewing
machine
from
the
electrical
outlet
when
removing
covers,
lubricating,
or
when
making
any
other
user
servicing
adjustments
mentioned
in
the
instruction
manual.
SAVE
THESE
INSTRUCTIONS
-3-

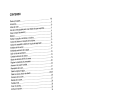
CONTENTS
Name
of
parts
7-8
Accessories
9
Before
sewing
(Power
supply
and
sewing
lamp)
10
Removing
extension
table
11
Free-arm
sewing
11
Winding
the
bobbin
12
Removing
bobbin
case
and
bobbin
13
Inserting
bobbin
into
bobbin
case
13
Inserting
bobbin
case
into
shuttle
race
14
Threading
upper
thread
&
Twin
needle
threading
15
Auto
threader
16
Drawing
up
bobbin
thread
18
Changing
sewing
directions
18
Adjusting
thread
tension
19
Regulating
the
presser
foot
pressure
20
Drop
feed
20
Changing
needle
21
Fabric-Thread-Needle-table
22
Sewing
(pattern
selector)
and
operation
table
24-25
To
start
sewing
26
How
to
finish
stitches
27
Straight
stitch
28
Zigzag
sewing
28
Stitch
width
29
Stretch
stitch
adjustment
29
Overcasting
30
Straight
and
zigzag
stretch
stitches
30
Blind
stitch
31-32
Button
sewing
33
Binding
33
Zipper
sewing
34
One-step
buttonhole
sewing
35-37
Hemming
38
Twin
needle
39
Embroidery
39
Quilter
40
Seam
guide
40
Maintenance
(Cleaning
and
oiling)
41
Checking
performance
problems-Troubleshooting
42
-5-

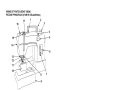
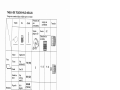
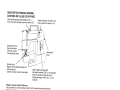
NAME
OF
PARTS
(FRONT
VIEW)
PIEZAS
PRINCIPALES (PARTE
DELANTERA)
Stitch
width
control
Spool
pins
Bobbin
winder
stopper
Pattern
selector
window
Pattern
selector
dial
Reverse
button
Stitch
length
dial
Thread
guide
and
needle
clamp
Extension
table
Shuttle
cover
Needle
threader
Threading
lever
One
step
button-hole
lever
Face
cover
Take
up
lever
Pressure
regulator
Thread
tension
dial
BotOn
de
anchura
de
cosido
Portador
de
bobina
extraible
Stop
de
bobina
Disco
visor
BotOn
de
tipo
de
cosido
Palanca
de
marcha
atrás
de
cosido
Rueda
de
longitud
de
cosido
Abrazadera
de
Ia
aguja
Base
de
cosido
Cubierta
del
brazo
de
ajuste
Enehebrador
de
Ia
aguja
Palanca
de
enhebrado
Palanca
del
ojalador
en
unver
solo
paso
Cubierta
delantera
Palanca
de
compensación
Pie
de
control
de
Ia
maquina
BotOn
de
Ia
tensiOn
1.
2.
3.
4.
5.
6.
7.
8.
9.
10.
11.
12.
13.
14.
15.
16.
17.
1.
2.
3.
4.
5.
6.
7.
8.
9.
10.
11.
12.
13.
14.
15.
16.
17.
-7-

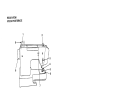
REAR
VIEW
VISTA
POSTERIORE
I
1.
Bobbin
winder
spindle
2.
Upper
thread
guide
3.
Presser
foot
lever
4.
Thumb
screw
5.
Presser
foot
6.
Needle
plate
7.
Stretch
stitch
adjustment
screw
8.
Hand
wheel
9.
Spool
pin
1.
Husodela
bobina
2.
Gula
de
hilo
de
rosca
superior
3.
Palanca
del
pie
4.
Tornillo
que
afianza
Ia
abrazadera
5.
Pie
de
costura
6.
Placa
de
Ia
aguja
7.
Destor
8.
Manubrio
9.
Portador
de
bobina
extraible
9
2
-8-

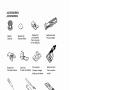
Bobbin
Bobinas
Button
foot
Pie
para
botones
Spool
pin
felt
Discos
del
fieltro
Zipper
foot
Pie
para
cremalleras
Zigzag
foot
(on
machine)
Pie
de
zig-zag
(en
Ia
maquina)
Pin
tuckfoot
Contacto
Imagen
doble
por
Ia
lámain
Buttonhole
foot
Pie
para ojales
Pie
de
costura
oculta
Screw
driver
Destornillador
Spool
pin
Portadorde
bobina
extraible
Buttonhole
cutter
Abridor
de
costuras
y
ojales
Machine
oil
Tubo
de
aceite
Narrow
hem
foot
Pie
de
dobladillo
Needle
Agujas
ACCESSORIES
ACCESORIOS
Blind
hem
foot
angosto
-9-

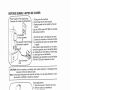
BEFORE
SEWING
I
ANTES
DE
COSER
1.
Fit
plug
into
the
machine.
2.
Insert
plug
into
the
main
socket.
3.
Sewing
speed
can
be
varied
by
the
foot
control.
Use
only
FDM
model
KD-1902
foot
controll4
with
sewing
machine.
1.
Enchufe
el
cable
a
Ia
máquina
de
coser
2.
Conecte
el
enchufe
a
Ia
toma
de
corrient
3.
La
velocidad
de
costura
se
ajusta
mediar
el
pedal.
Esta
máquina
está
equipada
con
un
cable
conexiOn
especial,
que,
si
se
dañara
deberi
ser
sustituido
por
otro
idéntico.
Podrá
adqu
un
cable
igual
en
su
distribuidor.
Solamente
usa
regulador
de
pie
del
Modeic
FDM
KD-1
902
para
maquina
de
coser.
CAUTION:
When
the
machine
is
not
being
used,
when
cleaning
it
or
changing
its
lam
disconnect
it
from
the
electric
outlet.
Nota:
Desconecte
a
máquina
de
a
toma
de
corriente
si
no
se
ostá
utilizando,
Si
se
ti
que
sustituir
Ia
bombilla
a
durante
su
limpieza.
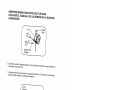
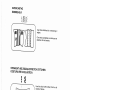
Bulb
replacement:
1.
Open
face
cover
in
direction
of
arrow.
2.
Remove
bulb
by
unscrewing
it
counter-clockwise.
3.
Install
a
new
bulb
by
screwing
it
in
clockwise.
4.
Use
a
15
watt
bulb
(max).
Reemplazar
yb
colocar
Ia
bombilla.
1.
Para
abrir
el
compartimiento
do
Ia
bomi
deberá
destornillar
los
tornillos
como
s
indica.
2.
Desenrosque
Ia
bombilla
hacia
Ia
izquk
(en
el
sentido
contrario
a
las
agujas
do
reloj).
3.
Enrosque
Ia
bombilla
hacia
Ia
derecha
el
sentido
do
las
agujas
del
reloj).
4.
Utilice
solamente
bombillas
do
15W
th
rosca
E12.
5.
Después
do
cambiar
Ia
bombilla
y
do
corrar
ol
compartimiento,
atornillar
ol
dispositivo
do
ciorro
coma
se
indica.
Power
supply
I
Power
supply
pIug
Conoxión
do
La
fuonte
de
alimontaciOn
Power
sui
Enchufo
do
pared
ug
receptacle
machine
xiOn
de
La
máquina
4
‘5
-
10-
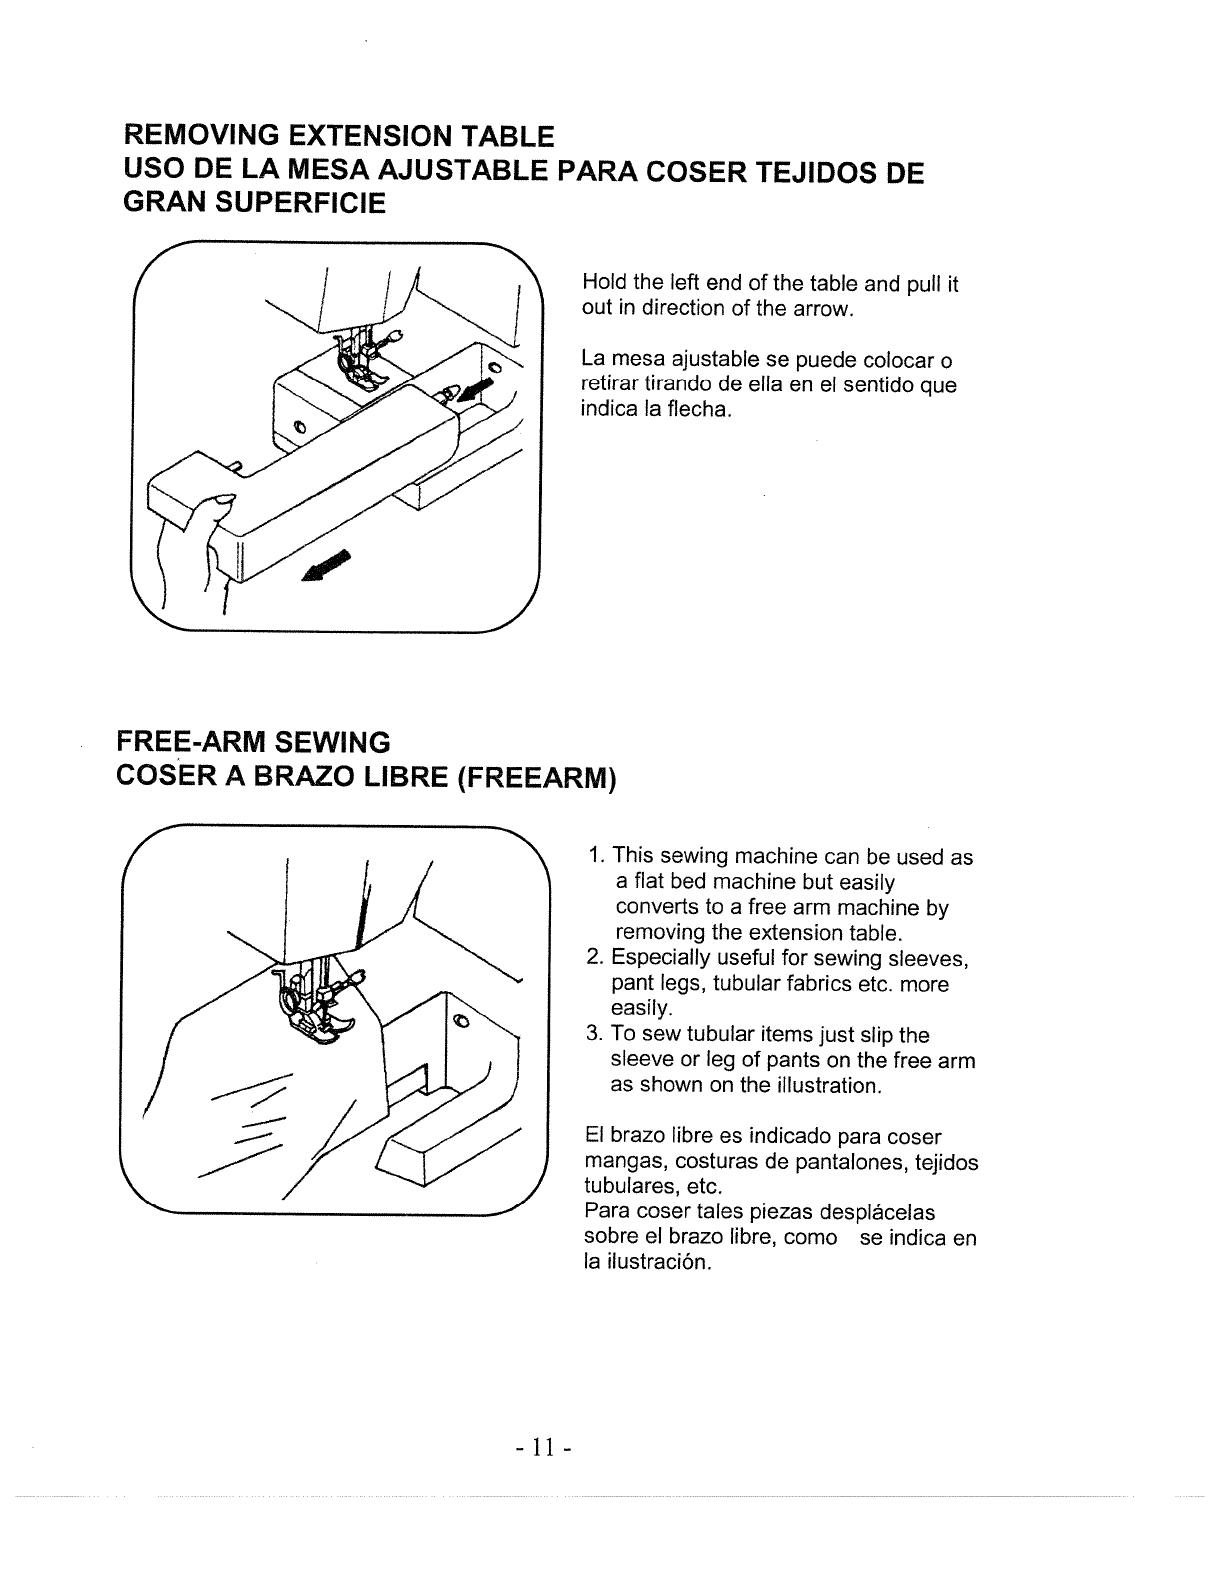
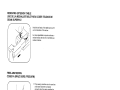
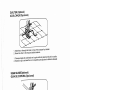
REMOVING
EXTENSION
TABLE
USO
DE
LA
MESA
AJUSTABLE
PARA
COSER
TEJIDOS
DE
GRAN
SUPERFICIE
Hold
the
left
end
of
the
table
and
pull
it
out
in
direction
of
the
arrow.
La
mesa
ajustable
se
puede
colocar
o
retirar
tirando
de
ella
en
el
sentido
que
indica
Ia
flecha.
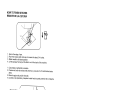
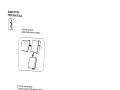
FREE-ARM
SEWING
COSER
A
BRAZO
LIBRE
(FREEARM)
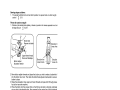
1.
This
sewing
machine
can
be
used
as
a
flat
bed
machine
but
easily
converts
to
a
free
arm
machine
by
removing
the
extension
table.
2.
Especially
useful
for
sewing
sleeves,
pant
legs,
tubular
fabrics
etc.
more
easily.
3.
To
sew
tubular
items
just
slip
the
sleeve
or
leg
of
pants
on
the
free
arm
as
shown
on
the
illustration.
El
brazo
libre
es
indicado
para
coser
mangas,
costuras
de
pantalones,
tejidos
tubulares,
etc.
Para
coser
tales
piezas
desplácelas
sobre
el
brazo
libre,
como
se
indica
en
Ia
ilustraciOn.
4
-11
-

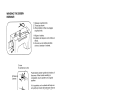
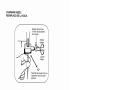
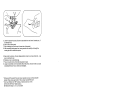
WINDING
THE
BOBBIN
BOBINAR
1.
Release
coupling
knob.
2.
Thread
as
shown.
3.
When
bobbin
is
filled,
re-engage
coupling
knob.
1
.
Aflojar
el
volante.
2.
Enhebrar
Ia
máquina
como
indica
el
dibujo.
3.
Una
vez
que
Ia
canilla
esté
lista
volver a
conectar
el
volante.
Winder
Carrete
Screw
Tornillo
2
inches
5
centimetros
de
hilo
Push
bobbin
winder
spindle
in
direction
of
the
arrow.
When
bobbin
winding
is
completed,
return
spindle
to
its
original
position.
A
Ia
izquierda,
en
Ia
cubierta
del
brazo
se
encuentra
Ia
tension de
bobinado.
Esta
se
puede
ajustar
como
se
describe,
si
Ia
mãquina
no
enrollara
de
manera
uniforme.
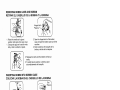
When
bobbin
winding
is
incorrect,
release
the
screw
of
the
upper
thread
guide and
adjust
up
or
down
until
bobbin
the
winding
is
balanced.
Si
el
bobinado
no
es
uniforme,
afloje
el
tornillo
de
Ia
tensiOn
de
bobinado
y
colOquelo
para
arriba
o
para abajo
hasta
que
bobine
uniformemente.
4
0
x
__
-I
I
I
I
II
II
I
Correct
Correcto
-
12
-

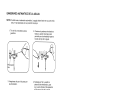
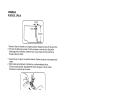
1.
Raise
the
needle
to
its
highest
position
and
open
shuttle
race
cover.
1.
Coloque
Ia
aguja
en
Ia
posiciOn
más
alta
y
abra
Ia
cubierta
del
ajuste.
2.
Open
the
hinged
latch
of
the
bobbin
case
and
pull
the
bobbin
case
out
of
the
machine.
2.
Abra
Ia
palanca
del
casquillo
de
Ia
bobina
y
retirelo
de
Ia
máquina.
3.
Release
the
latch
and
the
bobbin
will
fall
out
easily.
3.
Si
usted
deja
Ia
palanca,
Ia
bobina
caerá
automáticamente
del
casquillo.
1.
Pull
5
cm
of
thread
from
bobbin
and
insert
it
into
bobbin
case
as
shown.
1.
Cuando
coloque
Ia
bobina
en
el
casquillo,
deje
5
centImetros
de
hilo
de
rosca
de
mãs.
(Véase
ilustración).
/
Slot
Rauj
2.
Guide
the end
of
thread
into
the
slot.
2.
Conduzca
el
extremo
del
hilo
de
rosca
por
Ia
ranura.
3.
Pull
the
thread
through
the
slot
and
under
the
tension
spring
and
draw
out
about
10
cm
of
thread.
3.
Tire
del
hilo
de
rosca
por
Ia
ranura
y
por
debajo
del
muelle
do
tension
y
tire
aproximadamente
10
centimetros
do
hilo.
REMOVING
BOBBIN
CASE
AND
BOBBIN
RETIRAR
EL
CASQUILLO
DE
LA
BOBINA
Y
LA
BOBINA
J
INSERTING
BOBBIN
INTO
BOBBIN
CASE
COLOCAR
LA
BOBINA
EN
EL
CASQUILLO
DE
LA
BOBINA
5cm
Tension
spring
de
tensiOn
-
13
-
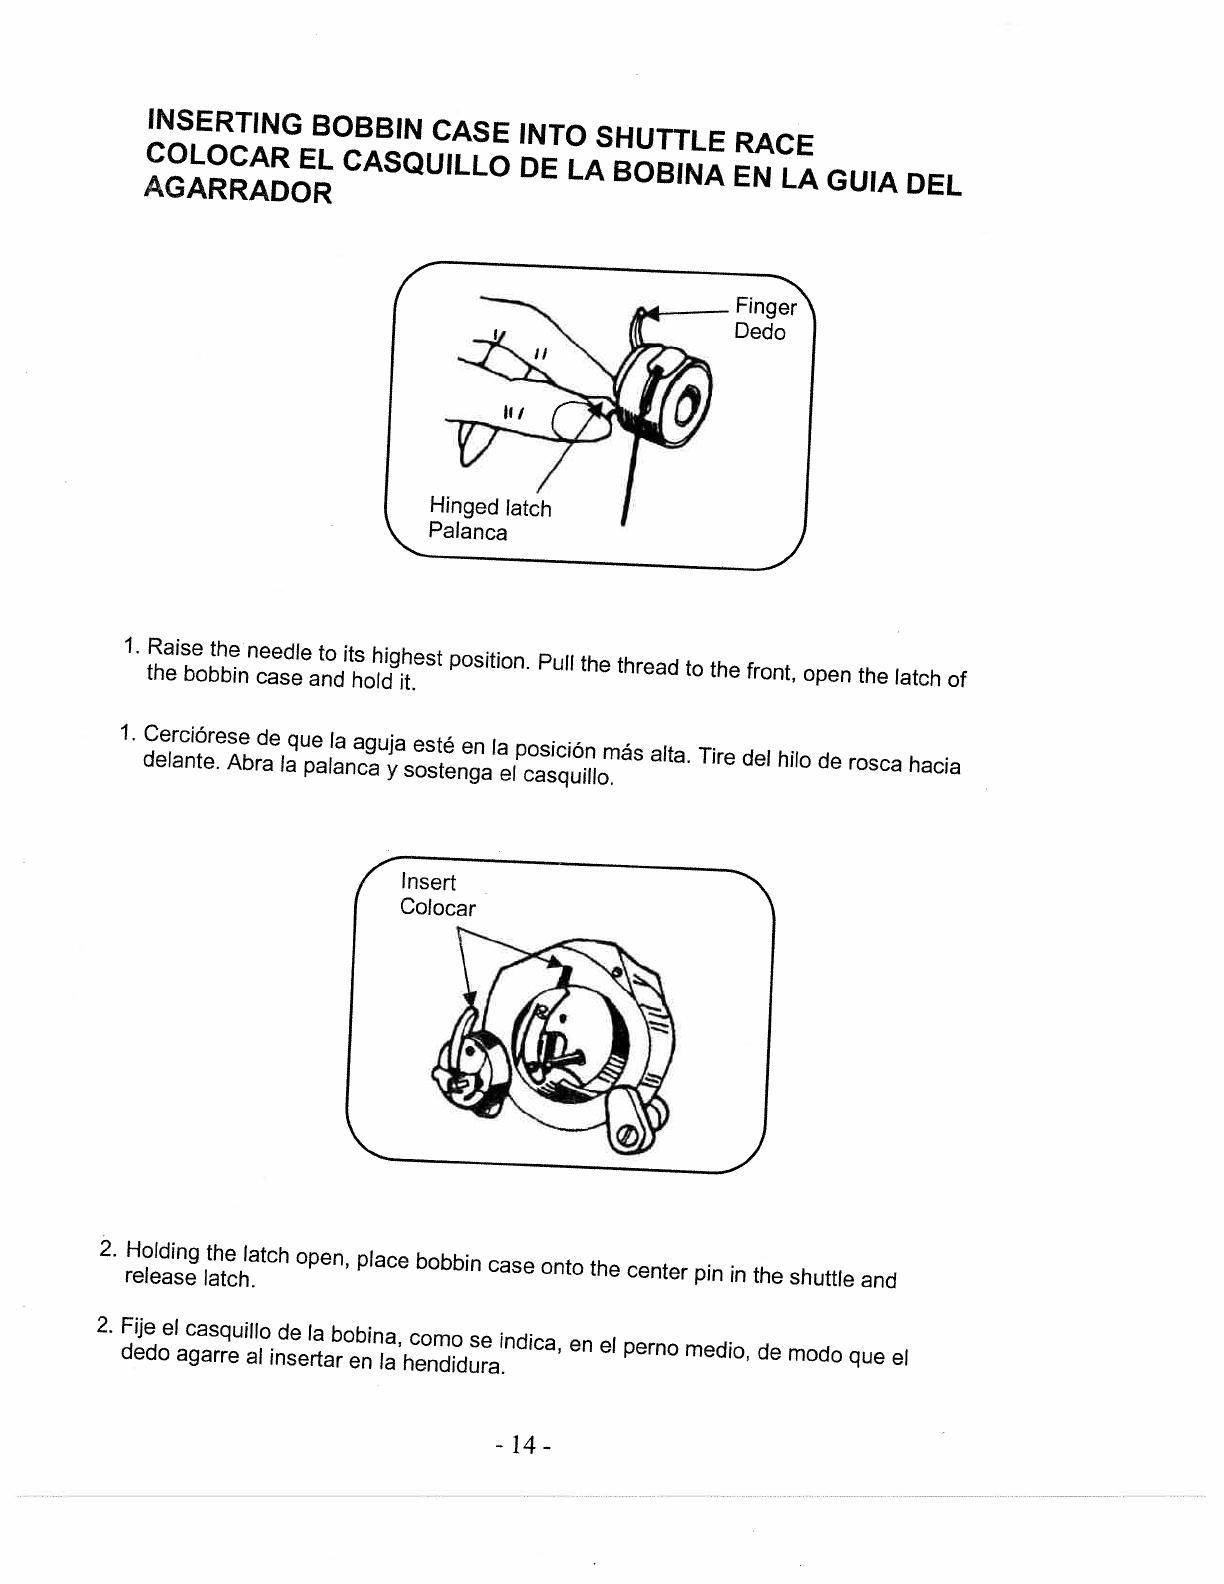
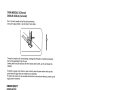
INSERT1NG
BOBBIN
CASE
INTO
SHUTTLE
COLOCAR
EL
CASQUILLO
DE
LA
BOBINA
AGARRADOR
RACE
EN
LA
GUIA
DEL
1
Raise
the
needle
to
its
highest
position.
Pull
the
thread
to
the
front,
open
the
latch
of
the
bobbin
case
and
hold
it.
1.
Cerciórese
de
que
Ia
aguja
esté
en
Ia
posiciOn
más
alta.
Tire
del
hilo
de
rosca
hacia
delante.
Abra
Ia
palanca
y
sostenga
el
casquillo.
2.
Holding
the
latch
open,
place
bobbin
case
onto
the
center
pin
in
the
shuttle
and
release
latch.
2.
Fije
el
casquillo
de
Ia
bobina,
como
se
indica,
en
el
perno
medio,
de
modo
que
et
dedo
agarre
al
insertar
en
Ia
hendidura.
I
Finge
Dedo
I
Hinged
latch
Palanca
Insert
Colocar
-
14
-
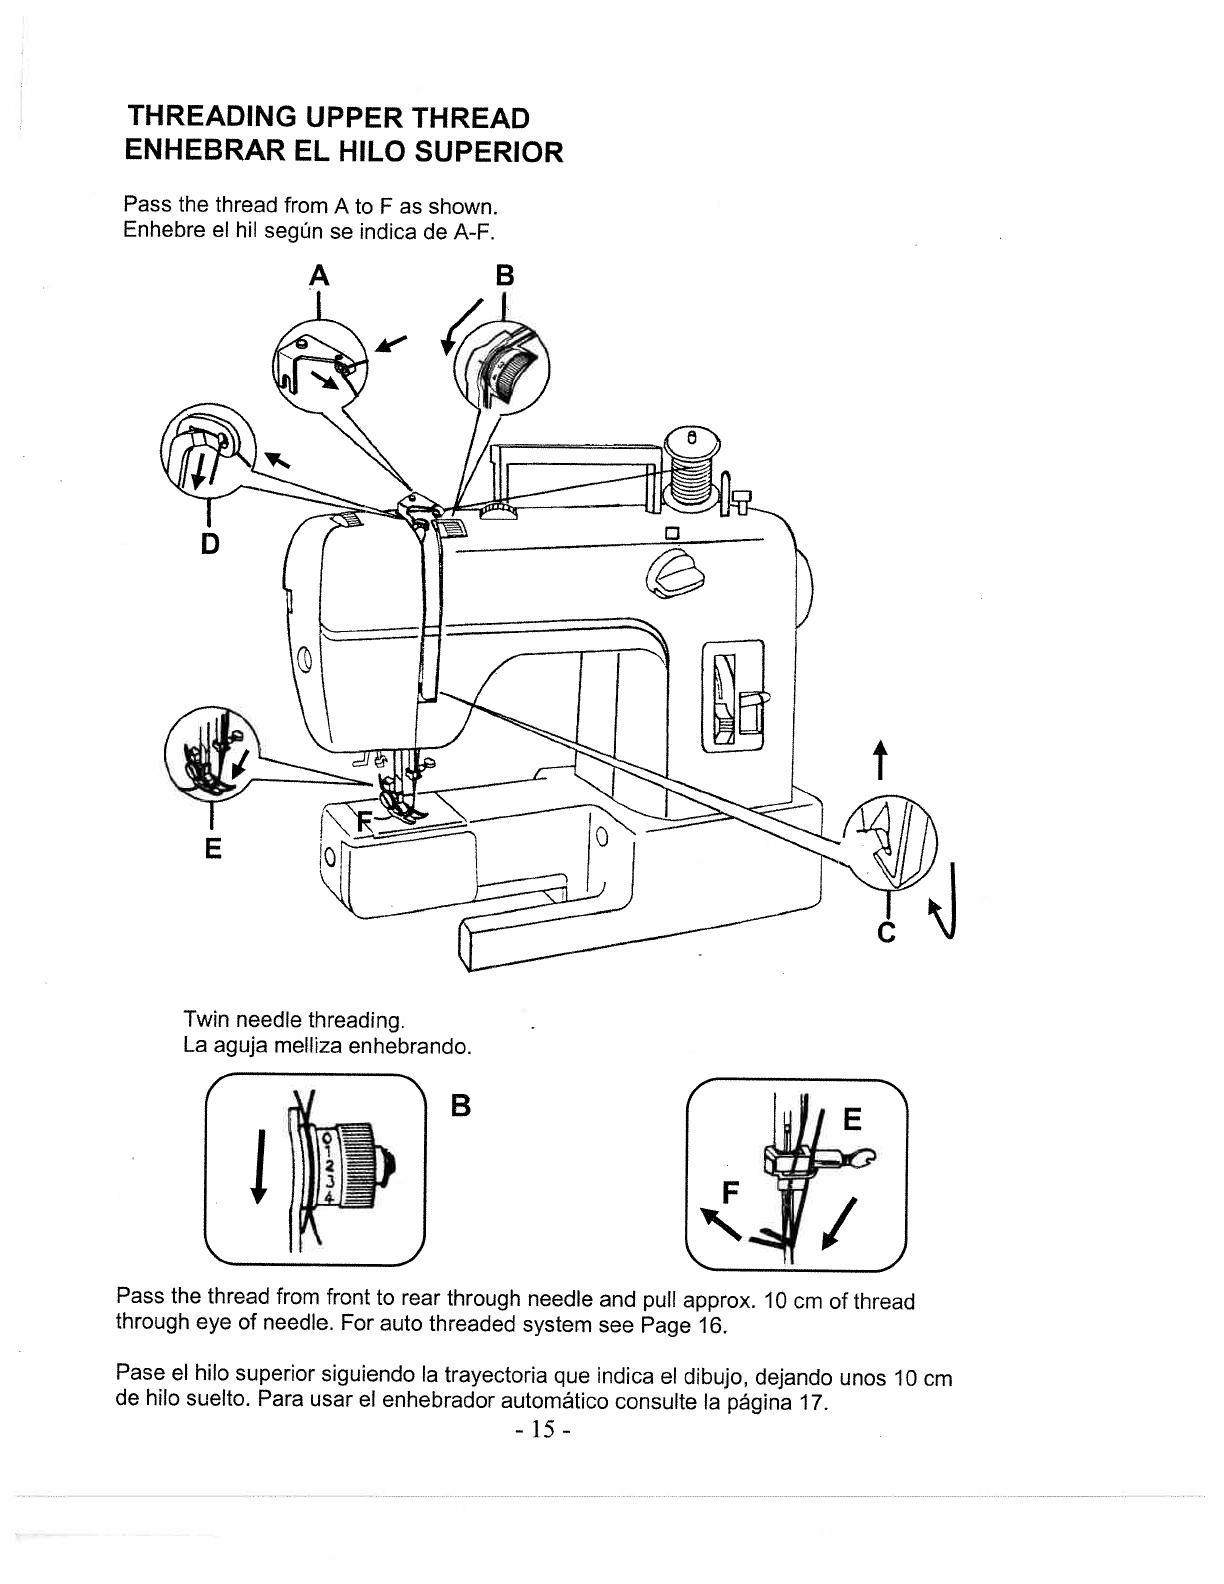
THREADING
UPPER
THREAD
ENHEBRAR
EL
HILO
SUPERIOR
Pass
the
thread
from
A
to
F
as
shown.
Enhebre
e!
hi!
segün
se
indica
de
A-F.
B
Twin
need)e
threading.
La
aguja
me!!iza
enhebrando.
(_
“%-
B
Pass
the
thread
from
front
to
rear
through
need!e
and
pull
approx.
10
cm
of
thread
through
eye
of
need!e.
For
auto
threaded
system
see
Page
16.
Pase
el
hi!o
superior
siguiendo
a
trayectoria
que
indica
e!
dibujo,
dejando
unos
10
cm
de
hi!o
sue!to.
Para
usar
e!
enhebrador
automático
consu!te
a
página
17.
A
-
15-

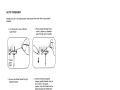
AUTO
THREADER
Needle
must
be
in
its
highest
position
and
presser
foot down
while
using
needle
threader.
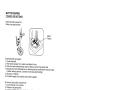
1.
Pull
thread
from
inside
of
thread
guide
finger.
3.
Be
sure
the
thread
passes
through
needle
threader.
2.
Press
needle
threader
lever
down
to
bottom
so
threader
goes
through
eye
of
needle.
4.
Hold
the
thread
and
gently
release
needle
threader
lever
to
let
it
return
to
the
upper
position,
then
the
thread
can
be
pulled
through
the
needle
eye.
NOTE:
*
Do
not
turn
the
handwheel
while
using
the
needle
threader.
*
Do
not
touch
threader
lever
while,
sewing
as
needle
threader
will
be
damaged.
We
advise
you
to
switch
off
power
while
using
the
threader
unit.
-
16
-
\
Jr
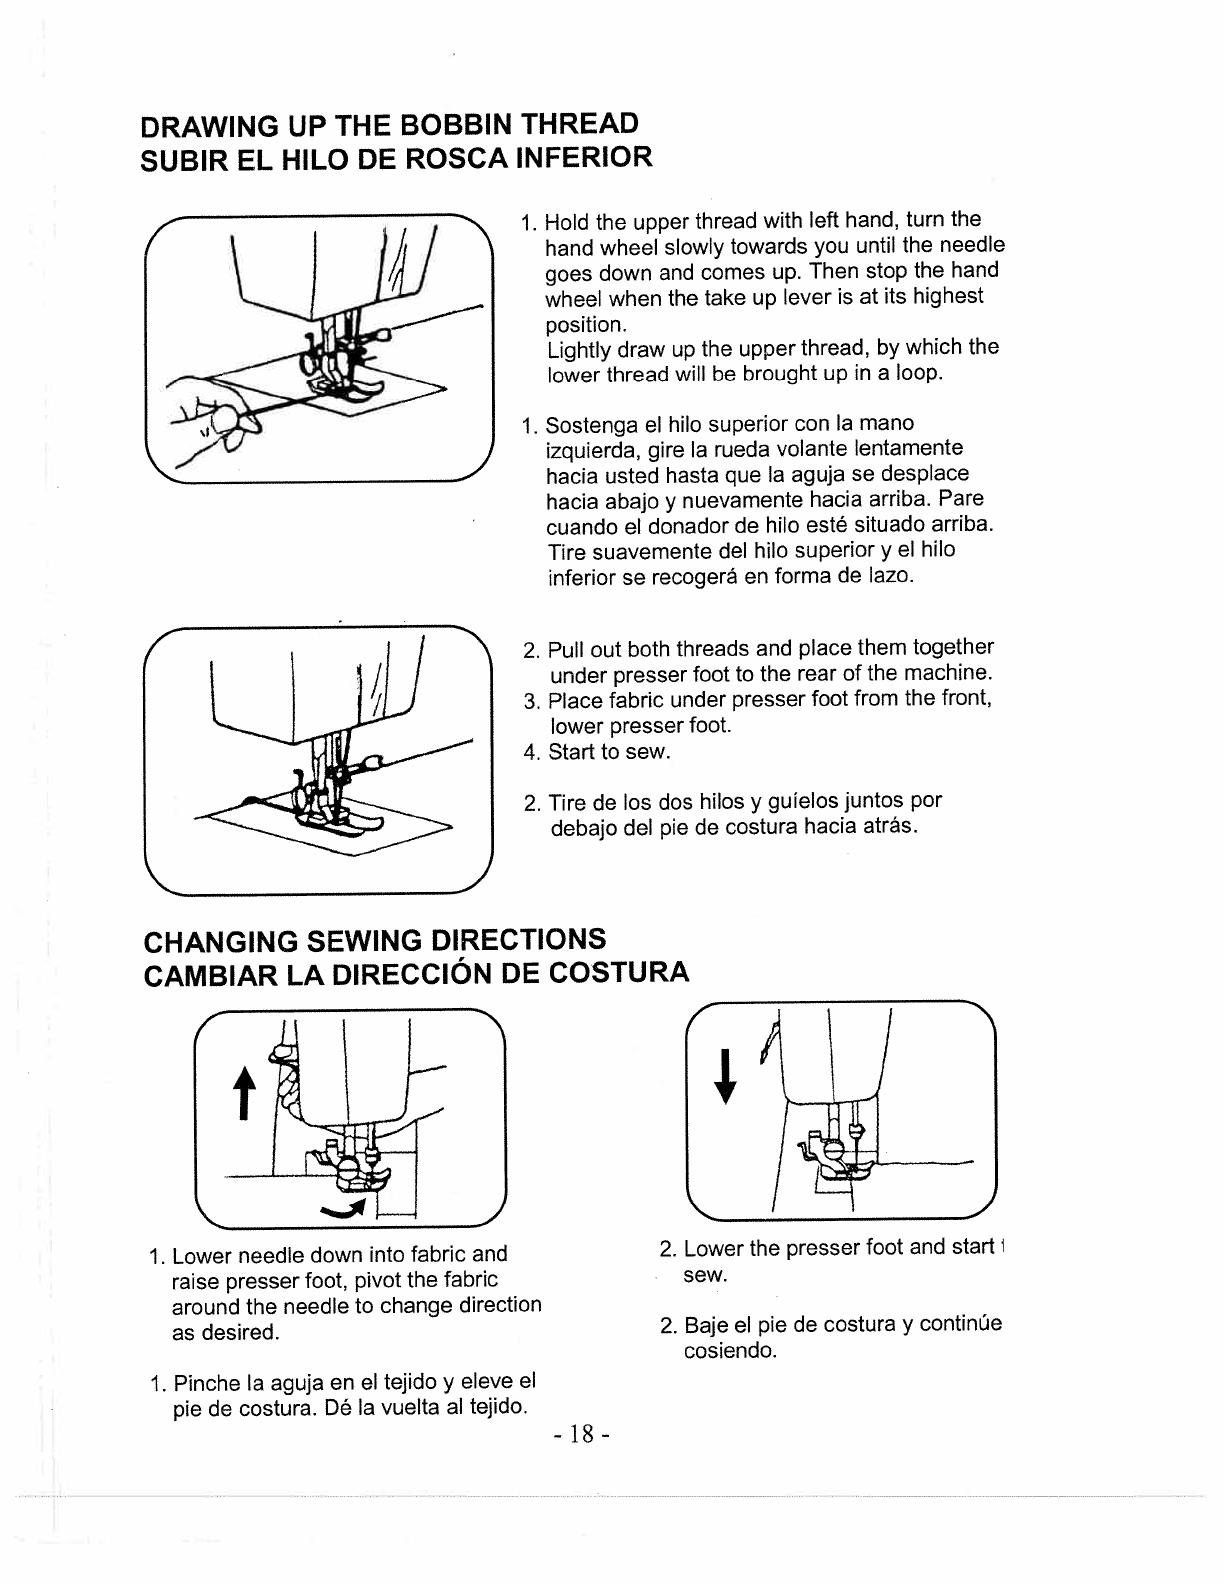
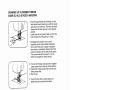
DRAWING
UP
THE
BOBBIN
THREAD
SUBIR
EL
HILO
DE
ROSCA
INFERIOR
1.
Hold
the
upper
thread
with
left
hand,
turn
the
hand
wheel
slowly
towards
you
until
the
needle
goes
down
and
comes
up.
Then
stop
the
hand
wheel
when
the
take
up
lever
is
at
its
highest
position.
Lightly
draw
up
the
upper
thread,
by
which
the
lower
thread
will
be
brought
up
in
a
loop.
1.
Sostenga
el
hilo
superior
con
Ia
mano
izquierda,
gire
Ia
rueda
volante
lentamente
—
hacia
usted
hasta
que
Ia
aguja
se
desplace
hacia
abajo
y
nuevamente
hacia
arriba.
Pare
cuando
el
donador
de
hilo
esté
situado
arriba.
Tire
suavemente
del
hilo
superior
y
el
hilo
inferior
se
recogera
en
forma
de
lazo.
2.
Pull
out
both
threads
and
place
them
together
under
presser
foot
to
the
rear
of
the
machine.
3.
Place
fabric
under
presser
foot
from
the
front,
lower
presser
foot.
4.
Start
to
sew.
2.
Tire
de
los
dos
hilos
y
gulelos
juntos
por
debajo
del
pie
de
costura
hacia
atrás.
CHANGING
SEWING
DIRECTIONS
CAMBIAR
LA
DIRECCION
DE
COSTURA
1.
Lower
needle
down
into
fabric
and
raise
presser
foot,
pivot
the
fabric
sew.
around
the
needle
to
change
direction
as
desired.
2.
Baje
el
pie
de
costura
y
continue
cosiendo.
1.
Pinche
Ia
aguja
en
el
tejido
y
eleve
el
pie
de
costura.
Dé
Ia
vuelta
al
tejido.
-
18
-
r
Jr
2.
Lower
the
presser
foot
and
start

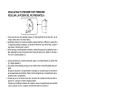
ADJUSTING
THREAD
TENSION
AJUSTAR
LAS
TENSION
ES
DEL
HILO
DE
ROSCA
Normal
upper
thread
tension:
4
—
6
Tension
normal
del
hilo
superior:
entre
4
—
6
/
\___
Upper
thread
tension
may
be
adjusted
by
turning
the
thread
tension
dial.
La
tension
maxima
puede
ser
regulada
girando
el
botOn
de
tensiOn.
Incorrect
I
ncorrecto
Correct
Correcto
____
Upper
thread
4r
Hilo
superior
____
Bobbin
thread
Hilo
inferior
Inside
of
fabric
Upper
thread
Lado
interior
del
tejido,
hilo
superior
Lower
thread
tension
can
be
increased
by
turning
the
screw
of
the
bobbin
case
slightly
to
the
right
(clockwise).
Turning
it
to
the
left
(counter-clockwise)
decreases
tension.
La
tension
del
hilo
inferior
puede
ser
regulada
girando
el
tornillo
del
casquillo
de
Ia
bobina
ligeramente
hacia
Ia
derecha
(en
sentido
a
las
agujas
del
reloj)
para
aumentar
Ta
tension
y
hacia
Ta
izquierda
(en
el
sentido
contrario
a
las
agujas
del
reloj)
pare
disminuir
Ia
tension.
Fabric
_____
Tejido
4r
-
19
-
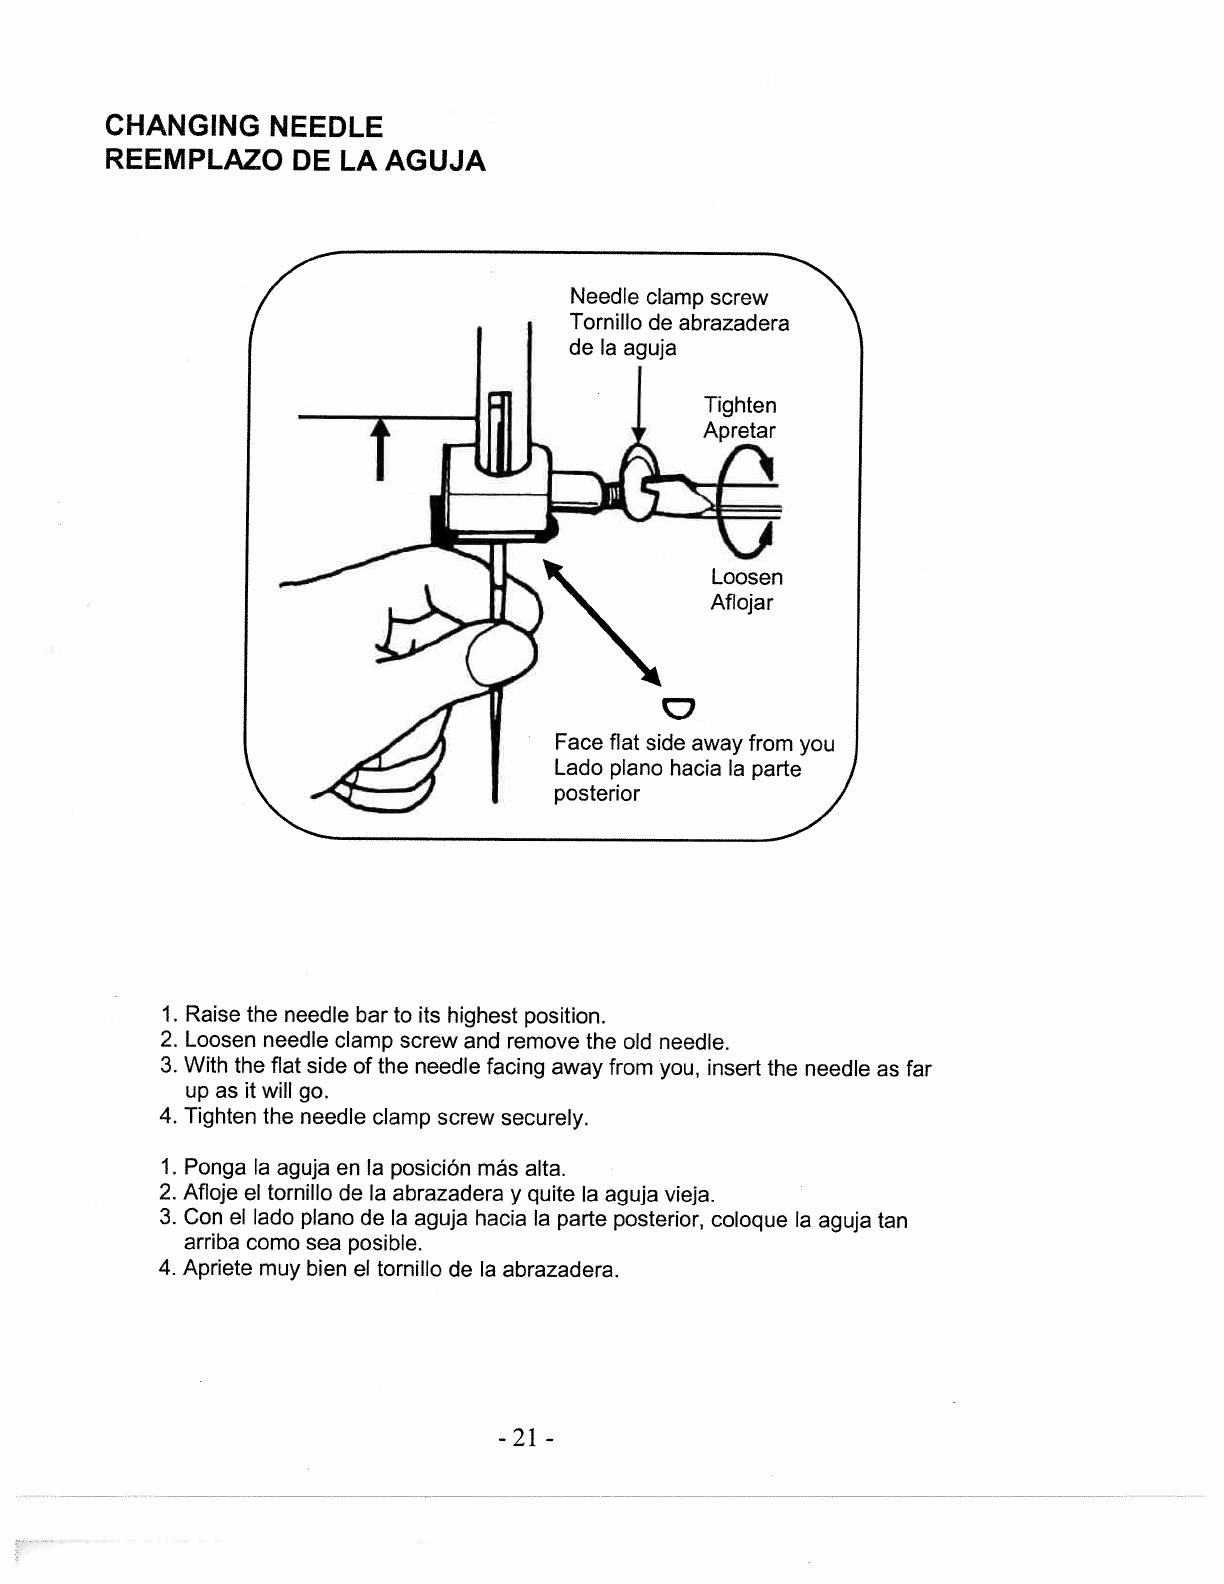
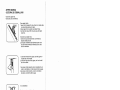
CHANGING
NEEDLE
REEMPLAZO
DE
LA
AGUJA
Needle
clamp
screw
Tornillo
de
abrazadera
de
Ia
aguja
Tighten
Apretar
Loosen
Aflojar
Face
flat
side
away
from
you
Lado
pIano
hacia
Ia
parte
posterior
1.
Raise
the
needle
bar
to
its
highest
position.
2.
Loosen
needle
clamp
screw
and
remove
the
old
needle.
3.
With
the
flat
side
of
the
needle
facing
away
from
you,
insert
the
needle
as
far
up
as
it
will
go.
4.
Tighten
the
needle
clamp
screw
securely.
1.
Ponga
Ia
aguja
en
Ia
posición
más
alta.
2.
Afloje
el
tornillo
de
Ia
abrazadera
y
quite
Ia
aguja
vieja.
3.
Con
eI
lado
piano
de
Ia
aguja
hacia
Ia
parte
posterior,
coloque
Ia
aguja
tan
arriba
como
sea
posible.
4.
Apriete
muy
bien
el
tornillo
de
Ia
abrazadera.
-21-
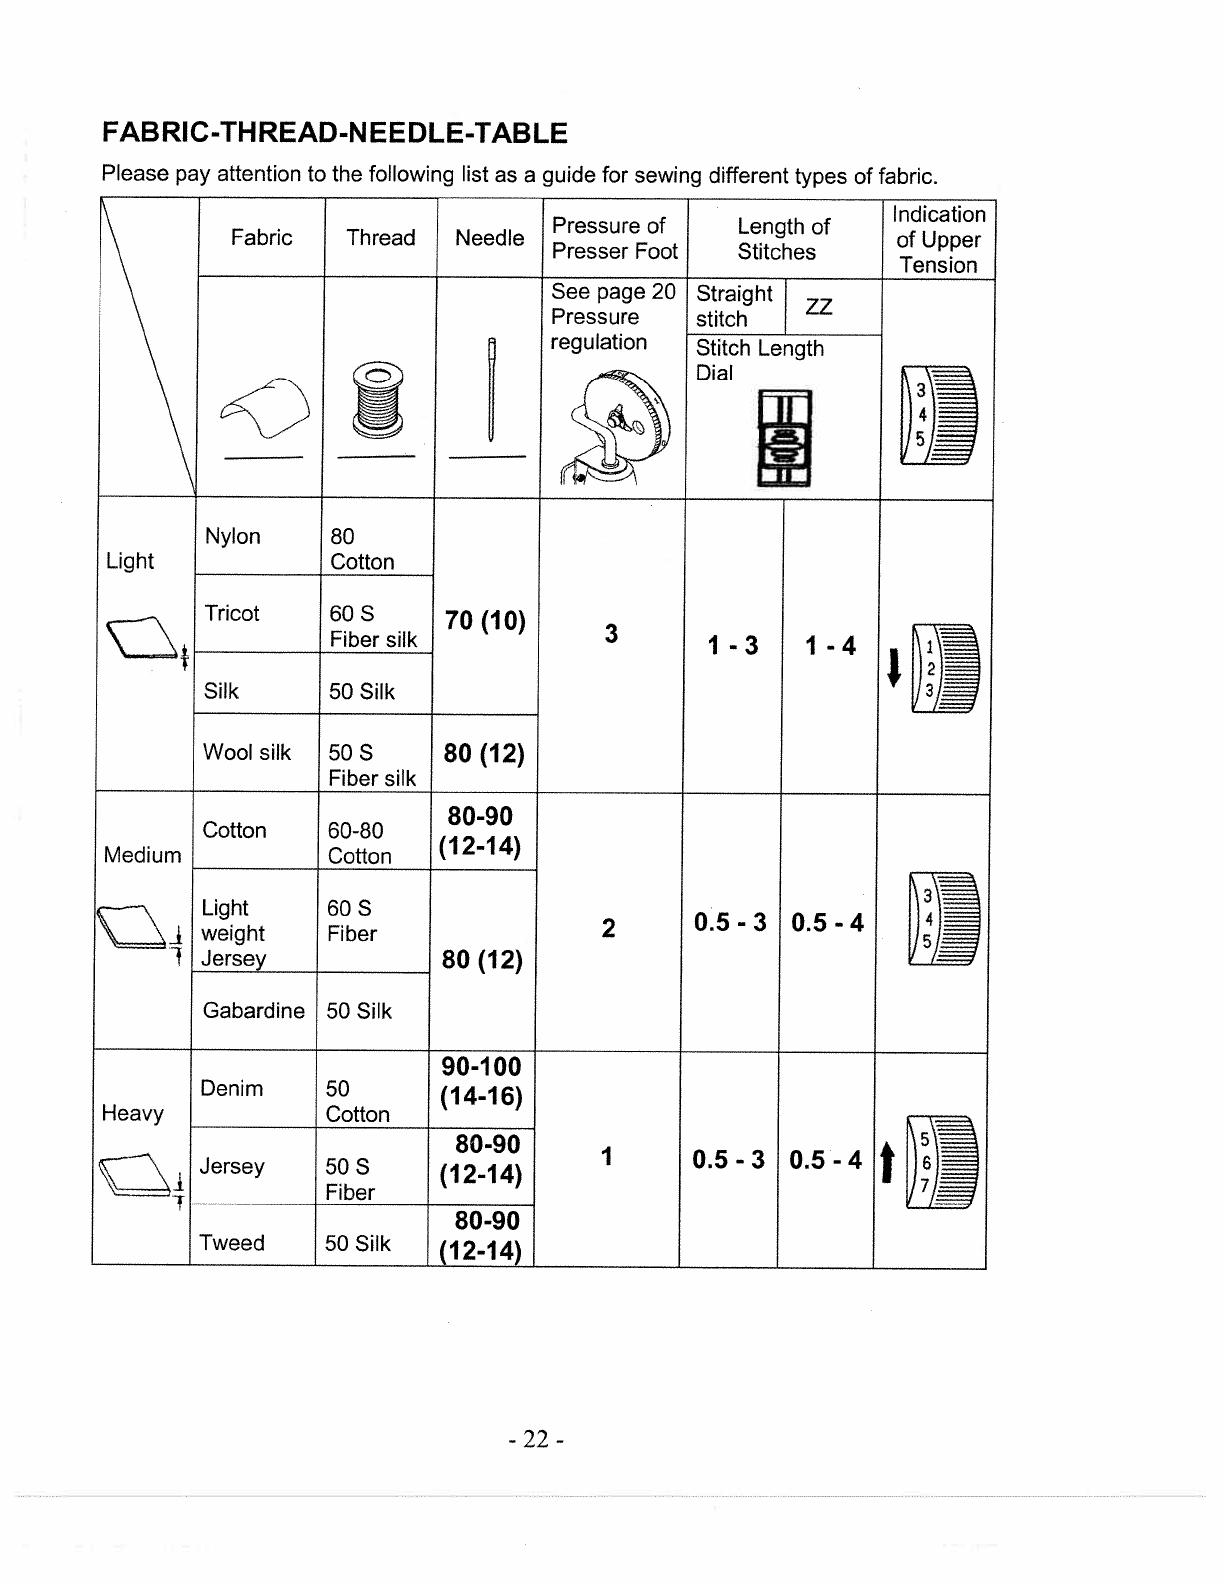
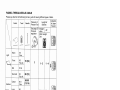
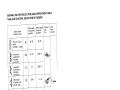
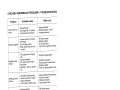
FABRIC-THREAD-NEEDLE-TABLE
Please
pay
attention
to
the
following
list
as
a
guide
for
sewing
different
types
of
fabric.
Fabric
Thread
Needle
N
Pressure
of
Presser
Foot
Length
of
Stitches
Indication
of
Upper
Tension
Straight
stitch
j
zz
See
page
20
Pressure
regulation
Nylon
Stitch
Length
Dial
I
iii
[-Il—I
80
Cotton
Light
Tricot
60
S
Fiber
silk
70
(10)
Silk
50
Silk
3
Wool
silk
1-3
1-4
50
S
Fiber
silk
80
(12)
Ii
Cotton
60-80
80-90
Medium
Cotton
(1214)
Light
60S
J
weight
Fiber
2
O5
-
3
0.5
-
4
4,)
Jersey
80
(12)
Gabardine
50
Silk
90-100
Denim
50
Heavy
Cotton
(14-16)
80-90
Jersey
50S
(12-14)
1
O.53
O54
Fiber
80-90
Tweed
50
Silk
(12-14)
-
22
-

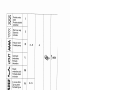
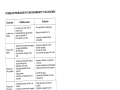
SEWING
(PATTERN
SELECTOR)
AND
OPERATION
TABLE
TABLA
DE
COSTURA,
SELECTOR
DE
DlSEIO
Stitch
width
Stitch
length
Presser
Drop
Stitch
patterns
Anchura
de
Largo
de
foot
feed
Costura,
diseño
puntada
puntada
Pie
Avance
Automatic
embroidery
Puntada
decorativa
Blind
hem
Costura
oculta
revertida
Honeycomb
stitch
Nido
de
abeja
3-5
1—3
4
Ric-rac
I
Zig-zag
stitch
Puntada
Zig-zag
A
0-5
0-4
Automatic
B
3
-
5
0.5
-
i
embroidery
Puntada
decorativa
C
5
0.5—1
I
Blind
stitch
Costura
oculta
D
3-5
1
—
3
borde
ciego
E
+AAA
E
Blind
hem
Costura
oculta
revertida
F
:2:
Three
step
zigzag
G
5
0.5
-
3
<
stitch
::
Zig-zag
con
3
‘
pasos
H
3-5
-24
-

TO
START
SEWING
COMIENZO
DE
LA
COSTURA
Important
hints:
1.
Lower
the
take-up
lever
to
its
lowest
position
before
starting,
and
raise
it
after
stoppin
sewing.
2.
Hold
both
threads
about
4
inches
to
the
rear
of
the
machine
for
the
first
two
or
three
stitches.
3.
Sufficient
fabric
should
be
placed
under
needle
before
lowering
the
presser
foot.
4.
Depress
foot/speed
control
and
start
to
sew.
5.
Test
the
machine
stitches
on
a
scrap
of
fabric
you
plan
to
use,
adjusting
the
machine
for
the
length
of
the
stitch
and
tension
suitable
to
your
fabric.
Attention:
1.
When
turning
the
hand
wheel
manually,
always
turn
it
toward
you.
2.
Guide
the
fabric
gently
with
your
hand.
3.
To
prevent
breaking
needles,
always
raise
the
needle
out
of
the
fabric
when
you
stop
sewing.
Notas
importantes:
1.
Al
empezar
o
terminar
una
costura
levantar
el
tirahilos
a
Ia
posicion
más
alta.
2.
Retenga
ambos
hilos
aproximadamente
10
centImetros
hacia
atrás
de
Ia
máquina
durante
las
primeras
dos
o
tres
puntadas.
3.
Asegurese
de
que
el
tejido
está
debajo
de
Ia
aguja
antes
de
empezar
a
coser
y
pisar
el
pedal.
4.
Presione
el
pedal
y
comience
a
coser.
5
Pruebe
las
puntadas
en
un
trozo
de
tejido
de
muestra,
para
asI
poder
ajustar
Ia
longitud
de
puntada
y
Ia
tensiOn.
Notas:
1.
Gire
el
volante
siempre
en
su
direcciôn.
2.
Conduzca
el
tejido
suavemente
con
Ia
mano.
3.
Para
evitar
que
se
rompa
Ia
aguja,
deje
de
coser
desplazando
Ia
aguja
hacia
arriba
y
no
dejándola
en
Ia
tela.
-26-


 1
1
 2
2
 3
3
 4
4
 5
5
 6
6
 7
7
 8
8
 9
9
 10
10
 11
11
 12
12
 13
13
 14
14
 15
15
 16
16
 17
17
 18
18
 19
19
 20
20
 21
21
 22
22
 23
23
 24
24
 25
25
 26
26
 27
27
 28
28
 29
29
 30
30
 31
31
 32
32
 33
33
 34
34
 35
35
 36
36
 37
37
 38
38
 39
39
 40
40
 41
41
 42
42
 43
43
 44
44


