Page is loading ...

Installation
Instructions
Universal Whole House
Instrucciones de instalación
Sistema universal para toda la casa
Model Series WFPF13003B
Serie del modelo WFPF13003B
Water Filtration
V4.0

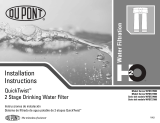
Package Contents
UNIVERSAL WHOLE HOUSE
Installation Instructions
Universal Complete Home Filtration System
Universal Whole House Filtration System
Parts & Hardware Included
Filter System (System Head with Filter Housing)
Filter Cartridge
Filter O-Ring
Filter Housing Wrench
Mounting Bracket
3/4" Mounting Screws (4)
2" Mounting Screws (4)
Tools & Materials Required
Compression Fittings/Valves
(See Step 2: Configure Your System)
Two Adjustable Wrenches
Pipe Wrench
Pipe Cutter or Hacksaw
File
Pencil
Plumber’s Tape
Silicone Grease
Pan or Bucket
Optional Materials
Grounding Kit
Fo r in stallation s in M assac huse tts, the Comm on wealth of M assac huse tts Plum bing Code CM R248 shall be adhered to.
www.waterfiltration.DuPont.com
Protect Plus, LLC Hickory, NC 28601 USA
866-709-2086 Toll Free
For Service Requests & Product Information
Hours of Operation: 24 Hours/Day, 7 Days/Week
800-441-7515
For Safety & Health Questions
Information & Assistance
System Head
Filter O-Ring
DuPont Part No. WFAO200
Filter Cartridge
Mounting Bracket
DuPont Part No. WFAB200
2" Mounting Screws (4)
Filter Housing
Filter Housing Wrench
DuPont Part No. WFAW200
3/4" Mounting Screws (4)
DuPont Part No. WFAS300 (Package of 2)
A E
F
G
A
C
B
D
A
B
C
D
E
F
G

WFPF13003B
2
V4.0
Proper Installation
Please read all instructions, specifications, and precautions before installing and using your water filter system.
Precautions:
After prolonged periods of non-use (such as during a vacation), it is recommended that the system be flushed thoroughly. Let water run
for 10 minutes before using.
The filter cartridges used with this Filter System have a limited
service life. Changes in taste, odor, and/or flow of the water being filtered
indicate that the cartridge should be replaced.
Do not install where system will be exposed to direct sunlight.
Your water filtration system will withstand up to 100 psi water pressure. If your house water supply pressure is higher than 100 psi, install
a pressure reducing valve before the system is installed.
Before You Begin
Locate the main water supply line to your home and check to see what type of plumbing is in place (ex: plastic, copper, galvanized).
The main water supply line is typically located in a basement, crawlspace or garage. For cold water lines only.
Measure the diameter of the existing pipe to determine what size fittings and/or valves (not included) will be required.
Choose a location in the main su
pply line to install the Filter System. Make sure to place the Filter System in an area after the
water meter or pressure tank and before the water heater. Also select a location that will be easily accessible when changing
filter cartridges.
Consult your local plumbing codes and install accordingly.
STEP
Turn Off the Main Water Supply Line
NOTE: The Filter System must be installed after the water meter or pressure tank.
Turn off the main water supply line to your home.
Purge all water from the plumbing lines by turning on all faucets in your home and draining completely.
This filter must be protected
from freezing, which can
cause cracking of the filter
and water leakage.
Because of the product’s limited service life and to prevent costly repairs or possible water damage, we strongly
recommend that the housing be replaced every ten years. If the head of the filter has been in use for longer than
this period, it should be replaced immediately. Date the top of any new head to indicate the next recommended
replacement date.
NOTICE NOTICE
1
2
1
1

WFPF13003B
3
V4.0
STEP
2
Configure Your System
See the System Configuration Chart to determine how you will configure your Filter System and to identify the additional parts
and tools you will need for installation.
NOTE: For galvanized piping consult a professional plumber.
Materials Needed For 3/4" Diameter Housing Inlet /Outlet Ports
______________________________________________________________________________________________________________________________________
2 3/4" O.D. Tube x 3/4" M.I.P No Individual Fitting. 3/4" NPT x 3/4" Tube 3/4" NPT x 1" Tube
Compression Male Adapter It may be made up of: Male Adapter Male Adapter
or - 1" x 1" sch 40 coupling PVC Slip Type PVC Sli
p Ty
pe
3/4" MPT x 3/4" CTS QC - 1" x 3/4" sch 40 bushing
Adapter (WATTS WaterPEX) - 3/4" sch 80 nipple (2 each)
- 1" CTS QC Adapter
(WATTS WaterPEX)
______________________________________________________________________________________________________________________________________
TOOLS
______________________________________________________________________________________________________________________________________
P
ipe Cutter or Hacksaw Pipe Cutter or Hacksaw Pipe Cutter or Hacksaw Pipe Cutter or Hacksaw
2 Adjustable Wrenches 2 Adjustable Wrenches 2 Adjustable Wrenches 2 Adjustable Wrenches
Tape Measure Tape Measure Tape Measure Tape Measure
______________________________________________________________________________________________________________________________________
SUPPLIES
______________________________________________________________________________________________________________________________________
Plumber’s Tape Plumber’s Tape Plumber’s Tape Plumber’s Tape
PVC Cleaner PVC Cleaner
PVC Adhesive PVC Adhesive
______________________________________________________________________________________________________________________________________
QUANTITY
1" COPPER PIPE
1" PVC PIPE3/4" PVC PIPE
3/4" CO
PPER P
IPE
GOOD
BETTER
BEST
NOTE: Valves shown in diagrams are not included but
can be purchased at a local hardware store.
During filter cartridge replacement it is necessary to shut
off the water supply and purge the water lines. Adding
shut-off valves will isolate the system from the supply
line and household water. In this way, filter cartridge
replacement is faster with less mess and hassle
.
A
A
VALVE
VALVE
VALVE
2
A

X
STEP
4
1
2
3
1
2
3
4
WFPF13003B
4
V4.0
Assemble the System and Install Mounting Bracket
Dry assemble the complete system (according to the configuration chosen), including all fittings and valves.
Measure the overall length (see diagram) of the configured system.
Reduce this measurement enough to allow for the amount of engagement (X) to determine how much pipe to remove from the line.
When installing the Mounting Bracket
E , position it on top of the System Head A , aligning the bracket holes with the holes in
the System Head. Insert the four 3/4" Mounting Screws
F
through the Mounting Bracket and into the holes of the System Head
until tight.
Mark Measurements and Cut the Plumbing Pipe
Mark the section of the plumbing pipe that will need to be removed to allow for the configured system (as determined in Step 3).
NOTE: Measure twice, cut once!
Using a pipe cutter or hacksaw, cut the marked section from the plumbing pipe.
NOTE: Use a pan or bucket to catch any remaining water in the pipes.
Remove any burrs or debris from the cut edges with a file.
Please wear safety glasses to protect
eyes when cutting.
A
SEE CHART
PAGE 3
STEP
3
CAUTION
3
4
2
3
A
E
E
F
A

WFPF13003B
5
V4.0
STEP 5
6
Hang the Filter System Head
1 Align the System Head
A
on the pipes so that the inlet and outlet are in the correct locations. The "in" port on the System Head
should be facing the incoming water supply.
2 Allow the System Head to temporarily hang between the two cut plumbing pipes.
3 Apply plumber’s tape or appropriate sealant to the fittings and lines, according to your system configuration.
4 Make all connections and tighten fittings.
NOTE: Keep the Filter System in an upright position.
5 Attach the Mounting Bracket E to the wall using the four 2" Mounting Screws F or alternative fasteners (not included).
STEP
Hang the Filter Housing
1 Insert the Filter Cartridge B over standpipe in the bottom of the Filter Housing A .
2 Screw the Filter Housing back onto the System Head and hand-tighten. Using the Filter Housing Wrench D , tighten 1/4 turn.
NOTE: Do not over tighten.
A grounding kit (not included) must be installed on water pipes if they are
used to ground electrical systems, appliances or phones.
GROUNDING KIT (NOT INCLUDED)
WATER
FLOW
TO
HOUSE
IN OUT
CAUTION
5
6
A
E
E
G
A
D
3
5
2

WFPF13003B
6
V4.0
Test the Filter System for Proper Operation
Slowly turn on the water supply at the main shutoff valve.
Press the red pressure-relief button on top of the Filter System
A to release any trapped air.
Check for any leaks between the System Head and Filter Housing of the Filter System, and on the inlet and outlet connections.
If there are leaks, see the troubleshooting tips below.
Flush the
Filter System for 40 minutes by keeping the nearest faucet turned on.
If there are leaks between the System Head and Filter Housing of the Filter System:
Turn off the main water supply to your home.
Purge all water from the plumbing lines by turning on all faucets in your home and drain completely.
Press the red pressure-relief button on top of the Filter System
A to release pressure.
Unscrew and remove the System Head from the Filter System using the Filter Housing Wrench
D .
NOTE: Use a pan or bucket to catch any water in the housing.
Remove the black O-Ring
C
and inspect. Clean and lubricate with silicone grease.
Clean the groove in the top of the Filter Housing where the O-Ring sits.
Place the clean, lubricated O-Ring back in the groove.
Screw the Filter Housing back onto the System Head and hand-tighten. Using the Filter Housing Wrench, tighten 1/4 turn.
NOTE: Do not over tighten.
Turn on the main water supply and inspect for leaks.
If there are leaks on the inlet and/or outlet connections:
Turn off the main water supply to your home.
Purge all water from the plumbing lines by turning on all faucets in your home and drain completely.
Tighten all fittings.
Turn on the main water supply and inspec
t for leaks.
If leaks continue, disassemble the configured system, reapply plumber’s tape or sealant, and reinstall the Filter System.
> If leaks continue, turn off the water supply and call Customer Service.
STEP
7
1
2
3
4
7
2
A

WFPF13003B
7
V4.0
Filter Cartridge Replacement
Turn off the main water supply to your home.
NOTE: This will shut off all water flow in the home.
Purge all water from the plumbing lines by turning on all faucets in your home and draining completely.
Press the red pressure-relief button on top of the Filter System
A to release pressure.
Use the Filter Housing Wrench
D
to unscrew the Filter Housing.
NOTE: Use a pan or bucket to catch any water in the Filter Housing.
Pour out the water in the Filter Housing and remove the used Filter Cartridge B .
STEP
NOTE: Have a pan or bucket handy to rinse out the Filter Housing.
Rinse out the bottom of the Filter Housing.
Add enough water to fill the Filter Housing 1/3 full. Add approximately 2 tablespoons of bleach and clean the System Head and
bottom of the Filter Housing with a clean cloth.
Rinse the Filter Housing thoroughly to remove bleach.
Remove the O-Ring
C
in the top of the Filter Housing and wipe clean.
Use silicone grease to lubricate the O-Ring.
Place the O-Ring back in the groove of the Filter Housing.
NOTE: Make sure that the O-Ring is seated properly in the groove to ensure a good seal.
Insert the new Filter Cartridge over the standpipe in the bottom of the Filter Housing.
Screw the Filter Housing back onto the System Head and hand-tighten. Using the Filter Housing Wrench, tighten 1/4 turn.
NOTE: Do not over tighten.
Slowly turn on the water supply at the main shutoff valve.
Press the red pressure-relief button on top of the Filter System to release any trapped air.
Check for any leaks before proceeding. (Refer to troubleshooting on Page 6.)
Turn on
the nearest faucet and flush the Filter System for 40 minutes.
A
STEP
1
STEP
2
STEP
3
1
2
3
4
5
1
2
3
4
5
6
1
2
3
4
5
6
1
3
A
4 4
A
D
A
C
B
A

WFPF13003B
8
V4.0
These units are intended for non-commercial use. They should be used only in
ambient air temperature of between 35 degrees F / 2 degrees C and 100 degrees
F / 38 degrees C. Placement of these units in direct sunlight or use of electrical
heating equipment on these units must be avoided. Replace filter cartridge when
and as directed in the installation/ operation instructions included with each
cartridge. Replacement filter cartridges are available at retail outlets.
Operation/Maintenance Data
• These filters are not water purifiers. Do not use with water that is microbiologically
unsafe or of unknown quality without adequate disinfection before or after the
system. Systems certified for Cyst reduction may be used on disinfected waters
that may contain filterable Cysts.
• This unit is not designed to filter sulfur (rotten egg odor). Use of carbon filters to
treat sulfur may intensify taste/odor problems.
• Please comply with all state and local regulations regarding the installation of
water treatment devices.
• The contaminants or other substances reduced by the water filter device are not
necessarily in your water.
CAUTION
Usage and quality of water in your incoming water line affect the life of filter cartridges
and determine when the cartridge should be changed. Cartridges should be replaced
sooner if water pressure at the faucet begins to drop noticeably or if the filter fails to
perform satisfactorily.
Replacement Cartridges
DuPont™ Universal Whole House System
System
Cartridge Model Numbers
________________________________________________________________________________________________
Universal Whole House Model Series WFPF1300 WFPFC3002, WFPFC4002, WFPFC5002,
WFPFC8002, WFPFC9001
________________________________________________________________________________________________
Replacement Parts
DuPont™ Universal Whole House System
Part Number
Description
________________________________________________________________________________________________
WFAB200 Mounting Bracket
________________________________________________________________________________________________
WFAO200 O-Ring
________________________________________________________________________________________________
WFAW200 Filter Housing Wrench
________________________________________________________________________________________________
WFAS300 Mounting Screws (Package of 2)
________________________________________________________________________________________________
www.waterfiltration.DuPont.com
Protect Plus, LLC n Hickory, NC 28601 USA
866-709-2086 Toll Free
For Service Requests & Product Information
Hours of Operation: 24 Hours/Day, 7 Days/Week
Ordering Information:

WFPF13003B V4.0
Smarter Choices for a Cleaner World
Creating better products for you and your family is what you can expect from DuPont.
The product inside this package was created adhering to high standards in quality and efficacy.
Independently Tested and Certified to Improve Taste and Water Quality
© 2009 Protect Plus, LLC. H2O Trademark is a trademark of Protect Plus.
The DuPont Oval Logo®, DuPont™, The miracles of science™ are trademarks or registered trademarks of E. I. du
Pont de Nemours and Company or it affiliates. All rights reserved.
/