DeLonghi NESPRESSO Lattissima+ User manual
- Category
- Coffee makers
- Type
- User manual
This manual is also suitable for

TSM SUCCESS MANUAL
®
designed and copyright by
*
* Ma machine
Page is loading ...
Page is loading ...
Page is loading ...
Page is loading ...

EN
FR
SAFETY PRECAUTIONS
Avoid risks of fatal electric shock and fire
1. Only plug the appliance into suitable, earthed mains connections. Make sure that the voltage of the
power source is the same as that specified on the rating plate. The use of an incorrect connection
voids warranty.
2. If an extension lead is required, use only an earthed cable with a conductor cross-section of at least
1.5 mm
2
.
3. Do not pull the cable over sharp edges. Clamp it or allow it to hang down. Keep the cable away from
heat and damp.
4. If the cable is damaged, do not operate the appliance. Return appliance to the manufacturer‘s service,
the Nespresso Club or similarly qualified persons for repair.
5. To avoid hazardous damage, never place the appliance on or beside hot surfaces such as radiators,
cooking rings, gas burners, open flames, or similar.
6. Always place it on a stable and even surface. The surface must be resistant to heat and fluids, like
water, coffee, descaler, or similar.
7. Disconnect the appliance from the mains when not in use for a long period.
8. Disconnect by pulling out the plug and not pulling the cable itself or the cable may be damaged.
Never touch the cable with wet hands.
9. Never immerse the appliance or part of it in water. Never put the appliance or part of it into a dish-
washer, except the Rapid Cappuccino System (R.C.S.). Electricity and water together is dangerous and
can lead to deadly electrical shocks.
10. Do not open the appliance. Hazardous voltage inside!
11. Do not put anything into openings. Doing so may cause fire or electrical shock!
Avoid possible harm when operating the appliance
12. This product has been designed for domestic use only. Any commercial use, inappropriate use or
failure to comply with the instructions, the manufacturer accepts no responsibility and the warranty
will not apply.
13. This is a household appliance only. It is not intended to be used in:
– staff kitchen areas in shops, offices and other working environments;
– farm houses;
– by clients in hotels, motels and other residential type environments;
– bed and breakfast type environments;
– planes, boats, trains and automobiles.
14. Do not use the appliance if it is damaged or not operating perfectly. Immediately remove the plug
from the power socket. Call the Nespresso Club for a diagnosis. A damaged appliance can cause
electrical shocks, burns and fire.
15. The appliance is not intended for use by persons (including children) with reduced physical, sensory
or mental capabilities, or lack of experience and knowledge, unless they have been given supervi-
sion or instruction concerning use of the appliance by a person responsible for their safety. Children
should be supervised to ensure that they do not play with the appliance.
16. Always close the lever and never lift it during or immediately after operation. Risk of scalding! Do not
put fingers into the capsule compartment or the capsule shaft. Danger of injury!
17. Do not put fingers under the coffee outlet or milk spout. Risk of scalding!
18. Never use a damaged or deformed capsule. Water could flow around the capsule when not perfo-
rated by the blades and damage appliance.
19. Do not use the appliance without drip tray and drip grid to avoid spilling any liquid on surrounding
surfaces.
20. Always use the milk container (Rapid Cappuccino System) supplied with the machine. Risk of scald-
ing if milk container is not inserted properly.
21. The milk spout gets hot. Risk of burns! Use with care.
22. If coffee volumes higher than 150 ml are programmed: Let the machine cool down for 5 minutes
before making the next coffee. Risk of overheating!
23. Do not use any strong cleaning agent or solvent cleaner. Use a damp cloth and mild cleaning agent
to clean the surface of the machine.
24. Descale the machine when you see the descaling alert. Read the safety precautions on the descaling
pack age care fully. The desc aling solut ion can be ha rmful. Avoid cont act w ith eyes, sk in and sur face s. We
recommend the Nespresso descaling kit available from the Nespresso Club as it is specifically adapted
to your machine. Do not use other products (such as vinegar) that would affect the taste of the coffee.
For any additional questions you may have regarding descaling, please contact the Nespresso Club
25. This machine works with Nespresso capsules available exclusively through the Nespresso Club.Your
Nespresso machine’s proper functioning and lifetime are only guaranteed with the usage of Nes-
presso capsules.
SAVE THESE INSTRUCTIONS
Pass them on to any subsequent user
This instruction manual is also available as a PDF at nespresso.com.
5
Page is loading ...

1
2
3 4
5 6 7
8
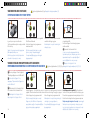
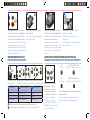
Rinse the Rapid Cappuccino System (R.C.S.) by
following the section “Care of the Rapid Cappuc-
cino System (R.C.S) twice a week”, p. 11
Rincer le “Rapid Cappuccino System” (R.C.S) en
suivant le chapitre Entretien du “Rapid Capuccino
System (R.C.S) deux fois par semaine, page 11
EN
FR
Allumer la machine. Les boutons Espresso et
Lungo clignotent. Le temps de chauffe de la ma-
chine est estimé à 40 secondes. Quand la lumière
des boutons est fixe, la machine est prête.
Se référer au chapitre Signification des
boutons rétroéclairés page 4
Switch the machine on.
Blinking light: heating up for approximately 40 sec.
Steady light: ready
Refer to the button indications on page 4.
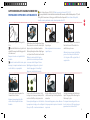
First read the safety precautions to avoid risks of fatal electrical
shock and fire/ Commencer par lire attentivement les consignes de sécurité pour éviter tout accident
corporel ou dégât matériel.
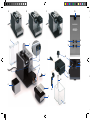
Le réservoir d’eau peut être
soulevé par son couvercle.
Retirer le réservoir d’eau, la grille d’égouttage
et le réservoir à capsules. Ajuster la longueur du
câble d’alimentation et ranger l’excès de câble
dans le range-câble situé sous la machine.
Retirer le film plastique des grilles gauche
et droit et des panneaux latéraux.
Redresser la machine en position droite et la
brancher sur l’alimentation du secteur.
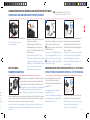
PREMIÈRE UTILISATION OU APRÈS UNE PÉRIODE DE NONUTILISATION PROLONGÉE
Rincer le réservoir d’eau avant de le remplir
d’eau potable jusqu’au niveau maximum.
Rinçage : placer un récipient sous la sortie Café
et appuyer sur le bouton Lungo sans utiliser de
capsule. Répéter trois fois l’opération.
Des tests sont réalisés sur les machines en
fin de production. Des traces de café en poudre
peuvent donc apparaitre dans l’eau de rinçage.
The water tank can be carried
by its cover.
Remove the water tank, drip tray, and
capsule container. Adjust the cable
length and store the excess in the cable
guide under the machine.
Remove the plastic film from both the left and
right grid, and machine panels.
Put the machine in the upright position and plug
it into the mains.
FIRST USE OR AFTER A LONG PERIOD OF NONUSE/
Rinse the water tank before filling with potable
water up to the maximum level.
Rinsing: Place a container under the coffee outlet
and press the Lungo button. Repeat three times.
Machines are fully tested after being
produced. Some traces of coffee powder could be
found in the rinsing water.
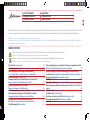
7

2
1
3 4
1 2
3 4
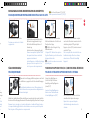
Refer to safety precautions (16)/Lire les consignes de sécurité (16)
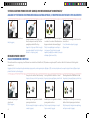
Appuyer sur le bouton Espresso (40ml) ou le
bouton Lungo (110ml). La préparation du café
s’arrêtera automatiquement. Pour arrêter la
préparation du café ou la redémarrer, appuyer
une nouvelle fois.
Prenez votre tasse. Soulever puis baisser le levier
pour éjecter la capsule usagée dans le bac à
capsules usagées.
PRÉPARATION DU CAFÉ
Pour un verre Latte Macchiato, pousser le bac de
récupération à l’intérieur de la machine.
Soulever le levier et insérer la capsule
Nespresso. Baisser le levier et positionner une
tasse sous la sortie Café.
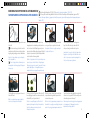
Retirer la buse de lait en la tirant
vers l’extérieur.
Retirer le bouton de réglage de la mousse de
lait en le tournant jusqu’au (
) et en le tirant
vers le haut.
Retirer le couvercle du bac à lait et
débrancher le tuyau d’aspiration du lait.
Retirer le connecteur du “Rapid Cappuccino
System” verrouillé en le tournant vers la gauche
et en le tirant vers l’extérieur.
MONTAGE/DÉMONTAGE DU “RAPID CAPPUCCINO SYSTEM” R.C.S
Press the Espresso (40 ml / 1.35 oz) or the
Lungo (110 ml / 3.7 oz) button. Preparation will
stop automatically. To stop the coffee flow or
top up your coffee, press again.
Take the cup. Lift and close the lever to eject the
capsule into the used capsule container.
COFFEE PREPARATION/
For a Latte Macchiato glass, push the drip tray
inside the machine.
Lift the lever completely and insert a Nespresso
capsule.
Close the lever and place a cup under the
coffee outlet.
Remove the milk spout by
pulling it off.
Remove the milk froth regulator knob by
turning it to (
) and pulling it up.
Remove the milk container lid and unplug the
milk aspiration tube.
Unlock and remove the Rapid Cappuccino System
connector by turning it from (
) to ( ) and
pulling it off.
ASSEMBLING / DISASSEMBLING OF THE RAPID CAPPUCCINO SYSTEM R.C.S/
8

1 2 3 4
5 6 7 8
EN
FR
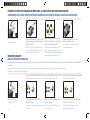
Refer to safety precautions (16) (20) (21)/Se référer aux conditions de sécurité (16) (20) (21)
For perfect milk froth, use skimmed or semi-skimmed milk at refrigerator temperature (about 4° C)/Pour une mousse
de lait parfaite, utiliser du lait écrémé et demi-écrémé conservé à température réfrigérée (env 4°C).
PRÉPARATION D’UN CAPPUCCINO OU
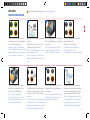
D’UN LATTE MACCHIATO
Remplir le bac à lait avec la quantité de lait voulue.
Lorsque le pot à lait est vide et avant de le
remplir de nouveau, rincer minutieusement le pot
à lait et le tuyau d’aspiration du lait avec de l’eau
potable.
Soulever le levier et insérer une capsule
Nespresso.
Refermer le pot à lait. Ouvrir la trappe d’accès au
connecteur vapeur en la faisant glisser sur la droite.
Connecter le “Rapid Cappuccino System” (R.C.S) à l’ap-
pareil. Les boutons des recettes à base de lait clignotent:
le Rapid Cappuccino se met en mode chauffe. Quand la
lumière des boutons est fixe, la machine est prête.
Baisser le levier, placer une tasse Cappuccino
ou un verre à Latte Macchiato sous la sortie
Café et ajuster la position de la buse de lait.
Ajuster le tuyau d’aspiration du lait selon la
quantité de mousse désirée.
Rincer après chaque utilisation comme cela est
décrit dans le chapitre “Nettoyage après chaque
recette à base de lait”.
A la fin de la préparation, soulever et baisser
le levier pour éjecter la capsule dans le bac à
capsules usagées.
Appuyer sur le bouton Cappuccino ou Macchiato.
La préparation commence après quelques secondes
(le lait puis le café) et s’arrêtera automatiquement.
PREPARING A CAPPUCCINO AND LATTE MACCHIATO/
Fill the milk container with your desired quantity
of milk.
When the milk container is empty, before
refilling, thoroughly rinse it and the milk aspiration
tube with potable water.
Lift the lever completely and insert a
Nespresso capsule.
Close the milk container. Open the steam con-
nector door by sliding it to the right. Connect
the Rapid Cappuccino System to the machine.
Milk recipe buttons blink: the Rapid
Cappuccino heats up. Steady light: ready
Close the lever, place a Cappuccino cup or a
Latte Macchiato glass under the coffee outlet
and adjust the position of the milk spout.
Adjust the milk froth regulator knob accord-
ing to the quantity of froth you want.
Rinse after each use as described in the section
“Rinsing after each milk recipe preparation”.
At the end of the preparation, lift and close the
lever to eject the capsule into the used capsule
container.
Press the Cappucino or Latte Macchiato button.
The preparation starts after a few seconds (first
milk and then coffee) and will stop automatically.
9

2 3
1 2 3 4
1
Refer to safety precautions (20) (21) (22)/Lire les consignes de sécurité (20) (21) (22).
Refer to safety precautions (22)/Lire les consignes de sécurité (22).
Appuyer et maintenir appuyé le même bouton. L’extraction
commence. Lâcher le bouton lorsque la quantité de café désiré est
atteinte. Le bouton clignote 3 fois : le nouveau volume de la recette
est enregistré.
PROGRAMMATION DU VOLUME D’EAU
Appuyer et maintenir appuyé le bouton
Espresso ou Lungo. L’extraction du café
commence. Le bouton clignote rapidement :
mode programmation.
Lâcher le bouton lorsque le volume désiré est
atteint.
PROGRAMMATION DE LA QUANTITÉ DE CAPPUCCINO/LATTE MACCHIATO
Le volume d’eau est enregistré pour les prochaines
préparations de café. Le bouton clignote 3 fois : le
nouveau volume d’eau est enregistré.
min. 20 ml / max. 300 ml
Suivre les étapes 1 à 5 du chapitre
“Préparation du Cappuccino et du Lait
Macchiato”
Appuyer et maintenir appuyé le bouton Cap-
puccino ou Latte Macchiato. La préparation de
la mousse de lait commence. Le bouton clignote
rapidement : mode programmation.
Lâcher le bouton lorsque la quantité de mousse
désirée est atteinte. Le bouton clignote rapide-
ment : mode programmation.
Remplir le réservoir d’eau, allumer la
machine et insérer une capsule Nespresso.
Baisser le levier et placer une tasse sous la
sortie Café.
Lait : min 20 ml / max 300 ml
Café : min 20 ml / max 300 ml
Press and hold the same button. Brewing starts. Release the
button when your desired coffee volume is reached. The recipe volume
is now stored for future preparations. Button blinks 3 times: confirm the
new recipe volume. Eject the capsule and press the clean button.
PROGRAMMING THE WATER VOLUME/
Press and hold the Espresso or Lungo button.
Brewing starts.
Button blinks quickly: programming mode.
Release the button when the desired volume is
reached.
PROGRAMMING CAPPUCCINO/LATTE MACCHIATO VOLUME/
The water volume is now stored for future coffee
preparations.
Button blinks 3 times: confirm the new water volume
min 20 ml / max 300 ml.
Milk: min 20 ml/max 300 ml.
Coffee: min 20 ml/max 300 ml
Follow the steps 1-5 of section “Preparing a
Cappuccino and Latte Macchiato”
Press and hold the Cappuccino or Latte Macchiato
button. Milk frothing starts.
Button blinks quickly: programming mode.
Release the button when your desired volume of
milk froth is reached.
Button blinks quickly: programming mode.
Fill the water tank, switch the machine on and
insert a Nespresso capsule.
Close the lever and place a cup under the coffee
outlet.
10

1
1 1
2 3 4
EN
FR
Refer to safety precautions (20) (21) (22)/Lire les consignes de sécurité (20) (21) (22).
Refer to safety precautions (17) (20) (21)/
Lire les consignes de sécurité (17) (20) (21).
Appuyer et maintenir appuyé le même bouton. L’extraction
commence. Lâcher le bouton lorsque la quantité de café désiré est
atteinte. Le bouton clignote 3 fois : le nouveau volume de la recette
est enregistré.
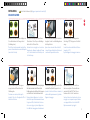
NETTOYAGE APRÈS CHAQUE PRÉPARATION DE RECETTE À BASE DE LAIT
NETTOYAGE AU QUOTIDIEN
ENTRETIEN DU “RAPID CAPPUCINO SYSTEM” R.C.S DEUX FOIS PAR SEMAINE
Placer un récipient sous la buse de lait.
Retirer le bac de récupération, le bac à capsules usagées et le réservoir d’eau. Vider et rincer. Les
grilles gauche et droite doivent être retirés de la machine pour être facilement lavés. Laver la sortie
Café régulièrement avec un chiffon humide.
Mettre tous les composants dans la partie
haute du lave vaisselle au moins deux fois
par semaine.
Déconnecter la R.C.S de la machine et le placer
au réfrigérateur. Fermer la trappe d’accès au
connecteur vapeur.
Le lait ne doit pas être conservé plus de 2
jours.
Appuyer et maintenir appuyé le bouton
“Clean” jusqu’à ce que la machine s’arrête
automatiquement de pomper (environ 10
secondes). La lumière est fixe : processus de
rinçage terminé.
Tous les composants du bac à lait peuvent être lavés
au lave-vaisselle. Deux fois par semaine, suivre le
chapitre Entretien du “Rapid Cappucino System”
(R.C.S) deux fois par semaine
Ne pas utiliser de détartrant ou de solvant. Utiliser un chiffon
humide et un produit d’entretien doux pour nettoyer la surface de la
machine. Ne pas mettre au lave-vaisselle.
Démonter le “Rapid Cappucino Sys-
tem”. Se référer au chapitre Montage/
Démontage du “Rapid Cappucino
System” (R.C.S)
Press and hold the same button. Brewing starts. Release the
button when your desired coffee volume is reached. The recipe volume
is now stored for future preparations. Button blinks 3 times: confirm the
new recipe volume. Eject the capsule and press the clean button.
RINSING AFTER EACH MILK RECIPE PREPARATION/
DAILY CLEANING/ CARE OF RAPID CAPPUCCINO SYSTEM R.C.S. TWICE A WEEK/
Place a container under the milk spout.
Remove the drip tray, capsule container and water tank. Empty and rinse. Both left and right grid
can be removed for easy cleaning. Clean the coffee outlet regularly with a damp cloth.
Clean all components in the upper level
of a dishwasher at least twice a week.
Disconnect the R.C.S. from the machine and place
it in the refrigerator. Close the machine steam
connector door.
This milk should not be kept for more than
2 days.
Press and hold the ”CLEAN” button until
machine stops pumping automatically.
Milk recipe buttons blink: rinsing process
approximately 10 sec.
Steady light: rinsing process finished.
All the milk container components are dishwash-
erproof. Twice a week, follow the section “Care of
Rapid Cappuccino System twice a week”.
Disassemble the Rapid Cappuccino
System. Refer to section ”Assembling/
Disassembling of Rapid Cappuccino
System (R.C.S)”.
Do not use any strong cleaning agent or solvent cleaner. Use a damp
cloth and mild cleaning agent to clean the surface of the machine. Do not
put in a dishwasher.
11

1 2 3 4
1 A B C
VIDER L’APPAREIL AVANT UN PÉRIODE DE NONUTILISATION, CONTRE LE GEL OU AVANT UNE RÉPARATION
MODE ÉCONOMIE D’ÉNERGIE
Allumer la machine.
Activer le mode arrêt automatique après 9 mn (réglage d’usine)
Activer le mode arrêt automatique après 30 mn
Activer le mode arrêt automatique après 8h
Appuyer et maintenir appuyé sur le bouton Lungo
et allumer la machine.
Appuyer et maintenir appuyé le bouton Espresso
et allumer la machine.
Appuyer et maintenir appuyé les boutons Lungo et
Espresso et allumer la machine.
Appuyer simultanément sur les boutons Cappuc-
cino et Espresso pendant 5 secondes. Les boutons
de préparation clignotent alternativement : le
mode vidange est en marche.
Retirer le réservoir d’eau. Baisser le levier (sans
capsule à l’intérieur). Placer un récipient sous la
sortie Café.
Lorsque l’opération est terminée, la machine
s’éteint automatiquement.
Eteindre la machine
Cette machine consomme moins d’énergie grâce notamment à un arrêt automatique (0W).
L’appareil s’éteind après 9 minutes de non-utilisation.
EMPTYING THE SYSTEM BEFORE A PERIOD OF NONUSE, FOR FROST PROTECTION OR BEFORE A REPAIR/
ENERGY SAVING CONCEPT/
Switch on the machine.
Activation power off after 9min (factory setting)
Activation power off mode after 30min
Activation power off mode after 8h
Press and hold the Lungo button and switch the
machine on.
Press and hold the Espresso button and switch
the machine on.
Press and hold both the Lungo and Espresso button
and switch machine on.
Press the Cappuccino and Espresso buttons simul-
taneously for 5 seconds. Preparation buttons blink
alternately: emptying mode is in progress.
Remove the water tank. Close the lever (without
a capsule inside). Place a container under the
coffee outlet.
When the process is finished, the machine switches
off automatically.
This machine has an excellent energy consumption profile as well as an automatic power off function (0W) which enables you to save energy. The appliance switches off 9 minutes after the last use.
Switch the machine off.
12
Page is loading ...

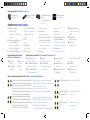
9 10 11 12
1 A B C
1
A
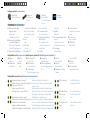
Soft water hardness
Faible dureté de l’eau
B
Medium water hardness
Moyenne dureté de l’eau
C
Hard water hardness
Forte dureté de l’eau
< 10° dH 10° dH – 20° dH >20° dH
< 18° fH 18° fH – 36° fH >36° fH
< 180 mg/l CaCO
3
180–360 mg/l CaCO
3
360 mg/l CaCO
3
40 ml (1.35 oz)
40 ml (1.35 oz)
110 ml (3.7oz)
110 ml (3.7oz)
Milk*: 50ml (1.7 oz)/Coffee: 40ml (1.35 oz)
Lait* : 50ml (1.7 oz)/Café : 40ml (1.35 oz)
Milk*: 150ml (5 oz)/Coffee: 40 ml (1.35 oz)
Lait* : 150ml (5 oz)/Café : 40 ml (1.35 oz)
RÉGLER LA DURETÉ DE L’EAU
Appuyer et maintenir appuyé les boutons indiqués et allumer la machine.
Appuyer une nouvelle fois sur le bouton Cappuccino.
L’opération de rinçage se poursuit depuis la sortie
Café, la buse de détartrage et le bac de récupération
jusqu’à ce que le réservoir d’eau soit vide. Les boutons
Cappuccino et Macchiato clignotent alternativement.
Laver la machine avec un chiffon humide.
Vous avez terminé de détartrer votre machine.
Une fois l’opération de rincage terminée, la
machine s’éteint.
Eteindre la machine
Retirer et ranger la buse de détartrage. Vider
le bac de récupération et le bac à capsules
usagées. Remplir le réservoir d’eau d’eau
potable.
REVENIR À LA PROGRAMMATION INITIALE
Lorsque la machine est allumée,
appuyer sur les 4 boutons à la fois
pendant 5 secondes.
Les boutons programmés clignotent 3 fois : la dureté de l’eau est réglée
*La quantité de mousse de lait dépend du type de lait utilisé et
de sa température.
WATER HARDNESS SETTING/
Press and hold the indicated buttons and switch the machine on.
Press the Cappuccino button again. The rinsing
cycle continues through the coffee outlet, descaling
pipe and drip tray until the water tank is empty.
The Cappucino and Macchiato button blink alternatively.
Clean the machine using a damp cloth.
You have now finished descaling the machine.
Once the rinsing process is finished, the machine
switches off.
Switch the machine off.
Remove and store the descaling pipe. Empty
the drip tray and used capsule container. Fill the
water tank with fresh potable water.
RESTORING VOLUMES TO FACTORY SETTINGS/
Press all 4 buttons for 5 sec (when
machine is switched on). All
buttons blink 3 times: all volumes
are reset.
Programmed buttons blink 3 times: water hardness is set.
* The volume of milk froth depends on the kind of milk that is
used and its temperature.
14
Page is loading ...

Nous nous sommes engagés à acheter du café de qualité supérieure, produit dans le respect de l’environnement et des cultivateurs. Depuis 6 ans, nous collaborons avec l’organisation Rainforest Alliance
pour mettre en œuvre notre Programme Nespresso AAA Substainable Quality™, et notre objectif est que 80% de notre café soit issu du Programme et bénéficie de la certification Rainforest Alliance
d’ici à 2013.
Nous avons choisi l’aluminium comme matériau d’emballage de nos capsules car il protège les arômes des Grands Crus Nespresso et peut aussi être recyclé à l’infini sans perdre sa qualité. Nous mettons
en place notre propre système de collecte et de recyclage des capsules usagées avec pour objectif de tripler notre capacité de recyclage à 75% des capsules utilisées d’ici à 2013.
Nespresso s’engage à développer des machines à la fois innovantes, performantes et esthétiques. Désormais, nous intégrons des caractéristiques environnementales dans la conception de nos gammes
de machines.
GARANTIE
ECOLABORATION : ECOLABORATION.COM
Delonghi garantit ce produit contre tous les défauts matériels et de fabrication pour une période de deux ans à compter de la date d’achat. Pendant cette période, Delonghi réparera ou remplacera, à sa discrétion,
tout produit défectueux sans frais supplémentaires pour son propriétaire. Les produits de remplacement ou les pièces réparées seront exclusivement garantis pour la part non expirée de la garantie initiale ou
pendant six mois, la durée retenue étant la plus longue. Cette garantie limitée ne s’applique pas à un quelconque défaut résultant d’un accident, d’un usage inapproprié de la machine, d’un mauvais entretien ou
d’une usure normale. Tout défaut résultant d’une utilisation de capsules autres que Nespresso ne sera pas couvert par la garantie. Sauf si cela est prévu par la législation en vigueur, les conditions de cette garantie
limité n’excluent, ni ne restreignent, ni ne modifient les droits légaux obligatoires relatifs à votre achat, voire y sont complémentaires. Si vous estimez que votre produit est défectueux, contactez Nespresso pour
obtenir des précisions sur l’adresse à laquelle il convient de l’envoyer ou de l’apporter pour réparation. Veuillez consulter notre site web www.nespresso.com pour en savoir plus sur Nespresso.
WARRANTY/
ECOLABORATION : ECOLABORATION.COM/
Delonghi warrants this product against defects in materials and workmanship for a period of two years from the date of purchase. During this period, Nespresso will either repair or replace, at its discretion, any
defective product at no charge to the owner. Replacement products or repaired parts will be guaranteed for only the unexpired portion of the original warranty or six months, whichever is greater. This limited
warranty does not apply to any defect resulting from accident, misuse, improper maintenance, or normal wear and tear. Any defect resulting from the usage of non genuine Nespresso capsules will not be covered
by this warranty. Except to the extent allowed by applicable law, the terms of this limited warranty do not exclude, restrict or modify, and are in addition to, the mandatory statutory rights applicable to the sale of
the product to you. If you believe your product is defective, contact Nespresso for instructions on where to send or bring it for repair. Any defect resulting from the use of capsules which are not genuine Nespresso
capsules will not be covered by this warranty. Please visit our website at nespresso.com to discover more about Nespresso.
We have committed to buy coffee of the very highest quality grown in a way that is respectful of the environment and farming communities. Since 2003 we have been working together with the Rainfor-
est Alliance developing our Nespresso AAA Sustainable Quality
TM
Coffee Program, and now we are committed to sourcing 80% of our coffee from the Program, Rainforest Alliance Certified
TM
, by 2013.
We chose aluminium as the material for our capsules because it protects the coffee and aromas of the Nespresso Grands Crus. Aluminium is also infinitely recyclable, without losing any of its qualities.
We are setting up a capsule collection system in major European markets to triple our capacity to recycle used capsules to 75% by 2013.
Nespresso is committed to designing and making machines that are innovative, high-performing and user friendly. Now we are engineering environmental benefits into the design of our new and future
machine ranges.
16
Page is loading ...
Page is loading ...
Page is loading ...
Page is loading ...
Page is loading ...
Page is loading ...
Page is loading ...
Page is loading ...
Page is loading ...
Page is loading ...
Page is loading ...
Page is loading ...
Page is loading ...
Page is loading ...
Page is loading ...
Page is loading ...
Page is loading ...
Page is loading ...
Page is loading ...
Page is loading ...
Page is loading ...
Page is loading ...
Page is loading ...
Page is loading ...
Page is loading ...
Page is loading ...
Page is loading ...
Page is loading ...

TSM SUCCESS MANUAL
®
designed and copyright by
* Ma machine
-
 1
1
-
 2
2
-
 3
3
-
 4
4
-
 5
5
-
 6
6
-
 7
7
-
 8
8
-
 9
9
-
 10
10
-
 11
11
-
 12
12
-
 13
13
-
 14
14
-
 15
15
-
 16
16
-
 17
17
-
 18
18
-
 19
19
-
 20
20
-
 21
21
-
 22
22
-
 23
23
-
 24
24
-
 25
25
-
 26
26
-
 27
27
-
 28
28
-
 29
29
-
 30
30
-
 31
31
-
 32
32
-
 33
33
-
 34
34
-
 35
35
-
 36
36
-
 37
37
-
 38
38
-
 39
39
-
 40
40
-
 41
41
-
 42
42
-
 43
43
-
 44
44
-
 45
45
-
 46
46


DeLonghi NESPRESSO Lattissima+ User manual
- Category
- Coffee makers
- Type
- User manual
- This manual is also suitable for
Ask a question and I''ll find the answer in the document
Finding information in a document is now easier with AI
in other languages
Related papers
-
DeLonghi EN 520.W User manual
-
-
-
-
-
DeLonghi LATTISSIMA EN680M Instructions Manual
-
-
Nespresso EN660.R Owner's manual
-
-
Other documents
-
Nespresso EN560B User manual
-
Nespresso Krups ESSENZA XN 214 User manual
-
Krups Pixie - Nespresso XN3045 Owner's manual
-
 Nestle Nespresso C60-US-TI-NE User manual
-
Krups ESSENZA MINI INTENSE YY2911FD Owner's manual
-
De'Longhi EN750MB User manual
-
-
-
-
Nescafe Pixie User manual
