A
Hardware Review
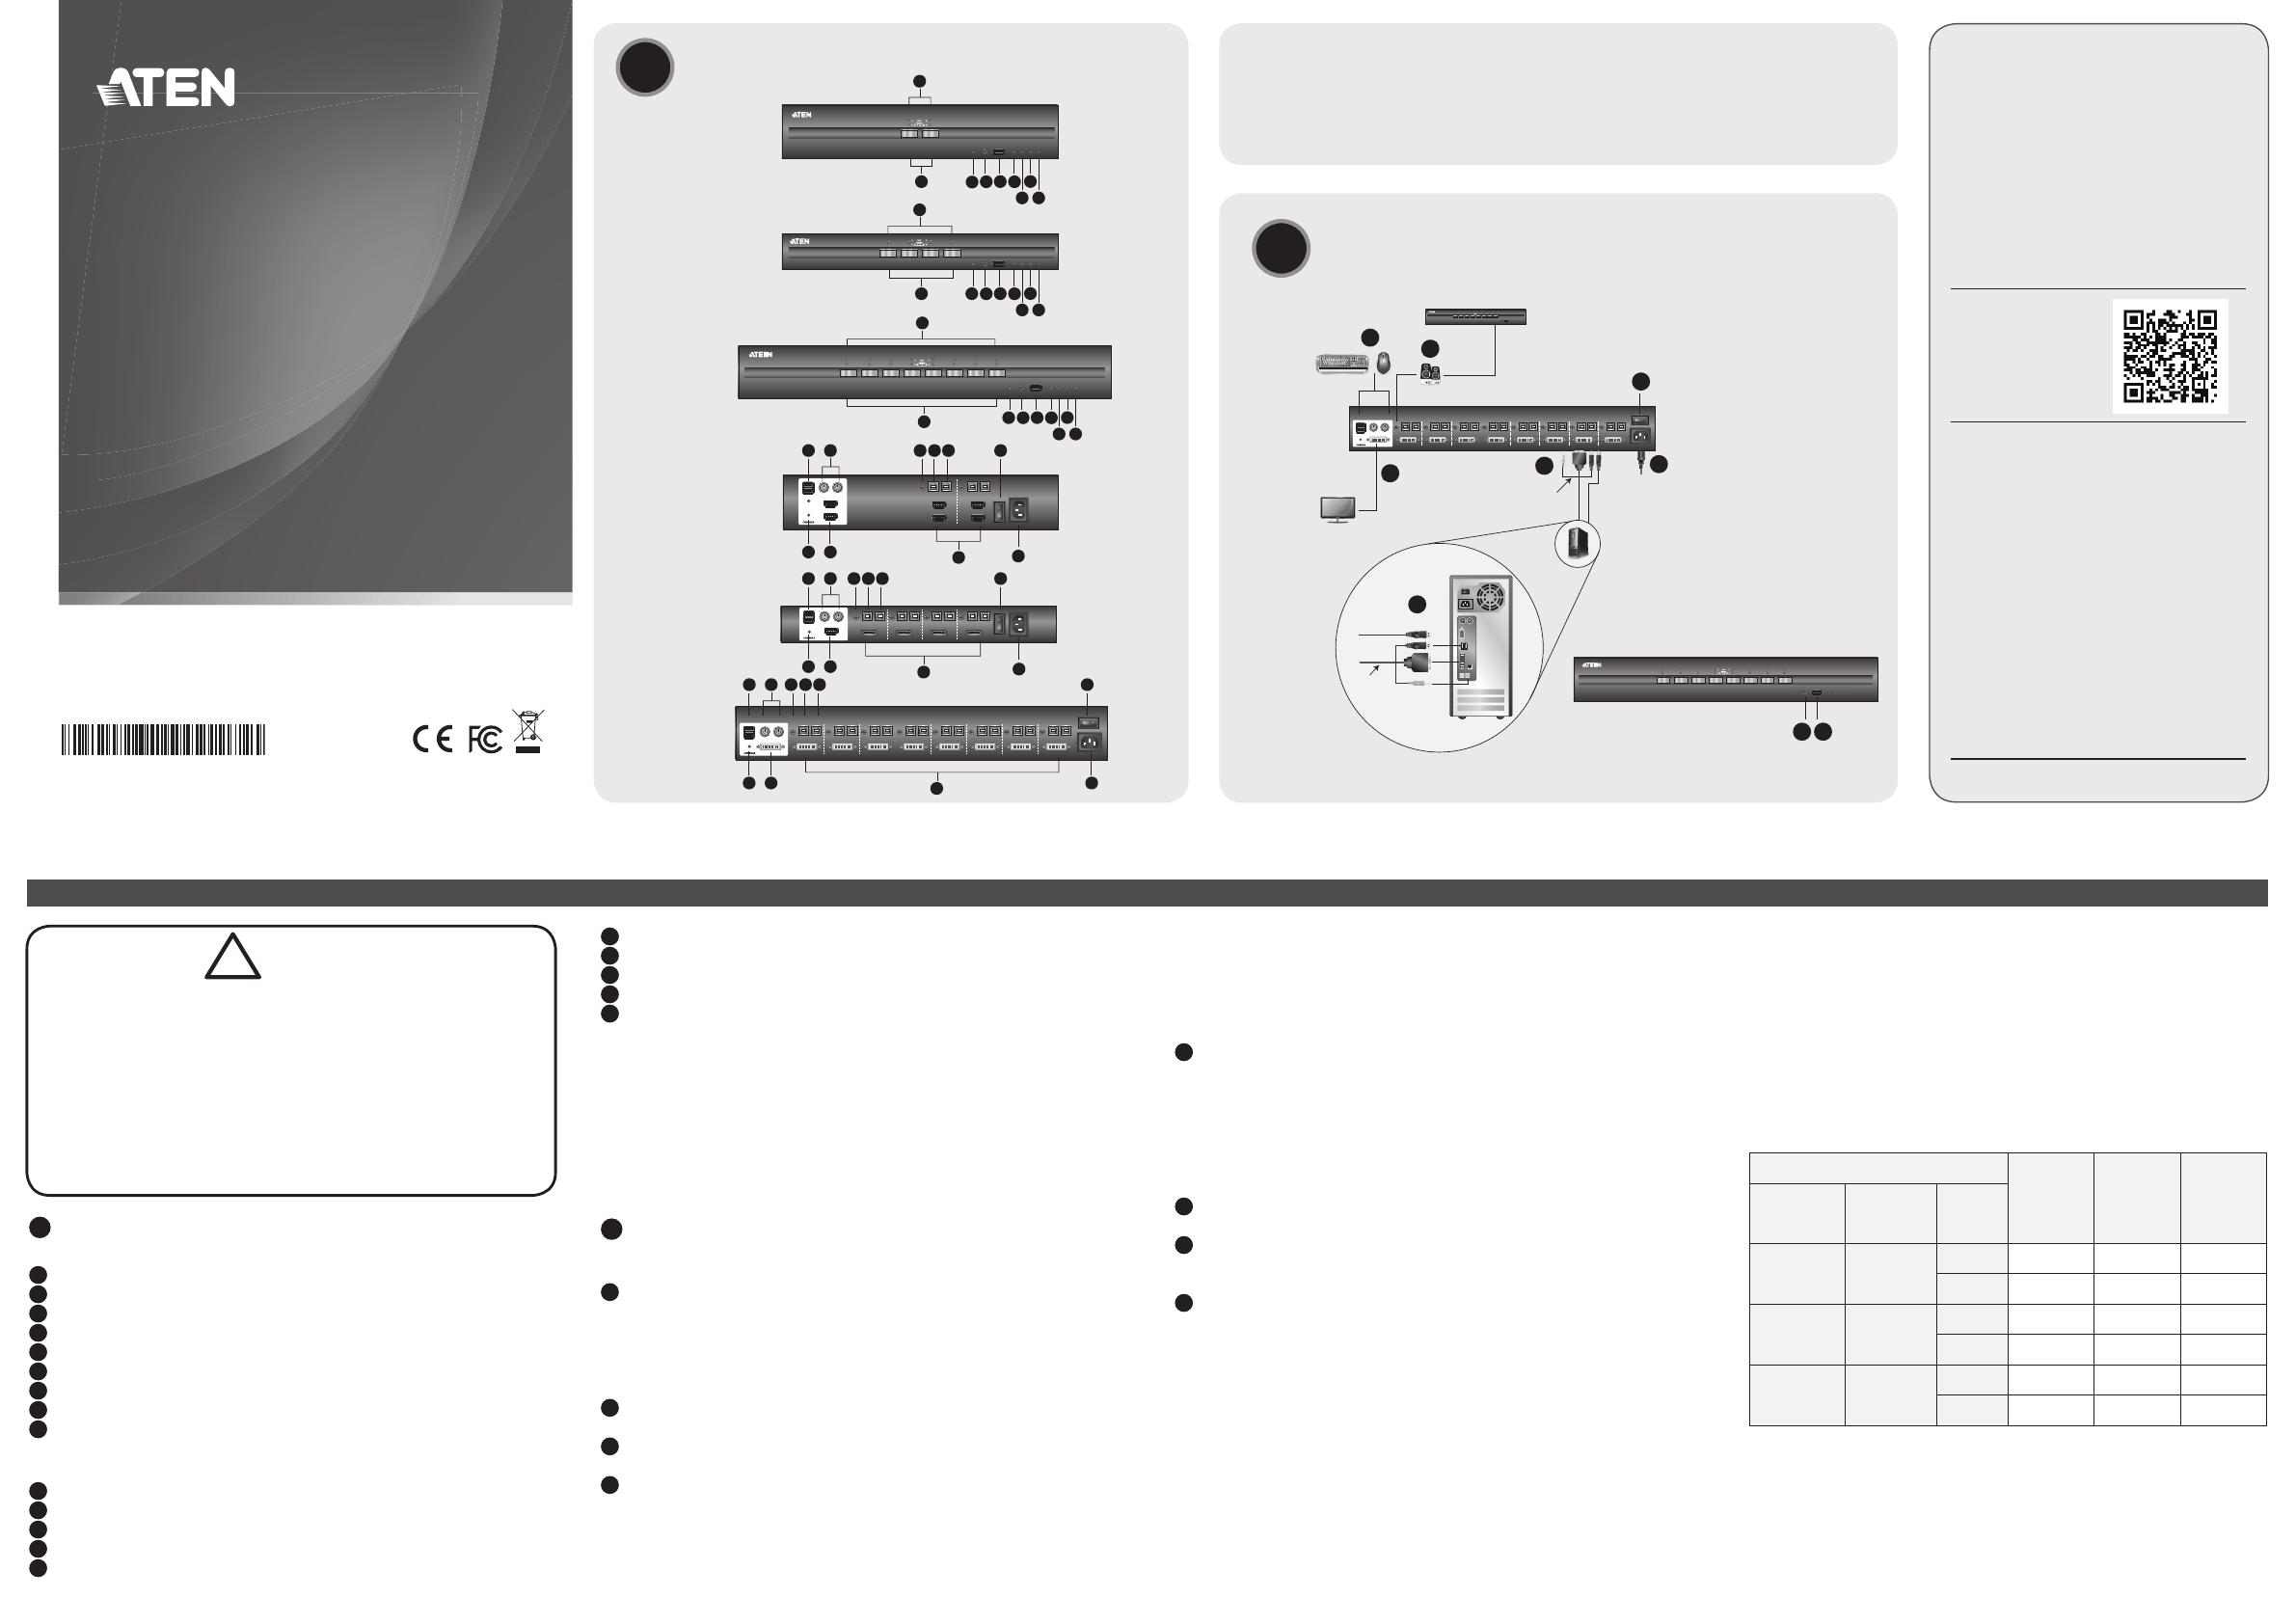
Front View
1 Port Selection Pushbuttons
2 Port and CAC LEDs
3 Reset Button
4 Audio Ports
5 USB Smart Card / CAC Reader Port
6 Num Lock LED
7 Caps Lock LED
8 Scroll Lock LED
9 Power LED
Rear View
1 USB Console Ports
2 PS/2 Console Ports
3 Video LED(s)
4 Console Monitor Port(s)
5 KVM Port Section
6 KVM Audio Port
7 KVM USB Port
8 USB Smart Card / CAC (Common Access Card) Reader Port
9 Power Switch
10 Power Socket
Note:
1. This Quick Start Guide uses CS1188D, CS1142H, and CS1184DP to
demonstrate each interface (DVI/HDMI/DisplayPort), port numbers
(2/4/8- Port), and number of displays (single/dual).
2. The console video on DisplayPort models only supports HDMI video
output.
3. All models support USB and PS/2 console keyboard/mouse and USB
CAC card reader port.
B
Hardware Installation
To set up your ATEN Secure KVM Switch, please refer to the diagram
and do the following:
1 Plug your standard USB keyboard and USB mouse into the USB
console ports located on the unit’s rear panel. (If you are using
PS/2 keyboard/mouse, plug your PS/2 keyboard and PS/2 mouse
into the corresponding PS/2 ports.)
ATTENTION: For security purposes, do not attempt to
connect a wireless keyboard to the switch.
2 Plug your console monitor(s) into the console video port(s) located
on the unit’s rear panel and power on the monitor.
3 Plug your speakers into the console's speaker jack located on the
unit’s front panel.
4 With a single-display Secure KVM Switch, using a KVM cable
set*, plug the video connector into any available video socket in
the KVM port section of the switch, then plug the accompanying
USB (keyboard/mouse or CAC) and speaker connectors into their
corresponding USB and speaker ports.
With a dual-display Secure KVM Switch, using a KVM cable
set*, plug the video connector for your primary monitor into any
available video socket A in the KVM port section of the switch,
then plug the accompanying USB (Keyboard/Mouse or CAC) and
speaker connectors into their corresponding USB and speaker
sockets.
5 At the other end of the KVM cable set, plug the USB, video, and
speaker cables into their respective ports on the computer. With
a dual-display Secure KVM Switch, use another video cable* for
your second monitor to plug the video connector into video socket
B on the same KVM port section of the switch. At the other end
of the video cable, plug the monitor cable into its respective port
on the computer. Repeat steps 4 and 5 for each computer you are
installing.
6 Plug the USB Smart Card / CAC reader to the CAC port on the
front panel.
7 Plug the female end of the power cord into the ATEN Secure KVM
Switches' power sockets; plug the male end into an AC power
source.
8 Turn on the ATEN Secure KVM Switch and check that the LEDs
light up. The ATEN Secure KVM Switch will start a self-test.
*Note: KVM cable sets or extra video cables are not provided and
must be purchased separately
Operation
Manual Switching
For increased security, the ATEN Secure KVM Switch offers manual
port-switching only. This is achieved by pressing the port selection
pushbuttons located on the unit’s front panel.
Press and release a port selection pushbutton to bring the KVM focus
to the computer attached to its corresponding port. The Selected
Port LED lights orange to indicate that the computer attached to its
BHardware Installation
© Copyright 2018 ATEN® International Co., Ltd.
ATEN and the ATEN logo are trademarks of ATEN International Co., Ltd. All rights reserved. All
other trademarks are the property of their respective owners.
Part No. PAPE-1223-L30G Printing Date: 03/2018
2/4/8-Port USB DVI/HDMI/DisplayPort Single/
Dual Display Secure KVM Switch
Quick Start Guide
PP3.0 Secure KVM Switch Series
2/4/8-Port USB DVI/HDMI/DisplayPort Single/Dual Display Secure KVM Switch www.aten.com
corresponding port has the KVM focus. To meet maximum security
and channel isolation requirements, keyboard, mouse, video, audio,
and USB CAC reader ports will be switched together.
Chassis Intrusion Detection
To help prevent malicious tampering, the switch becomes inoperable
and all front panel LEDs (except the Power LED) fl ash constantly when
a chassis intrusion (such as the cover being removed) is detected.
This QSG covers the following ATEN Secure KVM
Switches:
Confi guration
2-Port 4-Port 8-Port
PC Video
Connection
Console
Video
Connection
No. of
Displays
DisplayPort HDMI Single CS1182DP CS1184DP CS1188DP
Dual CS1142DP CS1144DP CS1148DP
HDMI HDMI Single CS1182H CS1184H CS1188H
Dual CS1142H CS1144H CS1148H
DVI DVI Single CS1182D CS1184D CS1188D
Dual CS1142D CS1144D CS1148D
Package Contents
1 Secure KVM Switch
1 Power Cord
1 User Instructions*
*Note: Please visit our website for the latest version of the user manual:
http://www.aten.com
Support and Documentation Notice
All information, documentation, fi rmware,
software utilities, and specifi cations
contained in this package are subject to
change without prior notifi cation by
the manufacturer.
To reduce the environmental impact of our
products, ATEN documentation and software
can be found online at
http://www.aten.com/download/
Technical Support
www.aten.com/support
Scan for
more information
EMC Information
FEDERAL COMMUNICATIONS COMMISSION INTERFERENCE STATEMENT:
This equipment has been tested and found to comply with the limits for
a Class B digital service, pursuant to Part 15 of the FCC rules. These limits
are designed to provide reasonable protection against harmful interference
in a residential installation. Any changes or modifi cations made to this
equipment may void the user s authority to operate this equipment. This
equipment generates, uses, and can radiate radio frequency energy. If not
installed and used in accordance with the instructions, may cause harmful
interference to radio communications. However, there is no guarantee that
interference will not occur in a particular installation. If this equipment
does cause harmful interference to radio or television reception, which
can be determined by turning the equipment off and on, the user is
encouraged to try to correct the interference by one or more of the
following measures:
- Reorient or relocate the receiving antenna;
- Increase the separation between the equipment and receiver;
- Connect the equipment into an outlet on a circuit different from
that to which the receiver is connected;
- Consult the dealer/an experienced radio/television technician for help.
FCC Caution: Any changes or modifi cations not expressly approved by the
party responsible for compliance could void the user's authority to operate
this equipment.
This device complies with Part 15 of the FCC Rules. Operation is subject
to the following two conditions: (1) this device may not cause harmful
interference, and (2) this device must accept any interference received,
including interference that may cause undesired operation.
AHardware Review
!ATTENTION
If the tamper-evident seal is missing or peeled, avoid using the product
and contact your ATEN dealer.
If all front panel LEDs fl ash continuously (except the Power LED), or
the switch’s enclosure appears breached, avoid using the product and
contact your ATEN dealer.
This Secure KVM Switch is equipped with active always-on chassis
intrusion detection security. Any attempt to open the enclosure
will cause permanent damage and disable the switch, and void the
warranty.
4
1
2
7
8
9
56
4
1
2
3
7
8
9
56
3
4
1
2
3
7
8
9
56
3
21
CS1142H
Rear View
CS1184DP
Rear View
CS1188D
Rear View
CS1142H
Front View
CS1184DP
Front View
CS1188D
Front View
4
6
5
3 4 5
3 4 5
7 9
10
10
8
21 6 7 98
21 6 7 9
10
8USB Video
KVM Cable Set
USB cable for
CAC reader
USB Video
KVM Cable Set USB Type B-to-A cable
for CAC Reader
CS1188D (Front)
CS1188D (Rear)
1
8
7
3
4
2
5
63
Speakers to front panel
이 기기는 가정용(B급) 전자파적합기기로서 주로 가정에서 사용하
는 것을 목적으로 하며, 모든 지역에서 사용할 수 있습니다.
