MOUNTING THE BATTERY
Warning: For safety reasons, a cyclist should never be
tethered to the bike. If the headlamp is mounted to the
helmet, do not mount the battery to the frame. Conversely, if
the headlamp is mounted to the handlebar, do not place the
battery in a pocket or pack.
Frame Mount
1. Thread the velcro straps through the 2 slots on the bottom
of the battery.
2. Attach the concave surface of the battery to a safe,
convenient location on the frame (typically under the top or
down tube), placing the velcro strap over the tube, but under
any shift or brake cables. The cable from the
battery should extend toward the stem.
3. Secure the headlamp and battery cable to the frame using
the thin velcro strapettes. Make sure the cables do not
interfere with any moving parts.
Pocket or Pack
1. Route the 36” extension cable through a helmet vent or
along the outside of the helmet using the thin velcro
strapette to secure the cable.
2. Connect the 36” extension cable to the battery, making sure
the cable does not interfere with any moving parts.
3. Simply place the battery in a pocket or pack.
OPERATION
1. Connect the headlamp cable to the battery.
2. Press and release the headlamp power button to turn the
light on. Cycle through the three brightness levels by
pressing and releasing the power button.
3. To access the daylight saftey ash mode, press and hold the
power button until the headlamp starts to ash.
4. With the headlamp in ash mode, press and release the
power button to access Beacon, S.O.S. or Walk. From walk
mode you can return to normal mode by
pressing and releasing the power button.
5. To turn the headlamp o from normal, ash or walk modes,
press and hold the power button until the headlamp
shuts o.
6. Always disconnect the battery from the headlamp when
transporting the light system to prevent accidentally turning
on the headlamp which may cause overheating and potential
damage from high heat or even a risk of re.
PROTECTING YOUR INVESTMENT
Properly charge your battery to maximize its lifespan (see the
“Battery Charging and Care” section for detailed information).
The Pro 1800 Race will perform in wet weather conditions, but
submerging it in water will damage the system.
SUPPORT
If you experience diculties during product installation or
operation, NiteRider® provides free telephone support on
weekdays from 8:00 AM to 4:30 PM (Pacic Time)
at 800.466.8366, ext 4. You may also e-mail us at
help@niterider.com
WARRANTY
NiteRider® stands behind its products with the following
warranties:
•Lifetimewarrantyonallmechanicalcomponents
•2yearsonelectricalcomponents
•180daysonrechargeablebatteries
To obtain warranty service, it is preferable to have your
original sales receipt. Contact the NiteRider® customer
service department at 800.466.8366, ext 4 to obtain a Return
Merchandise Authorization (RMA) number. The RMA number
must be prominently displayed on the outside of your package.
The product must be properly packaged to prevent damage in
transit. For complete warranty information, please visit
our website at www.niterider.com.
RUNTIMES-PRO1800RACE
Low - 6:00h at 400 Lumens
Medium - 3:00h at 700 Lumens
High - 1:30h at 1800 Lumens
Flash - 25:00h
Beacon - 25:00h
S.O.S. - 25:00h
Walk - 25:00h at 80 Lumens
NiteRider® Technical Lighting Systems, Inc.
12255 Crosthwaite Circle, Suite A
Poway, CA 92064
www.niterider.com
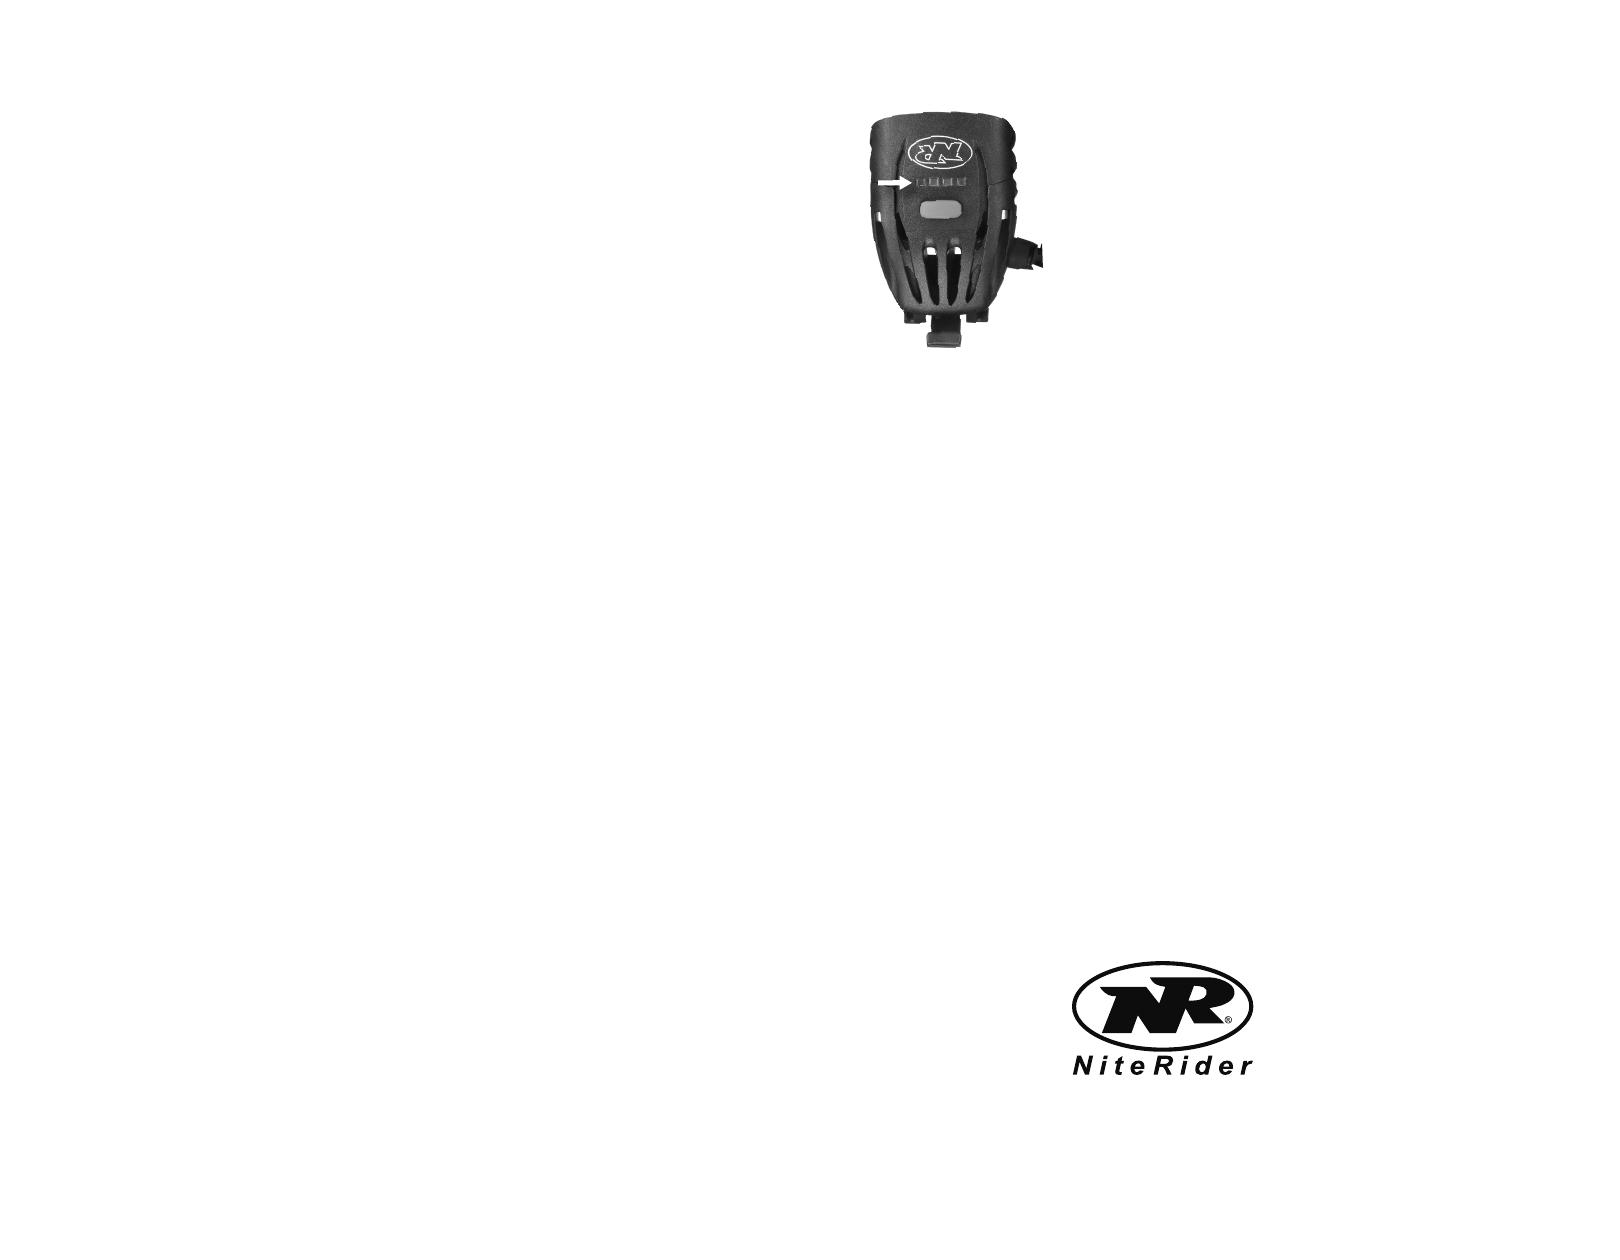
Fuel Gauge
The 8-step, LED fuel gauge is located
on top of the headlamp in front of the
power button. When all four LED’s
are lit solid green, the battery is fully
charged. As the battery discharges ⅛
increments of capacity, the LED’s from
right to left, successively go from solid
to blinking green, to out. With only the
nal ⅛ capacity remaining one LED
blinks red. At this time, the headlamp
should be turned o and the battery
recharged.
BATTERY CHARGING AND CARE
1. Plug the AC Power Adapter into an electric outlet, then plug
the cable from the AC Power Adapter into the battery.
2. The indicator light will be red until the battery is fully charged;
then it changes to blue.
3. Unplug the AC Adapter from the battery by grasping the
connectors rather than the cable.
4. Leaving the battery and AC Adapter connected indenitely
will not harm the batteries.
5. When storing for an extended period of time, charge battery
every three months to maximize battery life.
RIDING AT NIGHT
While a Pro 1800 Race lighting system will improve your view,
control and enjoyment of night riding, please remember that
cycling at night is an inherently dangerous activity. In addition
to using your lighting system properly and riding with extreme
caution, NiteRider® urges you to:
•Neverridealone
•Alwaysletsomeoneknowwhereyouaregoing
•Wearahelmetandreectiveclothing
•Carryanauxiliarylightandemergencysupplies
•Makesuretheheadlamp,mountingbracketandbattery
are securely fastened
•Alwaysdisconnectthebatteryfromtheheadlampwhen
transporting the light system


 1
1
 2
2


Silva Trail Speed 5XT User manual
moon ADJ-1300 & ADJ-950 User manual
Ducati SUPERSPORT Owner's manual
Moon Sport X-Power 2500 & X-Power 1800 User manual
Buell XB Series Owner's Manual's
BMW R 1150 GS + Adventure User manual
HERO Destini Prime Owner's manual