Page is loading ...

Service Manual
Phaser
™
480 and Phaser
™
480X
Color Printers
Warning
The following servicing instructions are for
use by qualified service personnel only. To
avoid personal injury, do not perform any
servicing other than that contained in
operating instructions unless you are qualified
to do so.
This printing June 1995
070-8850-01

Copyright
©
1995 by Tektronix, Inc., Wilsonville, Oregon. Printed in the United States of America. All rights
reserved. Contents of this publication may not be reproduced in any form without permission of Tektronix, Inc.
This instrument, in whole or in part, may be protected by one or more U.S. or foreign patents or patent applications.
Information provided upon request from Tektronix, Inc., P.O. Box 1000, Wilsonville, Oregon 97070-1000.
If acquired subject to FAR or DFARS, the following shall apply:
■
Unpublished — rights reserved under the copyright laws of the United States.
■
Restricted Rights Legend — Use, duplication or disclosures by the government is subject to restrictions as set forth
in subparagraph (c) (1) (ii) of the Rights in Technical Data and Computer Software at DFARS 252.227-7013, or in
subparagraph (c) (2) of the Commercial Computer Software – Restricted Rights clause at FAR 52.227-19, as
applicable. Tektronix, Inc., P.O. Box 1000, Wilsonville, Oregon 97070-1000.
Tektronix
®
is a registered trademark of Tektronix, Inc. TekColor™ and Photofine™ are trademarks of Tektronix, Inc.
Phaser™ is a trademark of Tektronix, Inc. for color printers and related products.
Adobe™ and PostScript™ are trademarks of Adobe Systems, Incorporated which may be registered in certain
jurisdictions.
Times™, Helvetica™ and Palatino™ are trademarks of Linotype-Hell AG and/or its subsidiaries.
Other marks are trademarks or registered trademarks of the companies with which they are associated.
PANTONE
®
* Colors generated by the Phaser 480 and Phaser 480X Color Printers are four-color process simulations
and may not match PANTONE-identified solid color standards. Use current PANTONE Color Reference Manuals
for accurate colors.
PANTONE Color simulations are only obtainable on these products when driven by qualified Pantone-licensed
software packages. Contact Pantone, Inc. for a current list of qualified licensees.
* Pantone, Inc.’s check-standard trademark for color reproduction and color reproduction materials.
© Pantone. Inc., 1988.

Users safety summary
Terms in manual:
CAUTION Conditions that can result in damage to the product.
WARNING Conditions that can result in personal injury or loss of life.
Power source:
Do not apply more than 250 volts RMS between the supply conductors or between either supply
conductor and ground. Use only the specified power cord and connector. Refer to a qualified service technician for
changes to the cord or connector.
Operation of product:
Avoid electric shock by contacting a qualified service technician to replace fuses inside the
product. Do not operate without the covers and panels properly installed. Do not operate in an atmosphere of
explosive gases.
Safety instructions:
Read all installation instructions carefully before you plug the product into a power source.
Terms on product:
CAUTION A personal injury hazard exists that may not be apparent. For example, a panel
may cover the hazardous area. Also applies to a hazard to property including the
product itself.
DANGER A personal injury hazard exists in the area where you see the sign.
Care of product:
Disconnect the power plug by pulling the plug, not the cord. Disconnect the power plug if the
power cord or plug is frayed or otherwise damaged, if you spill anything into the case, if product is exposed to any
excess moisture, if product is dropped or damaged, if you suspect that the product needs servicing or repair, and
whenever you clean the product.
Ground the product:
Plug the three-wire power cord (with grounding prong) into grounded AC outlets only. If
necessary, contact a licensed electrician to install a properly grounded outlet.
Symbols as marked on product:
DANGER high voltage:
Protective ground (earth) terminal:
Use caution. Refer to the manual(s) for information:
WARNING:
If the product loses the ground connection, usage of knobs and controls (and other conductive parts) can
cause an electrical shock. Electrical product may be hazardous if misused.
!

Service safety summary
For qualified service personnel only:
Refer also to the preceding Users Safety Summary.
Do not service alone:
Do not perform internal service or adjustment of this product unless another person capable of
rendering first aid or resuscitation is present.
Use care when servicing with power on:
Dangerous voltages may exist at several points in this product. To avoid
personal injury, do not touch exposed connections and components while power is on.
Disconnect power before removing the power supply shield, soldering, or replacing components.
Do not wear jewelry:
Remove jewelry prior to servicing. Rings, necklaces, and other metallic objects could come into
contact with dangerous voltages and currents.
Power source:
This product is intended to operate from a power source that will not apply more than 250 volts rms
between the supply conductors or between either supply conductor and ground. A protective ground connection by
way of the grounding conductor in the power cord is essential for safe operation.

Service Manual
E-1
Appendix
E
Shipping the Printer
Repacking the printer
1.
Turn off the printer; remove all cords and cables.
2.
Slide the cover release to open the top cover.
Caution
To keep your warranty valid, the printer must be shipped in its
Tektronix shipping box, taking reasonable care to repack it properly.
Failure to do so will result in damage to the printer.
3.
Remove the paper tray and repack it for shipping:
a.
Insert the two small foam shipping blocks into the paper tray on
either side of the metal plate.
b.
Secure the cover to the paper tray. Use masking tape.
Note
If you are shipping the printer for service, you do not need to return
the paper tray.
4.
Remove the transfer roll tray; remove the transfer roll from the tray
and wrap the tray in packing material.

E-2
Phaser 480 Color Printer
E
Shipping the Printer
5.
Insert the medium-sized foam shipping block inside the printer
behind the paper guide.
6.
Attach the long foam shipping block to the paper clamp bar:
a.
Use the black rubber belt to move the paper clamp bar so that it is
positioned directly over the label
Position paper clamp bar HERE to clear
a paper jam
.
b.
Insert the shipping block under the paper clamp bar.
c.
Use the two tie-wraps to secure the block to the paper clamp bar.
Attach them on the right-hand side where there is open space
beneath the paper clamp bar. Make sure that they are tightly
secured.
5
8849-71
6a
6b
6c

Service Manual
E-3
Shipping the Printer
E
7.
Place the two rubber cushions, marked
L
(left) and
R
(right), onto the
metal bar on either side of the platen. Make sure that the rubber
cushions are positioned with the posts
upright
(or
leaning slightly
forward)
and
facing outward
as shown.
Caution
The rubber cushions protect the printhead. If they are positioned
incorrectly, the printhead will be damaged in shipping.
8.
Replace the transfer roll tray inside the printer.
9.
Close the top cover; the printhead must be resting on the rubber
cushions.
10.
Secure the top cover closed. Use masking tape.
L
8849-73
L
7

E-4
Phaser 480 Color Printer
E
Shipping the Printer
11.
Repack the printer in the Tektronix shipping box. Keep the printer
level when moving.
8849-50
Phaser
480
ERROR JAM MEDIA
TRANSFER
ROLL
COVER READY POWER

Service Manual
1-1
Chapter
1
General Information
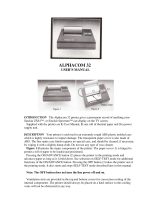
This field service manual contains information you may use for troubleshooting,
repairing, adjusting, and maintaining the Tektronix Phaser™ 480 and
Phaser™ 480X Color Printers. This manual includes troubleshooting and
adjustment procedures, a field replaceable units (FRU) list, and
assembly/disassembly procedures for selected FRUs. To ensure complete
understanding of the product Tektronix recommends participation in Phaser 480
and 480X service training, if available.
Figure 1-1. The Phaser 480 Color Printer
Phaser
480
ERROR
JAM
MEDIA
TRANSFER
ROLL
COVER
READY
POWER
1
2
3

1-2
Phaser 480 Color Printer
1
General Information
The Phaser 480 Color Printer
The Phaser 480 Color Printer combines sublimation dye printing technology
with Adobe’s PostScript Level 2 page description language. The Phaser 480
features RS-232 serial, standard parallel and AppleTalk interfaces for host
communication. Ethernet, TCP-IP or Novell support is optionally available.
The printer also features a SCSI-compatible interface to connect to an external
hard disk drive for font storage. The Phaser 480 can produce prints on A/A4
and B/A3-size media as well as 12 x 18-inch Tabloid Extra (366 x 457 mm). It
prints at an addressability of 300 dots-per-inch on both dye diffusion paper and
transparency film. The printer, in its base configuration, features 32 Mbytes of
RAM SIMM and two additional SIMM sockets for two more 16 Mbyte RAM
SIMMs. With both sockets filled, the printer boasts of 64 Mbytes of RAM.
The Phaser 480X Color Printer
The Phaser 480X Color Printer has the same features and capabilities as the
Phaser 480 but with more capabilities to serve customers with color pre-press
needs. The Phaser 480X has the ability to create image separations and printing
revealing overprinting and trapping information. It also ships with improved
color calibration tools.
The Phaser 480X also has a greater RAM memory capacity. Unlike the
Phaser 480, the Phaser 480X can use 32 Mbytes SIMMs in the first three of its
four RAM SIMM connectors, giving the Phaser 480X a potential total RAM
memory capacity of 112 Mbytes. In its base configuration, the printer is shipped
with one 32 Mbyte RAM SIMM in its first RAM SIMM connector.
The following table shows the increasing capabilities of the Phaser 480X with
incremental increases in installed RAM.
Table 1-1. Phaser 480X capabilities with increases in RAM
Total RAM
memory
Printing capabilities Separation
printing
Color
cache
Virtual
memory
Buffers
32 Mbytes 3-pass on all page
sizes
No 100 kbytes 2 Mbytes 128 kbytes
48 Mbytes 4-pass on all page
sizes
No 500 kbytes 4 Mbytes 1 Mbytes
64 Mbytes 4-pass on all page
sizes
No 8 Mbytes 7 Mbytes 2 Mbytes
80 Mbytes 4-pass on all page
sizes
No 8 Mbytes 23 Mbytes 2 Mbytes
96 Mbytes 4-pass on all page
sizes
Yes 8 Mbytes 3 Mbytes 2 Mbytes
112 Mbytes 4-pass on all page
sizes
Yes 8 Mbytes 19 Mbytes 2 Mbytes

Service Manual
1-3
General Information
1
Sublimation dye printing
Dye sublimation printing is an extension of thermal wax transfer printing.
Many of Tektronix’ current and previous printers are based on thermal-wax
transfer technology. During the dye sublimation printing process, transfer roll
dye, in contact with a sheet of special paper, is vaporized (sublimed) into the
surface of the paper by an electronically controlled thermal head. The thermal
head features individually controllable heating elements at 300 elements per
inch that span the width of the printing paper and the transfer roll. The
temperature of each element can be controlled so that a specific amount of dye is
vaporized into the paper. This allows the printer to produce a remarkably wide
range of colors and shades with detailed precision.
The printer, using the subtractive color method, transfers sequential layers of
yellow, cyan, magenta, and black dye into the paper to create its full gamut of
color.
The printing paper is an ultra-smooth material. Since the transferred dye
penetrates and bonds into the surface of the paper, the prints are durable and do
not scratch, rub off, or retransfer to other materials.
Regarding printer service
There are only a few field replaceable units (FRUs) for the printer. Based on the
problem, servicing the printer generally involves:
■
adjusting the printer
■
replacing the image processor board or its SIMMs
■
replacing the power supply or engine control board
■
replacing certain printer rollers
■
replacing the print engine
With this in mind, before you travel to a customer site, you should contact the
customer, and to the extent possible, try and troubleshoot the printer to the point
that you are reasonable sure whether or not you must replace the print engine.
To troubleshoot the printer “over the phone” you can work with the customer
and follow the step-by-step troubleshooting procedure described at the
beginning of Section 6
Troubleshooting
. This way you can determine whether or
not you must bring a replacement print engine to the customer site.

1-4
Phaser 480 Color Printer
1
General Information
Print engine assemblies
The following illustrations point out external and internal assemblies of the
printer.
Figure 1-2. Print engine front view
Figure 1-3. Print engine rear view
8850-02
Paper stop
Paper stop
Top cover
Front panel
Paper tray
Power switch
Left side
Phaser
480
ERROR JAM MEDIA
TRANSFER
ROLL
COVER READY POWER
8849-03
LocalTalk®
Serial
(RS-232)
Status
SCSI
Parallel
PHASER 480
MODEL 4688
*
See User Manual
Reset
Run
Variable
1 2 3 4 5 67
8 9
Diagnostics
1200
Baud Rate
Skip
Run
Startjob
**
Color Correction
*
Ethernet®
Not Installed
Upper rear cover
Lower rear cover
Rear panel of
image processor board
Power cord
receptacle

Service Manual
1-5
General Information
1
Figure 1-4. Print with top cover open
Figure 1-5. Print engine interior
8850-04
Thermal head
Right side cover
Top cover release
Transfer
roll
8849-05
Pinch roller
Idle roller
Timing belt
Paper clamp bar
Platten

1-6
Phaser 480 Color Printer
1
General Information
Figure 1-6. Sensors and switches locations
8850-06
Clutch B
Upper transfer
roll sensor
Left step motor
Clutch gear
Exit sensor
Right stepper motor
Clutch F
Clutch
feed
Paper size sensor
Pick solenoid
Paper clamp sensor
Print start sensor
Lower transfer
roll sensor
Paper sensor
Paper stop sensor

Service Manual
1-7
General Information
1
Rear panel
The rear panel features the host interface connectors to the printer. They include
the following connectors:
■
Standard parallel
■
RS-232 serial
■
LocalTalk
■
SCSI (hard disk for downloaded font storage only)
■
Ethernet AAUI
About the Ethernet AAUI connector
Activating the Ethernet AAUI connector is optional as indicated by “not
installed” printed above the connector. Installing the Ethernet card on the image
controller board activates the Ethernet connector. The Ethernet card contains the
hardware and code to support the EtherTalk, TCP-IP and Novell network
protocols. The Ethernet card also comes with an “installed” sticker to place over
the rear panel text “not installed.”
The TCP/IP protocol is activated by a printer-specific authorization code, sold as
a separate option. Simply installing the Ethernet card does not activate TCP/IP.
Refer to the Section 2 topic “About installing an Ethernet card” on page 1-8.
DIP switches
The rear panel features a bank of DIP switches to control certain aspects of the
printer's imaging. You can also use the DIP switches to control the self-tests of
the printer’s image processor board. Refer to the Chapter 6 topic “Image
processor self-diagnostics.”
Figure 1-7. The Phaser 480 rear panel
8849-07
LocalTalk®
Serial
(RS-232)
Status
SCSI
Parallel
PHASER 480
MODEL 4688
Ethernet®
*See User Manual
Reset
Run
Variable
1 2 3 4 5 6 7
8 9
Diagnostics
1200
Baud Rate
Skip
Run
Startjob
**
Color Correction
*
Not Installed

1-8
Phaser 480 Color Printer
1
General Information
Health LED
A single health LED indicates the status of the printer’s image processor board.
■
Blinking
(at a steady rate): The printer is operating normally. The LED
blinks irregularly during diagnostics.
■
On or Off
: A hard error condition has occurred that would keep the
image processor board from operating.

Service Manual
1-9
General Information
1
Rear panel DIP switches
The Phaser 480's rear panel DIP switches control the functions of the printer.
Combine the switch settings listed in the table below to customize the printer to
the users' operating needs.
For normal operation, the switches are usually in the
off
position.
Table 1-2. Normal operation — Phaser 480 rear panel DIP switches
Switch Position
(
↑
means ON)
123456789 Normal operation modes
---------
Serial interface at variable rate, 38400 baud maximum.
Following power-up, look for and execute start-up file stored
on attached SCSI disk drive. No color adjustments.
↑
--------
Reset.
Off
for normal printer operation.
---
↑
-----
Print a configuration page. Following power-up flip this switch
up and down to print a configuration page.
----
↑
----
Following power-up, do not look for start-up file stored on
attached SCSI disk drive.
-----
↑
---
Switch up — Cleaning mode active. Refer to Chapter 7,
Cleaning and Maintenance for more information.
------
↑
--
Serial interface at fixed 1200 baud rate (switch
up
); variable
rate (switch
down
) with a 38400 baud maximum.
-------
↑
-
Switch
up
— Vivid Blue Adjust active, alters the shade of blue
to be less purple. The switch change is effective immediately.
Switch
down
-- no color adjust. If color correction is sent with
the print job, then this switch setting is ignored for that print
job. Refer to the
Phaser 480 Drivers and Utilities Printing
Reference
manual for more information.
--------
↑
Switch
up
— Press Color Adjust active, alters the output to
more closely match printing press output. The default is
SWOP color corrections. The switch change is effective
immediately. If color correction is sent with the print job, then
this switch setting is ignored for that print job.
Switch
down
— no color adjust. Refer to the
Phaser 480
Drivers and Utilities Printing Reference
manual for more
information.
NVRAM reset. The position of Switch 9 is read at power-up
and after a reset. If it is in the
up
position, then immediately
following self-diagnostics, the rear panel LED flashes for 10
seconds in a 4-flash-per-second rate. During this time, if you
flip Switch 9 to the down position, then all persistent
parameters, except the copy count and the serial number,
reset to their factory default settings.
-------
↑↑
Switches
up
— The color correction page device setting
stored in NVRAM is used with each received print job unless
the printjob has its own color correction settings. The factory
default value is Vivid Blue.

1-10
Phaser 480 Color Printer
1
General Information
You must toggle Switch 1
on
and
off
to reset the printer and enable most switch
changes (Switches 8 and 9 are acted upon immediately). Alternatively, turning
the printer off for 10 seconds and then powering it on again also resets the
printer and enables the new DIP switch setting.
Front panel
The front panel consists of seven LEDs indicating the printer's normal operating
status.
POWER:
Illuminates to indicate that the power supply is generating +5 VDC.
READY:
On
indicates the printer is idle.
Blinking
indicates the printer is
receiving and processing data.
Off
indicates that the printer is not ready, not
working, or there is an error.
COVER:
On
indicates the top cover is open.
TRANSFER ROLL:
On
blinking indicates the transfer roll is empty and must be
replaced.
MEDIA:
On
blinking indicates that the paper tray is empty.
JAM:
On
indicates a jam has occurred inside the printer.
ERROR:
On
indicates a hardware engine error has occurred.
Figure 1-8. The front panel
8850-08
ERROR JAM MEDIA
TRANSFER
ROLL
COVER READY POWER

Service Manual
1-11
General Information
1
Specifications
Table 1-3. Physical dimensions
Dimensions Value
Height 34 cm. (13.4 ins.)
Width: 52 cm (20.5 ins.)
Depth: 57 cm (22.5 ins.) Without paper tray
Weight: Approximately 41 kgs (90.2 lbs.) Print engine, paper tray and
transfer roll weight only
Table 1-4. Printer clearances
Clearances Value
Top: 84 cm (33 ins.)
Left: 10 cm (4 ins.)
Right: 10 cm (4 ins.)
Front Unrestricted to replace trays and transfer rolls
Rear 10 cm (4 ins.)
Bottom No obstruction under printer that could block its cooling
vents.
Mounting surface
flatness
Within 5 degrees of horizontal with all four feet in contact with
the surface.

1-12
Phaser 480 Color Printer
1
General Information
Table 1-5. Functional specifications
Characteristic Specification
Printing process Sequential sublimation dye transfer printing.
Transfer rolls Dye-impregnated transfer rolls. The printer automatically
senses the transfer roll type by the coding on the leading edge
of the yellow band.
A3/B-size 3-Color Transfer Roll features sequential bands of
yellow, cyan, and magenta; 215 prints per roll.
A3/B-size 4-Color Transfer Roll features sequential bands of
black, yellow, magenta and cyan; 160 prints per roll.
A4/A-size 4-Color Transfer Roll features sequential bands of
black, yellow, magenta and cyan; 210 prints per roll.
Black Transfer Roll features all black panels; 650 A, A4, B, A3,
or WB prints per roll.
Addressability 300 dots-per-inch (11.8 dots-per-mm) — horizontal and
vertical.
Color addressability 8 bits per pixel, 256 levels per color
Media sizes A, A4, B, A3, WB (320 x 465 mm)
Engine printing speed Time from paper load to paper eject:
Full-size A3/B-size image with 3-Color Transfer Roll: about
180 seconds per print.
Full-size A3/B-size image with 4-Color Transfer Roll: about
220 seconds per print.
Full-size A4/A-size image with 4-Color Transfer Roll: about
150 seconds per print.
Print times do not include image processing time by the
image processor which varies due to image complexity.
Minimum printing
margins (±3 mm,
0.12 in.)
B-size A3-size A-size A4-size WB
Top 0.71 in. 18 mm 0.71 in. 18 mm 18 mm
Bottom 0.24 in 5.7 mm 0.24 in. 6.0 mm 10.8 mm
Left/right 0.14 in. 3.6 mm 0.14 in. 3.4 mm 8.6 mm
/