Page is loading ...

HEAD OFFICE:M ITSUBISHI DENKI BLDG MARUNOUCHI TOKYO 100-8310
Printed in JapanIB(N A )-0600042-A (0007)M EE
Specifications subject to change w ithout notice.
TRANSISTORIZED INVERTER
INSTRUCTION M ANUAL
FR -A T
SPEED SELECTO R

A-1
Thank you for choosing this Mitsubishi transistorized Inverter option.
This instruction manual gives handling information and precautions for use of this
equipment.
Incorrect handling might cause an unexpected fault. Before using the equipment,
please read this manual carefully to use the equipment to its optimum.
Please forward this manual to the end user.
This section is specifically about safety matters
Do not attempt to install, operate, maintain or inspect this product until you have
read through this instruction manual and appended documents carefully and can
use the equipment correctly.
Do not use this product until you have a full knowledge of the equipment, safety
information and instructions.
In this instruction manual, the safety instruction levels are classified into
“WARNING” and “CAUTION”.
WARNING
Assumes that incorrect handling may cause hazardous
conditions, resulting in death or severe injury.
CAUTION
Assumes that incorrect handling may cause hazardous
conditions, resulting in medium or slight injury, or may
cause physical damage only.
Note that the CAUTION level may lead to a serious consequence according to
conditions. Please follow the instructions of both levels because they are important
to personnel safety.

A-2
SAFETY INSTRUCTIONS
1. Electric Shock Prevention
WARNING
While power is on or when the inverter is running, do not open the front cover.
You may get an electric shock.
Do not run the inverter with the front cover removed. Otherwise, you may access
the exposed high-voltage terminals or the charging part of the circuitry and get
an electric shock.
If power is off, do not remove the front cover except for wiring or periodic
inspection. You may access the charged inverter circuits and get an electric
shock.
Before starting wiring or inspection, switch power off, wait for more at least 10
minutes and check for the presence of any residual voltage with a meter etc.
Earth the option unit.
Any person who is involved in the wiring or inspection of this equipment should
be fully competent to do the work.
Always install the inverter before wiring. Otherwise, you may get an electric
shock or be injured.
Operate the switches with dry hands to prevent an electric shock.
Do not subject the cables to scratches, excessive stress, heavy loads or
pinching. Otherwise, you may get an electric shock.
2. Fire Prevention
CAUTION
Mount the option unit on an incombustible surface. Installing the inverter or
option unit directly on or near a combustible surface could lead to a fire.
If the inverter has become faulty, switch off the inverter power. A continuous flow
of large current could cause a fire.
3. Injury Prevention
CAUTION
Apply only the voltage specified in the instruction manual to each terminal to
prevent damage etc.
Ensure that the cables are connected to the correct terminals. Otherwise,
damage etc. may occur.
Always make sure that polarity is correct to prevent damage etc.
While power is on and for some time after power-off, do not touch the option unit
as they are hot and you may get burnt.

A-3
4. Additional instructions
Also note the following points to prevent an accidental failure, injury, electric shock, etc.:
(1) Transportation and installation
CAUTION
When carrying products, use correct lifting gear to prevent injury.
Do not stack the inverter boxes higher than the number recommended.
Ensure that installation position and material can withstand the weight of the
option unit. Install according to the information in the Instruction Manual.
Do not operate if the option unit is damaged or has parts missing.
Do not stand or rest heavy objects on the option unit.
Check the option unit mounting orientation is correct.
Prevent screws, wire fragments, conductive bodies, oil or other flammable
substances from entering the option unit.
Do not drop the option unit, or subject it to impact.
Use the inverter under the following environmental conditions:
Ambient
temperature
-10°C to +50°C (non-freezing)
Ambient humidity 90%RH or less (non-condensing)
Storage
temperature
-20°C to +65°C*
Ambience
Indoors (free from corrosive gas, flammable gas,
oil mist, dust and dirt)
Environment
Altitude, vibration
Maximum 1000m above sea level for standard
operation.
5.9 m/s
2
or less (conforming to JIS C0911)
*Temperatures applicable for a short time, e.g. in transit.
(2) Trial run
CAUTION
Check all parameters, and ensure that the machine will not be damaged by a
sudden start-up.
(3) Operation
CAUTION
Do not modify the equipment.

A-4
(4) Emergency stop
CAUTION
Provide a safety backup such as an emergency brake which will prevent the
machine and equipment from hazardous conditions if the inverter or option fails.
(5) Maintenance, inspection and parts replacement
CAUTION
Do not carry out a megger (insulation resistance) test on the control circuit of the
option unit.
(6) Disposing of the inverter
CAUTION
Treat as industrial waste.
(7) General instructions
Many of the diagrams and drawings in this instruction manual show the inverter
without a cover, or partially open. Never run the inverter like this. Always replace
the cover and follow this instruction manual when operating the inverter.

CONTENTS
1. STRUCTURE...........................................................................1
2. INSTALLATION.......................................................................2
3. WIRING ...................................................................................3
4. ADJUSTMENT ........................................................................ 5
5. SPECIFICATIONS...................................................................6
6. OUTLINE DRAWING............................................................... 6
FR-AT SPEED SELECTOR
The "FR-AT" speed selector can be used with the FR series inverters to start/stop a
motor and also allows you to perform operation at three different preset frequencies
using the setting select switch, frequency selecting limit switch etc.

1
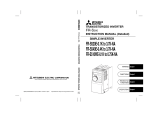
1. STRUCTURE
FR-AT
REV FWD
Mounting foot
Speed (3-speed)
(H/M/L/EXT)
select switch
Reverse rotation
(REV)
High speed setting
(HIGH)
start switch
Middle speed setting
(MIDDLE)
Low speed setting
(LOW)
Terminal block
Mounting foot
Forward rotation start switch
(FWD)
Mounting screw 4-M4
potentiometer
potentiometer
potentiometer
Fig.1 Structure

2
2. INSTALLATION
The selector can be installed by fastening the mounting feet with screws (4 screws).
The mounting dimensions are shown in Fig. 2.
(Note) Install the unit after wiring the terminal
block.
When changing the wiring after installation,
removal of the mounting screws (4, M4
screws) in the front panel allows you to
remove only the unit, leaving the mounting
feet behind.
50
190
4-M4 screw
Fig. 2 Mounting Dimensions
Embedding the controller in a panel etc.
(1) Cut the mounting panel to the mounting hole
dimensions in Fig. 3.
(2) Take off the mounting screws (4 screws) in the
controller front panel, and remove the mounting
feet.
56
170
162
68
4-M4 screw
Square
hole
Fig. 3 Embedding Dimensions

3
3. WIRING
3.1 Circuit Structure and Connection Method
IM
Motor
RAH
RAM
RAL
10
2
STF
STR
SD
[FWD]
[REV]
EXT
CS
H
M
L
RH
RM
RL
LS/L
LS/M
*LS/H
FR-AT
RS
W
OCR
U
V
R
S
T
STF
STR
SD
10
2
5
5
RAL
VRL
[LOW]
RAL
RAM
VRM
[MIDDLE]
RAM
RAH
RAH
VRH
[HIGH]
RE
NFB
AC200V 50Hz
200/200V 60Hz
R
S
T
T
400/200
NFB
RS
FR-AT
Power supply
Inverter
*LS/H:
High speed
command contact
LS/M:
Middle speed
command contact
LS/L:
command contact
Low speed
Wiring for use
with 400V class
inverter
Inverter
Fig. 4 Connection Diagram and Wiring Example
F

4
3.2 Circuit Explanation
The circuit consists of the three-speed selective (selector) operation circuit, start
(forward/reverse rotation) circuit and frequency setting circuit.
When the speed select switch CS is moved to choose any of high speed (H),
middle speed (M) and low speed (L), the relay of the selected speed is energized
to output the frequency setting signal set with the corresponding frequency
setting potentiometer.
When you move the switch CS to "EXT" after setting each speed with the
frequency setting potentiometer, the relay is energized by the external speed
select signal to choose the corresponding speed to output the required frequency
setting signal.
(Note) When no power is input to terminals R-S, the relays are not activated and
three-speed setting operation cannot be performed.
3.3
Terminal Layout and Wiring
Instructions
The terminal layout is shown in Fig. 5.
(1) Terminals SD1 and SD2 are connected by a
link.
(2) Terminals marked * cannot be used as they are
provided for terminal mounting.
- Wiring instructions -
(1) The wiring distance between controller and
inverter should be 50m maximum and should
be made as short as possible.
(2) Use twisted or shielded cables for wiring the
frequency setting potentiometer (terminals 10,
2, 5), and connect the shields to the common
(terminal 5), not to the earth. (Refer to Fig. 4.)
*
*
R
S
RH
RM
RL
RE
STF
STR
SD
10
2
5
Fig. 5 Terminal Layout Diagram

5
4. ADJUSTMENT
Before operation, adjust the three set-speeds.
Three speed setting method
Set each speed using the following procedure:
Preset the speed setting potentiometers (3 potentiometers) to fully counterclockwise
positions (scale 0).
↓
Turn on the start switch FWD (or REV).
↓
Move the speed select switch to "H" (high speed).
↓
Using the high speed setting potentiometer "HIGH", set the high-speed frequency.
↓
Move the speed select switch to "M" (middle speed).
↓
Using the middle speed setting potentiometer "MIDDLE", set the middle-speed
frequency.
↓
Move the speed select switch to "L" (low speed).
↓
Using the low speed setting potentiometer "LOW", set the low-speed frequency.
↓
Three speed setting is complete
↓
Move the speed select switch to "EXT".
↓
Turn on the speed selector, e.g. externally provided switch or limit switch, to check
operation at each speed.

6
5. SPECIFICATIONS
Operation power supply voltage
[Terminals R, S]
200VAC 50Hz, 200/220VAC 60Hz
Power consumption 1.5VA
Frequency setting input voltage
[Terminal 10]
5V or 10VDC
Frequency setting output signal
[Terminal 2]
0 to 5VDC (at input voltage of 5V)
0 to 10VDC (at input voltage of 10V)
Frequency setting potentiometers
(VRH, VRM, VRL)
1kΩ 1W B characteristic
6. OUTLINE DRAWING
5
MIDDLE
5
STOP
STOP
FWD
64
7
8
9
10
3
2
1
0
REV
LOW
70
90
120
70
50
10
5
5
5
200
190
7
5
5
10
160
MAX
20
*56
180
*170
FR-AT
64
7
8
9
3
2
1
0
HIGH
10
EXT
L
M
H
64
7
8
9
3
2
1
0
10
5
*Mounting dimensions for embedding in a panel etc. (Refer to page 2)

REVISIONS
*The manual number is given on the bottom left of the back cover.
Print Date *Manual Number Revision
Jul., 2000 IB(NA)-0600042-A First edition
/