Page is loading ...

1
VENTILATOR E N
Montageanleitung
Replacement-Kit ER-RPK
(Art.-Nr. 0093.1563)
Lieferumfang
- 1x Blindstopfen
- 1x Befestigungsschraube
- 1x Zentralbefestigungsschraube für
Abdeckung
- 1x Ausblasadapter
- 1x Gehäusebodendichtung
- 1x Adapterplatine
- diese Anleitung
Bestimmungsgemäße Verwendung
Das Replacement-Kit ER-RPK dient zur
Montage des ER EC Ventilatoreinsatzes in
ER-UP/G,-UPD,-UPB Gehäusen.
Sicherheitshinweise und
Warnungen
WARNUNG
Verletzungsgefahr bei Arbeiten in der
Höhe.
Benutzen Sie geeignete, zertifizierte
Aufstiegshilfen (Leitern). Die
Standsicherheit ist zu gewährleisten, die
Leiter ggf. durch eine 2. Person zu
sichern.
Sorgen Sie dafür, dass Sie sicher
stehen und sich niemand unterhalb des
Gerätes aufhält.
VORSICHT
Nicht bestimmungsgemäßer Betrieb
bei falschem Einbau. Ein nicht
ordnungsgemäß eingebauter Ventilator
kann einen nicht bestimmungsgemäßen
Betrieb verursachen.
Ventilator nur gemäß den
Planungsunterlagen installieren.
Insbesondere die Ausführungen von
Lüftungskanälen und Schalldämmung
beachten.
GEFAHR
Gefahr bei Betrieb mit nicht komplett
montiertem Ventilator. An elektrischen
Komponenten besteht
Stromschlaggefahr.
Bei offenem Gerät müssen alle
Versorgungsstromkreise angeschaltet
(Netzsicherung aus), gegen
Wiedereinschalten gesichert und ein
Warnschild sichtbar angebracht sein.
Ventilator nur komplett montiert
betreiben.
Ventilator nicht abdecken.
GEFAHR
Gefahr bei Nichtbeachtung der
geltenden Vorschriften für
Elektroinstallationen.
Vor dem Abnehmen des
Gehäuseoberteils/Ventilatoreinsatzes und
vor Elektroinstallationen alle
Versorgungsstromkreise abschalten,
Netzsicherung ausschalten und gegen
Wiedereinschalten sichern. Ein
Warnschild sichtbar anbringen.
Bei der Elektroinstallation die
geltenden Vorschriften beachten, z. B.
DIN EN 50110-1, in Deutschland
insbesondere VDE 0100 mit den
entsprechenden Teilen.
Eine Vorrichtung zur Trennung vom
Netz mit mindestens 3 mm
Kontaktöffnung je Pol ist vorgeschrieben.
Gerät nur an einer fest verlegten
elektrischen Installation und mit Leitungen
vom Typ NYM-O oder NYM-J
anschließen, je nach Gerätevariante 3x
1,5 mm
2
oder 5x 1,5 mm
2
.
Geräte nur mit auf Typenschild
angegebener Spannung und Frequenz
betreiben.

2
VENTILATOR E N
GEFAHR
Gefahr bei Nichtbeachtung der
geltenden Vorschriften für
Elektroinstallationen.
Gerät kann auch im Stillstand unter
Spannung stehen und durch Sensorik
(Zeitverzögerung, Feuchte etc.) oder dem
Thermoschalter in der Motorwicklung
automatisch einschalten. Wartung und
Fehlerfindung nur durch Elektrofachkräfte
zulässig.
Die auf dem Typenschild angegebene
Schutzart ist nur gewährleistet bei
bestimmungsgemäßem Einbau und bei
ordnungsgemäßer Einführung der
Anschlussleitung durch die Leistungstülle
(Tülle muss den Leitungsmantel komplett
umschließen). Außerdem muss der
Ventilatoreinsatz eingerastet und die
Gehäuseabdeckung montiert sein.
GEFAHR
Gefahr durch Stromschlag. Vor dem
Abnehmen der Gehäuseabdeckung und
vor Elektroinstallationen alle
Versorgungsstromkreise abschalten,
Netzsicherung ausschalten und gegen
Wiedereinschalten sichern. Ein
Warnschild sichtbar anbringen.
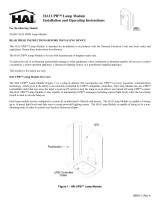
1 Demontage des alten
ER 60/100 Ventilatoreinsatzes
1. Netzsicherung ausschalten, gegen
Wiedereinschalten sichern und
Warnschild anbringen.
2. Abdeckung durch Lösen der
Zentralschraube entfernen.
3. Ventilatoreinsatz ausbauen.
1.1 Vorbereitung und Montage des
ER EC Ventilatoreinsatzen mit ER-
RPK Replacement Kit
1.1.1 Bodendichtung, ER-UP/G, -UPD, -
UPB tauschen
1. Alte Bodendichtung aus dem ER-
UP/G, -UPD,- UPB-Gehäuse
entfernen.
2. Neue Bodendichtung einsetzen.
Darauf achten, dass die
Schraubendome und der
Flachschnapper ausgespart sind.
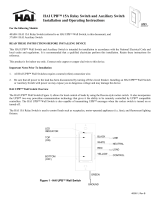
1.1.2 Blindstopfen anbringen

3
VENTILATOR E N
1.1.3 Umbau Ausblasadapter für
Ausblas
1.2 Adapterplatine montieren
1. Platine mit Flachstecker auf die
Stiftleiste aufstecken.
2. Adapterplatine über den Führungsdorn
in den freien Elektronikbauraum legen.
3. Adapterplatine mit
Befestigungsschraube befestigen.
Impressum:
© Maico Elektroapparate-Fabrik GmbH.
Deutsche Original-Betriebsanleitung.
Druckfehler, Irrtümer und technische
Änderungen vorbehalten.

4
VENTILATOR E N
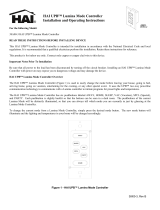
1.2.1 Elektroinstallation
Im ER UP/G, -UPD, -UPB Gehäuse den
elektrischen Anschluss gemäß
Anschlussvariante vornehmen.
Anschlussvarianten Grundlast/Volllast
für ER-A, ER-AK, ER-AH, ER-AB
Anschlussvarianten Intervall, Feuchte,
Bewegung für ER-AK, ER-AH, ER-AB
1.3 Ventilatoreinsatz einsetzen und
Abdeckung montieren
1. Den Ventilatoreinsatz in das Gehäuse
einsetzen.
2. Sicherstellen, dass alle Rasthaken und
der Flachschnapper eingerastet sind.
3. Abdeckung aufsetzen und mit
Zentralschraube befestigen.

5
VENTILATOR E N
Mounting instructions
ER-RPK replacement kit
(article no. 0093.1563)
Scope of delivery
- 1x blind plug
- 1x retaining bolt
- 1x central retaining bolt for cover
- 1x exhaust adapter
- 1x housing floor seal
- 1x adapter board
- these instructions
Intended use
The ER-RPK replacement kit is used for
mounting the ER EC fan insert in ER-UP/G,
ER-UPD, and ER-UPB housing.
Safety instructions and
warnings
WARNING
Risk of injury when working at heights.
Use appropriate, certified climbing aids
(ladders).
Stability should be ensured, if
necessary have the ladders steadied by a
2nd person.
Ensure that you are standing securely
and cannot lose your balance and that there
is no one under the unit.
CAUTION
Intended operation not ensured if
installed incorrectly. A fan not installed
correctly may result in operation not as
intended.
Only install fan in accordance with the
planning documents.
In particular, note the models on
ventilation channels and sound deadening.
DANGER
Danger from operating with the fan not
fully mounted. Electric components are
a potential source of electric shock.
If the unit is open, all off the supply
circuits must be switched off (mains fuse
off), secured against being accidentally
switched back on and a visible warning sign
positioned.
Only operate the fan when it is
completely installed.
Do not cover the fan.
DANGER
Danger if the relevant regulations for
electrical installations are not
observed.
Before removing the upper housing
part/fan insert and before installing the
electrics, switch off all supply circuits as well
as the mains fuse and secure them against
being accidentally switched back on again.
Attach a warning sign in a clearly visible
place.
Be sure to observe the relevant
regulations for electrical installation; e.g.
DIN EN 50110-1, in Germany this is
particularly VDE 0100, with the
corresponding parts.
A mains isolation device with contact
openings of at least 3 mm at each pole is
mandatory.
Only connect unit to permanently wired
electrical installation and with NYM-O or
NYM-J cables, depending on the unit
variant, 3x 1.5 mm² or 5x 1.5 mm².
The units may only be operated using the
voltage and frequency shown on the rating
plate.

6
VENTILATOR E N
DANGER
Danger if the relevant regulations for
electrical installations are not
observed.
Unit may also be energized even when
at a standstill and may be switched on
automatically by sensors (time delay,
humidity etc.) or by the thermo switch in
the motor winding. Maintenance and fault
finding only permissible when carried out
by trained electricians.
The degree of protection stated on the
rating plate is only guaranteed if installation
is undertaken correctly and if the connecting
cable is correctly guided through the cable
grommet (The grommet must completely
enclose the cable sheathing).
The fan insert
must also be engaged and the housing
cover installed.
DANGER
Danger of electric shock. Before
removing the housing cover and before
installing the electrics, switch off all supply
circuits as well as the mains fuse and
secure them against being accidentally
switched back on again. Attach a warning
sign in a clearly visible place.
1 Dismantling the old
ER 60/100 fan insert
1. Switch off mains fuse, secure
against being accidentally
switched back on and fit a warning
sign.
2. Remove the cover by loosening
the central screw.
3. Remove fan insert.
1.1 Preparation and mounting of the
ER EC fan insert with ER-RPK
replacement kit
1.1.1 Replace floor seal, ER-UP/G, ER-
UPD, and ER-UPB
1. Remove old floor seals from the ER-
UP/G, ER-UPD, and ER-UPB-
housing.
2. Insert new floor seal. Ensure that
there is a recess for the screw dome
and the flat safety catch.
1.1.2 Attaching blind plug

7
VENTILATOR E N
1.1.3 Conversion of exhaust adapter for
air outlet
1.2 Mounting adapter board
1. Plug board into the plug connector
with flat plug
2. Place the adapter board in the free
electronic installation space using the
locating pin.
3. Fasten adapter board with retaining
bolts.
Acknowledgements:
© Maico Elektroapparate-Fabrik GmbH.
Translation of the original operating
instructions Misprints, errors and technical
changes are reserved.

8
VENTILATOR E N
1.2.1 Electrical installation
Establish electrical connection in ER UP/G,
ER-UPD, and ER-UPB housing according
to connection variant.
Connection variants, base load/full load
for ER-A, ER-AK, ER-AH and ER-AB
Connection variants for interval,
humidity, movement for ER-AK, ER-AH,
ER-AB
1.3 Inserting fan filter and mounting
the cover
1. Insert the fan insert in the housing.
2. Ensure that all locking hooks and the
flat safety catch are engaged.
3. Put on the cover and fasten with a
central screw.

9
VENTILATOR E N
Notice de montage
Kit de rechange ER-RPK
(N° de réf. 0093.1563)
Volume de fourniture
- 1x bouchon borgne
- 1x vis de fixation
- 1x vis de fixation centrale pour cache de
protection
- 1x adaptateur de soufflage
- 1x joint au fond de boîtier
- 1x platine d'adaptation
- cette notice
Utilisation conforme
Le kit de rechange ER-RPK sert au
montage de l'insert de ventilateur ER EC
dans des boîtiers ER-UP/G,-UPD,-UPB.
Consignes de sécurité et
avertissements
AVERTISSEMENT
Risque de blessure lors des travaux en
hauteur.
Utiliser des auxiliaires d'accès vertical
(échelles) appropriés et agréés. Assurer
la stabilité de l'échelle. Le cas échéant,
faire appel à une 2ème personne pour
maintenir l'échelle.
Veiller à avoir une position stable et à
ce que personne ne séjourne sous
l'appareil.
PRUDENCE
Utilisation non conforme suite à
montage erroné. Si le ventilateur n'est
pas monté correctement, son exploitation
peut être non conforme.
Installer le ventilateur uniquement en
conformité avec les documents de
conception.
Veiller particulièrement à l'exécution
des gaines de ventilation et de
l'insonorisation.
DANGER
Danger en cas d'exploitation d'un
ventilateur partiellement monté.
Danger d'électrocution présenté par
les composants électriques.
Lorsque l'appareil est ouvert, tous les
circuits d'alimentation électrique doivent
être coupés (fusible secteur désactivé) et
protégés contre une remise en marche
intempestive. Un panneau
d'avertissement doit être apposé de
manière bien visible.
N'utiliser le ventilateur qu'après son
montage complet.
Ne pas recouvrir le ventilateur.
DANGER
Danger en cas de non-respect des
consignes en vigueur relatives aux
installations électriques.
Avant de retirer la partie supérieure du
boîtier / l'insert de ventilateur et avant
l'installation électrique, couper tous les
circuits d'alimentation électrique,
désactiver le fusible secteur et sécuriser
contre une remise en marche. Apposer un
panneau d'avertissement de manière bien
visible.
La réglementation en vigueur pour
l'installation électrique, p. ex.
DIN EN 50110-1, et notamment, pour
l'Allemagne, la norme VDE 0100 et les
parties correspondantes, doivent être
respectées.
Prévoir un dispositif de coupure du
secteur avec une ouverture de contact
d'au moins 3 mm par pôle.
Brancher exclusivement l'appareil sur
une installation électrique permanente
avec des câbles de type NYM-O ou NYM-
J (3x 1,5 mm
2
ou 5x 1,5 mm
2
selon la
version d'appareil).
Utiliser exclusivement les appareils à la
tension et à la fréquence indiquées sur la
plaque signalétique.

10
VENTILATOR E N
DANGER
Danger en cas de non-respect des
consignes en vigueur relatives aux
installations électriques.
Même à l'arrêt, l'appareil peut être
sous tension et être mis automatiquement
en marche par les capteurs
(temporisation, humidité, etc.) ou par le
thermocontact dans la bobine de moteur.
L'entretien et la détection d'erreurs sont
réservés à des électriciens qualifiés.
Le type de protection indiqué sur la
plaque signalétique est uniquement
garanti sous réserve d'un montage
conforme aux prescriptions et de
l'insertion correcte du câble de
raccordement à travers le manchon de
câble (le manchon doit enserrer
étroitement l'enveloppe du câble). Par
ailleurs, l'insert de ventilateur doit être
encliqueté et le cache du boîtier monté.
DANGER
Risque d'électrocution. Avant de
retirer le cache du boîtier et avant
l'installation électrique, couper tous les
circuits d'alimentation électrique,
désactiver le fusible secteur et sécuriser
contre une remise en marche. Apposer un
panneau d'avertissement de manière bien
visible.
1 Démontage de l'ancien
insert de ventilateur ER 60/100
1. Désactiver le fusible secteur,
sécuriser contre toute remise en
service intempestive et apposer
un panneau d'avertissement.
2. Enlever le cache de protection en
desserrant la vis centrale.
3. Déposer l'insert de ventilateur.
1.1 Préparation et montage de
l'insert de ventilateur ER EC avec le
kit de rechange ER-RPK
1.1.1 Remplacer le joint au fond ER-
UP/G, -UPD, -UPB
1. Enlever l'ancien joint au fond du
boîtier ER-UP/G, -UPD,- UPB.
2. Insérer le nouveau joint au fond.
Veiller à ce que les dômes à vis et le
cliquet plat soient évidés.
1.1.2 Monter le bouchon borgne

11
VENTILATOR E N
1.1.3 Transformation de l'adaptateur
pour le soufflage
1.2 Monter la platine d'adaptation
1. Insérer la platine avec le connecteur
plat sur la barrette enfichable.
2. Poser la platine d'adaptation dans
l'espace de montage électronique libre
via la broche de guidage.
3. Fixer la platine d'adaptation avec la vis
de fixation.
Mentions légales :
© Maico Elektroapparate-Fabrik GmbH.
Traduction du mode d'emploi original. Sous
réserve de fautes d'impression, d'erreurs et de
modifications techniques.

12
Maico Elektroapparate-Fabrik GmbH • Steinbeisstr. 20 • 78056 Villingen-Schwenningen •
VENTILATOR E N
0185.1245.0000_03.19_AS
03.19_Es
1.2.1 Installation électrique
Effectuer le branchement électrique
conformément à la variante de
raccordement dans le boîtier ER UP/G, -
UPD, -UPB.
Variantes de raccordement charge de
base / charge pleine pour ER-A, ER-AK,
ER-AH, ER-AB
Variantes de raccordement intervalle,
humidité, mouvement pour ER-AK,
ER-AH, ER-AB
1.3 Introduire l'insert de ventilateur
et monter le cache de protection
1. Introduire l'insert de ventilateur
dans le boîtier.
2. S'assurer que tous les crochets
d'arrêt et le cliquet plat sont
encliquetés.
3. Remettre le cache de protection en
place et le fixer avec la vis centrale.
/