Dimplex DFB8842 User manual

Category
Fireplaces
Type
User manual
Owners Manual
Model
DFB8842
7207500200R05
IMPORTANT SAFETY INFORMATION: 





 
Table of Contents



!
NOTE: 



CAUTION: 


in damage to the equipment
WARNING: 




 3
4
7
8
Operation                              10
                           15
Warranty18
                       23
3
Welcome & Congratulations


Please carefully read and save these instructions.
CAUTION: 





NO NEED TO RETURN TO THE STORE
Questions with operation or assembly? Require Parts Information?

Contact us at: www.dimplex.com/customer_support

OR Toll-Free 1-888-DIMPLEX (1-888-346-7539)



Part Number
Serial Number
Model Number
 


















when any heater is used by or

whenever the unit is left operating



Do not operate any unit with


IMPORTANT INSTRUCTIONS











fall into a bathtub or other water





area and where it will not be




Do not insert or allow foreign

or exhaust opening as this may

5
SAVE THESE INSTRUCTIONS










liquids are used or stored or
where the unit will be exposed to







Avoid the use of an extension





Do not burn wood or other






Always use properly






When transporting or storing


vibration and store so as to avoid

IMPORTANT INSTRUCTIONS
 
!
NOTE: This equipment has been













by turning the equipment off and




















IMPORTANT INSTRUCTIONS
WARNING: 




WARNING: Do not install


battery types - may explode or

CAUTION: 

approved by the party



7
Site Selection and Preparation


preparing the site to install the


 



 



 

!
NOTE 1: 






fuse blows on a regular basis




breaker
CAUTION: 


Do not
install the replace insert
directly on carpet or similar
surfaces which may restrict
air circulation. If installing






WARNING: 


sharp edge and ensure that











Do not attempt to wire your
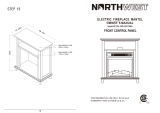





 
Figure 1



(648
mm)

(670
mm)

(267 mm)
Fireplace Installation



does not require any additional

!
NOTE 1: 






fuse blows on a regular basis




breaker

into the mantel (refer to mantel

!
IMPORTANT: If not using a

must be installed in an

MINIMUM

New Wall Construction
 



 


9
Fireplace Installation
 



 



Option #1
be lead from behind the trim
and along the wall to an outlet


(781 mm)
Figure 2

(273
mm)

(654
mm)
Option #2
installed inside the new frame



10 
Operation
Electric Fireplace Manual
Controls



A. Main On/Off Switch
Supplies power to the 3

B. 3 Position Manual Control
Switch
Remote (right position):
The unit is operated with the

Flame (center position): The

Flame & Heat (left position):



in the Flame & Heat position
the heater does not run on the

C. Initialization Button


!
NOTE: When the manual
Flame
and Flame & Heat 

operate with the remote

Resetting The
Temperature Cutoff
Switch




will turn the heater off and it will





CAUTION: If you need to






Figure 3
A
B
11
Operation
Remote Control









Battery Installation (Figure 4)
 
the tab on
the battery


the remote
transmitter
and
remove
battery

 


 

 
!
NOTE: When the “BAT
symbol is present on the remote






Initializing/ Reprogram-
ming the Remote Control
 

 

in the On

 

Remote
 
Initialization Button on the unit

 


button or the

button on


 

 
button



to

Batteries
Figure 4

12 
Remote Control Functions
(Figure 5)
Operation
M
L
N
K
B
A
D
I
P
O
J
F
R
Q
 
 
 
 
 
 
 
 
 
 
 
 
 
 
 
 
 
 
B. Set Temperature
Press H button 
J
or I
both J and I
C. Light Dimmer Control

repeatedly press the L or K


D. Flame Speed Control

press the N

M

13
Operation
E. Sleep Timer


preset time (from 30 minutes to 8


set the sleep timer press the P






at any time by pressing the O
button repeatedly until the sleep

F. Purire™


G button





The default setting for the

Press the Q or the R buttons to

G button to

H. Flame & Heat On/Off Button
Press the H button to turn the

B is higher then A the heat will

lower the B
is lower then the A


!
NOTE: When using the


J or I buttons to adjust the

desired set temperature is

on and
off to maintain the desired set

Child Lock (Figure 6)
Depress tab on the battery 

remote transmitter and remove








14 
Figure 6




Operation
!
NOTE: 
the remote transmitter press
(in order) I then J then K

Child
Lock
Child Lock is

Frequency Interference







Simultaneously press the  O.
Sleep Timer Down button and
the Q button on the remote

 COD

Release the  O button and the
Q 
Press the Initialization button 

Press the  H button on the

Your remote will now


15
Maintenance
WARNING: 
power before attempting any



Light Bulb Replacement







(3) 

and two (2) bulbs above the log
that illuminate the log exterior
Helpful Hints

light bulbs at one time if they are


the number of times you need


removing the Log Set as the Log

Lower Light Bulb Requirements
-




Do not exceed 60 Watts per
bulb.
To access the lower light bulb
area:

Trim

Log Set Assembly
Figure 7

Lower Bulbs
Upper Bulbs
16 
Remove four (4) Phillips 



Slide glass to right side of 

Pull the front edge of the 

up and forward until the rear
tab releases from the ledge


!
IMPORTANT: Only handle
the Log Set Assembly by the

!
NOTE: 


Set Log Set Assembly in front 



 

Install the Log Set Assembly 





Bed until the rear tab snaps


!
NOTE: 
Assembly is installed tightly




Upper Light Bulb Requirements




Do not exceed 15 Watts per
bulb.
To access the upper light bulb
area:

Remove four (4) Phillips 



Maintenance

Ledge
Log

Rear
Tab
Front


Figure 8
17
Slide glass to the right side of 





the upper left and upper right








Purire™ Filter






to dislodge any loose dirt or





To replace lter:


Maintenance
the top rear of the unit (Figure




!
NOTE: If after market air




Figure 9

Filter
Glass Cleaning





be removed by dusting lightly with
18 










Maintenance
Fireplace Surface Clean-
ing





Five Year Limited Warranty
Products to which this limited
warranty applies
This limited warranty applies to
the following model of your newly

DFB8842





or Northwest Territories or in any
of the 50 States of the USA (and


warranty applies to the original


Products excluded from this limited
Warranty
warranty


and are the sole responsibility of






or territories are sold AS IS without










19
Warranty
What this limited warranty covers and
for how long







in material and workmanship for a
period of 5 years from the date of the















limited warranty have been tested




in material and workmanship for a




The above section is a summary
only of your warranty rights.
Please review the remaining
provisions of this warranty for your
specic rights.
The limited 5 year warranty period

surrounds (mantels) and trims and
the limited 1 year warranty period

and trims also applies to any implied
warranties that may exist under

do not allow limitations on how long

above limitation may not apply to the

What this limited warranty does not
cover
This limited warranty does not apply










What you must do to get service
under this limited warranty



1-888-


20 
Warranty

model and serial numbers available



What Dimplex will do in the event of
a defect



workmanship during (i) the 5 year



1 year limited warranty period for



be performed solely by dealers

authorized to provide limited

For products (other than
surrounds (mantels) and
trims) for the period ending at
midnight on the rst anniversary
of the date of rst purchase,














Dimplex will be responsible for all














For products (other than
surrounds (mantels) and trims)
for the period commencing
at 12:01 a.m. on the day after
the rst anniversary of the
rst purchase and ending at
midnight on the fth anniversary
of the date of rst purchase,
this limited warranty entitles the









to on-site or in-home warranty
  • Page 1 1
  • Page 2 2
  • Page 3 3
  • Page 4 4
  • Page 5 5
  • Page 6 6
  • Page 7 7
  • Page 8 8
  • Page 9 9
  • Page 10 10
  • Page 11 11
  • Page 12 12
  • Page 13 13
  • Page 14 14
  • Page 15 15
  • Page 16 16
  • Page 17 17
  • Page 18 18
  • Page 19 19
  • Page 20 20
  • Page 21 21
  • Page 22 22
  • Page 23 23

Dimplex DFB8842 User manual

Category
Fireplaces
Type
User manual

Ask a question and I''ll find the answer in the document

Finding information in a document is now easier with AI