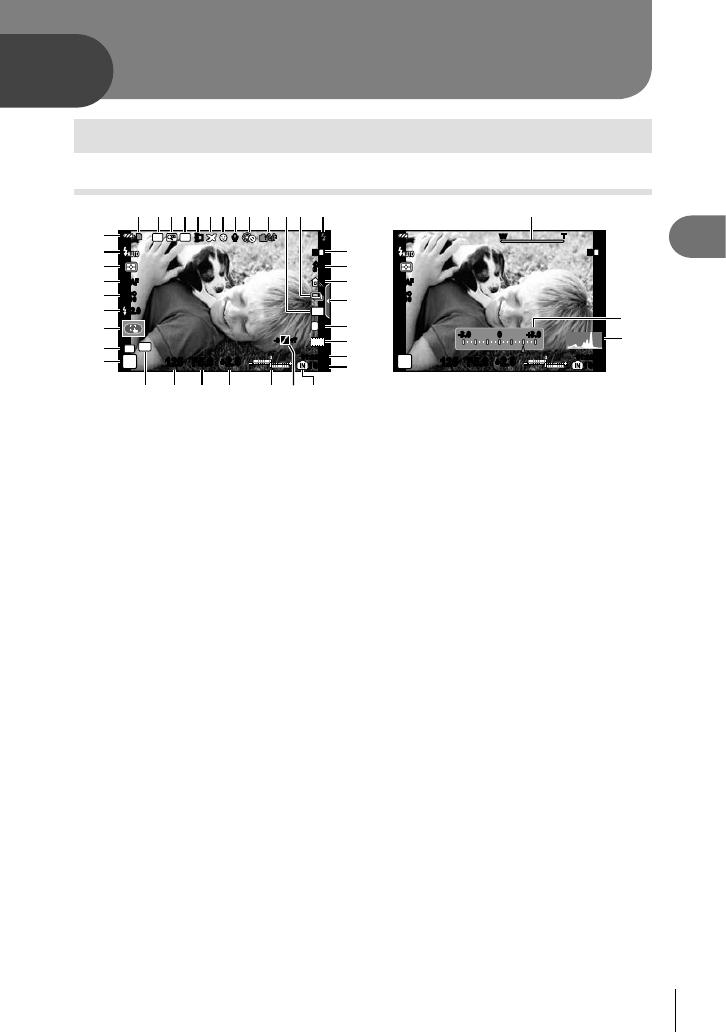
Olympus XZ-2 User manual

Category
Bridge cameras
Type
User manual

This manual is also suitable for

Thank you for purchasing an Olympus digital camera. Before you start to use your new
camera, please read these instructions carefully to enjoy optimum performance and a longer
service life. Keep this manual in a safe place for future reference.
We recommend that you take test shots to get accustomed to your camera before taking
important photographs.
The screen and camera illustrations shown in this manual were produced during the
development stages and may differ from the actual product.
The contents in this manual are based on rmware version 1.0 for this camera. If there
are additions and/or modi cations of functions due to rmware update for the camera, the
contents will differ. For the latest information, please visit the Olympus website.
Instruction Manual
DIGITAL CAMERA
XZ-2
2
EN
Preparations for shooting
1
1
Preparations for shooting
Names of parts
Camera
0 a9
1
2
3
4
6
5
c
4
b
87
g
d
e
f
h
i
1 Shutter button .............................P. 9, 43
2 Mode dial ..........................................P. 8
3 Zoom lever ....................P. 10, 11, 29, 89
4 Strap eyelet.......................................P. 4
5 Control ring* (j) ..................P. 29, P. 89
6 Grip attachment screw
7 Fn2 button ......................................P. 65
8 Lever ...............................................P. 43
9 Self-timer lamp/AF illuminator
...............................................P. 27/P. 59
0 Hot shoe cover
a Built-in ash ..............................P. 10, 24
b Stereo microphone
c Lens
d Tripod socket
e Battery/card compartment cover.......P. 5
f Battery/card compartment lock .........P. 5
g Connector cover
h Multi-connector ...................P. 66, 71, 74
i HDMI micro connector (Type D) .....P. 66
* In this manual, the j icon represents operations performed using the control ring.
3
EN
Preparations for shooting
1
1
3
2
4 5 6 7
8 90a
b
F (Up) / F (Exposure compensation)
button (P. 23)
I (Right) /# (Flash)
button (P. 24)
G (Down) / jY /
(Sequential shooting/Self-timer/Erase)
button (P. 27/P. 12)
H (Left) / P (AF target)
button (P. 26)
Q button
(P. 12, 29, 30)
Sub dial* (j)
(P. 11, 16 18, 29–30)
• Rotate to choose an option.
1 Flash switch ....................................P. 10
2 Accessory port
3 Monitor (Touch screen)
........................................P. 8, 13, 28, 33
4 q (Playback) button ................P. 11, 29
5 Fn1 button ................................P. 29, 65
6 MENU button .................................P. 46
7 INFO (Information display) button
.....................................P. 14, 28, 67 , 69
8 Hot shoe .........................................P. 86
9 ON/OFF button ................................P. 7
0 Indicator lamp ...................................P. 6
a R (Movie) button......................P. 10, 29
b Arrow pad .........................................P. 7
* In this manual, the j icon represents operations performed using the sub dial.
Using the monitor
You can adjust the angle of the monitor.
1
2
4
EN
Preparations for shooting
1
Unpack the box contents
The following items are included with the camera.
If anything is missing or damaged, contact the dealer from whom you purchased the
camera.
Camera
Lens cap and
lens cap strap
Strap USB cable
CB-USB8
or
• Computer software
CD-ROM
• Instruction manual
• Warranty card
Lithium ion battery
LI-90B
USB-AC Adapter
F-2AC
Attaching the camera strap and lens cap
1
2
3
4
5
Attach the strap to the other eyelet in the same manner.
Pull the strap tight so that it does not come loose.
Indications used in this manual
The following symbols are used throughout this manual.
#
Cautions
Warns of operations that should be absolutely avoided. Also
important information on factors which may lead to a malfunction or
operational problems.
$
Notes
Points to note when using the camera.
%
Tips
Useful information and hints that will help you get the most out of
your camera.
g
Reference pages describing details or related information.
5
EN
Preparations for shooting
1
Inserting and removing the battery and card
1
Follow Steps 1 and 2 to open the
battery/card compartment cover.
Turn off the camera before opening the battery/
card compartment cover.
2
1
Battery/card compartment lock
Battery/card compartment cover
2
Insert the battery while sliding the battery
lock knob in the direction of the arrow.
Insert the battery as illustrated with the
l
mark
toward the battery lock knob.
Damage to the battery exterior (scratches, etc.)
may produce heat or an explosion.
Slide the battery lock knob in the direction of the
arrow to unlock, and then remove the battery.
Battery lock knob
3
Insert the card straight until it clicks into
place.
Always use SD/SDHC/SDXC cards or Eye-Fi
card with this camera. Do not insert other types
of memory cards. “Cards compatible with this
camera” (P. 83)
Do not touch the metallic parts of the card
directly.
Write-protect switch
To remove the card
Press the card in until it clicks and comes out
slightly, then remove the card.
4
Follow Steps 1 and 2 to close battery/
card compartment cover.
When using the camera, be sure to close the
battery/card compartment cover.
2
1
6
EN
Preparations for shooting
1
Charging the battery
Connect the USB cable and USB-AC adapter to the camera and charge the battery.
The battery is not fully charged at shipment. Before use, be sure to charge the battery
until the indicator lamp turns off (up to 5 hours).
Connecting the camera
AC outlet
Multi-
connector
USB cable
(supplied)
Indicator lamp
Indicator lamp
On: Charging
Off: Charged
When to charge the batteries
Charge the battery when the error
message shown below appears.
Error message
Battery Empty
Flashes in red
The included F-2AC USB-AC adapter (hereafter referred to as USB-AC adapter) differs
depending on the region where you purchased the camera. If you received a plug-in type
USB-AC adapter, plug it directly into AC outlet.
The included USB-AC adapter has been designed to be used for charging and playback.
Do not take pictures while the AC adapter is connected to the camera.
Be sure to unplug the power plug of the USB-AC adapter from the wall outlet when the
charging is complete or the playback ends.
For details on the battery, see “Battery Handling Precautions” (P. 95). For details on the
USB-AC adapter, see “USB-AC adapter” (P. 96).
If the indicator lamp does not light, check the USB cable and USB-AC adapter
connections.
The battery can be charged while the camera is connected to the computer via USB.
The charging time varies depending on the performance of the computer. (There may be
cases in which it takes approx. 10 hours.)
7
EN
Preparations for shooting
1
Turning on the camera and making the initial settings
When you turn on the camera for the rst time, a screen appears enabling to set the
language for the menus and messages displayed in the monitor, and the date and time.
1
After turning the camera on with the ON/OFF button, select a language
using FGHI and press the A button.
2
Use FG to select the
year for [Y].
X
2012
YMDTime
Cancel
Y/M/D
3
Press I to save the
setting for [Y].
X
2012
YMDTime
Cancel
Y/M/D
4
As in Steps 2 and 3, useFGHIto set [M] (month), [D] (day), [Time]
(hours and minutes), and [Y/M/D] (date order), and then press the A
button.
For precise time setting, press the A button as the time signal strikes 00 seconds.
5
Use
HI
to select the
[x] time zone and then
press the A button.
• Use
FG
to turn daylight
saving time ([Summer]) on
or off.
Seoul
Tokyo
Summer
’12.10.26 12:30
Camera sleep operation
If no operations are performed for the time set, the camera enters “sleep” (stand-by)
mode. In this mode, the monitor turns off and all actions are canceled. The camera
activates again when you touch any button (the shutter button, q button, etc.). The
camera will turn off automatically if left in sleep mode for 5 minutes. Turn the camera on
again before use.
8
EN
Preparations for shooting
1
Shooting
Select a shooting mode
Select a shooting mode using the mode dial.
Indicator Mode dial
A
A full auto mode in which the camera automatically optimizes settings for the
current scene. The camera does all the work, which is convenient for beginners.
P
Aperture and shutter speed are automatically adjusted for optimal results.
A
You control aperture. You can sharpen or soften background details.
S
You control shutter speed. You can express the motion of moving subjects, or
freeze motion without any blur.
M
You control aperture and shutter speed. You can shoot with long exposures for
reworks or other dark scenes.
C1
You can save shooting settings in advance, and then quickly call those settings
when shooting.
C2
SCN
Select a scene according to the subject.
ART
Select an art lter.
Taking photographs
First, try taking photographs in full auto mode.
1
Set the mode dial to A.
Monitor
125125 F5.6
01:02:0301:02:03
3838
L
N
ISO-A
200
HD
Number of
storable still
pictures
Available
recording
time
ISO
sensitivity
Shutter speed Aperture value
9
EN
Preparations for shooting
1
2
Frame the shot.
When holding the camera,
take care not to cover the
ash, microphone or other
important parts with your
ngers, etc.
Horizontal grip Vertical grip
3
Adjust the focus.
Lightly press the shutter button down to the rst position (press the shutter button
halfway).
Press the shutter
button halfway.
125125 F5.6
Shutter speed Aperture value
AF target
The shutter speed and aperture value that have been set automatically by the
camera are displayed.
Pressing the shutter button halfway and all the way down
The shutter button has two positions. The act of lightly pressing the shutter button to the
rst position and holding it there is called “pressing the shutter button halfway,” that of
pressing it all the way down to the second position “pressing the shutter button all (or the
rest of) the way down.”
Press halfway
Press the rest of
the way down
4
Release the shutter.
Press the shutter button all the way (fully).
The shutter sounds and the picture is taken.
The shot image will be displayed on the monitor.
$ Notes
You can also take photographs using the touch screen. g “Using the Touch screen”
(P. 33)
10
EN
Preparations for shooting
1
Using the zoom
Turning the zoom lever adjusts the shooting range.
W side T side
Recording movies
1
Set the mode dial to A.
2
Press the R button to begin
recording.
R button
3
Press the R button again to end recording.
00:02:18
00:00:00
RR
Displayed during
recording
Recording
time
11
EN
Preparations for shooting
1
Viewing photographs and movies
1
Press the q button.
Your most recent photograph is displayed.
• Press HI or turn the sub dial to select an image.
q button
Arrow pad/Sub dial
Displays the
previous frame
Displays the
next frame
2012.10.26 12:30 20
100-0020
L
N
Still image
2012.10.26 12:30 4
100-0004
WB
AUTO
WBWBWB
AUTOAUTOAUTO
P
HD
Movie
Index display
In single-frame playback, turn the zoom lever to W for Index
playback.
2012.10.26 12:30 21
Index display
Close-up playback
In single-frame playback, turn the zoom lever to T to zoom
in up to 14×; turn to W to return to single-frame playback.
You can also use the control ring to change the
magni cation strength.
2x
12
EN
Preparations for shooting
1
Movie playback
Select a movie and press Q to display the playback
menu. Select [Movie Play] and press Q to begin playback.
To interrupt movie playback, press MENU.
L
Movie
Back
Movie Play
Erase
Set
Volume
Volume can be adjusted by pressing F or G during
single-frame and movie playback.
00:00:02/00:00:14
Selecting images
Select multiple pictures for protection or deletion. Press
the R button to select the current picture. Selected
pictures are marked with v. To remove v and deselect
the picture, press the R button again.
Select multiple pictures and press Q. You can protect or
delete the multiple selected images.
2012.10.26 12:30 21
Erasing images
Display an image you want to delete and press G (). Select [Yes] and press Q.
You can also select multiple images for deletion. g “Selecting images” (P. 12)
Erase
Back
Yes
No
Set
13
EN
Basic photography
2
2
Basic shooting operations
Shooting
125125 F5.6
ISO
400
L
N
1
ISIS
4:3
S-AFS-AF
AEL
RC
+
2.0
+
2.0
P
01:02:0301:02:03
10231023
1
1
j
RR
+
2.0
+
2.0
ND
C
1
+7+7-3-3
w
x
y
z
A
v
u
t
1
g
h
i
j
k
m
f
e
32 54 678 09
q
s
pornl
HD
d
c
Bba
125125 F5.6
ISO
400
S-AFS-AF
P
1
ISIS
+
2.0
+
2.0
01:02:0301:02:03
10231023
D
C
-3.0-3.0 +3.0+3.000
W TWT
Basic photography
1 Card write indicator .........................P. 84
2 RC mode.........................................P. 86
3 Digital Tele-converter ......................P. 65
4 ND Filter Setting .............................P. 65
5 Conversion lens ..............................P. 53
6 World Time ......................................P. 57
7 Face priority I .........................P. 42, 44
8 Movie sound ...................................P. 12
9 dLock ............................................P. 59
0 Internal temperature warning
m ...........................................P. 79
a Sequential shooting/self-timer ........P. 27
b Aspect ratio .....................................P. 39
c Flash ...............................................P. 24
(blinks: charging in progress)
d Image stabilizer...............................P. 36
e Art lter ...........................................P. 19
Scene mode....................................P. 20
Picture mode...................................P. 37
f White balance .................................P. 38
g Live guide recall ........................P. 22, 33
h Record mode (still images) .............P. 40
i Record mode (movies) ...................P. 41
j Available recording time
k Number of storable still pictures ......P. 85
l Current memory ..............................P. 84
m Tone control ....................................P. 23
n Top: Flash intensity control ......P. 41
Bottom: Exposure compensation
indicator............................P. 23
o Exposure compensation value........P. 23
p Aperture value .........................P. 15 18
q Shutter speed ..........................P. 15 18
r AE Lock u ...................................P. 42
s Shooting mode.....................P. 8, 15 18
t C Mode Setup .................................P. 48
u Touch screen mode ........................P. 33
v Flash intensity control .....................P. 41
w ISO sensitivity .................................P. 44
x AF mode .........................................P. 43
y Metering mode ................................P. 42
z Flash mode .....................................P. 24
A Battery check
7 Lit up (green) : Ready for use
(displayed for about ten seconds
after the camera is turned on)
8 Lit up (green) : Battery is running
low
9 Blinks (red) : Charging required
B Zoom bar ........................................P. 10
C
Control ring function
........................P. 89
D Histogram .......................................P. 14
14
EN
Basic photography
2
Switching the information display
Press the INFO button to choose the information displayed when shooting.
INFO
INFO
INFO
INFO
INFO
INFO
Histogram displayInformation display on
L
N
01:02:0301:02:03
3838
F5.6
P
0.00.0
ISO
200
125125
HD
L
N
01:02:0301:02:03
3838
F5.6
P
0.00.0
ISO
200
125125
HD
Image only
Histogram display
Displays a histogram showing the distribution of brightness in the image. The horizontal axis
gives the brightness, the vertical axis the number of pixels of each brightness in the image.
Areas above the upper limit at shooting are displayed in red, those below the lower limit in
blue, and the area metered using spot metering in green.
Focus lock
If the camera is unable to focus on your chosen subject, select single target mode and use
focus lock to focus on another subject at about the same distance.
1
In [S-AF] mode, position the AF target over the subject and press the
shutter button halfway.
Check that the AF target mark has turned green.
Focus locks while the shutter button is pressed halfway.
2
Keeping the shutter button pressed halfway, recompose the photograph
and then press the shutter button the rest of the way down.
Do not change the distance between the camera and the subject while pressing the
shutter button halfway.
% Tips
If the camera is unable to focus on the subject even when using focus lock, use P (AF
target). g “Choosing a focus target (AF target)” (P. 26)
15
EN
Basic photography
2
Using the shooting modes
“Point-and-shoot” photography (P program mode)
In mode P, the camera automatically adjusts shutter speed and aperture in response
to subject brightness. Set the mode dial to P.
125125 F5.6
01:02:0301:02:03
3838
L
N
P
0.00.0
ISO
400
HD
Shooting mode
Shutter speed Aperture value
The shutter speed and aperture selected by the camera are displayed in the monitor.
The shutter speed and aperture displays ash if the camera is unable to achieve optimal
exposure.
Warning display
example (blinking)
Status Action
60"
60"
F1.8
F1.8
The subject is too
dark.
• Use the ash.
2000
2000
F8
F8
The subject is too
bright.
The metered range of the camera is
exceeded. Set [ND Filter Setting] (
P. 35
)
to [On].
Program shift (%)
In P mode, you can use the control ring to change the
combination of aperture value and shutter speed while
maintaining the correct exposure. “s” appears next to the
shooting mode during program shift. To cancel program
shift, rotate the control ring backwards until “s” is no longer
displayed.
Program shift is not available when you are using a ash.
250125 F5.6
01:02:0301:02:03
3838
L
N
P
s
0.00.0
ISO
400
HD
Program shift
16
EN
Basic photography
2
Choosing aperture (A aperture-priority mode)
In mode A, you choose the aperture and let the camera automatically adjust shutter
speed for optimal exposure. Rotate the mode dial to A.
You can set the aperture value with the control ring, and
the exposure compensation with the sub dial.
Larger apertures (lower F-numbers) decrease depth of
eld (the area in front of or behind the focus point that
appears to be in focus), softening background details.
Smaller apertures (higher F-numbers) increase depth
of eld.
Lower aperture value F2F5.6F8.0 Higher aperture value
The shutter speed display will blink if the camera is unable to achieve optimal exposure.
Warning display
example (blinking)
Status Action
60"
60"
F5.6
F5.6
The subject is
underexposed.
Decrease the aperture value.
2000
2000
F5.6
F5.6
The subject is
overexposed.
Increase the aperture value.
If the warning display does not disappear,
the metered range of the camera is
exceeded. Set [ND Filter Setting] (
P. 35
)
to [On].
Aperture value
125125 F5.6
01:02:0301:02:03
3838
L
N
A
+0.0+0.0
ISO
400
HD
17
EN
Basic photography
2
Choosing shutter speed (S shutter-priority mode)
In mode S, you choose the shutter speed and let the camera automatically adjust
aperture for optimal exposure. Rotate the mode dial to S.
You can set the shutter speed with the control ring, and
the exposure compensation with the sub dial.
A fast shutter speed can freeze a fast action scene
without any blur. A slow shutter speed will blur a fast
action scene. This blurring will give the impression of
dynamic motion.
Slower shutter speed 2115601004001000 Faster shutter speed
The aperture value display will blink if the camera is unable to achieve optimal exposure.
Warning display
example (blinking)
Status Action
2000
2000
F1.8
F1.8
The subject is
underexposed.
Set the shutter speed slower.
125
125
F8
F8
The subject is
overexposed.
Set the shutter speed faster.
If the warning display does not disappear,
the metered range of the camera is
exceeded. Set [ND Filter Setting] (
P. 35
)
to [On].
Shutter speed
125125 F5.6
01:02:0301:02:03
3838
L
N
S
+0.0+0.0
ISO
400
HD
18
EN
Basic photography
2
Choosing aperture and shutter speed (M manual mode)
In mode M, you choose both the aperture and the shutter speed. At a speed of BULB, the
shutter remains open while the shutter button is pressed. Set the mode dial to M, and set the
shutter speed with the control ring, and the aperture value with the sub dial.
The shutter speed can be set to 1/2000 60 sec. or [BULB].
You can change the functions assigned to the control ring and the sub dial. g “Dial
Function” (P. 89)
# Cautions
Exposure compensation is not available in M mode.
Choosing when the exposure ends (bulb)
You can take a picture with a bulb exposure time in which the shutter stays open as
long as you hold down the shutter button. Time the end of the exposure to suit the
subject. Use for night landscapes and reworks. In M mode, set the shutter speed to
[BULB].
# Cautions
Maximum 16 minutes (default)
The maximum exposure time of bulb shooting depends on ISO sensitivity.
To reduce camera shake for bulb shooting, mounting the camera on a stable tripod or
using a remote cable (sold separately) is recommended.
The following features are not available during long exposures:
Sequential shooing/self-timer shooting/AE bracket shooting/image stabilizer/
ash bracketing
Noise in images
While shooting at slow shutter speeds, noise may appear on-screen. These phenomena
are caused when current is generated in those sections of the image pickup device that
are not normally exposed to light, resulting in a rise in temperature in the image pickup
device or image pickup device drive circuit. This can also occur when shooting with a high
ISO setting in a high-temperature environment. To reduce this noise, the camera activates
the noise reduction function. g [Noise Reduct.] (P. 61)
19
EN
Basic photography
2
Using art lters
1
Rotate the mode dial to ART.
A menu of art lters will be displayed. Select a lter
using FG and press Q.
ART 1
1
7
Pop Art
Exit
Set
Types of art lters
j Pop Art s Diorama
k Soft Focus t Cross Process
l Pale&Light Color u Gentle Sepia
m Light Tone v Dramatic Tone
n Grainy Film Y Key Line
o Pin Hole
2
Shoot.
To choose a different setting, press Q to display the art lter menu.
Art effects
Art lters can be modi ed and effects can be added. Pressing I in the art lter menu
displays additional options.
Modifying lters
Option I is the original lter, while options II and on add effects that modify the original
lter.
Adding effects *
Soft focus, pin-hole, frames, white edges, starlight
* The effects available vary with the selected lter.
# Cautions
If [RAW] is currently selected for image quality, image quality will automatically be set to
[YN+RAW]. The art lter will be applied to the JPEG copy only.
Depending on the subject, tone transitions may be ragged, the effect may be less
noticeable, or the image may become more “grainy.”
Some effects may not be visible in live view or during movie recording.
Playback may differ according to the lters, effects, or movie quality settings applied.
20
EN
Basic photography
2
Shooting in scene mode
1
Rotate the mode dial to SCN.
A menu of scene menu will be displayed. Select a
scene using FG.
• Press Q or press the shutter button halfway to
change to the live view display. Press Q to go
back to the scene menu display.
SCN 1
R
Portrait
Exit
Set
Types of scene modes
O Portrait s Panorama (P. 21)
P e-Portrait
(
Fireworks
L Landscape 0 Multi. Exposure
J
Sport g Beach & Snow
G Night Scene
Y
Underwater Wide
U Night+Portrait
X
Underwater Macro
R Sunset
Backlight HDR
T Documents
2
Shoot.
To choose a different setting, press Q to display the scene menu.
# Cautions
In [e-Portrait] mode, two images are recorded: an unmodi ed image and a second image
to which [e-Portrait] effects have been applied. The unmodi ed image is recorded using
the option currently selected for image quality, the modi ed copy at an image quality of
JPEG (X-quality (2560 × 1920)).
Effects of some scene modes are not applied in recording movies.
  • Page 1 1
  • Page 2 2
  • Page 3 3
  • Page 4 4
  • Page 5 5
  • Page 6 6
  • Page 7 7
  • Page 8 8
  • Page 9 9
  • Page 10 10
  • Page 11 11
  • Page 12 12
  • Page 13 13
  • Page 14 14
  • Page 15 15
  • Page 16 16
  • Page 17 17
  • Page 18 18
  • Page 19 19
  • Page 20 20
  • Page 21 21
  • Page 22 22
  • Page 23 23
  • Page 24 24
  • Page 25 25
  • Page 26 26
  • Page 27 27
  • Page 28 28
  • Page 29 29
  • Page 30 30
  • Page 31 31
  • Page 32 32
  • Page 33 33
  • Page 34 34
  • Page 35 35
  • Page 36 36
  • Page 37 37
  • Page 38 38
  • Page 39 39
  • Page 40 40
  • Page 41 41
  • Page 42 42
  • Page 43 43
  • Page 44 44
  • Page 45 45
  • Page 46 46
  • Page 47 47
  • Page 48 48
  • Page 49 49
  • Page 50 50
  • Page 51 51
  • Page 52 52
  • Page 53 53
  • Page 54 54
  • Page 55 55
  • Page 56 56
  • Page 57 57
  • Page 58 58
  • Page 59 59
  • Page 60 60
  • Page 61 61
  • Page 62 62
  • Page 63 63
  • Page 64 64
  • Page 65 65
  • Page 66 66
  • Page 67 67
  • Page 68 68
  • Page 69 69
  • Page 70 70
  • Page 71 71
  • Page 72 72
  • Page 73 73
  • Page 74 74
  • Page 75 75
  • Page 76 76
  • Page 77 77
  • Page 78 78
  • Page 79 79
  • Page 80 80
  • Page 81 81
  • Page 82 82
  • Page 83 83
  • Page 84 84
  • Page 85 85
  • Page 86 86
  • Page 87 87
  • Page 88 88
  • Page 89 89
  • Page 90 90
  • Page 91 91
  • Page 92 92
  • Page 93 93
  • Page 94 94
  • Page 95 95
  • Page 96 96
  • Page 97 97
  • Page 98 98
  • Page 99 99
  • Page 100 100
  • Page 101 101
  • Page 102 102

Olympus XZ-2 User manual

Category
Bridge cameras
Type
User manual
This manual is also suitable for

Ask a question and I''ll find the answer in the document

Finding information in a document is now easier with AI