
PLEASE READ CAREFULLY BEFORE USE
IB-DVD-2002-WC-ZR-E-V1
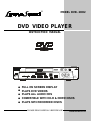
DVD VIDEO PLAYER
INSTRUCTION MANUAL
®
MODEL DVD- 2OO2
FULL ON SCREEN DISPLAY
PLAYS DVD VIDEOS
PLAYS ALL AUDIO CDS
COMPATIBLE WITH CD-R & CDRW DISCS
PLAYS MP3 RECORDED DISCS
®

1
SAFETY INSTRUCTIONS
WARNING
TO REDUCE THE RISK OF FIRE OR
ELECTRIC SHOCK, DO NOT EXPOSE THIS
APPLIANCE TO RAIN OR MOISTURE.
THESE IMPORTANT SAFETY INSTRUCTIONS ARE INCLUDED, AS
APPLICABLE TO THE APPLIANCE, CONVEYING TO THE USER THE
INFORMATION ITEMIZED BELOW:
1.Read Instructions - All the safety and operating instructions should be read before
the appliance is operated.
2.Retain Instructions - The safety and operating instructions should be retained for
future reference.
3.Heed Warnings - All warnings on the appliance and in the operating instructions
should be adhered to.
4.Follow Instructions - All operating and use instructions should be followed.
5.Water and Moisture - The appliance should not be used near water - for example
near a bathtub, washbowl, kitchen sink, laundry tub, in a wet basement, or near a
swimming pool, and the like.
6.Wall or Ceiling Mounting - The appliance should not be mounted to a wall or ceiling.
7.Ventilation - The appliance should be situated so that its location or position does
not interfere with its proper ventilation. For example, the appliance should not be
situated on a bed, sofa, rug, or similar surface that may block the ventilation openings;
or, placed in a built-in installation, such as a bookcase or cabinet that impede the flow
of air through the ventilation openings.
8.Heat - The appliance should be situated away from heat sources such as radiators,
heat registers, stoves, or other appliances (including amplifiers) that produce heat.
9.Power Sources - The appliance should be connected to a power supply only of the
type described in the operating instructions or as marked on the appliance.
10.Grounding or Polarization - Precautions should be taken so that the grounding or
polarization means of an appliance is not defeated.
11. Power Cord Protection - Power supply cords should be routed so that they are not
likely to be walked on or pinched by items placed upon or against them, paying
particular attention to cords at plugs, convenient receptacles, and the point where
they exit from the appliance.
12.Cleaning - The appliance should be cleaned only as recommended by the manufacturer.
13.Nonuse periods - The power cord of the appliance should be unplugged from the
outlet when left unused for a long period of time.
SEE BACK OF THE SET
14.Object and Liquid Entry - Care should be taken so that objects do not fall and
liquids are not spilled into the enclosure through openings.
15.Damage Requiring Service - The appliance should be serviced by qualified service
personnel when:
A. The power supply cord or the plug has been damaged; or
B. Objects have fallen, or liquid has been spilled into the appliance; or
C. The appliance has been exposed to rain; or
D. The appliance does not appear to operate normally or exhibits a marked change in
performance; or
E. The appliance has been dropped, or the enclosure damaged.
16.Servicing - The user should not attempt to service the appliance beyond that described
in the operating instructions. All other servicing should be referred to qualified service
personnel.
The lightning flash and
arrow head within the
triangle is a warning
sign alerting you of
dangerous voltage
inside the product.
CAUTION
RISK OF ELECTRIC
SHOCK
DO NOT OPEN
CAUTION: TO REDUCE THE
RISK OF ELECTRIC SHOCK,
DO NOT REMOVE COVER (OR
BACK). NO USER SERVICEABLE
PARTS INSIDE. REFER
SERVICING TO QUALIFIED
SERVICE PERSONNEL.
The exclamation point within
the triangle is a warning sign
alerting you of important
instructions accompanying
the product.
NOTE
This device is protected by U.S. patent numbers
4,631,603 and 4,819,098 and other intellectual property
rights. The use of Macrovisions copy protection
technology in the device must be authorized by
Macrovision and is intended for home and other limited
pay-per-view uses only, unless otherwise authorized
in writing by macrovision. Reverse engineering or
disassembly is prohibited.
CAUTION
Use of controls or adjustments or performance of
procedures other than those specified herein may
result in hazardous radiation exposure. Do not
open covers and do not repair yourself. Refer
servicing to qualified personnel.
This DVD VIDEO player is classified as CLASS
1 LASER PRODUCT as stated on the back of
the set.
Do not apply oil or petroleum products or solvents to any part of this set.
IB-DVD-2002-WC-ZR-E-V1

Getting Started:
Safety Instructions------------------------------------1
Connections
Choose Your Connection---------------------3
Cables Needed to Connect Components to
Your TV-------------------------------------------3
DVD Player + TV
with Audio/Video Input Jacks----------------4,5
DVD Player + TV + VCR----------------------6
DVD Player + TV + Dolby Digital Theatre
System (Audio/Video Receiver)-------------7
DVD Player + TV + VCR + Satellite Receiver
-----------------------------------------------------8
Introduction---------------------------------------------9
Location of Controls--------------------------------9,10
Remote Control Preparation------------------------11
Notes on Discs ---------------------------------------12
Precautions-------------------------------------------13
• Initial Setting:
How to Find Your TVs Video Input Channel----14
How to Move Around the DVD Players Menu
System-------------------------------------------------14
Setting Languages (OSD menu, Subtitle, Audio and
DVD Menu)-------------------------------------------15
Select TV Screen Type -----------------------------16
Setting Soundtrack Output ------------------------17
Setting Parental Controls Rating Level ---------17
Basic Operation:
1.Basic Play--------------------------------------18,19
2.Using the Search & Skip Functions----------20
3.Pause or Step Play------------------------------20
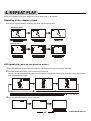
4.Repeat Play----------------------------------------21
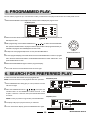
5.Programmed Play-------------------------------22
6.Search for Preferred Play----------------------22
7.Zoom Play----------------------------------------23
8.Slow-Motion Play---------------------------------23
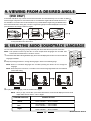
9.Viewing from a Desired Angle-----------------24
10.Selecting Audio Soundtrack Language-----24
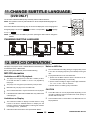
11.Changing Subtitle Language---------------------25
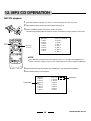
12.MP3 CD Operation---------------------------25,26
Trouble Shooting -------------------------27,28
Specifications ---------------------------------29
2
TABLE OF CONTENTS
Manufactured under license from Dolby Laboratories. Dolby and the double-D symbol are trademarks of Dolby Labora-
tories. Confidential Unpublished works. ©1992-1997 Dolby Laboratories, Inc. All rights reserved.
DTS and DTS Digital Out are trademarks of Digital Theater Systems, Inc.
IB-DVD-2002-WC-ZR-E-V1

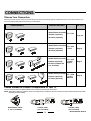
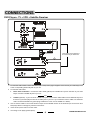
Choose Your Connection
There are several ways to connect your DVD player. Please use the following chart to determine which connection is best for you.
Turn to the appropriate page and connect your DVD player.
COMPONENTS CABLES NEEDED GO TO ...
Cables Needed to Connect Components to Your TV
The pictures below show the cables needed for the connections represented in this booklet.
NOTE: Audio/Video cables (A/V cables for short) are usually sold as a bundled set, but the connection pictures in this booklet show each cable
separately for better visibility.
Audio/Video (included)
Coaxial (optional)
S-Video (optional)
Audio/Video (included)
Coaxial (optional)
S-Video (optional)
Audio/Video (included)
Coaxial (optional)
S-Video (needed but
not included)
Audio/Video (included)
Coaxial (optional)
S-Video (optional)
TV + DVD
TV + DVD
+ VCR
TV + DVD
+ Dolby
Digital
TV + DVD
+ VCR +
Satellite
Page 7
Page 8
Page 4,5
Page 6
Audio/Video cables
(1 set is included)
Coaxial cable
(not included)
S-Video cable
(not included)
CONNECTIONS
3
IB-DVD-2002-WC-ZR-E-V1

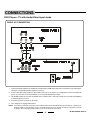
DVD Player + TV with Audio/Video Input Jacks
BASIC A/V CONNECTION
CONNECTIONS
4
1. Connect the audio cables to the AUDIO OUT L (left=white) and R (right=red) jacks on the back of your DVD player,
and to the corresponding AUDIO IN jacks on your TV.
2. Connect the video cable (yellow) to the VIDEO OUT jack on the back of your DVD Player, and to the VIDEO IN
jack on your TV. This connection will allow you to enjoy standard quality images.
3. The SPARE OUTPUTS are same as AUDIO OUT R, AUDIO OUT L, they can provide more connection possibilities
to other equipment you have.
4. Insert the AC power cord into an AC outlet.
5. Go to Page 18 for playing DVDs (discs).
NOTE: Your cable or antenna connection to the television should not be affected by this connection. Connect your
antenna cable to your television as you normally would. You may need to consult your television manual
for details, but no changes will be made to your current antenna connections.
IB-DVD-2002-WC-ZR-E-V1

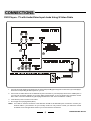
DVD Player + TV with Audio/Video Input Jacks Using S-Video Cable
CONNECTIONS
1. Connect the audio cables to the AUDIO OUT L (left=white) and R (right=red) jacks on the back of your DVD player,
and to the corresponding AUDIO IN jacks on your TV.
2. Connect the S-Video cable to the S-VIDEO OUT jack on the back of your DVD player and to the S-VIDEO jack on
your TV. This connection will allow you to enjoy higher quality images. If your TV doesnt have S-VIDEO, use the
basic video connection listed above (yellow plugs: VIDEO IN or OUT, are not needed for S-Video).
3. Insert the AC power cord into an AC outlet.
4. Go to Page 18 for playing DVDs (discs).
NOTE: Your cable or antenna connection to the television should not be affected by this connection. Connect your
antenna cable to your television as you normally would. You may need to consult your television manual
for details, but no changes will be made to your current antenna connections.
5
IB-DVD-2002-WC-ZR-E-V1

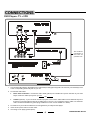
DVD Player + TV + VCR
1. Connect the audio cables to the AUDIO OUT L (left=white) and R (right=red) jacks on the back of your DVD Player, and
to the corresponding AUDIO IN jacks on your TV.
2. Connect the video cable.
Basic video connection - Connect the video cable (yellow) to the VIDEO OUT jack on the back of your DVD
Player, and to the Video Input jack on your TV.
OR
S-Video (optional) - If your TV has an S-Video Input jack, connect the S-Video cable to the S-VIDEO OUT jack on
the back of your DVD player and to the S-Video jack on your TV. If your TV doesnt have S-Video, use the basic
video connection listed above (yellow plugs: VIDEO IN or OUT, are not needed for S-Video).
3. Connections of your antenna cables are not changed when you add your DVD player.
4. Insert the AC power cord into an AC outlet.
5. Go to Page 18 for playing DVDs (discs).
CONNECTIONS
6
This antenna
connection is
the same as
you have now.
"
!
!
IB-DVD-2002-WC-ZR-E-V1

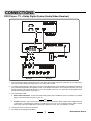
DVD Player + TV + Dolby Digital System (Audio/Video Receiver)
1. Connect the audio cables to the AUDIO OUT L (left -white) and R (right-red) jacks on the back of your DVD Player,
and to the corresponding audio input jacks on your audio video receiver.
2. If you have a Dolby Digital or DTS receiver, insert a coaxial digital cable (not included) to the DIGITAL AUDIO OUT
jack on the DVD player and to the Digital Input jack on the back of the receiver. This connection will allow you to use
the Dolby Digital or DTS decoder functions of your AV amplifier (receiver). You must also set the Digital Output
setting in the Soundtrack menu (see page 17).
3. Connect the video cable.
Basic video connection - Connect the video cable (yellow) to the VIDEO OUT jack on the back of your DVD
Player, and to the Video Input jack on your TV.
OR
S-Video (optional) - If your TV has an S-Video Input jack, connect the S-Video cable to the S-VIDEO OUT jack
on the back of your DVD player and to the S-Video jack on your TV. If your TV doesnt have S-Video, use the
basic video connection listed above (yellow plugs: VIDEO IN or OUT, are not needed for S-Video).
4. Insert the AC power cord into an AC outlet.
5. Go to Page 18 for playing DVDs (discs).
CONNECTIONS
7
4-,9016-
4-, 9016 -
IB-DVD-2002-WC-ZR-E-V1

DVD Player + TV + VCR + Satellite Receiver
1. Connect the audio cables to the AUDIO OUT L (left -white) and R (right-red) jacks on the back of your DVD Player, and
to the corresponding AUDIO IN jacks on your TV.
2. Connect the video cable.
Basic video connection - Connect the video cable (yellow) to the VIDEO OUT jack on the back of your DVD
Player, and to the VIDEO IN jack on your TV.
OR
S-Video (optional) - If your TV has an S-Video Input jack, connect the S-Video cable to the S-VIDEO OUT jack on
the back of your DVD player and to the S-Video jack on your TV. If your TV doesnt have S-Video, use the basic
video connection listed above (yellow plugs: VIDEO IN or OUT, are not needed for S-Video).
3. Use an antenna cable to connect the antenna output on the satellite receiver to the antenna input on the VCR. This
DVD player does not change any antenna connections.
4. Insert the AC power cord into an AC outlet.
5. Go to Page 18 for playing DVDs (discs).
CONNECTIONS
8
This antenna connection is
the same as you have now.
I N FRONT ANT
!
"
IB-DVD-2002-WC-ZR-E-V1

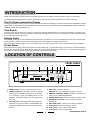
Your DVD player is equipped with some special features. The following information summarizes some of these features.
INTRODUCTION
The On-Screen Information Display
This menu bar display can bring up to access certain features while discs are playing. Icons and words represent the different features
supported by your DVD player. By selecting different icons and words, you can access features including REPEAT, AUDIO, SUBTITLES,
CAMERA ANGLE and LANGUAGES, etc.
Time Search
The Time Search feature lets you go to a point on a disc by entering the elapsed time in the on-screen time display. For example, if your
favorite scene in a movie is one hour and twelve minutes after the beginning of the movie, you can enter 01:12:00 into the time display
and go right to that point in the movie.
Ratings Limits
Your DVD player allows you to set ratings limits and passwords. For example, you can set the DVD player so that any movie with a PG-
13 rating or above requires a password to be entered. There are many levels of ratings to choose from.
Since not all discs contain ratings, you can also decide if you want to allow free access or require a password to view unrated discs.
®
2
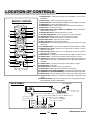
1
36
57
8
9
1011
4
1. POWER button - Press to switch the set on or off.
2. STANDBY indicator - This lamp has 2 colors: red and
green (green is STANDBY, red is ON). When the player
is off (standby), press the POWER button on the
REMOTE, the indicator lights up in RED which turns
the set on.
3. PLAY indicator - During play, this indicator lights up,
also when you press any button on the REMOTE, this
lamp flashes rapidly to show you the remotes signal was
received.
FRONT PANEL
LOCATION OF CONTROLS
4. DISC TRAY - Load the disc here.
CAUTION: Do not put anything but a disc on the tray.
5. REMOTE CONTROL SIGNAL sensor - Receives the
signal from the REMOTE CONTROL.
6. OPEN/CLOSE button - Opens and closes the DISC TRAY.
7. PREVIOUS SKIP button - Skips to previous chapter
(backwards).
8. NEXT SKIP button - Skips to next chapter (forwards).
9. PAUSE button - Press to pause the picture.
10. PLAY button - Press to start playing the disc.
11. STOP button - Stops playing the disc.
9
NOTE: This DVD player will play DVD movies as well as Audio CDs. To simplify, we refer to these as discs in this booklet.
Screen Saver
When the power is on and no video signal is output, several minutes later, your DVD will change to Screen Saver mode automatically.
For example, when playing a CD music disc (no video output), the screen will change to Screen Saver, you will see a moving ball on
the screen. You may exit Screen Saver mode by pressing any of the remote buttons.
IB-DVD-2002-WC-ZR-E-V1

REMOTE CONTROL
1
2
3
4
5
6
7
8
9
10
12
13
14
15
16
17
18
19
20
22
23
24
25
26
27
28
11
29
1.POWER button - Switches the player from STANDBY to ON or ON to
STANDBY.
2.EJECT button - Opens and closes the DISC TRAY.
3.SUBTITLE button - Press to display the subtitle menu (if available on your disc).
4.ZOOM button - Press to enlarge the picture.
5.NUMERIC buttons - Used in DVD menus & audio CD track selection.
6.PLAY button - Press to start play.
7.DIRECTION buttons (LEFT, RIGHT, UP & DOWN)- Used in DVD menus,
audio CD track selection.
8.PAUSE/STEP button - Pauses the picture or music.
9.VOLUME DOWN button - Press to lower the volume level a little.
10.VOLUME UP button - Press to raise the volume level a little.
11. TITLE button - Displays the title menu if present on the disc.
12.BACK SKIP button - Skips to previous chapter.
13.NEXT SKIP button - Skips to next chapter.
14.SETUP button - Press to display the DVD players setup menu (in STOP
mode only).
15.A-B REPEAT button - Use to mark a segment to repeat between A and B.
16.REPEAT 1/ALL button - Allows you to repeat a title, a chapter, a song or
all songs on the disc.
17.DISPLAY/EXIT button - Press once to display all the disc information;
press again to exit display.
18.MUTE button - Instantly turns off the sound, press again to restore sound.
19.ANGLE button - Uses to access various camera angles on a DVD.
20.AUDIO button - Displays and changes the audio menu and language of a
DVD if present on the disc; or selects stereo, left or right audio channel of a
music disc.
21.CLEAR button - Use this to erase any wrong number you input.
22.STOP button - Stops play.
23.SELECT button - Used to confirm your selection.
24.SLOW button - Makes the picture advance in slow motion.
25.FORWARD button (FAST FORWARD) - Searches forward through a disc.
26.REWIND button (FAST BACKWARD) - Searches backward through a disc.
27.MENU button - Press to display the discs menu (if your disc has a menu).
28.SEARCH button - Allows you to select the desired disc starting time, track
or title.
29.PROGRAM button - Allows you to play the disc in a programmed order.
This is especially useful on Audio discs.
10
LOCATION OF CONTROLS
BACK PANEL
To a wall outlet
R
L
VIDEO
OUT
1
2
AUDIO
OUT
DIGITAL
AUDIO OUT
(PCM/DTS/
BITSTREAM)
COAXIAL
To TV’s video input connector (yellow)
To TV’s or Home Theatre’s audio input connector (red) right channel
To TV’s or Home Theatre’s audio input connector (white) left channel
NOTE: One blade of plug
and outlet is wider.
This connects to your
Home Theatre system
(optional)
This connects to TV’s S-Video
input connector (optional)
21
IB-DVD-2002-WC-ZR-E-V1

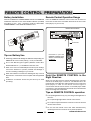
REMOTE CONTROL PREPARATION
Remove the BATTERY COMPARTMENT DOOR of the REMOTE
CONTROL and insert 2 size AAA alkaline batteries (included)
according to the + and - markings inside the BATTERY
COMPARTMENT of the REMOTE CONTROL unit.
Tips on Battery Use
Reversing polarities will damage the batteries and possibly your
REMOTE. Be sure to follow polarity ( + and -) as indicated.
Do not mix different types together (Alkaline, Carbon-Zinc,
Nickel-Cadmium etc.), or old batteries with new ones.
When not in use for an extended period of time (over 60 days)
remove the batteries to prevent possible acid leakage or
corrosion resulting in damage to your remote.
When the batteries have become discharged, they must be
disposed of in a safe manner that complies with all applicable
laws.
Installation of batteries should only be done by an adult
(for safety).
Battery Installation Remote Control Operation Range
Point the REMOTE CONTROL unit from less than 20 feet from
the remote control sensor and within about 60
0
of the front of the
DVD player (not your TV set).
Tips on REMOTE CONTROL operation
The operating distance may vary according to the brightness of
the room.
Do not point bright lights at the remote control sensor.
Do not place objects between the remote control unit and the
remote control sensor.
Do not use this remote control unit while simultaneously
operating the remote control unit of any other equipment.
! !
REMOTE SENSOR RANGE
within 20 feet
®
Remember to point the
REMOTE CONTROL in the
direction of the DVD player,
not the TV.
Point the REMOTE CONTROL in the
Right Direction
When you want the remote to operate the DVD player, point the
remote at the DVD player, not the TV. The Remote has to be
pointed in the correct direction and toward the correct component
(DVD player) in order for the remote controls signal to
communicate with the remote sensor on the DVD player. Make
sure there is a clear path between the remote control and the DVD
player so the signal is not blocked.
11
IB-DVD-2002-WC-ZR-E-V1

NOTES ON DISCS
DVD Video Disc
3
2
3
16:9
LB
Multiple Languages
Multi-language subtitles
Multi-Angle viewing available for some scenes
Multi-Aspect (wide screen or normal)
Region number, only region number 1 (USA)
DVD discs can be used on this unit and only
NTSC (USA standard) DVD discs can play on
this set.
The following types of discs can be played by this unit:
DISC TYPE & LOGO MARK
RECORDED
CONTENT
DISC SIZE MAX. PLAYING TIME
DVD Video
(NTSC only -
for USA)
Music CD
MP3 disc
CD-R disc
CD-RW disc
Video
Audio
5 inches
(12cm)
3 inches
(8cm)
5 inches
(12cm)
Audio
Audio
Audio
5 inches
(12cm)
3 inches
(8cm)
5 inches
(12cm)
3 inches
(8cm)
5 inches
(12cm)
3 inches
(8cm)
Approx. 4 hours (single sided disc)
Approx. 8 hours (double sided disc)
Approx. 80 minutes (single sided disc)
Approx. 160 minutes (double sided disc)
3 inches
(8cm)
20 minutes
74 minutes
85 minutes
85 minutes
Approx. 12 hours
Approx. 3 hours
VARIES
VARIES
NOTE: may appear on the TV screen during operation. A means that the operation is not permitted
by the DVD video player of the disc in that mode or at that time. This DVD player can not play the
following discs: CD-Is, CD-ROMs (including PHOTO CDs or computer software discs), Data part of
CD-Extras, DVD-ROMs, DVD Audio discs, HD layer on SACDs or discs recorded in another format
such as PAL, SECAM, and regions other than REGION 1.
These are the typical marks on some DVD disc packages:
Structure of Disc Contents
Normally, DVD video discs are divided into titles, and the titles are
sub-divided into chapters. Audio CDs are divided into tracks.
DVD video discs
Audio CD
Each title, chapter or track is assigned a number, which is called
title number, chapter number or track number respectively.
There may be discs that do not have these numbers.
12
IB-DVD-2002-WC-ZR-E-V1

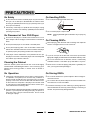
On Safety
As the laser beam used in the DVD player may be harmful to
the eyes, do not attempt to disassemble the cabinet. Refer
servicing to qualified personnel only (it is perfectly safe if you
dont open the cabinet).
Should any solid object or liquid fall into the player, unplug
the player, and have it checked by qualified personnel before
operating it any further.
On Operation
If the player is brought directly from a cold to a warm location,
or is placed in a very damp room, moisture may condense on
the lens inside. Should this occur, the player may not operate
properly. In this case, remove the disc and wait about an hour
for the moisture to evaporate. If the player has not been used
for a long time, turn the POWER button to ON to warm it up for
a few minutes before inserting a disc.
This DVD player is designed to be played on a stable no vibration
position. If you bump the set during DVD play, the picture or
music may stop or skip for several seconds. This is normal
for this type of player.
On Placement of Your DVD Player
Do not leave the player in a location near a heat source, or in a
place subject to direct sunlight, excessive dust or mechanical
shock.
Do not place the player on an inclined or unstable place.
Do not place anything within 1 inch of the sides or back of the
cabinet. The ventilation holes must not be covered for the player
to operate properly and prolong the life of its components.
If the player or discs will be left in a car parked in the sun, put
the player in the trunk or where the player will not be subjected
to the direct rays and heat of the sun.
Cleaning the Cabinet
Clean the cabinet, panel and controls with a soft cloth slightly
moistened with a mild detergent solution. Do not use any type of
abrasive pad, scouring powder, or solvent, such as alcohol or
benzene.
PRECAUTIONS
On Cleaning DISCs
Before playing, clean the DISC with a cleaning cloth. Wipe the
DISC in a straight motion from the center out.
If you can not wipe off the dust with a soft cloth, wipe the disc
lightly with a slightly moistened soft cloth and finish with a dry cloth.
Do not use solvents such as benzene, thinner, commercially
available cleaners or anti-static spray intended for vinyl LPs.
Never touch or scratch the playing side (silver or gold side) of a
disc, you may permanently damage it.
On Handling DISCs
Do not touch the playback side of the disc.
Do not attach paper or tape to disc.
On Storing DISCs
Do not store the DISCs in a place subject to direct sunlight or
near heat sources.
Do not store discs in places subject to moisture and dust such
as a bathroom or near a humidifier.
Store discs vertically in a case. Stacking or placing objects on
discs outside of their case may cause warping or scratching of
the disc, and permanently damage the disc.
13
NOTE: If the playback side gets scratched, it may not play any
more.
IB-DVD-2002-WC-ZR-E-V1

INITIAL SETTING
How to Find Your TVs Video Input Channel
You need to tune your TV to the Video Input Channel to see the DVD Players menu and to see the movie on a disc. The video channel
on TVs varies for different brands and different models. In order for your DVD remote to work, your TV must be set on the correct video
input channel.
Once you locate the correct video channel, write it down for future reference.
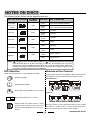
Video Input Channel Variations
Button/Switch Button on the Possible
on the TV TV Remote Channel#
VIDEO VID 1 00
SIGNAL LINE 90
VID 1 VID 91
VID 2 VIDEO 92
S-VID S-VID 93
S-VIDEO INPUT VID 1
S-VIDEO VID 2
SOURCE
AUX
VIDEO 2 VIDEO 2
Below are some things to try:
Depending on your TV brand, press the TV button on the remote
that came with your TV (not the DVD remote). Then press the
INPUT button or SELECT button or VIDEO button on the remote.
Consult your TVs owners Manual.
If the above options dont work, try one of the following options:
Press a button on the TVs remote (see this chart).
Select it from the TVs menu system.
Tune directly to the DVD input channel by pressing a specific
number (see this chart).
Go through all the channels in the channel list by pressing the
channel up/down buttons on the TV.
Some common scenarios are listed in the table to the right.
How to Move Around the DVD Players Menu System
This booklet tells you how to select different menu items, but you can explore
the menu system on your own by following a few rules.
Press the DIRECTION buttons ( , , & ) on the remote to highlight
different menu items on the screen.
To select a menu item, press SELECT on the remote when the menu item is
highlighted.
If the invalid symbol appears on the screen when you press a button,
this means that function cannot be done at this time.
14
NOTE: The SELECT button confirms your selection and acts like an enter
button on a computer, remember to press this after your selection.
SELECT
BUTTON
LEFT
RIGHT
UP
DOWN
DIRECTION & SELECT
BUTTONS
NOTE: Most people will not adjust the following functions and will go directly to Page 18 for basic play.
IB-DVD-2002-WC-ZR-E-V1

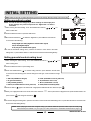
INITIAL SETTING
Once the initial programming is entered, it is retained in memory until changed. The
player will always be operated under the same conditions even if the set is shut off.
Common procedure for initial settings is as follows:
1 Press SETUP button in the stop mode, a menu like below will appear on your TV.
2 Move the DIRECTION buttons ( & ) to select the preferred item.
3 Press SELECT button, and a sub-screen will open. Each screen for setting the value is displayed (SELECT button is similar to an ENTER
button on a computer).
4 Move the DIRECTION buttons ( , , & ) to select what you want to change.
5 Press SELECT button to confirm (this is like the ENTER button on a computer).
6 Press SETUP button to close the initial menu and return to STOP mode.
3&5
(
SELECT
BUTTON)
2&4
(DIRECTION
BUTTONS)
1&6
(SETUP
BUTTON)
Setting LANGUAGE (OSD MENU, SUBTITLE, AUDIO AND DVD MENU)
1 After entering the initial setting, move the DIRECTION buttons ( , , & ) to
select the Language.
2 Press the SELECT button to open language menu.
3 Move the DIRECTION buttons ( , , & ) again to select OSD MENU, then
press SELECT button to open submenu of OSD.
4 Select the language you want for your OSD using the UP & DOWN buttons ( , ), press
SELECT button to confirm.
5 Follow the above 3-4 steps to set the languages for subtitle, audio and DVD Menu.
6 To exit the language setting menu, press the UP button to return back to the initial
setting menu, or press SETUP button to close initial setting directly.
15
SELECT
BUTTON
LEFT
RIGHT
UP
DOWN
NOTE: OSD stands for ON SCREEN DISPLAY .
NOTE: Most people will not adjust the following functions and will go directly to Page 18 for basic play.
SELECT
BUTTON
LEFT
RIGHT
UP
DOWN
NOTE: The factory settings for LANGUAGE is English.
IB-DVD-2002-WC-ZR-E-V1

INITIAL SETTING
Select TV screen type
1 After entering the initial setting, press the DIRECTION buttons ( , , & ) to
select Video item.
2 Press the SELECT button to open the Video menu.
3 Press the DIRECTION buttons ( , , & ) again to select TV Shape, then
press SELECT button to open submenu of TV Shape.
4 Select the TV shape you want using the UP & DOWN buttons ( , ), press SELECT button to confirm.
4 X 3 Letterbox (4:3 LB) - Choose this setting if you want to see movies in
their original aspect ratio (width-to-height ratio). Youll see the entire frame
of the movie, but it will take up a smaller portion of the screen vertically. The
movie might appear with black bars at the top and bottom of the screen.
4 X 3 Standard (4:3 PS) - Choose this setting if you want to see movies to
fill the entire screen of your TV. This might mean that parts of the picture (the
left and right edges) wont be seen.
Most discs produced in a widescreen format cant be cropped in this fashion.
This means the black bars will appear at the top and the bottom of the screen.
16 X 9 Widescreen (16:9) - Choose this setting if your DVD Player is
connected to a widescreen TV. If you choose this setting and you dont have
a widescreen TV, the images on the screen may appear distorted due to
vertical compression (faces may seem long and thin).
If you play a disc recorded in 4 X 3 format on a widerscreen TV, the left and
right side of the screen will appear black.
Press STOP button and SETUP button to change to 4:3 ratio or match the
type of TV you have.
16
SELECT
BUTTON
LEFT
RIGHT
UP
DOWN
NOTE: Most people will not adjust the following functions and will go directly to Page 18 for basic play.
5 Note VIDEO is preset to NTSC USA normal standard at the factory.
6 To exit the Video setting menu, press the UP button to return back to the initial setting menu, or press the SETUP
button to close the menu and exit the initial setting directly.
NOTE: The factory settings for TV shape is 4:3 PS
IB-DVD-2002-WC-ZR-E-V1

INITIAL SETTING
1 After entering the initial setting, move the DIRECTION buttons ( , , & ) to
select Audio item.
2 Press the SELECT button to open the Audio menu.
3 Move the RIGHT button ( )to select the Digital Out, press SELECT several times
to choose from the following:
Setting soundtrack output
Setting parental controls rating level
1 After entering the initial setting, move the DIRECTION buttons ( , , & ) to
select Rating item.
2 Press the SELECT button to open Rating menu.
3 Press the DOWN button ( ) to activate rating selection, press SELECT several times
to choose from the following (some of these ratings are USA type, some of these are foreign
type):
1. Kid Saft (suitable for all ages)
2. G (general audience)
3. PG (parental guidance)
4. PG 13 (recommended for over 13 years old)
5. PG-R (restricted to over 13 years old)
6. R (restricted to 18 or over)
7. NC-17 (restricted to over 17)
8. Adult (adult can view any DVD)
4 Press UP button ( ) again to set Password. 4 digit password blanks will show with lock open .
5 Enter your 4 digit password to lock the set, the screen will show
****
stars in place of the 4-digit password, press SELECT button, the
open lock icon will change to closed lock .
6 To exit the rating level setting menu, press the UP button to return back to the initial setting menu, or press SETUP button to close the menu
and exit the initial setting directly.
NOTE: When playing a movie with a higher rating, you will be asked to input the code. Input the code you
selected and press SELECT. If you forget your code, please refer to TROUBLE SHOOTING on page 27.
17
SELECT
BUTTON
LEFT
RIGHT
UP
DOWN
NOTE: Most people will not adjust the following functions and will go directly to Page 18 for basic play.
NOTE: You will not need to change any of these settings for normal play and
all the settings are preset except that the Digital Out for AC3 is
selectable.
Dolby Digital (for Dolby Digital 5.1 channel audio signal)
Off (no AC3 digital output)
Pcm (only for 2 channel audio signal)
4To exit the soundtrack setting menu, press the UP button to return back to the initial
setting menu, or press SETUP button to close the menu and exit the initial setting directly.
IB-DVD-2002-WC-ZR-E-V1

1. BASIC PLAY
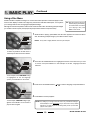
To Load and Play a Disc
NOTE: We call any DVD or AUDIO CD as disc in this booklet.
Turn on the TV and DVD player ( press ON/OFF on the player or press the POWER button on the remote control in STANDBY mode).
1 Press the OPEN/CLOSE button on the front of the DVD player or the EJECT button on the
REMOTE, wait a few seconds, the disc tray will open.
2 Place a disc gently into the tray with the discs label facing up (double-sided discs have content on both
sides, so you can place either side up).
3 Press the OPEN/CLOSE or PLAY button, the disc tray will close.
The DVD player reads the discs table of contents (this may take a few seconds) with a loading icon
on the left upper corner of the screen, and then one of the three things happens depending on how
the disc was programmed:
The disc starts playing.
The disc menu appears on the screen. One of the options will be Start Disc Play. Highlight that
option and press the SELECT button or PLAY button.
The DVD Players main menu appears on the screen. Highlight the Play option and press
SELECT button.
5 Press STOP button to stop play.
6 After play, press OPEN/CLOSE or EJECT button to open the tray and take the disc out of the disc tray.
NOTE: When player is stopped, the display will show Pre Stop, the player records the point where
STOP was pressed (RESUME function). Press PLAY again, playback will resume from this point.
When the tray is opened or STOP is pressed again, the return function will be cleared and the set
is fully stopped.
4 Press VOLUME UP or DOWN button to adjust the volume level on your TVs REMOTE and DVDs
REMOTE.
Open Clo se Loadin g Pla y
c
a
n
'
t
c
a
t
c
h
u
p
(
w
i
d
e
s
c
r
e
e
n
v
e
r
s
i
o
n
s
)
c
a
n
'
t
c
a
t
c
h
u
p
G
r
e
a
t
M
o
v
i
e
G
r
e
a
t
M
o
v
i
e
This is an example of a
one-sided disc.
This is an example of a
2-sided disc. The title is
in the center.
18
IB-DVD-2002-WC-ZR-E-V1

Using a Disc Menu
A DVD movie disc is capable of having an on-screen menu that is separate from the DVD players menu
and on-screen display. The disc menu might only contain a list of the titles and chapters, or it may allow
you to change features such as language and playback settings.
Although the content and operation of disc menus varies from disc to disc, the following example will give
you an idea of what to expect (most people will just put a disc in the door and press PLAY).
1. BASIC PLAY
1 While the disc is playing, press MENU, the disc menu appears, but varies from disc to
disc, the following example will give you an idea of what to expect.
TIP: Many discs skip the disc menu
and start playing automatically.
To access the disc menu when
youre playing a disc, press
MENU on the remote.
NOTE: Every DVD is slightly different, these are just examples.
2 Press the UP and DOWN buttons to highlight the section of the disc menu you want
to choose, and press SELECT. In the example on the left, Language has been
selected.
An example of a disc menu. The menus
on discs vary because the disc menu is
created by the discs author and director.
3 Press the UP and DOWN buttons ( & ) to select a language, and press SELECT.
NOTE:
Any settings you change on the disc menu only override the settings in
the DVD Players menu temporarily (only for this current movie). Default
settings for your DVD player are the settings that you set up in the DVD
players menu system.
4 Press MENU to resume playback.
In this example, the LANGUAGE setting
is highlighted. To see the language
options, press SELECT on the remote.
In this example, ENGLISH setting is high-
lighted. Press SELECT on the remote to
play the disc in English.
19
Continued
IB-DVD-2002-WC-ZR-E-V1
Page is loading ...
Page is loading ...
Page is loading ...
Page is loading ...
Page is loading ...
Page is loading ...
Page is loading ...
Page is loading ...
Page is loading ...
Page is loading ...
-
 1
1
-
 2
2
-
 3
3
-
 4
4
-
 5
5
-
 6
6
-
 7
7
-
 8
8
-
 9
9
-
 10
10
-
 11
11
-
 12
12
-
 13
13
-
 14
14
-
 15
15
-
 16
16
-
 17
17
-
 18
18
-
 19
19
-
 20
20
-
 21
21
-
 22
22
-
 23
23
-
 24
24
-
 25
25
-
 26
26
-
 27
27
-
 28
28
-
 29
29
-
 30
30


Ask a question and I''ll find the answer in the document
Finding information in a document is now easier with AI